| Author |
Message |
Mike Fisher
Samba Member

Joined: January 30, 2006
Posts: 17970
Location: Eugene, OR

|
 Posted: Sat Jun 13, 2015 11:26 am Post subject: Posted: Sat Jun 13, 2015 11:26 am Post subject: |
 |
|
| one4house wrote: |
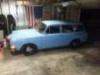
Here are a couple of pics with the hub caps n I think in going to find a set of pristine caps for a little contrast. These get lost in all the sameness of color.
Also, what does everyone use for license plate mounting? Texas played have holes on top and bottom. That doesn't work with the "middle" stock mounting brackets. Any suggestions? |
What did you spray on it to cover up the gray primer?
_________________
https://imgur.com/user/FisherSquareback/posts
69 FI/AT square Daily Driver
66 sunroof,67,70,71,71,71AT,72,72AT,73 Parts
two 57 oval ragtops sold
'68 Karmann Ghia sold
Society is like stew. If you don't keep it stirred up you end up with a lot of scum on the top! - Russ_Wolfe/Edward Abbey |
|
| Back to top |
|
 |
one4house
Samba Member
Joined: July 18, 2009
Posts: 1121
Location: Sherman Texas
|
| Posted: Sat Jun 13, 2015 1:44 pm Post subject: |
|
|
| Mike Fisher wrote: |
What did you spray on it to cover up the gray primer? |
I didn't. The grey primer is still there. I am thinking about spraying some Rustoleum Red Primer on it. I believe that the Rustoleum Red Primer is sprayed all over the car now. You can see it in the bottom picture all long the trim line and a couple of squirts on the passenger door.
As far as the "Hood Ride" stencils that were sprayed all over the car, I sprayed Easy Off oven cleaner on them. Let it sit for 10 seconds, LIGHTLY scrubbed with a green scotch brite and then rinsed with water. That stuff fell right off. It also washed some of the patina off, so it wasn't all WIN. At least it doesn't say "Hood Ride" anymore.
_________________
My Old 64 Field Find
My Old 66 Squareback
My Old 66 Beetle
My Old 70 Squareback |
|
| Back to top |
|
|
69 Notchback
Samba Member
Joined: September 12, 2011
Posts: 714
Location: Bailey Co
|
| Posted: Sat Jun 13, 2015 2:40 pm Post subject: |
|
|
Love the wheels. I had a set of OG ones done up for my square.
Trying to go for all period correct EMPI parts for my square. |
|
| Back to top |
|
|
one4house
Samba Member
Joined: July 18, 2009
Posts: 1121
Location: Sherman Texas
|
|
| Back to top |
|
|
69 Notchback
Samba Member
Joined: September 12, 2011
Posts: 714
Location: Bailey Co
|
| Posted: Sun Jun 14, 2015 7:09 pm Post subject: |
|
|
| There is progress it's just slow progress. I keep hearing how there is 100 of hrs into getting it right and I want perfection. So I'm been img patient. |
|
| Back to top |
|
|
one4house
Samba Member
Joined: July 18, 2009
Posts: 1121
Location: Sherman Texas
|
|
| Back to top |
|
|
Max Welton
Samba Member
Joined: May 19, 2003
Posts: 10697
Location: Black Forest, CO
|
|
| Back to top |
|
|
one4house
Samba Member
Joined: July 18, 2009
Posts: 1121
Location: Sherman Texas
|
| Posted: Sun Jul 05, 2015 1:04 pm Post subject: |
|
|
It was a little bit of a busy weekend for me and my Square. I had a few nagging issues that I took care of while I had an extended weekend.
The biggest project was installing new rotors and bearings on the front. Since I have had the car, I have had a wild vibration when stopping with just the right amount of pedal pressure. In the FSM it mentions "excessive runout is another condition you should check for. This defect is often the real cause of front-end shimmy....that can be corrected by releasing the brakes."
This explained exactly what I was experiencing. Since I was going to be there, I went ahead and ordered new Timkin bearings off of www.rockauto.com. The shimmy and bearing grind is gone. One thing I did learn is that you should wipe the "rust protectant" off of the new rotors before driving. It makes the brakes suck for the first few miles. 
Next on the list was fuel filter relocation. I had already gotten rid of the cheap plastic filter sitting on top of the engine, but I still had the new hard metal filter up top. I took the time to run new fuel lines and put the filter down under the fender mounted to the frame horn. Much better.
I also took the time to find the ground strap that I thought was missing. I tightened/adjusted the passenger side rear brake. I lubed the front beam as best I could. Two of the 4 grease zerts are missing. I will have to get those purchased and screwed on.
I also changed the oil and made sure everything was tight and right for the summer. That is about all. I will say that I am glad for a proper shop. As you can see from my video below, it would have been a wet mess had I needed to do this outside.
Link
_________________
My Old 64 Field Find
My Old 66 Squareback
My Old 66 Beetle
My Old 70 Squareback |
|
| Back to top |
|
|
Max Welton
Samba Member
Joined: May 19, 2003
Posts: 10697
Location: Black Forest, CO
|
|
| Back to top |
|
|
one4house
Samba Member
Joined: July 18, 2009
Posts: 1121
Location: Sherman Texas
|
|
| Back to top |
|
|
vwfye
Samba Member
Joined: April 15, 2000
Posts: 7661
|
| Posted: Mon Jul 06, 2015 11:22 am Post subject: |
|
|
Nice space!
_________________
64 No'back Speedster "Pearl"
1980s Sand Dragster "The Plunger"
LME "Little Giant Killer 3" |
|
| Back to top |
|
|
TMI Products
Samba Member

Joined: February 14, 2014
Posts: 744
Location: Corona, Ca
|
| Posted: Tue Jul 07, 2015 11:15 am Post subject: |
|
|
| one4house wrote: |
These seat covers you have,
I went to that website, and don't see where they offer VW stuff. Did you get these recently? Custom order? |
The boxes the cover came in said TMI. I still have the boxes and will look for where they were shipped from. I am betting that the "Distinctive Industries" are a 3rd party vendor.
[/quote]Those are from Distinctive, not affiliated with TMI. They must be really old because they moved all production to Mexico a few years ago.
_________________
Mario De Leon
1965 Turbo Mustang Fastback
1966 Type 3 Fastback
VW Division Sales Manager
[email protected]
TMI Products
1493 Bentley Dr.
Corona Ca, 92879
1-800-624-7960
951-272-1584 FAX |
|
| Back to top |
|
|
one4house
Samba Member
Joined: July 18, 2009
Posts: 1121
Location: Sherman Texas
|
| Posted: Tue Jul 07, 2015 3:29 pm Post subject: |
|
|
[quote="TMI Products"]
| one4house wrote: |
These seat covers you have,
I went to that website, and don't see where they offer VW stuff. Did you get these recently? Custom order? |
The boxes the cover came in said TMI. I still have the boxes and will look for where they were shipped from. I am betting that the "Distinctive Industries" are a 3rd party vendor.
| Quote: |
| Those are from Distinctive, not affiliated with TMI. They must be really old because they moved all production to Mexico a few years ago. |
Thanks for clearing that up. I am betting the seat covers were in borrowed boxes from something else the PO ordered.
_________________
My Old 64 Field Find
My Old 66 Squareback
My Old 66 Beetle
My Old 70 Squareback |
|
| Back to top |
|
|
one4house
Samba Member
Joined: July 18, 2009
Posts: 1121
Location: Sherman Texas
|
| Posted: Fri Jul 17, 2015 9:00 am Post subject: |
|
|
Turn a clock into a tach? We can do that.
My inspiration came from a similar project that W1K1 did for his car. A picture is in his reply below. We had the same end result; a tach in the car. Implementation is a little different.
Bored and tired of the heat, I wanted a project I could do inside. So I dug through the forum for inspiration and remembered that I had seen someone turn their clock into a tach. What first got me was the fact that the rivets holding the clock mechanism to the body of the clock were the same spacing as a cheap tach from AutoZone, as mentioned in W1K1's post.
Here is the tach I used: http://www.autozone.com/1/products/127829-2-1-2-tachometer-equus-6086.html
Those two screws in the tach face are the exact same spacing as the rivets inside the clock housing. I decided to take my first stab with the clock that came with my car. My first attempt was OK. It did not look stock, and the lighting was off because I did not use the stock parts to maintain the "halo" spacing that makes the lighting in the type 3 cars look consistant.
So I found another clock in the classifieds and worked it into what I have now. Here are some pictures of the process.
Parts and Pieces everywhere.
I ended up mounting my tach parts with epoxy so that I could use the stock monting points for the shields and stock parts. I had to space the back shield with some washers to get the right spacing.
Almost done. I had to figure out how to mount the red needle to the plastic piece that came with the tach. Some trimming and epoxy and I had a match.
Here is how it looks in the car. I still need to run a line from the coil to the tach, so it is only there for looks now. Seeing how it is supposed to be 100 degrees for the next few days, I might get that wire run sometime in September or October when it cools off a bit.
I do not have a "stop" post on the tach, so the needle falls far lower than it is supposed to without power. Once powered up it holds at the "12" which is zero. It is most accurate between 3000 and 6000 rpm. Right where you need it most.
I like how it turned out, and I can't wait to get it 100% in and working.
I am trying to figure out how to mount this button back in the center hole. With everything I have done to the inside of the clock, I no longer have room for it in its stock form. I am going to have to trim in down a bit and epoxy it in somehow. Again, a project for a cooler day.
My favorite part is the fact that I was able to get the red needle behind the clock face. I like the effect and look of it.
_________________
My Old 64 Field Find
My Old 66 Squareback
My Old 66 Beetle
My Old 70 Squareback
Last edited by one4house on Sun Jul 19, 2015 8:42 am; edited 1 time in total |
|
| Back to top |
|
|
W1K1
Samba Member

Joined: March 04, 2004
Posts: 4921
Location: Southern AB
|
|
| Back to top |
|
|
one4house
Samba Member
Joined: July 18, 2009
Posts: 1121
Location: Sherman Texas
|
| Posted: Fri Jul 17, 2015 10:33 am Post subject: |
|
|
| W1K1 wrote: |
you forgot the part where you sand numbers off and polish the plastic so you can add numbers to the face. 
The needle was from a MK2 gauge cluster
|
Yours was my inspiration, but I wanted it it look, at the surface, like a stock clock turned wrong.
One thing I am going to have to correct is going to a plastic needle. The metal clock hand is going to be to heavy. I haven't actually hooked it up and tested it. When I sat it on its side the needle dipped far past 12, which is my zero. 1 is 1000, 2 is 2000....you get the idea.
In my prototype, I worked it to where I screwed the cheap tach into the rivet holes, but I didn't like it as much, so I redid the design last night. I think it will look stock once I get the little things sorted out and the bezel in.
I will post a full writeup this weekend. WIKI, thanks for the inspiration.
Here is a picture with the bezel and no needle.
_________________
My Old 64 Field Find
My Old 66 Squareback
My Old 66 Beetle
My Old 70 Squareback |
|
| Back to top |
|
|
one4house
Samba Member
Joined: July 18, 2009
Posts: 1121
Location: Sherman Texas
|
| Posted: Sun Jul 19, 2015 8:54 am Post subject: Fender Recoloring |
|
|
Another day another project......
If you remember, my passenger fender looked like this:
Today I decided that I had to get rid of that.
Masking
First coat.
Close enough for government work.
One of the many colors now smoothed a bit. I got tired of such a drastic change on that fender.
_________________
My Old 64 Field Find
My Old 66 Squareback
My Old 66 Beetle
My Old 70 Squareback |
|
| Back to top |
|
|
one4house
Samba Member
Joined: July 18, 2009
Posts: 1121
Location: Sherman Texas
|
| Posted: Sun Aug 23, 2015 4:15 am Post subject: |
|
|
I haven't updated this one in a bit. The car was down for a week about 2 weeks ago. I had some leaky throttle plate bushings, so I tore the carbs apart to check everything over. I'm glad I did. They were in bad shape.
Besides being full of crap in the bowls, the carbs are 32 -2 on the driver's side and 32 -3 on the passenger. When I checked further I realized that the venturi were also not matching and the jets were off from side to side. The mains were 180 on one side and 150 on the other.
I had purchased two parts carbs from the forums. They came in handy for the needed venturi and jets. I got both sides to 150 on the mains and matching venturi. The car is running better than ever. I am also averaging 26 mpg. Not bad for a 1600 sp in a Square.
I also got around to installing the front portion of the interior yesterday. It was challenging but not hard. Could have used an extra set of hands from time to time.
All in all it went without a hitch and I'm pretty happy with it being my first time and all. Hit me up with questions if you would like to know any secrets I learned along the way.
This is the secret sauce. 3M, yellow, 08090. I found it at autozone. This chit is not cheap at $25 a can. This is not a product that you want to fail, so spend the money on a good adhesive. You will thank me later.
As far as using this stuff, put a piece in place, spray a section of both the contact surface and the carpet, let set for 4 minutes and air dry and then stick them together.
The best piece of advice I got told going in was "put the interior panel in place, fold in 1/2 to expose the back and the wall you are gluing it to, glue each up and apply."
The puzzle pieces and helper. I wish she had opposable thumbs.
The first piece in place.
Letting the second piece air dry before tacking it down.
Done.
One of these days, in the fall, I'll install the last 3 pieces in the rear. I was over it with today's heat and humidity.
_________________
My Old 64 Field Find
My Old 66 Squareback
My Old 66 Beetle
My Old 70 Squareback |
|
| Back to top |
|
|
MonT3
Samba Member
Joined: January 07, 2012
Posts: 1988
Location: South Dakota
|
| Posted: Wed Sep 02, 2015 8:41 pm Post subject: |
|
|
Looks good with the interior carpet set up.
On the carbs, have you had time to check the fuel inlet brass fittings as they've been known to come out. I had that happen and it was a huge learning experience. I ended up getting the valves barbed and threaded for my new carb tops and safety wired them as I don't want that happening them again. Keep at it as the car looks good.
_________________
MonT3
67 Squareback
64 Squareback
63 Squareback
Engine rebuild
Trailer rebuild |
|
| Back to top |
|
|
one4house
Samba Member
Joined: July 18, 2009
Posts: 1121
Location: Sherman Texas
|
| Posted: Sun Sep 13, 2015 3:50 pm Post subject: |
|
|
Recently took Labor Day Weekend to take a drive around the Texas hill country. What a great weekend was had. 1000+ miles of driving and great times were had.
With the high of a successful trip, I am now in the low of a crappy rebuild. The engine in the Square has some assembly issues that have cause the main bearings to go out. We can back up first.
After the trip to the Austin area, the car started sounding a little loud. It seemed to have a lot of crank case noise that was not there before the trip. When looking for a cause, I thought it might have been a noisy clutch or throw-out bearing. After driving it a couple more days, I decided that it was time to pull the engine and tear it down just-in-case.
It is good that I took the time to trailer it to my parents' shop and tear into it. What we found were a few different issues.
1) Oil blow by on #3 and #4 cylinders. I was told that the engine was rebuilt with new pistons and cylinders. This was not the case. #3 and #4 both show scaring and pitting from water damage. It looks like these cylinders were reused from another engine, or these were with the engine for a long time.
2) Silicone used for assembly where it should not be used. It looks like the oil pump cover plate was smeared with silicone before being put in place. The oil pump gears were also not set right and grinding into the cover. This caused silicone to get inside the engine. The case halves were also put together with silicone. Another big no-no. If a piece of silicone gets into an oil galley, that could cause major issues.
3) Main bearings installed incorrectly. #4 bearing was locked to the crank. It could not be spun by hand, and the crank was not able to be turned over when sitting in only 1/2 of the case. We finally got the bearing to turn with a pair of pliers. Looks like it was about to seize to the crank. We also found that #1 (thrust) bearing had not been indexed on the case pin. The case halves were put together with the bearing spun about a 1/4" out. This caused a high spot on the bearing, excessive wear and scaring. This was more than likely the cause for the excess metal savings on the oil drain plate.
I am going to take the engine case and parts to a reputable VW shop in Grand Prairie to see if the case is usable, make sure the crank is still usable and have the engine reassembled with some new Pistons and Cylinders. It breaks my heart that the engine is hurt because it ran so good, but this time I am going to have it done right.
Because of how much i liked it before, I am going to keep it 1600. The heads are fine, hopefully the case and rotating assembly will be fine, and I can get it back together and back in in the next couple of weeks.
Pictures are worth 1000 words. Here is some of the carnage.
This was the final factor that made me decide to pull the engine. Metal shavings in the oil are never good.
This is #1 main that was missed. Looks like the index pin may have been pushed into the case. You can also see some of the silicone that was holding the case haves together.
This is the bearing that was missed when assembled. This would have caused the rotating assembly not to spin when the case haves were being torqued.
This is the #4 bearing that was almost seized onto the crank. Looks like it may have been spinning in the bearing saddle. That was more than likely the noise I heard when the engine was at idle.
Here is one of the jugs from the 3/4 side that had scaring and water damage.
When we started and the best mechanic I know. Stan the Man.
Heads look good.
_________________
My Old 64 Field Find
My Old 66 Squareback
My Old 66 Beetle
My Old 70 Squareback |
|
| Back to top |
|
|
|


