| Author |
Message |
Merovex
Samba Member

Joined: May 04, 2015
Posts: 71
Location: United States

|
 Posted: Tue May 26, 2015 5:02 pm Post subject: Nova Beetle ('72 Super) Posted: Tue May 26, 2015 5:02 pm Post subject: Nova Beetle ('72 Super) |
 |
|
I earlier posted about this project, asking about pans v. channels. I'm still on the project. Yesterday, I finished separating the body from the chassis. The windows are out, etc. I thought perhaps to name the thread a little differently to keep from spawning multiple threads. "Nova" is Northern Virginia...
The rust in the B-pillar still isn't as bad as it could be...there was prior work in that area.
However, the front is rusted. Based on the color under the current paint job, the hood, front apron, front quarter panels are from another car. All are rusted. The frame head as well, and it appears the front firewall panel.
I've cruised through the Samba threads on the frame head, so I feel reasonably confident there. When it comes to replacing the quarter panels and firewall panel, which comes first? |
|
| Back to top |
|
 |
green1303
Samba Member

Joined: February 04, 2014
Posts: 748
Location: Alexandria, VA
|
| Posted: Tue May 26, 2015 9:23 pm Post subject: |
|
|
You typically don't replace the entire front inner firewall, just cut out the rusty part (usually limited to the lower 10 cm) and replace what you removed. The area where the front quarter panels, front inner firewall, and heater channels meet is structurally the most complex area of that car, so make sure that you know how each panel fits and overlaps before you cut. You should replace the quarter panels last.
Your list of rusted panels includes most of the front end. Can you patch some of it? At some point, it becomes cost-effective to replace the whole front end with a clip from another car.
On the frame head, you may only need the bottom plate. Replacing the whole thing is risky, because it needs to be precisely aligned.
_________________
1973 green Super Beetle |
|
| Back to top |
|
|
Merovex
Samba Member
Joined: May 04, 2015
Posts: 71
Location: United States
|
| Posted: Sat May 30, 2015 8:37 am Post subject: |
|
|
Body panel repair/replace sequence:
1. Heater Channels
2. Front bulkhead
3. Front Quarters
4. Spare Tire Well
5. Front Apron
6. Rear Cross-members
7. Rear Luggage
8. Rear Quarters
9. Engine sides
10. Rear Apron
* Fenders
* Hood
Any thoughts/recommendations on this sequence? I assume the heater channels first for body integrity, and that the front bulkhead can be fitted after (not welding channels front until).
I'm assuming a pace of one or two weekends per step (1-10).
I would like to add an observation, now that the body & chassis are separated. The last time around, somebody did not use the traditional gasket between the two, instead using some gel-like material. And, I have rust at all points where that gel is. Not devastating rust, but annoying enough. I'm assuming the gel was water-friendly. |
|
| Back to top |
|
|
green1303
Samba Member
Joined: February 04, 2014
Posts: 748
Location: Alexandria, VA
|
| Posted: Sat May 30, 2015 2:16 pm Post subject: |
|
|
I had a similar scope of work and divided it into groups of panels. It is helpful to start with the rear cross members, because they bolt to the chassis, providing a helpful reference point for the rear of the heater channels. The floor pan bolts serve as another reference point, because they have to line up when you're done.
LOWER BODY
Rear cross members
Heater channels
Front inner firewall
FRONT END
Spare tire well
Front quarters
Front apron
REAR END
Rear luggage
Rear quarters
Engine sides
Rear apron
BOLTED
Fenders
Hood
My 1973 Super Beetle also had that sticky sealant instead of a rubber seal. The factory used it at that time. I replaced it with a rubber seal.
_________________
1973 green Super Beetle |
|
| Back to top |
|
|
Merovex
Samba Member
Joined: May 04, 2015
Posts: 71
Location: United States
|
| Posted: Sun May 31, 2015 4:11 am Post subject: |
|
|
I like that sequence. It has the advantage of hiding the earlier welds which will likely be uglier.
Now down to getting the remaining screws out of the door hinges...
Edit: 11:00...doors out, door braces in. Heat helped two, three others had heads too far gone so I drilled them out. |
|
| Back to top |
|
|
Merovex
Samba Member
Joined: May 04, 2015
Posts: 71
Location: United States
|
| Posted: Wed Jun 03, 2015 4:03 pm Post subject: |
|
|
So, last night on a lark I deadlifted the rear of the car and put it on a sawhorse, and then tried to do the same to the front. Alas, I seem to have not separated the steering column from the chassis. Instead, I have a stud on jack stands.
I've looked on site and on the Internet for how to separate the steering column from the chassis of a '72 Super. No joy. Otherwise, I am terribly close to rolling the chassis out of the garage so I can focus on the body.
Ignore this...I looked again tonight. A rod that was taken off was grabbing onto the chassis. The body is 8" off the chassis. Idiot Me. |
|
| Back to top |
|
|
Merovex
Samba Member
Joined: May 04, 2015
Posts: 71
Location: United States
|
| Posted: Sun Jun 07, 2015 5:09 am Post subject: |
|
|
| Body off, chassis in the drive way. I have the pans off per the BugMeVideo (BMV). That is, cut the metal out, then chisel out the remaining metal. I'm still in the chisel phase. The left side came out better. The right side is being a real pain. |
|
| Back to top |
|
|
jhicken
Samba Member
Joined: October 24, 2003
Posts: 9466
Location: Fallbrook, CA
|
| Posted: Sun Jun 07, 2015 6:54 am Post subject: |
|
|
Why aren't you taking any pictures?
-jeffrey
_________________
Der Kleiner Kampfwagens |
|
| Back to top |
|
|
Merovex
Samba Member
Joined: May 04, 2015
Posts: 71
Location: United States
|
| Posted: Sun Jun 07, 2015 7:11 am Post subject: |
|
|
| jhicken wrote: |
Why aren't you taking any pictures?
-jeffrey |
I should be. I even have a camera in the garage for that purpose. I'm just forgetful. I'll take some today. |
|
| Back to top |
|
|
Merovex
Samba Member
Joined: May 04, 2015
Posts: 71
Location: United States
|
| Posted: Sun Jun 07, 2015 4:37 pm Post subject: |
|
|
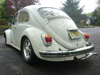
Just a couple shots of the body. On the second one, there's an aftermarket air conditioner visible at the windshield. |
|
| Back to top |
|
|
Merovex
Samba Member
Joined: May 04, 2015
Posts: 71
Location: United States
|
| Posted: Sat Jun 13, 2015 3:15 pm Post subject: |
|
|
Grrr... I tried to practice welding today. I was going to use the old floor pans. I ground through the underbody to what I hoped would be bare metal. Instead, I was greeted with more rust. Those pans were more rust than metal.
Going to a recycler tomorrow to see if I can score some steel. |
|
| Back to top |
|
|
blienemann
Samba Member
Joined: February 21, 2009
Posts: 125
Location: Richmond, Va
|
| Posted: Sat Jun 13, 2015 5:27 pm Post subject: |
|
|
You can also grab a sheet of 16 gauge sheet metal at your local Lowes. I used that to help learn on and also came in handy for small spot repairs.
_________________
Previous - 73 1303
Current:
71 1302 w 2110
70 Deluxe Bus - Project
"Aim for the sky and you'll reach the ceiling. Aim for the ceiling and you'll stay on the floor." Bill Shankly |
|
| Back to top |
|
|
Merovex
Samba Member
Joined: May 04, 2015
Posts: 71
Location: United States
|
| Posted: Sat Jun 13, 2015 6:30 pm Post subject: |
|
|
https://goo.gl/photos/gKVHpaXNvjS9pPSR8
I'm trying to spare TheSamba all the images, but it's hard to get the images to show up in the thread. Toward the bottom of the album are a series of photos of the frame head. There's rust on the ends where the heater channels connected, largely on the bottom. However, on the right side of the frame head, there is damage. I thought I might be able to weld the cracks, but thought I should ask y'all.
|
|
| Back to top |
|
|
Merovex
Samba Member
Joined: May 04, 2015
Posts: 71
Location: United States
|
| Posted: Sun Jun 14, 2015 8:40 am Post subject: |
|
|
Got feedback on the frame head (i.e. Napoleon's Hat) via separate thread.
Couldn't find anywhere around here that would sell scrap due to liability...so I bought a couple sheets off of Amazon. Should be here tomorrow.
If it were a different time of month, I could perhaps get some out of the county recycling facility...but at least this way I was able to select the gauge and avoid galvanized. |
|
| Back to top |
|
|
Merovex
Samba Member
Joined: May 04, 2015
Posts: 71
Location: United States
|
| Posted: Fri Jun 19, 2015 11:58 am Post subject: |
|
|
10# of dry ice, two hours and a couple chisels, and the original tar is off the tunnel. It pretty much just chipped off.
Edit: The MacPh struts are now off as well; ball joints still attached.
I got the The Volkswagon Super Beetle Handbook by VWTrends and have been reading through it. Yes, I know it's online content now and it's a bit of an extravagance. But, I now have a much better idea ahead of me in terms of what this project should entail. I'll be spending most of the summer on the chassis.
I also have been cruising YouTube for inspiration. |
|
| Back to top |
|
|
Volks Wagen
Samba Member

Joined: February 13, 2013
Posts: 2926
Location: Germany
|
| Posted: Fri Jun 19, 2015 6:10 pm Post subject: |
|
|
| Merovex wrote: |
https://goo.gl/photos/gKVHpaXNvjS9pPSR8
I'm trying to spare TheSamba all the images, but it's hard to get the images to show up in the thread. Toward the bottom of the album are a series of photos of the frame head. There's rust on the ends where the heater channels connected, largely on the bottom. However, on the right side of the frame head, there is damage. I thought I might be able to weld the cracks, but thought I should ask y'all.
|
Looks shagged to me. I'd say replace.
_________________
1973 1303 with AB-motor - sporadic
reconstruction as time permits, 1986 ex-Bundeswehr Doka - on the road again.
I'm definitely, probably, the worlds greatest lover.
Aithníonn ciaróg ciaróg eile. |
|
| Back to top |
|
|
Merovex
Samba Member
Joined: May 04, 2015
Posts: 71
Location: United States
|
| Posted: Sat Jun 20, 2015 1:17 pm Post subject: |
|
|
Shagged is the perfect word to describe them.
I've the Hat and lower frame head pieces in my garage now. I've started removing the hat. I'm assuming I don't have to replace the whole lower frame piece since most of it is in decent shape.
I detached the lower control arm on both sides. One had the standard bolt size the other was a 15mm. It looks like the bushings there might be newer, but the bushing for the sway bar/lower control arm is likewise shagged. |
|
| Back to top |
|
|
Merovex
Samba Member
Joined: May 04, 2015
Posts: 71
Location: United States
|
| Posted: Fri Jun 26, 2015 2:53 am Post subject: |
|
|
The Hat is off.
Next steps:
* Tack the Hat on Tunnel
* Drop the Tranny
* Flip Chassis
* Repair Lower Frame Head.
(And, inspect Tunnel bottom.) |
|
| Back to top |
|
|
swhitcomb
Samba Member

Joined: November 05, 2003
Posts: 5673
Location: Inwood WV
|
| Posted: Sat Jun 27, 2015 9:12 am Post subject: |
|
|
Mine looked a lot like that. Lucked into buying an entire front clip with a half decent frame head. Cut off what I needed, patched it a little, and grafted it on to my car.
_________________
My 71 Ghia Been in my family since 1980
My Patina 66
My 74 Ghia
07 Boxster |
|
| Back to top |
|
|
Merovex
Samba Member
Joined: May 04, 2015
Posts: 71
Location: United States
|
| Posted: Sat Jun 27, 2015 6:16 pm Post subject: |
|
|
I may have erred in removing the entire Hat. We shall see. I've been working on removing the tranny, but with the chassis outside and very rainy days I've not gotten too far along. Perhaps tomorrow.
That said, I have been considering a Freeway Flyer. This related thread dissuaded me, and saved a few hundred dollars. My tranny needs to be rebuilt, but it's 4.12 and a Flyer is 3.88. So, no gain. |
|
| Back to top |
|
|
|


