| Author |
Message |
Himejii
Samba Member

Joined: June 07, 2015
Posts: 124
Location: Saskatchewan, Canada

|
 Posted: Tue Jun 23, 2015 12:44 am Post subject: Resurrecting Pippin - 1978 Canadian Deluxe Campmobile Posted: Tue Jun 23, 2015 12:44 am Post subject: Resurrecting Pippin - 1978 Canadian Deluxe Campmobile |
 |
|
I guess it's time to start a build thread.
Pippin has been in the driveway since Tuesday June 9th, and I got home Friday to meet her. It was already getting dark so I didn't get to see much. The first things that struck me were the mouse nest in the engine compartment and the mildew in the cab. That's probably a good sign, since it took me almost a full week to notice the spot that had rusted through.
Backstory: This camper has been sitting in storage for about 20 years. My husband recalls a conversation he had with his cousin, the PO: "Dude, life totally ends at 25." "No way man! Life BEGINS at 25!!" Well, turns out they were both right, respectively. So when Steven passed on, the van went into storage. Years passed, neither his brother or sister had any interest in some old hippie van, so it kept sitting. Eventually the barn owner wanted to burn down the building, and this triggered the "what should we do about the van?" discussion. Of course, they kept using the word "camper" and I had no clue they were talking about a VW camper. When I finally clued in, I was like "woah, what?! Me! Pick me! I'll buy it and fix it and oh please please!!"
Well that was all they needed. They hated to see it go to some stranger, and here's their niece(-in-law) beside herself for it. They decided that since they didn't need the money, we should have it for free, and use the money we would have spent buying it to get it safe instead.
YAY WHOOHOO WOOPWOOP!
So not only did I get a 1978 Canadian Deluxe Campmobile in pretty darned good shape, but I got it as a frickin gift!!! Am I not the luckiest gal on the planet?!
Their only "condition" was that I get it professionally ok-ed. Luckily we have Todd from Air Cooled Classics right in town. When it comes time for her bumper-to-bumper, fine-toothed-comb inspection, I know just the guy!
Before taking possession, I hummed and hawed about whether to get her running myself or just have it done lickity-split by Todd. I opted for the experiential route, and though I'm still having my doubts, I'm starting to make a little bit of progress. We'll see how much I feel like that when it comes time to pull the transmission. Apparently it doesn't have 2nd gear...
Here's the spreadsheet where I keep track of what I've spent on tools, parts, and service; as well as my own service record.
_________________
1978 Canadian Deluxe Campmobile
Last edited by Himejii on Tue Jun 23, 2015 2:14 am; edited 4 times in total |
|
| Back to top |
|
 |
Himejii
Samba Member
Joined: June 07, 2015
Posts: 124
Location: Saskatchewan, Canada
|
| Posted: Tue Jun 23, 2015 12:48 am Post subject: Mouse nest removal |
|
|
We started with the cleaning so we could see what we had to work with.
My husband, bless him, dealt with the mouse nest. I did the "ew ew ew" dance as he tossed dried out carcasses on the driveway. He informed me that even big tough he had trouble with it. I'll stick with my Physics, thank you.
Next, against my better judgement, we hosed down the engine and compartment. I'm still not convinced splashing a ton of water around is good for an air cooled engine, but he talked me into it and well, too late now. It does look much better, at least.
That's about as far as we got on day one. We opened it up to air out the mildew and let the engine dry. I apologized to the van for all the water. I hope he forgives me.
_________________
1978 Canadian Deluxe Campmobile
Last edited by Himejii on Thu Jun 25, 2015 11:53 am; edited 3 times in total |
|
| Back to top |
|
|
Himejii
Samba Member
Joined: June 07, 2015
Posts: 124
Location: Saskatchewan, Canada
|
| Posted: Tue Jun 23, 2015 12:48 am Post subject: Cupboard door latch repair |
|
|
The compartment under the bench wasn't staying closed. I noticed that the little button wasn't popping out. I was going to see if I could muck around with the inside of the mechanism or else just order a replacement.
But when I started to loosen the screws, the latch sprung open. Crisis averted!
_________________
1978 Canadian Deluxe Campmobile
Last edited by Himejii on Thu Jun 25, 2015 11:52 am; edited 2 times in total |
|
| Back to top |
|
|
Himejii
Samba Member
Joined: June 07, 2015
Posts: 124
Location: Saskatchewan, Canada
|
| Posted: Tue Jun 23, 2015 12:48 am Post subject: He or she? |
|
|
I seem to have assigned two genders to my van. Anything mechanical seems to be feminine and anything body and interior seems to be masculine. I'll get "her" running but I'm cleaning "him" out. </random brain dribble.>
_________________
1978 Canadian Deluxe Campmobile |
|
| Back to top |
|
|
Himejii
Samba Member
Joined: June 07, 2015
Posts: 124
Location: Saskatchewan, Canada
|
| Posted: Tue Jun 23, 2015 12:54 am Post subject: Mildew removal with borax and vinegar solution |
|
|
Mostly I just took care of the mildew problem. I used a borax solution, 1 pt borax, 14 pts water, about 3 pts vinegar (whatever it took to get from the 14oz line to the top of the sprayer). It occurred to me later that borax is a base, and that's part of how it works, and that adding vinegar may have neutralized some of that. But it also works with the specific boron-nitrogen-oxygen--unicellular-lifeform-membrane biochemistry, and so I wasn't too broken up about it. But I digress (sorry, I can't help sciencing sometimes).
Before:
Sprayed everything down thoroughly, even the carpet which showed some signs of growth, and especially under the carpet and seat covers. By the time I got all the way around, the first section had been sitting 5-10 minutes so I started wiping with microfiber car clothes, cut down to manageable sizes. About 85% of the mildew came off the first pass, only the stubborn bits stuck around.
After:
I tried my solution on the black mould in the pop-up but no dice. I was hoping to avoid bleach. I've read that the tilex works, but I don't think that's any less noxious than bleach. I could try pure vinegar first, or over-saturated borax. Could also try peroxide, but I only have topical strength. It'd be nice to get some of the industrial cleaning strength kind. But it sounds like the bleach works with no elbow grease, and that's quite appealing. I guess as long as I do it first thing in the morning and let it air out, get a mask and wear some goggles, should be fine? Befores only for now.
_________________
1978 Canadian Deluxe Campmobile
Last edited by Himejii on Thu Jun 25, 2015 11:54 am; edited 4 times in total |
|
| Back to top |
|
|
Himejii
Samba Member
Joined: June 07, 2015
Posts: 124
Location: Saskatchewan, Canada
|
| Posted: Tue Jun 23, 2015 1:20 am Post subject: Fuel and battery removal |
|
|
Today we finally started the first steps toward getting her running. We started by siphoning the fuel. I know there are better ways involving fuel lines, but we couldn't figure out exactly which those were, and we figured siphoning was at least a start.
The fuel looked as you'd expect after sitting 20 years. We got out less than 3 gallons. It was still perfectly thin, not tarred or anything, but the colour was quite dark. There were some rust flakes at the end of the procedure, so I'm sure that accounts for the colour. Eventually I'll pull the tank and get it cleaned and recoated, but first I just want to get it started so I can get it out of the elements and into the garage. (Our garage is up an incline that's too steep for pushing. If I don't get it running by the end of summer, I'll put an ad on kijiji/craigslist for free beer & pizza to 6 strong bodies who can help me out...)
After removing the fuel, we poured in a little bit of fresh, rocked the van to rinse it around a bit, and siphoned that back out. I still want to figure out where to drain the fuel from the engine so I can get out every drop, but one thing at a time.
I knew there would be no engine starting without a new battery, so that was the second project for the day. I got as far as tearing the positive terminal ring in half (I felt like the Hulk, until I realized it was lead) and removing the ground strap from the van, as it was ridiculously rusted on to the battery terminal. I headed off to Canadian Tire to get some liquid wrench to work on that and the clamp, and the new positive terminal to wire in. I noticed replacement ground cables and figured what the hell, that's a lot easier than fighting with a rusty one, and it will make a better contact without all the corrosion around. And it's only $8. I also picked up a can of that oil you spray on rust, I forget the name right now. I figured I'd dose that around the rust spots. I know it's like throwing alcohol on a gangrene leg, but at least it makes me feel like I'm not doing literally nothing about the rust, right now.
Ok, so armed with my liquid wrench, I fought and fought with that battery clamp. Because I don't have the finesse to use an extender properly yet, I was all over the place. Finally I found a position where I could get some, any, leverage, and proceded to remove that bolt two ratchet clicks at a time, alternating arms. I'm just not upper body strong, and it was seriously rusted.
Eventually I got it free, took out the battery, and headed back to Canadian Tire. I also had gotten too short (9") of a ground cable the first time, so exchanged that (13").
While I was out I picked up an area rug for the interior and one of those more industrial types to make mats for the driver & passenger. My rug is still pretty good up there, but I want to keep it that way, and throwing more rugs on top seems like a simple way to do that 
I liberally sprayed the battery clamp with the oil stuff, but I think that should realistically be treated more aggressively. I'm thinking of rust converter and then paint? It seems really solid right now, and it's good practice for more "critical" components.
I was impressed by the fact that there's still paint in the battery tray. Not much, mind, but some is something, right??
_________________
1978 Canadian Deluxe Campmobile
Last edited by Himejii on Thu Jun 25, 2015 11:55 am; edited 1 time in total |
|
| Back to top |
|
|
poptop tom
Samba Member

Joined: July 27, 2004
Posts: 1607
Location: The Hoosier State
|
| Posted: Tue Jun 23, 2015 3:38 am Post subject: |
|
|
Wow! And free? What a beauty! That bus is super clean (well it will be soon!).
Mind if I ask what the mileage is?
And keep the pics coming!
_________________
'76 Deluxe Campmobile |
|
| Back to top |
|
|
Wildthings
Samba Member

Joined: March 13, 2005
Posts: 50352
|
| Posted: Tue Jun 23, 2015 6:53 am Post subject: |
|
|
Treat the battery tray area with some form of phosphoric acid to kill the rust. Osphos, navel jelly, POR 15, etc. There are many.
Once you install the battery coat the posts with vasoline before and again after you connect the cables. Remember to attach the negative (ground) cable last, as you never want to put a wrench on the positive cable when the ground cable is installed.
Do put replacing the fuel lines high on your list, even if they look good they are past their service life. Same with the brake hoses. |
|
| Back to top |
|
|
jtauxe 
Samba Member

Joined: September 30, 2004
Posts: 5780
Location: Los Alamos, New Mexico
|
| Posted: Tue Jun 23, 2015 7:47 am Post subject: |
|
|
You are doing great, and you have a phenomenal bus to start with. Your attitude is wonderful and your posts are funny. Ah, those heady days when the romance is all new and fresh and exciting! Keep it up.
So... things to consider. It's great that you are cleaning out the fuel system. I would recommend replacing all the fuel line components. Here is a great source for that:
http://www.germansupply.com/home/customer/product.php?productid=16400
When going after the mouse nests, don't run the engine until you have checked under all the tin for nests. They sometimes like to build nests on top of the cylinders, which is hard to find and also blocks air flow.
Check to see that your tires are C-rated. They need to have light truck rating, so consider that before buying new ones if you need them. Read the tire sticky.
_________________
John
"Travelling in a fried-out Kombi, on a hippie trail, head full of zombie..." - Colin Hay and Ron Strykert
http://vw.tauxe.net
1969 Transporter, 1971 Westfalia, 1976, 1977, 1976, 1977, 1971, 1973, 1977 Westfalias,
1979 Champagne Sunroof, 1974 Westfalia Automatic, 1979 Transporter, 1972 Sportsmobile, 1973 Transporter Wild Westerner, 1974 Westfalia parts bus, 1975 Mexican single cab *FOR SALE*, 1978 Irish 4-door double cab RHD
|
|
| Back to top |
|
|
Ludwig van
Samba Member

Joined: April 17, 2009
Posts: 149
Location: Winnipeg, Manitoba, Canada
|
| Posted: Tue Jun 23, 2015 8:13 am Post subject: |
|
|
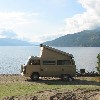
Great to see another Westy on the prairies - busses of all types are getting pretty scarce in these parts. Here's a pic from one of our trips to the Canadian Rockies, which always included a stopover in Rosetown when my father-in-law was alive.
That looks like a very solid camper, and it's going to a great home. Cleanup is tedious, but elbow grease is one of the few parts that's available same-day in Manitoba and Saskatchewan.
_________________
'78 Sage Green California Westy 'Ludwig Van'
Our iPad e-book "Camping With Ludwig Van"
http://store.blurb.com/ebooks/356253-camping-with-ludwig-van
Last edited by Ludwig van on Tue Jun 23, 2015 8:21 am; edited 1 time in total |
|
| Back to top |
|
|
Bala
Samba Member

Joined: December 04, 2003
Posts: 2613
Location: Austin, TX
|
| Posted: Tue Jun 23, 2015 8:20 am Post subject: |
|
|
Love it! Glad you started a refresh thread!
A very diluted bleach water solution will clean the flocking on your pop-top. That is really very minor mold. After I cleaned mine I treated it with an anti mold spray, and it seems to be working. Obviously I wouldn't use bleach on the canvas to avoid discoloration. Do you know if your canvas original? Looks like it could be (no side windows). Anyway, a mild detergent/water should clean it up pretty easily. Simple Green and sturdy scrub brush will get your exterior top looking good again until your ready to paint or coat it.
That was a lot of "mouse house" in the engine compartment! Usually I'm a fan of just getting a new project running and enjoying it for a bit, but I would be pretty worried you have nests blocking everything up on the inside as well. Could lead to a destroyed engine pretty quickly. Might think about pulling the engine for a deep clean.
I wouldn't rush in on the transmission. Do the easy stuff first. Front plastic doughnut on the shift rod, coupler in the back and adjust the shifter. Maybe you'll have some luck!
_________________
1976 Westy
1966 Beetle |
|
| Back to top |
|
|
hiwaycallin
Samba Member
Joined: May 07, 2008
Posts: 356
Location: Salmon Arm, BC
|
| Posted: Tue Jun 23, 2015 8:43 am Post subject: |
|
|
Nice bus! I've got a 1978 Canadian Deluxe Campmobile too  |
|
| Back to top |
|
|
Himejii
Samba Member
Joined: June 07, 2015
Posts: 124
Location: Saskatchewan, Canada
|
| Posted: Tue Jun 23, 2015 9:29 am Post subject: |
|
|
| Wildthings wrote: |
| Treat the battery tray area with some form of phosphoric acid to kill the rust. Osphos, navel jelly, POR 15, etc. There are many. |
My understanding is that acid will dissolve rust, but then you need to rinse off the acid ASAP and paint it to prevent further rust, and that any acid left behind will eat the steel like nobody's business.
But yep, dealing with the tray is definitely on my list. I'm tempted to do it now while the battery is already out, but I haven't found a good source for rust products locally, other than rustoleum and... No.
_________________
1978 Canadian Deluxe Campmobile |
|
| Back to top |
|
|
Himejii
Samba Member
Joined: June 07, 2015
Posts: 124
Location: Saskatchewan, Canada
|
| Posted: Tue Jun 23, 2015 9:35 am Post subject: |
|
|
| Bala wrote: |
| Do you know if your canvas original? Looks like it could be (no side windows). Anyway, a mild detergent/water should clean it up pretty easily. Simple Green and sturdy scrub brush will get your exterior top looking good again until your ready to paint or coat it. |
I can't be 100% certain but I believe it is. Though it feels awfully light canvas for the 70s, but that's just comparing to the oiled tents we used in Girl Guides, which were massively heavy. Or at least seemed like it to an 8 year old!
| Quote: |
| That was a lot of "mouse house" in the engine compartment! Usually I'm a fan of just getting a new project running and enjoying it for a bit, but I would be pretty worried you have nests blocking everything up on the inside as well. Could lead to a destroyed engine pretty quickly. Might think about pulling the engine for a deep clean. |
I hear you. It seemed mostly contained to the area. We checked the air filter, no signs of infestation. The engine block is solid steel so they'd have to get in through something, and we can't find any somethings with signs of mouse. I'm not saying I know it's safe, but I'm confident enough to risk it.
I keep pushing to pull the engine, but hubby is less than enthusiastic about the idea. Guess which one of us has pulled an engine before? 
Either way, I just need to drive it around the house. We're at the end of the block, it needs to go from the front driveway to the back yard garage. I know you can do a lot of damage in 100m, but then I really do want to strip down the engine anyway, so hopefully nothing gets completely destroyed that quickly.
_________________
1978 Canadian Deluxe Campmobile
Last edited by Himejii on Tue Jun 23, 2015 9:46 am; edited 1 time in total |
|
| Back to top |
|
|
Himejii
Samba Member
Joined: June 07, 2015
Posts: 124
Location: Saskatchewan, Canada
|
| Posted: Tue Jun 23, 2015 9:37 am Post subject: |
|
|
| poptop tom wrote: |
| Mind if I ask what the mileage is? |
59,000 km and change. That's part of the reason hubby's so hesitant to pull the engine, he's convinced there's no point. I'm convinced that I want to do it anyway, despite the blood and sweat and tears that will be involved.
_________________
1978 Canadian Deluxe Campmobile |
|
| Back to top |
|
|
Himejii
Samba Member
Joined: June 07, 2015
Posts: 124
Location: Saskatchewan, Canada
|
| Posted: Tue Jun 23, 2015 9:42 am Post subject: |
|
|
Just what I needed! I've been looking around for these but couldn't find anything that didn't have to cross the border, and I don't want to deal with customs if I can help it. I can't count the number of times a $25 purchase has cost me $80 by the time international shipping charges and customs fees got involved... Actually, three. Three times. Two of those were Doctor Who things, which is the only reason it wasn't one time. The only place I could find was c1, and I couldn't find the appropriate parts.
Fuel lines in cart! I'm going to poke around a bit more before ordering, combine as much shipping as possible.
The only real parts I've ordered yet are retractable seatbelts and a knob for the louvre windows. Hubby was fully supportive of that purchase, until he clued in that we already had seatbelts and I wanted retractable seatbelts. Apparently I'm spoiled. I neither confirm nor deny this statement.
_________________
1978 Canadian Deluxe Campmobile |
|
| Back to top |
|
|
THall
Samba Member

Joined: August 25, 2010
Posts: 324
Location: Verona, WI
|
| Posted: Tue Jun 23, 2015 10:52 am Post subject: |
|
|
[quote="Himejii"]
| Bala wrote: |
| Quote: |
| That was a lot of "mouse house" in the engine compartment! Usually I'm a fan of just getting a new project running and enjoying it for a bit, but I would be pretty worried you have nests blocking everything up on the inside as well. Could lead to a destroyed engine pretty quickly. Might think about pulling the engine for a deep clean. |
I hear you. It seemed mostly contained to the area. We checked the air filter, no signs of infestation. The engine block is solid steel so they'd have to get in through something, and we can't find any somethings with signs of mouse. I'm not saying I know it's safe, but I'm confident enough to risk it.
I keep pushing to pull the engine, but hubby is less than enthusiastic about the idea. Guess which one of us has pulled an engine before? |
I believe what Bala is saying by "on the inside" is under the tins where the spark plugs are. If there's nests in there like the others, it will rob you of vital cooling. If you're going to do all of the fuel lines, you may as well get behind the firewall to change out all the other hoses in the tank bay. That is easiest done with the engine out. My first engine removal had me a bit freaked out, but now that I've done it multiple times it's really not a bad job. Just label everything and I strongly suggest removing engine and tranny as a unit. Odds are it's gonna need to come out at some point, now would be a good time to check the state of everything so you know what you have.
Great bus and best of luck
_________________
'78 Westy - 2.0 FI |
|
| Back to top |
|
|
Himejii
Samba Member
Joined: June 07, 2015
Posts: 124
Location: Saskatchewan, Canada
|
| Posted: Tue Jun 23, 2015 11:11 am Post subject: |
|
|
| THall wrote: |
| I believe what Bala is saying by "on the inside" is under the tins where the spark plugs are. |
At the risk of sounding ignorant, aren't the spark plugs more or less on top? These, right? Do you mean inside this rusty box?? I'm tempted to pick up a fiber optic camera. They're getting cheaper and cheaper, and they're great for all kinds of entertainment... 
| Quote: |
| If you're going to do all of the fuel lines, you may as well get behind the firewall to change out all the other hoses in the tank bay. That is easiest done with the engine out. My first engine removal had me a bit freaked out, but now that I've done it multiple times it's really not a bad job. Just label everything and I strongly suggest removing engine and tranny as a unit. Odds are it's gonna need to come out at some point, now would be a good time to check the state of everything so you know what you have. |
Sense that makes.
What parts exactly will I need to get for "all the other hoses in the tank bay?" Or, better yet, where do I look to find this kind of information myself? I'm reading through Muir right now, but I notice it doesn't go into deep detail for each model, which is logical for a one-size-fits-all kind of book. I've also got a PDF of the Bentley manual, which has helped a lot more for figuring out specifics, but it seems organized with the assumption that you already know, more or less, what you're planning to do and you just need to know where exactly to do it.
_________________
1978 Canadian Deluxe Campmobile |
|
| Back to top |
|
|
Bala
Samba Member
Joined: December 04, 2003
Posts: 2613
Location: Austin, TX
|
| Posted: Tue Jun 23, 2015 11:41 am Post subject: |
|
|
| Himejii wrote: |
| THall wrote: |
| I believe what Bala is saying by "on the inside" is under the tins where the spark plugs are. |
At the risk of sounding ignorant, aren't the spark plugs more or less on top? These, right? Do you mean inside this rusty box?? I'm tempted to pick up a fiber optic camera. They're getting cheaper and cheaper, and they're great for all kinds of entertainment...
| Quote: |
| If you're going to do all of the fuel lines, you may as well get behind the firewall to change out all the other hoses in the tank bay. That is easiest done with the engine out. My first engine removal had me a bit freaked out, but now that I've done it multiple times it's really not a bad job. Just label everything and I strongly suggest removing engine and tranny as a unit. Odds are it's gonna need to come out at some point, now would be a good time to check the state of everything so you know what you have. |
Sense that makes.
What parts exactly will I need to get for "all the other hoses in the tank bay?" Or, better yet, where do I look to find this kind of information myself? I'm reading through Muir right now, but I notice it doesn't go into deep detail for each model, which is logical for a one-size-fits-all kind of book. I've also got a PDF of the Bentley manual, which has helped a lot more for figuring out specifics, but it seems organized with the assumption that you already know, more or less, what you're planning to do and you just need to know where exactly to do it. |
Yep, down there. If you could sneak a camera in there (and any other nooks and crannies you can) without seeing any evidence of mouse nest I would be reasonably confident you'll be OK to run the engine. But, if you plan on using your heater you might want to do some additional poking around.
For the lines behind the firewall just go to your local auto parts store and get some fuel injection hose. You can totally do this without dropping the engine, but it will require you to bend the breast plate a bit. Personally I thought it was worth the convenience, but that'll be your decision.
Ratwell has some good info. http://www.ratwell.com/technical/FuelHoses.html
Here are the "hidden" vent and filler lines you need to replace.
You can buy the angled (#1) filler line at most online part houses, and it's pretty inexpensive. For the slightly curved part (#6) get the Sprinter part below.
Dodge = 5119668AA
Mercedes = 9014760026
_________________
1976 Westy
1966 Beetle |
|
| Back to top |
|
|
Wildthings
Samba Member
Joined: March 13, 2005
Posts: 50352
|
| Posted: Tue Jun 23, 2015 11:45 am Post subject: |
|
|
| Himejii wrote: |
| THall wrote: |
| I believe what Bala is saying by "on the inside" is under the tins where the spark plugs are. |
At the risk of sounding ignorant, aren't the spark plugs more or less on top? These, right? Do you mean inside this rusty box?? I'm tempted to pick up a fiber optic camera. They're getting cheaper and cheaper, and they're great for all kinds of entertainment...
The rusty box is a part of your cooling tins which are vital to your aircooled engine. Getting a good view of the area over the oil cooler is of utmost importance, either using a mirror or scope. Nesting material can be removed using one of those flexible three fingered pickup tools, but removing the engine and pulling the tins is the best way to go if you find mice nesting material in there though.
| Quote: |
| If you're going to do all of the fuel lines, you may as well get behind the firewall to change out all the other hoses in the tank bay. That is easiest done with the engine out. My first engine removal had me a bit freaked out, but now that I've done it multiple times it's really not a bad job. Just label everything and I strongly suggest removing engine and tranny as a unit. Odds are it's gonna need to come out at some point, now would be a good time to check the state of everything so you know what you have. |
Sense that makes.
What parts exactly will I need to get for "all the other hoses in the tank bay?" Or, better yet, where do I look to find this kind of information myself? I'm reading through Muir right now, but I notice it doesn't go into deep detail for each model, which is logical for a one-size-fits-all kind of book. I've also got a PDF of the Bentley manual, which has helped a lot more for figuring out specifics, but it seems organized with the assumption that you already know, more or less, what you're planning to do and you just need to know where exactly to do it. |
You can find the information you want by using the search function on this site. Look for the Forums button near the top center of each page and hover your cursor over it, when the box drops down click the Search button. It will take a bit to learn how to use this feature but will be worth it. |
|
| Back to top |
|
|
|


