| Author |
Message |
Customalways
Samba Member

Joined: October 19, 2013
Posts: 67
Location: Baltimore, MD

|
 Posted: Mon Dec 07, 2015 1:45 pm Post subject: 56 Oval Build - First time for everything Posted: Mon Dec 07, 2015 1:45 pm Post subject: 56 Oval Build - First time for everything |
 |
|
So I figured I would start a build thread. I have spent so much time looking at tons of posts and have soaked up a lot of knowledge. This is my first VW tear down so each thing I do is the first for me. I am setting this in motion in hopes that I can help someone out if ever a reference is needed from what I learn and post and also hoping to get some knowledge form anyone who happens to peek in and maybe can offer suggestion if I happen to post a question or if I hit a wall and cry out for help.
I work alone which isn't always the easiest and also don't have a garage so I am trying to be as innovative as possible. I am in Maryland (just north of Annapolis) so the east cost cold has settled in (I hate fall and winter) so I am making do with what I can.
Now I bought this all put together after taking a quick peek and thinking i struck a deal, but the restricted access and viewing I had during the pre-purchase quickly trend into HOLY S*$T I got screwed. Granted it is a 56 (on a 65 pan) but it needed a ton of metal work that I hadn't panned. The motor ran before I pulled it but ran like hell (felt like 50% power). While pulling apart to remove body I discovered the left hand carb (34 ICT) was not squirting gas out of the main pup jet so i am HOPING that a carb rebuild will bring equal power back to the cylinders.
I will try and take simple easy to understand and see photos during the way as I know they are key from my searches.
If you landed here on accident or on purpose via search, I hope you enjoy.
Todd -- [email protected] |
|
| Back to top |
|
 |
Customalways
Samba Member
Joined: October 19, 2013
Posts: 67
Location: Baltimore, MD
|
| Posted: Mon Dec 07, 2015 2:21 pm Post subject: Re: 56 Oval Build - First time for everything |
|
|
First few days after purchase:
After poking and prodding and being annoyed with myself for not inspecting better. Got the head together and started to figure out how to dismantle everything.
Got it moved (crazy method but got it moved....was going to strip it down but stopped short and figured i would go in a slightly different direction. Was not ever going to go towards perfection on paint finish as i prefer a bit of a beat down look so went with red primer. Wound up going over everything on the surface with fine steel wool to dull it out a bit. in the end everything will be red primer and black aside form the trim which I also scuffed with steel wool.
Where it sits now under this lovely shed - yes I said shed extension. Sorry I don't have the garage I would love to have. Metal will fully in hand this week and I plan to start as soon as I can.
|
|
| Back to top |
|
|
Customalways
Samba Member
Joined: October 19, 2013
Posts: 67
Location: Baltimore, MD
|
| Posted: Mon Dec 07, 2015 2:29 pm Post subject: Re: 56 Oval Build - First time for everything |
|
|
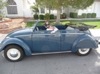
Just a few photos of a 61 rag I had a few years back where I did the interior and rewired it. Paint was existing but i wet sanded down to deafen the brightness a bit. Put my heart and should into this thing and hated to sell it but it was a "have to" situation. I gave it away basically and it went to NJ.
|
|
| Back to top |
|
|
Dake
Samba Member

Joined: September 02, 2014
Posts: 481
Location: Georgia
|
| Posted: Mon Dec 07, 2015 5:01 pm Post subject: Re: 56 Oval Build - First time for everything |
|
|
| Great job on the 61. Hope the 56 turns out as nice. I was wondering if you used that tent to paint in I was looking at using one for a paint booth. I'm working on a 62 rag top myself. |
|
| Back to top |
|
|
Customalways
Samba Member
Joined: October 19, 2013
Posts: 67
Location: Baltimore, MD
|
| Posted: Tue Dec 08, 2015 5:38 am Post subject: Re: 56 Oval Build - First time for everything |
|
|
Hey Dake -
I actually painted it outside uncovered with Rustoleum Professional rattle can. I know i was either going to wet sand it or scuff it somehow to dull it out so I wasn't sweating small stuff getting on paint. It actually went way smoother than I planned. This paint I used dries pretty fast as well.
i got the tent from a site called PES Auto )google it to find it). it is a 10'x20' and was $120.00. Not the best for long term but i am taking it as far as it will last. |
|
| Back to top |
|
|
Customalways
Samba Member
Joined: October 19, 2013
Posts: 67
Location: Baltimore, MD
|
| Posted: Tue Dec 08, 2015 1:45 pm Post subject: Re: 56 Oval Build - First time for everything |
|
|
Still waiting on all of my metal so spent a few minutes installing a new fuse block - 12 circuit ATO/ATC with 12 Negative term block as well. I used this in a rewire a few years back and really liked it. It is made by Blue Sea Systems and can be found on Amazon for under $40.
|
|
| Back to top |
|
|
Pool_hooligan
Samba Member
Joined: June 28, 2015
Posts: 1
Location: San Pedro
|
| Posted: Tue Dec 08, 2015 8:30 pm Post subject: Re: 56 Oval Build - First time for everything |
|
|
| I'll be following this thread. I just picked up a 56 and will be doing a full resto. Looking forward to seeing what you'll be doing. |
|
| Back to top |
|
|
Customalways
Samba Member
Joined: October 19, 2013
Posts: 67
Location: Baltimore, MD
|
| Posted: Fri Dec 11, 2015 10:15 am Post subject: Re: 56 Oval Build - First time for everything |
|
|
I am going to try and post references of all of the information I find specific to the work I am doing and also post references for alternative parts finds which I think are beneficial.
This first one is simple but for me was a cool find. I am going with stainless hardware everywhere I can and when I looked up stainless packages for Body Mount bolts I fell out of my chair. As an alternate to there stainless U/Channel profile washers out there for crazy pricing, I have found to use this little stainless product here which I paid .20 each. Good buy in my opinion..Found them on Supplyhouse.com. I ordered at 3pm yesterday and they were here this morning.
My bolts I got from McMaster Carr - Hex Head Stainless. All I needed plus a few extra ran about $45. Again, way way cheaper then the complete packages a few people offer.
|
|
| Back to top |
|
|
EMPIImp69
Samba Member

Joined: April 17, 2006
Posts: 3374
Location: Dirty Jersey
|
| Posted: Fri Dec 18, 2015 8:27 am Post subject: Re: 56 Oval Build - First time for everything |
|
|
How is it that you have perfect door alignment with a half rotted heater channel? My car has new heater channels and fit no where near that nice.
_________________
1963 Ragtop Bug |
|
| Back to top |
|
|
Joey
Samba Member

Joined: August 12, 2005
Posts: 5366
Location: Nova Scotia - Canada
|
| Posted: Fri Dec 18, 2015 8:35 pm Post subject: Re: 56 Oval Build - First time for everything |
|
|
Get rid of the urethane steering coupler. They are not reinforced and can fall apart leaving you with no steering.
_________________
Joey
60 Kombi - '74 Bus - '79 Panel - '65 Beetle |
|
| Back to top |
|
|
lovethatconvertible
Samba Member
Joined: August 22, 2008
Posts: 1434
Location: Las Vegas N. V.
|
| Posted: Fri Dec 18, 2015 10:03 pm Post subject: Re: 56 Oval Build - First time for everything |
|
|
Also looks like your missing the lock tabs on the Front Beam mounting bolts.
Cool Project, Keep the updates coming.
_________________
1960 Convertible |
|
| Back to top |
|
|
Joey
Samba Member
Joined: August 12, 2005
Posts: 5366
Location: Nova Scotia - Canada
|
| Posted: Sat Dec 19, 2015 6:52 pm Post subject: Re: 56 Oval Build - First time for everything |
|
|
| lovethatconvertible wrote: |
| Also looks like your missing the lock tabs on the Front Beam mounting bolts. |
There's what looks like lock washers under the bolts. I use lock washers instead of the lock tab plate as well.
_________________
Joey
60 Kombi - '74 Bus - '79 Panel - '65 Beetle |
|
| Back to top |
|
|
63Ragtop NZ
Samba Member
Joined: December 04, 2007
Posts: 895
Location: West Auckland
|
| Posted: Mon Dec 21, 2015 12:32 pm Post subject: Re: 56 Oval Build - First time for everything |
|
|
great project! I have always wanted a oval.
I hope you have some bracing inside the shell, doesn't look like there is much holding it together!?
_________________
If you can't join them, beat them! |
|
| Back to top |
|
|
Customalways
Samba Member
Joined: October 19, 2013
Posts: 67
Location: Baltimore, MD
|
| Posted: Tue Dec 22, 2015 5:35 am Post subject: Re: 56 Oval Build - First time for everything |
|
|
| Thanks for the notes....I definitely have bracing....I welded angle iron in 2 front to back and side to side and actually added turnbuckles in the middle of them so I can adjust if needed. I am hoping this covers my ass when putting back to gather. I am actually going to se the channels, crossmembers, and the firewall not he chassis and weld them lightly in place there. I will then mate that up to the body when going for the full weld. This should help with alignment when setting the body back down onto chasis. As the title says, first time for everything. |
|
| Back to top |
|
|
Redlines
Samba Member
Joined: June 07, 2009
Posts: 168
Location: Fredonia, NY
|
| Posted: Wed Dec 23, 2015 1:41 pm Post subject: Re: 56 Oval Build - First time for everything |
|
|
| I like your garage! Have always thought about getting one. Like your rattle can rustoleum red primer also. Will that be your finish coat? I have trouble finding milk in the refridgerator, but I don't see any shock towers. Yea, I always had a thing for ovals too. I've got an oval project myself, so I'm gonna follow yours very closely! Really looks like you've accomplished quite a bit working by yourself! |
|
| Back to top |
|
|
Customalways
Samba Member
Joined: October 19, 2013
Posts: 67
Location: Baltimore, MD
|
| Posted: Mon Jan 04, 2016 2:06 pm Post subject: Re: 56 Oval Build - First time for everything |
|
|
Thanks Redlines.....I am leaving it as is and no clear on top. Painting all of the trim black except the handles, and body molding on the sides and hood. I have some progress photos but haven't gotten them off my phone yet. I will post soon. I figured out a way to help myself big time when i go to put my channels, cross members, and firewall in. You will see in photos and I will explain as well.
Also, there were a number of comments on bracing which I will post too. Notice i haven't removed the doors and don't plan to. I think this assists greatly in holding everything together. It keeps the doors in line with the shut position. Again, I will post good follow up pictures. ** would be so much easier if I could just pull them from my computer and add..... |
|
| Back to top |
|
|
Customalways
Samba Member
Joined: October 19, 2013
Posts: 67
Location: Baltimore, MD
|
| Posted: Mon Jan 04, 2016 2:18 pm Post subject: Re: 56 Oval Build - First time for everything |
|
|
| EMPIImp69 wrote: |
How is it that you have perfect door alignment with a half rotted heater channel? My car has new heater channels and fit no where near that nice.
|
If i could have video taped the travel of this shell from my carport to the back yard where it is now you would fall out of your seat. I wound up doing it on 2 long boards (yes they are skateboards)...it was all i had since the dollies weren't working. Once brace broke a weld on the way so i would up removing and replacing all of them with the new ones in the pictures I am posting today. |
|
| Back to top |
|
|
Customalways
Samba Member
Joined: October 19, 2013
Posts: 67
Location: Baltimore, MD
|
| Posted: Mon Jan 04, 2016 2:57 pm Post subject: Re: 56 Oval Build - First time for everything |
|
|
Hello Everyone - just spent time getting photos from phone to computer to here....figured I would show the pictures of the Bracing some people were asking about and also progress photos. In addition, I built a sort of elevator system since I am working alone here. I am in prices of setting all of the channels, firewall, and cross members in place on the pan, bolting them in and then I will tack them in place (well a bit more then tack) and then I will remove the pieces as sort of a lower frame and will raise it up to the body as one piece. The chasis will leave the pen and wait elsewhere until I get done with the body. The lift system I built into the dolly will allow me to set it onto it and raise it as needed by using the nut at the bottom or the top. It will allow me to level it and also squeeze it up to body as needed (or that is my plan in figuring this out). I will be able to work in the middle of it on my feet when doing all of the permanent welding and misc. metal work. For anyone who is working by themselves and doesn't have a lift, I hope this helps. Please direct any dolly type of questions to this thread as i know I was in the "what dolly is best" boat one time not too far back.
Front looking back on dolly and recently added lift for the channel, cross member, and firewall assembly i am tacking together.
Back looking front:
The All-Thread will allow me to get adjustment up or down from either the top or the bottom ** tip, buy a pass through ratchet for ease of ratcheting - harbor freight has relatively low cost option **
Metal Work almost set up to tack weld into place:
Bracing installed a little while back using turnbuckles for adjustment if needed:
New body bolts - stainless allen/socket head:
Dash picture - used wood from my old 61 project to cover up a chopped up lower portion of dash. I have always liked wood adds personally as you can see from my old 61'
Feel free to send advice or offer comments (don't be a D!*k) |
|
| Back to top |
|
|
Customalways
Samba Member
Joined: October 19, 2013
Posts: 67
Location: Baltimore, MD
|
| Posted: Thu Jan 07, 2016 4:33 pm Post subject: Re: 56 Oval Build - First time for everything |
|
|
Adding more updates. Made some good progress today.
I was able to set up my mig (Miller 140) with gas finally CO2 with .23 wire. I bolted the channels and crossmembers in place and clamped the firewall in place to prep up for tack welding. Ultimate plan from the get go was to tack all in place and then raise it all up to body as an assembly. All of the metal is Klockerholm from CIP1.
Starting Point today:
I decided to put a few holes on the flanges are the ends of the channels.
After everything was tacked in place I was able to lift it up onto my little elevator contraption i built the other day.
Photos of the Channels, Crossmembers, and Firewall resting on elevator:
This will allow me to raise the section up to the body which is perfect since i am doing this all with only 2 hands.
Couple of things i have learned and thought I would share......Overall i think the metal is not so bad considering it is new and not original. It is workable. The DANSK channels is the way I went when ordering....they are built pretty well but the one thing I had an issue with was the front 2 holes where the 10x1.5 bolts thread through the Napoleon Hat.....they were definitely NOT set to accept that size. I had to run new thread chases using an stainless bolt that I cut groves into to use as sort of a thread chaser....not the best but it worked. Also the length i have seen recommended on here (1.25") is what I would consider .25" short....I will be using longer when i reattach body. I also had to grind out a groove where the seat mount brackets were, again no big deal.
Oh, and if you are ever using Kerosene heat outside and want an alternative fuel (cheaper than Kero) diesel works....I have been using it with no issue on the cylinder type of heater and the torpedo type. I added rubbing alcohol to it as I saw that on a search a while back.
Hope some of this helps for anyone looking for answers or clues.
** I need a MD (near Baltimore) person to look at my engine while all of this is going down. Motor was running when I pulled it, just don't know what year it is from or what size it is - Help ** |
|
| Back to top |
|
|
Customalways
Samba Member
Joined: October 19, 2013
Posts: 67
Location: Baltimore, MD
|
| Posted: Thu Jan 14, 2016 5:33 am Post subject: Re: 56 Oval Build - First time for everything |
|
|
Made some progress since last post. I was able to bring the Channels, Crossmembers, and firewall up to the body and slowly snug it up and into what seems to be the right place. I must say the lift system i built into the dolly was SUPER helpful. It allowed me to raise and lower the assembly as need which honestly made everything go smoother. For anyone building a dolly and doing the bottom end of the body by themselves, this is the way to go in my opinion. The fact that it is a guarantee that the body will mate up to the pan with no issue is a very nice thought with still so much work to do.
Since the last post my temporary tent was torn apart by a heavy wind storm day so i had to replace it. I went with the 10x17 portable garage @ Harbor Freight. Cost was $160 after the 20% coupon and the only materials I bought as extra were 2 - 2"x6"x10' to use as a nail down point on the sides. The tent hold in heat very very well and is very sturdy for the $$.
Onto progress.....I was scared as hell to to it since I didn't have anything welded in yet, but I FINALLY opened the door up on the drivers side door to start working on lining it up. If you have been reading you may recall the mention of braces I welded in with turnbuckles in the middle....again SUPER helpful and i would recommend only doing this on future work on the channel install. I was able to spread the doors to a point where the door closed with little to no effort - along with jacking the door hinge up about 3/8". I cut out the bottom of the pillar in order to weld in the new piece seen below. It wasn't easy, but I cut it all out with the doors still in place. I will move on to the other door once i have this piece welded in and tacked to the channel (if i had 2 jacks I would do them both at the same time).
I know I can be a bit wordy, but again I am always looking for advice and instruction on this site and google, and can never find it all in one place so I am trying to cover everything for anyone approaching this for the first time.
** the pictures at the bottom....can someone tell me if i should be installing (welding in) these splash guards behind the crossmember....I used Klockerholm crossmember and these are also Klockerholm...my assumption is that i should, just need some experience as a weigh in if possible **
Pillar in process of cutting out SHI**Y metal:
Pillar after cutting in new piece to set up for welding (it was my first fit in piece so I went for the harder one first):
Back end of Left side Crossmember....should I be welding in the splash guard to cover up back side of Crossmember?
|
|
| Back to top |
|
|
|


