| Author |
Message |
AggieZig
Samba Member

Joined: March 10, 2013
Posts: 188
Location: Los Angeles, CA

|
 Posted: Wed Jan 06, 2016 3:13 pm Post subject: Our 1956 Texas Brew (one piece at a time) Posted: Wed Jan 06, 2016 3:13 pm Post subject: Our 1956 Texas Brew (one piece at a time) |
 |
|
WARNING, PURISTS: READ THIS THREAD AT YOUR OWN RISK.
Its been a while since Dad, 63Ziggy & I have had the chance to feed the obsession (disease) and restore a Volkswagen together. It started back when I was 12 or so with a 1963 Beetle which was later sold to fund our 1974 Thing restoration. As the saying goes, time flies we just realized this last weekend that the Thing has been on the road for roughly six years. All of that being said, it was certainly time for another project.
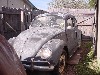
Five years ago I was a freshman at Texas A&M. I stopped by my uncles (by marriage) place on the way back home from school one weekend to check out a Volkswagen project he had tucked away in his shop. These were my findings:
My uncle called it Oscar, because of its green color. His plan was to make a rat rod out of it.
The rumor was that the project had my name on it as soon as I had a place to work on it providing I promised to finish & drive the thing. Of course, years passed with no progress on that front while I was still in school. At graduation, my aunt mentioned the project again and asked when I was going to come take it home.
Fast forward a few months, and here she is pulling into my parents house (for now):
(Yes, this is little brother below)
After a few hours of sorting through parts we had a chance to organize and really see what all we had gotten. The project had sat at my uncles in this state for nearly a decade so any relevant information was long forgotten. Heres what we were able to decipher:
-Its a 1956 Oval Body (#192390 February 56?) - missing its VIN tag
-The body is sitting on a 1963 chassis this chassis # is used on the title
-Despite the VIN being linked to a 63 chassis, the title says 1956
-The engine is a Bernie Bergmann build new, unsure of specs, hasnt run in years
-The transmission is supposed to be a beefed up swing axle again, no specs
With the mix-match that we have, and the plans in my mind this is not going to be a concourse restoration. Dont get me wrong, this will be a high-quality restoration just not going to put her back to stock. I want a daily driver, plenty of oomph, and some modern / custom touches.
So, heres the game plan (for now):
CHASSIS
-The later chassis will likely stay as that is how it is titled & no VIN on body
-Both front & rear have EMPI disk brakes
-Will likely convert the rear to IRS to avoid negative camber look
-Front beam needs a rebuild / potential narrowing
-Will also consider a slight lower, but nothing crazy
-The entire chassis will need a strip / repaint as it is flaking in some places
BODY
-Unfortunately, the body is going to need some help & missing pieces
-We sourced two early 60s front fenders (no not correct, but close) & will add bullets
-Also sourced a rear fender that is in very rough shape but will do the job
-It looks like at some point the car took a hit / roll on the passenger side
-We sourced a roof section to fix a very mangled drip rail & first 5 of the roof
-The whole thing will get a blast & epoxy primer after all body work is completed
ENGINE / TRANSMISSION
-As mentioned, this supposed beast of a motor has sat for years
-After reading on bergmanns reputation, we are even more in the dark - will likely tear down & inspect everything (see thread)
-Ideally, we will salvage parts & re-assemble (with help) something in the 1.9-2L range
-If we continue with the IRS conversion, we will obviously change out the transmission
-I would like to see some variation of a 5 speed, but that is major $$
INTERIOR
-The car came with a new, complete (stock) interior kit in gray but will likely be selling that
-I have a vision in my head, but will of course depend on colors
-Not sure if keeping the low backs or may opt for a conversion to high backs
For now, my dad & I will be working on the project whenever spare time / free weekends arise. Both of our previous projects were many years in the making, so we are hoping to keep the time down on this one. As always stay tuned, more to come!
_________________
Zig, Aircooled Enthusiast
Current: Porsche 914 Resto | 1969 VW Beetle
Past: 74 Thing | Sand Rail | Baja Project | Oval Beetle |
|
| Back to top |
|
 |
MacLeod Willy
Samba Member
Joined: February 18, 2014
Posts: 933
Location: Ontario Canada
|
| Posted: Wed Jan 06, 2016 3:52 pm Post subject: Re: Our 1956 Texas Brew (one piece at a time) |
|
|
Nice write up, great pics.
Keep them coming.
Sounds like you have a good work plan. Way to go |
|
| Back to top |
|
|
Gwdghiaguy
Samba Member

Joined: December 06, 2013
Posts: 340
Location: Greenwood, SC
|
| Posted: Wed Jan 06, 2016 6:34 pm Post subject: Re: Our 1956 Texas Brew (one piece at a time) |
|
|
Very nice opening post; good history and lots of pictures. That engine bay is quite full, isn't it? Looking forward to seeing what you brew up with this one.
byron
_________________
1957 Oval Window
1963 Alabama Camper Bus
1971 Ghia
1971 Baywindow Bus
Stop dead photo links! Post your photos to The Samba Gallery! |
|
| Back to top |
|
|
AggieZig
Samba Member
Joined: March 10, 2013
Posts: 188
Location: Los Angeles, CA
|
| Posted: Mon Jan 11, 2016 8:32 am Post subject: Re: Our 1956 Texas Brew (one piece at a time) |
|
|
Well, we had a suspicion there were some hidden treats on this body. As mentioned, it seems as though the passenger side took a hit / roll at some point in its life.
A quick torch to the front quarter panel confirms, yep - lots o' lead:
Here's the collection:
We also found a spot on the on the rear quarter panel:
It looks like we will be cutting out these spots & welding in donor sections. There are some pretty bad underlying dents that the lead & bondo had been hiding. Once we get a chance to blast the whole thing down, the real secrets will start coming out!
_________________
Zig, Aircooled Enthusiast
Current: Porsche 914 Resto | 1969 VW Beetle
Past: 74 Thing | Sand Rail | Baja Project | Oval Beetle |
|
| Back to top |
|
|
sunroof
Samba Member

Joined: October 06, 2006
Posts: 1773
Location: Winnipeg
|
| Posted: Mon Jan 11, 2016 2:17 pm Post subject: Re: Our 1956 Texas Brew (one piece at a time) |
|
|
I'm dealing with the exact same damage on my car:
In my case I know exactly what happened, I ran into a fence in a parking lot way back in 1991.
My thread:
http://www.thesamba.com/vw/forum/viewtopic.php?t=4...p;start=20
Don
_________________
Better and better mistakes! |
|
| Back to top |
|
|
AggieZig
Samba Member
Joined: March 10, 2013
Posts: 188
Location: Los Angeles, CA
|
| Posted: Tue Jan 12, 2016 9:10 am Post subject: Re: Our 1956 Texas Brew (one piece at a time) |
|
|
| sunroof wrote: |
| I'm dealing with the exact same damage on my car. In my case I know exactly what happened, I ran into a fence in a parking lot way back in 1991. |
Priceless. I checked out your thread - you've done some impressive patch work, Don!
------------------------------------------------------------------------
We picked up a pair of front fenders for the project. These are not the "correct" 56 oval fenders, but rather a set from a 1961 Beetle. Obviously these fenders were significantly less expensive, albeit still pricey. The plan is to fill in the "peanut" blinker holes and add "bullet" turn signals.
Starting place:
Sanded down, ready for patch:
Making circle patches out of the donor roof patch. (At least it's OG sheet metal?)
Ready to fill some holes!
Driver's side done:
Passenger side done:
All gone!
Additionally, we decided to fill in the bumper overrider holes as the game plan is either single blade bumpers (Dad) or no bumpers (me). We'll see what becomes of that.
Next up, adding the bullets to the fenders. This will be somewhat of a challenge because the later fenders do not have an identical shape to the early oval fenders (I believe the earlier fenders may be wider as well).
_________________
Zig, Aircooled Enthusiast
Current: Porsche 914 Resto | 1969 VW Beetle
Past: 74 Thing | Sand Rail | Baja Project | Oval Beetle |
|
| Back to top |
|
|
AggieZig
Samba Member
Joined: March 10, 2013
Posts: 188
Location: Los Angeles, CA
|
| Posted: Wed Jan 13, 2016 7:59 am Post subject: Re: Our 1956 Texas Brew (one piece at a time) |
|
|
First thing's first, a little mock up with some scotch tape:
We probably played with the "would be correct" placement of the bullets on these fenders for a couple of hours. We tried using several references from pictures of fenders with original bullets to other threads for adding bullets that had posted measurements. The bottom line for us was that this was going to be a custom fit no matter what, and we just needed to make it fit & look "right".
So, after deciding on a mounting location, we marked and made the first cuts. No turning back now!
Opted for the jigsaw on these holes:
First test fit, needs a little shaping:
Shaping the hole with flap wheel on a die grinder. The sharp edge of the cut really ate up this flap wheel:
Holding our breath for the first test fit...
I traced a paper template using the headlight ring mount hole as a locator, flipped, and transferred to the other side:
Not perfect, but a hell of a lot better than guessing:
Both sides cut & ready to go!
Drilling holes for spot welds:
Welded to the back of the fender:
We did have to alter the bullet mount on the driver's side by drilling out part of the raised, molded "locking tab" to allow for a little more rotation for a better fit. You can see the two holes at 11 & 5 o'clock:
Looks like a good fit to me!
I must be missing an overall picture with both bullets on, so I will be sure to take one & post at some point. I'm sure these bullets are not in the factory correct location, but these aren't even factory correct fenders. The mission here was simply to add something cool to the car that just happened to also be period correct. We are pleased, and that's all that matters!
Next up... we will tackle the replacement of a beat up roof w/ a donor panel:
Pardon my french...
_________________
Zig, Aircooled Enthusiast
Current: Porsche 914 Resto | 1969 VW Beetle
Past: 74 Thing | Sand Rail | Baja Project | Oval Beetle |
|
| Back to top |
|
|
René R.
Samba Member
Joined: July 06, 2015
Posts: 1711
Location: No. Calif.
|
| Posted: Wed Jan 13, 2016 9:32 am Post subject: Re: Our 1956 Texas Brew (one piece at a time) |
|
|
Very impressive job! I'm enjoying following this build, with so many good photos. Thumbs up.
_________________
Gone but not forgotten: 1950 Hoffman split (restored in 1966) - another 1950 Hoffman split (restored in 1996) |
|
| Back to top |
|
|
AggieZig
Samba Member
Joined: March 10, 2013
Posts: 188
Location: Los Angeles, CA
|
| Posted: Thu Jan 14, 2016 9:01 pm Post subject: Re: Our 1956 Texas Brew (one piece at a time) |
|
|
Well, here starts the nightmare roof repair.
The interior section of the roof where the headliner attaches was boogered up by the PO. So, we're going to try to replace the roof section as one piece (as best we can).
First, we cut out the shoddy repairs:
Then, probably spent two hours debating the best approach for the cut out.
We decided some bracing was probably a smart idea. (Turns out these would have to come off later as the passenger side appears to have been pushed in)
Let the cutting begin!
As we started to cut, we noticed the roof trying to separate:
So, we added some cross-bracing to prevent this. (Looking back, we think the car was just trying to return to its original shape)
After much cutting, the moment of truth:
Video evidence: http://i120.photobucket.com/albums/o198/cameraman123_photos/th_IMG_4569.mp4
Comparing the old with the new:
Surprisingly clean inside for 60 year old metal:
We then began the arduous process of slowly trimming the donor section to match the body. I emphasize arduous because after we made the first cut, and realized it was too short, we triple measured everything after that.
After a solid day of trimming & shaping, the patch fits the hole!
Of course, not without some issues. The original shape of the passenger side of the car has definitely been tweaked at some point. We ended up cutting our bracing free so that we could pull the B Pillar out about 1/2". Even with that help, the original pillar has lost its correct shape.
This will be fun to match up:
We then clamped the repair section in place to test the fit. It seems like each time we connected the two, we found another place that needed some minor trimming or shaping.
After another few hours, we were happy with the fitment:
Not perfect, but not bad either:
Now, for some welding! (Yep, Dad got a new "extra large viewfinder" helmet on sale at Northern)
After some very ugly spot welds
I convinced Dad that we needed to turn up the heat on the welder
Much better:
We managed to spot in the majority of the top side of the seam. The C Pillar took some work as well as it looks as though the original roof had been squeezed thus deforming the curvature on the roof style next just inside the gutter. Dad played around with this, and ended up getting a much improved fit. It will certainly take further work but good enough for this stage.
After cleaning up the grinds with a flap disc, then sanding disc:
I threw a coat of primer on the previously warped roof section above the C Pillar to see how the distortion looked. Honestly, not too bad & very workable:
Thats where weve stopped for now as Ive had to head back up to start classes for the semester. Next time I visit, were going to tackle the remaining roof section (including filler for our initial short cut oops), A Pillar, and B Pillar.
We should have a replacement front passenger quarter section coming from a donor car so after the roof is done, that will be next!
_________________
Zig, Aircooled Enthusiast
Current: Porsche 914 Resto | 1969 VW Beetle
Past: 74 Thing | Sand Rail | Baja Project | Oval Beetle |
|
| Back to top |
|
|
67Cabrio
Samba Member
Joined: March 30, 2014
Posts: 31
Location: Everett, Wa
|
| Posted: Thu Jan 14, 2016 9:36 pm Post subject: Re: Our 1956 Texas Brew (one piece at a time) |
|
|
| Looking good! |
|
| Back to top |
|
|
63ziggy
Samba Member
Joined: June 19, 2005
Posts: 1100
Location: The Woodlands, Texas
|
| Posted: Fri Jan 15, 2016 8:25 am Post subject: Re: Our 1956 Texas Brew (one piece at a time) |
|
|
So time for Dad to hijack the thread
Everyone has the one that started it all and the one that got away.
Here's a pick of our first beetle project (1963) and she is the one that got away.
Early pic, she had been sprayed in what appeared to be black primer. (please ignore early photo quality)
My son in action, this was 9 years ago at the ripe old age of 12 roughly.
Here's a couple pictures of her cleaned up before she was sold. She received new pans, new disk brakes, sheet metal repairs...just needing finish smooth/paint and an engine. We spent 1.5 yrs and then decided we needed a convertible....along came the Thing.
|
|
| Back to top |
|
|
Customalways
Samba Member

Joined: October 19, 2013
Posts: 67
Location: Baltimore, MD
|
| Posted: Fri Jan 15, 2016 9:29 am Post subject: Re: Our 1956 Texas Brew (one piece at a time) |
|
|
Great photos and good details. I have one going as well so I will be bouncing back on here again. My link below if interested.
http://www.thesamba.com/vw/forum/viewtopic.php?t=643759
|
|
| Back to top |
|
|
AggieZig
Samba Member
Joined: March 10, 2013
Posts: 188
Location: Los Angeles, CA
|
| Posted: Mon Mar 28, 2016 3:51 pm Post subject: Re: Our 1956 Texas Brew (one piece at a time) |
|
|
Long time, no post. We've been spending time helping my uncle realize his dream of building a Zenith 750 Cruzer home-built airplane:
Anyways, back to the project. We were able to just about finish welding in the "new" roof section. It's not 100% yet, but almost there. We had to cut open a few places and pull them out / re-weld to try to restore the curvature of the roof.
Some redneck ingenuity:
Up front, where we cut the panel too short & had to make a sliver of a patch:
Cool shot of Dad welding:
We also worked on fixing holes & tears in the fenders:
Before:
Filled because we are going to do single blade bumpers:
After:
More tears like this on each one:
We also started working on the front driver's quarter. The original panel has been mangled and was covered in bondo & lead filler. We opted for a year-correct replacement panel out of a salvage car. Unfortunately, the repair panel wasn't in much better shape - but nothing the planishing hammer couldn't tackle. This was our first time using one, pretty neat tool!
The "new patch panel":
All cut out:
Test fitting the panel:
Here's where we left it for now, with two corners tacked in:
Lastly, worked on coating the inside of the gas tank. Used KBS coatings large cycle tank kit:
Inside, before cleaning:
After cleaning:
After paint / sealer applied:
Next, we will need to finalize the roof repair, finish the front driver's quarter repair, and start on the rear driver's quarter:
More to come!
_________________
Zig, Aircooled Enthusiast
Current: Porsche 914 Resto | 1969 VW Beetle
Past: 74 Thing | Sand Rail | Baja Project | Oval Beetle |
|
| Back to top |
|
|
txoval
Samba Member
Joined: January 23, 2004
Posts: 3552
Location: The Woodlands, TX
|
| Posted: Mon Mar 28, 2016 8:15 pm Post subject: Re: Our 1956 Texas Brew (one piece at a time) |
|
|
| It's good to see another Aggie working on VW's, keep up the good work! |
|
| Back to top |
|
|
JeffL
Samba Member

Joined: September 04, 2004
Posts: 1370
|
|
| Back to top |
|
|
AggieZig
Samba Member
Joined: March 10, 2013
Posts: 188
Location: Los Angeles, CA
|
| Posted: Sun Apr 17, 2016 11:10 pm Post subject: Re: Our 1956 Texas Brew (one piece at a time) |
|
|
Thanks for the kind words. Small update for what was a full day in the garage on Saturday. We were able to get the quarter panel fitted and tacked all the way around. We started to finish up the stitch welding but were running low on gas.
Gaps are a little too big to weld, but a piece of copper and some creative technique will work to fill this gap:
Finished up the rain gutter / inner door jamb:
Also got a new toy from Harbor Freight to pull out some sections. We started playing on a door and learned that sheet metal was way too thin to be playing with:
Then moved to the roof - there was some concave / sinkage along the weld line of the repair, so we started to pull that out:
Then we played with the rear pax quarter panel, this spot of the car is ROUGH. Will need a shrinking disc (next new toy) and some body filler:
Then Dad climbed inside to try to knock out a couple last repairs before the day was done (I think we were both ready to call it quits at this point).
So, one thing we clearly didn't know about... the donor roof was from a same year bug, but a ragtop. They must have the headliner "rail" at a slightly lower position when compared to the sedans:
(notice the drop between the original green & replacement panel)
This will obviously need to be corrected so that the headliner sits correctly... will take some creative thinking. With all of those repairs burnt in now, there's just a couple of things remaining. The car is missing bumper mounts (PO chopped them off) so those will have to be added back. The PO also chopped out the engine compartment and inside of the rear apron to fit the big engine, so we'll have to decide how we want to repair that.
The goal is to get the body work done before the end of May so that it can move out of Mom/Dad's garage into a temporary home at my uncle's place where we can blast & epoxy prime. More to come, so stay tuned.
_________________
Zig, Aircooled Enthusiast
Current: Porsche 914 Resto | 1969 VW Beetle
Past: 74 Thing | Sand Rail | Baja Project | Oval Beetle |
|
| Back to top |
|
|
aa390392
Samba Member
Joined: March 28, 2007
Posts: 3602
Location: So.Cal
|
| Posted: Mon Apr 18, 2016 11:22 am Post subject: Re: Our 1956 Texas Brew (one piece at a time) |
|
|
Its lookig good great job, such tenacity
Thomas
_________________
.
getting grumpy & less tolerant!
55 ragtop
56 delux sedan
56 Kabriolet |
|
| Back to top |
|
|
63Ragtop NZ
Samba Member
Joined: December 04, 2007
Posts: 895
Location: West Auckland
|
| Posted: Mon Apr 18, 2016 9:20 pm Post subject: Re: Our 1956 Texas Brew (one piece at a time) |
|
|
Indeed!
should just graft a ragtop in!!
_________________
If you can't join them, beat them! |
|
| Back to top |
|
|
joel55bug
Samba Member
Joined: January 26, 2005
Posts: 297
Location: Texas
|
| Posted: Tue Apr 19, 2016 8:56 am Post subject: Re: Our 1956 Texas Brew (one piece at a time) |
|
|
| 63Ragtop NZ wrote: |
| should just graft a ragtop in!! |
Kind of what I was thinking. |
|
| Back to top |
|
|
63ziggy
Samba Member
Joined: June 19, 2005
Posts: 1100
Location: The Woodlands, Texas
|
| Posted: Thu Apr 21, 2016 7:07 am Post subject: Re: Our 1956 Texas Brew (one piece at a time) |
|
|
Dad checking in
easy on that ragtop idea
someone creating additional work..........
dear old dad says focus on what needs to be done even though it would be cool
Thanks for the props guys |
|
| Back to top |
|
|
|


