| Author |
Message |
Longboardluv
Samba Member

Joined: September 23, 2014
Posts: 934
Location: Austin TX

|
 Posted: Wed Dec 07, 2016 11:26 am Post subject: Re: "Helga" Matt's 65 bus restoration thread - Austin TX! Posted: Wed Dec 07, 2016 11:26 am Post subject: Re: "Helga" Matt's 65 bus restoration thread - Austin TX! |
 |
|
| khalimadeath wrote: |
| Why did you decide to put in a divider? |
Plan on driving out to Big Bend after Xmas and it's going to help keep the heat up front while driving and in the back while sleeping. Keep in mind it's only 4 screws to put it up. |
|
| Back to top |
|
 |
khalimadeath
Samba Member
Joined: June 24, 2014
Posts: 768
Location: Reno, NV
|
| Posted: Wed Dec 07, 2016 4:26 pm Post subject: Re: "Helga" Matt's 65 bus restoration thread - Austin TX! |
|
|
| Longboardluv wrote: |
| khalimadeath wrote: |
| Why did you decide to put in a divider? |
Plan on driving out to Big Bend after Xmas and it's going to help keep the heat up front while driving and in the back while sleeping. Keep in mind it's only 4 screws to put it up. |
makes sense. Its very difficult to warm my Bay.. pretty much impossible.
_________________
The United States Constitution
(c) 1787. All Rights Reserved
1970 Bus Westfalia
1964 Kombi |
|
| Back to top |
|
|
Longboardluv
Samba Member
Joined: September 23, 2014
Posts: 934
Location: Austin TX
|
| Posted: Thu Dec 08, 2016 7:06 pm Post subject: Re: "Helga" Matt's 65 bus restoration thread - Austin TX! |
|
|
made a lot of progress today on the right side window frame
glueing in the short piece along the vent window, this one needed to be trimmed
then the long one. i pre fit everything before this step, then i went back and glue these in. i marked on the felt and the frame so that i knew exactly where to position them
all the way around
this is the little clip that holds the top of the bar
here the bar with it's rubber seal holding the stationary glass in place before adding the sliding glass
then the sliding glass goes into the outside channel
the lower support rail all assembled. you have to align the little square cut outs in the metal with cut outs in the new felt. I then drilled holes though the flet where the screws go to make it a little easier.
the support rail is held in place with these little screws
there is some adjustment available you really want to make sure you the bar up as high as you can so that the sliding glass can't be lifted from the outside and someone can get in
the new rubber seal on the door with plent of baby powder to help slide it in
both ends will have to be trimmed
these two studs are on the bottom of the suppor rail and you can torque down the whole frame with them to help align the 6 other bolts that hold it on.
almost have them all in, then i'll trim it and move on to the other side! |
|
| Back to top |
|
|
Longboardluv
Samba Member
Joined: September 23, 2014
Posts: 934
Location: Austin TX
|
| Posted: Fri Dec 09, 2016 7:34 pm Post subject: Re: "Helga" Matt's 65 bus restoration thread - Austin TX! |
|
|
felt going in the lower channel of the left side window frame
then the little bar that the latch goes into
i found it made it easier to drill the felt to allow...
the screws to go in
i didn't have two springs so I tried using a bic pen spring which didn't work too well. I might trim it one day or get a repro
all done and it will go in in the morning!
got in seat stand mats from WW
and a grab handle! |
|
| Back to top |
|
|
Longboardluv
Samba Member
Joined: September 23, 2014
Posts: 934
Location: Austin TX
|
| Posted: Sat Dec 10, 2016 8:31 am Post subject: Re: "Helga" Matt's 65 bus restoration thread - Austin TX! |
|
|
heated up the part that tucks under the weather stripping to get it to fold better
without mat
with mat and lower weather stripping. I used glue on all this. Getting it to fold was rough. The weather strip was pretty good at tucking and holding in the mat but I really don't want it coming out so glued it was!
the long piece that goes all the way around the door did tuck in nicely though and no glue needed
this was a great feeling to having the door all done with the panel on there for the last time! now need to get the left side done
heating up the left mat and getting it to bend.
I've got several small holes that eventually I hope to fix the right way but for now I am using metal tape to keep the cold and wet out. I'm going to get underneath and sandwich the tape around the holes |
|
| Back to top |
|
|
BarryL 
Samba Member

Joined: November 01, 2004
Posts: 14255
Location: Casa de Oro, California
|
| Posted: Sat Dec 10, 2016 10:43 am Post subject: Re: "Helga" Matt's 65 bus restoration thread - Austin TX! |
|
|
| Longboardluv wrote: |
heating up the left mat and getting it to bend. |
Great documentation. See that little bead that ends the lip? I've found that if you cut that off the fold and tuck works better. I did it when the repros first came available so maybe that doesn't help nowadays. Your ears are going to pop when you shut your doors now. |
|
| Back to top |
|
|
Longboardluv
Samba Member
Joined: September 23, 2014
Posts: 934
Location: Austin TX
|
| Posted: Sun Dec 11, 2016 12:12 pm Post subject: Re: "Helga" Matt's 65 bus restoration thread - Austin TX! |
|
|
| BarryL wrote: |
Great documentation. See that little bead that ends the lip? I've found that if you cut that off the fold and tuck works better. I did it when the repros first came available so maybe that doesn't help nowadays. Your ears are going to pop when you shut your doors now. |
that actually helped! i only cut it off on the part where it curves down and it helped thanks! |
|
| Back to top |
|
|
Longboardluv
Samba Member
Joined: September 23, 2014
Posts: 934
Location: Austin TX
|
| Posted: Sun Dec 11, 2016 12:13 pm Post subject: Re: "Helga" Matt's 65 bus restoration thread - Austin TX! |
|
|
got the cab dividers painted and the plexiglass installed! Still need to add the mounting brackets
I finally got the heater cables figured out (I think). Stuck the muffler on there and will see if it works the next time out! |
|
| Back to top |
|
|
Longboardluv
Samba Member
Joined: September 23, 2014
Posts: 934
Location: Austin TX
|
| Posted: Tue Dec 13, 2016 6:59 am Post subject: Re: "Helga" Matt's 65 bus restoration thread - Austin TX! |
|
|
took of the 30/31
no carb
got the new 30 pict 1 from www.volkzbitz.com installed but still need to adjust it. It's not idling. |
|
| Back to top |
|
|
Longboardluv
Samba Member
Joined: September 23, 2014
Posts: 934
Location: Austin TX
|
| Posted: Wed Dec 14, 2016 8:14 pm Post subject: Re: "Helga" Matt's 65 bus restoration thread - Austin TX! |
|
|
my new Hankook spare tire came in and got it mounted!
bam! It makes the passenger seat sit up a little higher but it's all good
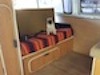
scored a rug that seems to fit with my xmas lights! mood lighting baby!
Also my heater works really good! it's blowing from the right side of the motor only but i'm really happy! |
|
| Back to top |
|
|
d-rick
Samba Member

Joined: May 14, 2006
Posts: 889
Location: Columbia,MO
|
| Posted: Wed Dec 14, 2016 10:35 pm Post subject: Re: "Helga" Matt's 65 bus restoration thread - Austin TX! |
|
|
Just went through this whole thread,love it. Great work man. Your bus is awesome
_________________
1959 mango-trailerbus
1962 single cab *1/2
1966 13 window
1967 panel/camper
1968 cig-panel *1/2
1968 passenger bus *1/2
1969 beetle
1969 dormobile
1978 sage green Westy
1990 DoKa
2002 Golf TDI |
|
| Back to top |
|
|
Longboardluv
Samba Member
Joined: September 23, 2014
Posts: 934
Location: Austin TX
|
| Posted: Fri Dec 16, 2016 7:35 am Post subject: Re: "Helga" Matt's 65 bus restoration thread - Austin TX! |
|
|
Thanks D-rick and everyone else for the encouragement!
got the cab divider installed
tapped some holes in the b pillar
I don't think the gaps are going to be bad enough to loose a lot of heat and if i need to i can put a rubber seal around the edge. Total cost to build my self was about 30 bucks.
magnetic drapes
Still need to sew in the brown pom poms but happy with the results. |
|
| Back to top |
|
|
khalimadeath
Samba Member
Joined: June 24, 2014
Posts: 768
Location: Reno, NV
|
| Posted: Fri Dec 16, 2016 10:48 am Post subject: Re: "Helga" Matt's 65 bus restoration thread - Austin TX! |
|
|
Very cool!
_________________
The United States Constitution
(c) 1787. All Rights Reserved
1970 Bus Westfalia
1964 Kombi |
|
| Back to top |
|
|
easy e
Samba Member

Joined: May 28, 2008
Posts: 3931
Location: 1 hr north of Santa Barbara
|
| Posted: Fri Dec 16, 2016 11:01 am Post subject: Re: "Helga" Matt's 65 bus restoration thread - Austin TX! |
|
|
Lookin' good Matt!
I didn't see you mention/take pics of any door plastic & thought you might want to consider it after reading this...
| Longboardluv wrote: |
| this was a great feeling to having the door all done with the panel on there for the last time! now need to get the left side done |
| Clara wrote: |
I put a vapor barrier under the cab door panels.
The cab doors are designed so water flows through them. The water on the glass drains into the door and out the holes in the bottom of the door. Installing door panels made the floor of my kombi drier. It is parked outside in the rain, so the water actively drips into the bottom of the doors and bounces onto the front floor if there is no door panel. It bounces onto the inside of the door panel if there is one, that's why I want a plastic layer between under the front door panel.
I do not put a vapor barrier anywhere else. The water does not actively drain through the bus anywhere else.
I feel that while ambient moisture can get under the other panels, I want it to be able to get out as well.
http://www.thesamba.com/vw/forum/album_search.php?...t_dir=DESC |
_________________
aka: Evan
Spreadsheet for Bus RPM, based on gearing & tire size (Excel format)
Searchable, click-navigable 1958 Bus Parts List |
|
| Back to top |
|
|
Longboardluv
Samba Member
Joined: September 23, 2014
Posts: 934
Location: Austin TX
|
| Posted: Fri Dec 16, 2016 11:13 am Post subject: Re: "Helga" Matt's 65 bus restoration thread - Austin TX! |
|
|
| easy e wrote: |
Lookin' good Matt!
I didn't see you mention/take pics of any door plastic & thought you might want to consider it after reading this...
| Longboardluv wrote: |
| this was a great feeling to having the door all done with the panel on there for the last p?search_keywords=vap%2A+and+barrier&search_terms=all&search_author=&search_forum%5B%5D=-1&search_time=0&search_fields=all&show_results=posts&sort_by=0&sort_dir=DESC |
|
Thanks Easy E! Yes thank you for your suggestion! I'm kind of in a rush to get stuff done before Big Bend. I'm going with Greg and noticed he put a vapor barrier in his bus so I'll have to talk with him about how he did it. It seems like it something worth doing. |
|
| Back to top |
|
|
easy e
Samba Member
Joined: May 28, 2008
Posts: 3931
Location: 1 hr north of Santa Barbara
|
| Posted: Fri Dec 16, 2016 11:22 am Post subject: Re: "Helga" Matt's 65 bus restoration thread - Austin TX! |
|
|
Cool... have fun in Big Bend!
I used some thick painter's type plastic... and traced a door panel. Then make the plastic a little smaller... so it doesn't show.
This stuff works good for securing the plastic. I think I rolled the strips to be thinner (like spaghetti, don't want it too thick... or will be fighting to push in panel clips)... put it all along the top edge... and then little strips here & there to keep the plastic secured.
3M 08578 Strip-calk
_________________
aka: Evan
Spreadsheet for Bus RPM, based on gearing & tire size (Excel format)
Searchable, click-navigable 1958 Bus Parts List |
|
| Back to top |
|
|
Longboardluv
Samba Member
Joined: September 23, 2014
Posts: 934
Location: Austin TX
|
| Posted: Sat Dec 17, 2016 3:41 pm Post subject: Re: "Helga" Matt's 65 bus restoration thread - Austin TX! |
|
|
with a trip to big bend coming it was time to install the front mud flaps!
also adjust the brakes while she was up
after thinking about it a while i chose to mount the flaps directly to the out rigger. There isn't much room between the tire and the wheel well for a bracket. That meant cutting this channel where the a seam lives.
you can see where that seam is that would prevent the flap from laying flush against it.
These are 2.5 inch bolts. I put the holes just above the thick part of jack point channel, you might be able to tell.
installed with the step. The step holds it in place.
there are where the holes ended up on the left side
and done!
I'm happy! need to replace two hub cap clips on the rear on this side so i can run hub caps. I'll do that when I go to paint the wheels L82 Silver white in January
in preperation for the big trip I changed the oil and adjusted the timing! |
|
| Back to top |
|
|
bus guy
Samba Member
Joined: November 13, 2002
Posts: 785
Location: Southsea, UK South Coast
|
| Posted: Sun Dec 18, 2016 6:20 am Post subject: Re: "Helga" Matt's 65 bus restoration thread - Austin TX! |
|
|
| Awesome bus and thread; just read the whole thing. Took me a few pages to realise I had just seen the bus on Instagram! |
|
| Back to top |
|
|
TexasAirCooler
Samba Member

Joined: October 31, 2005
Posts: 933
Location: Lone Oak, TX
|
| Posted: Sun Dec 18, 2016 6:44 am Post subject: Re: "Helga" Matt's 65 bus restoration thread - Austin TX! |
|
|
| Longboardluv wrote: |
i didn't have two springs so I tried using a bic pen spring which didn't work too well. I might trim it one day or get a repro |
Tractor Supply carries several packaged assortments of springs, might be worth checking out.
Great thread!
_________________
Terry
Common Sense Is A Flower That Doesn't Grow In Everyone's Garden. |
|
| Back to top |
|
|
Longboardluv
Samba Member
Joined: September 23, 2014
Posts: 934
Location: Austin TX
|
| Posted: Sun Dec 18, 2016 4:55 pm Post subject: Re: "Helga" Matt's 65 bus restoration thread - Austin TX! |
|
|
thanks bus guy and i'll check it out TexasAirCooler!
i decided to take another stab at the rear panels after cracking one the first time. I found some ABS plastic ones in the classifieds that looked nice but were a little more than I'd like to pay.
This time I used heat again but also water. By soaking it and heating it was able to bend easier.
You have to position it along the last window and the kind of punch the corner in. That's how I got it in! I was alittle surprised when I got it in and it just stayed. So i quickly screwed it in and called it good
Bam! did the left side too and am calling it good. I'm going to leave them in a while so they can really take the shape better before sanding and staining. |
|
| Back to top |
|
|
|


