| Author |
Message |
Cschenkel
Samba Member
Joined: February 20, 2013
Posts: 114
Location: San Bruno, CA

|
 Posted: Fri Feb 24, 2023 7:36 pm Post subject: Re: "Magnificent Marge"-1968 Squareback Posted: Fri Feb 24, 2023 7:36 pm Post subject: Re: "Magnificent Marge"-1968 Squareback |
 |
|
| jaransonT3 wrote: |
I found the pictures I had posted of mine and uploaded them to my personal server.
I modified a rear engine hanger to mount the filter to. My 66 is a swingaxle car with teh frame horns so it doesn't require the rear engine hanger for mounting the engine. Of course the motor is built on a late case with the mounting holes for the hanger bar.
I like this set-up because the filter comes out with the engine when you remove it. I originally had the filter mounted to the rear bumper mount area like some of the others, but then I had to unbolt it and deal with the filter flopping around on the end of the flexible lines every time I pulled the engine.
It has been very robust. I have over 60k miles on this set-up. |
Bobnotch I think this is the one you're referring to yes?
I like it but would hate to cut up a perfectly good hanger just to mount an oil filter off of. Maybe I can make something that uses the mounting holes to keep it off the exhaust studs.
I took some measurements today and would need about a 10-12" long by 3" wide piece to be able to machine something out of aluminum for the exhaust mounted version. I would need something almost twice that in both dim's to make a similar mount to the above photos. |
|
| Back to top |
|
 |
Bobnotch
Samba Member

Joined: July 06, 2003
Posts: 22413
Location: Kimball, Mi
|
| Posted: Sat Feb 25, 2023 11:07 am Post subject: Re: "Magnificent Marge"-1968 Squareback |
|
|
Yup, that's it. You might want to put an add in the classifieds for a broken one. I think someone on here had that happen to them.
_________________
Bob 65 Notch S with Sunroof
71 Notch ...aka Krunchy; build pics here;
http://www.thesamba.com/vw/forum/viewtopic.php?t=249390 -been busy working
64 T-34 Ghia...aka Wolfie, under construction... http://www.thesamba.com/vw/forum/viewtopic.php?t=412120
| Tram wrote: |
| "Friends are God's way of apologizing for relatives." |
| Tram wrote: |
| People keep confusing "restored" and "restroyed". |
|
|
| Back to top |
|
|
Cschenkel
Samba Member
Joined: February 20, 2013
Posts: 114
Location: San Bruno, CA
|
| Posted: Sun Feb 26, 2023 1:02 am Post subject: Re: "Magnificent Marge"-1968 Squareback |
|
|
Today was eventful on the engine and some "house keeping" on the rest of the car
Reinstalled the oil pump and got the an fitting adapters installed and in the right orientation. I Then ground the bottom left stud to clear the fan housing, after that I made the fan housing clear the lower an fitting. With the fan housing seated full against the block I made sure the an fitting nut could spin as well as be able to slide some paper in there. Fingers crossed it doesn't rub the fan  waiting on the oil filter mount to get the lines sorted waiting on the oil filter mount to get the lines sorted
My plan for the oil filter is to still mount it off the studs for #4 exhaust port. I spent the evening last night designing one that is almost identical to the cb/fastfab/you name it but 11" long so it clears all the engine tin and is in more open air. it's almost in the same spot as it would be with the half engine hanger style, I'm thinking this should be in a cool enough space and being out of aluminum not transfer heat as well... I am also thinking with these style mounts that there is hot oil going through the filter as it is pre cooled so its going to be hot-ish none the less. previous posters have noted no significant change in oil temps with similar albeit smaller/closer to the exhaust mounts
Now to just make it for real, heading to the shops come monday to find material
Onto the housekeeping, I noticed the passenger axle boot is starting to crack and seep on the end as well as a ton of grime and I'm guessing por-15/undercoating/oil all over the trans and frame horns so I got to cleaning things up in preparation for the axle boot swap on both sides and boy did I get dirty. Upon closer inspection the trans looks to be painted black at some point, possibly rebuilt at some stage in its life.
I tried to replace the rear/bell housing trans mounts today but couldn't get them out or to budge really. I didn't remove the 2 big bolts for the frame horns though. nothing big enough in my small arsenal of tools
Also removed the old engine compartment seal in preparation for a new one, installed the engine tin except for a couple small pieces I'm still waiting for from the powder guy, installed the heater channels after cleaning them up a bit, no major rust or holes in them so I'm sending it with them as is. Trimil/ispwest over the top is painted and ready to go on once the oil filter/fanshroud/etc is on and sorted |
|
| Back to top |
|
|
Cschenkel
Samba Member
Joined: February 20, 2013
Posts: 114
Location: San Bruno, CA
|
| Posted: Sun Mar 05, 2023 12:05 am Post subject: Re: "Magnificent Marge"-1968 Squareback |
|
|
This week I figured out that my design for the oil filter mount ended up not working as planned. Not only were my measurements for the exhaust studs a bit off  but the upper exhaust stud for #4 wouldn't budge so I scrapped that idea entirely and ordered up an engine hanger from ISPWest. Reasonable price and fast shipping as always. I hate to hack up a good mount but the one I got seems to have a peculiar bend to it and so I don't feel that bad. these also seem to be pretty readily available still. but the upper exhaust stud for #4 wouldn't budge so I scrapped that idea entirely and ordered up an engine hanger from ISPWest. Reasonable price and fast shipping as always. I hate to hack up a good mount but the one I got seems to have a peculiar bend to it and so I don't feel that bad. these also seem to be pretty readily available still.
The revolution pump controller came in and I was able to get the wiring sorted on that. The only key on fuse on the fuse box was #8 for the wiper motors. need to source a piggy back spade connector and that should be finalized. While scrounging around under the dash and in wiring diagrams I was able to locate the fuel pump relay wire that gets grounded by the FI brain to use as my "tach signal wire" for the fuel pump. The pump controller it self sits where the og fuel pump relay goes and all connectors used make it easy to go back to stock if I ever desire to.
While under the front end I found some shotty wiring fix by the PO (I believe)
A simple butt connector and it's fixed. I also noticed some excessive play in passenger tie rod ends both inner and outer while under there. Parts ordered ISPwest to the rescue again.
Rear transaxle mounts are now replaced. Boy was that a job and a half without the weight of the motor on the suspension. The old ones were so smushed and cracked. nose cone mount looks to be in good shape. probably gained about 3/8" back
Doing this I ended up getting a 2x4 flat under the middle of the trans with the nose cone mount loosened to allow for movement.
Today started out with a bunch of rain and hail all with in about 45 mins to an hour
Then ended with a great sunset over san bruno mountain 
|
|
| Back to top |
|
|
Cschenkel
Samba Member
Joined: February 20, 2013
Posts: 114
Location: San Bruno, CA
|
| Posted: Sun Mar 12, 2023 11:14 pm Post subject: Re: "Magnificent Marge"-1968 Squareback |
|
|
Howdy Y'all!
Another update, its been slow going waiting for this and that but making some progress nonetheless.
I realized I never shared any interior photos of the car so heres a couple to gander at
The carpets are falling down a bit, some are discolored but it is all there. I think a weekend of some work could definitely do it some good. The drivers seat is starting to tear on the seat bottom. so I'll be looking into fixing or replacing the worn out bits. I've gotten pretty decent with a sewing machine over the past year so I might be able to patch the seat up I'm thinking
This weekend the stars aligned and I was able to finish my shifter extension, I've always felt I was reaching a bit too far with just the skateboard wheel shift knob so I turned up this little gem to get the knob right here I wanted it.
I also received my engine hanger bar and turned it into my oil filter mount as well as getting a small adapter plate made to try a couple option for location at the end of the bar. This allowed me to get the motor about 90% complete minus the clutch and the fresh air tubes to heater box, I ordered the wrong size scat hose at first so waiting on that to come in to button the motor up.
I was also able to get the fuel tank out and install the new tie rod ends and steering donut, I found some surface rust under the tank that I didn't love so I also touched that up. Eventually I'd love to get really deep into this car and take care of all the under carriage surfaces but for now its got to get back on the road and out of my mums driveway no pictures of this yet |
|
| Back to top |
|
|
Cschenkel
Samba Member
Joined: February 20, 2013
Posts: 114
Location: San Bruno, CA
|
| Posted: Wed Mar 29, 2023 12:09 pm Post subject: Re: "Magnificent Marge"-1968 Squareback |
|
|
Got another update on marge here.
After getting the engine back in the car. I found the air cleaners would not fit at all. They were maybe ~1" or so off. This led me to search for the cause. I looked at lowering the trans carrier, the stock one doesn't allow for enough to get it down that far. So I searched around and asked a few questions. I found that the subframe bushings could be part of the cause I'm experiencing.
I replaced those, which ended up not looking too terrible. definitely worn but not flat by any means. the air cleaners ended up too tight still, it was getting better but no where near fitting the top covers on. So far I'd say I gained a 1/4" to 1/2" of clearance.
I got to talking with Pops, we had always suspected the car to have been hit from the rear but thought it was just a minor back up into a car in a parking lot type thing. But upon further inspection we found some hodge-podge repairs and the rear apron to have some bondo on it.
SOo... Here's some photos to show y'all what's going on
Trunk/luggage area as the car came, there was some rubber matting left but it was all super dry and brittle. I removed it a while back. I'd like to note this car's rubber matting all appears to be brown on top and black on bottom. Was this an option for 68?
onto the damage I found
drivers side;
wheel well
engine compartment
Passenger side;
wheel well
engine compartment
small evidence of bondo, there is more not shown
from the outside
Pops and I got a game plan together. Popped the motor out. wow so much easier not having to unhook the ecu
We set up two 4 ton hydraulic porta powers. we set them up connecting the subframe bolts to the bumper bracket bolt heads. this allowed us to push the whole rear apron and luggage floor up and back in one go. Pops used to be a body man back in his younger years so he got to working his magic on the luggage tray area.
Along with the luggage area that was all beat up so was the engine compartment lid. After a couple hours worth of smacking and pushing and looking and repeating. We found a good stopping point right as the sun was going down.
here's how it sits now
|
|
| Back to top |
|
|
GjMan
Samba Member
Joined: June 05, 2004
Posts: 822
Location: Grand Junction, CO
|
| Posted: Wed Mar 29, 2023 1:05 pm Post subject: Re: "Magnificent Marge"-1968 Squareback |
|
|
| Good work. Love the pics. |
|
| Back to top |
|
|
Bobnotch
Samba Member
Joined: July 06, 2003
Posts: 22413
Location: Kimball, Mi
|
| Posted: Thu Mar 30, 2023 11:32 am Post subject: Re: "Magnificent Marge"-1968 Squareback |
|
|
Looks damn good. I think the dent? up front was a towing hook indent from a tow truck. At least that's what it looks like to me.
The bondo spot looks like seam sealer on the inside, and bondo covering rust from the outside, as that's where 2 pieces of metal are spot welded.
_________________
Bob 65 Notch S with Sunroof
71 Notch ...aka Krunchy; build pics here;
http://www.thesamba.com/vw/forum/viewtopic.php?t=249390 -been busy working
64 T-34 Ghia...aka Wolfie, under construction... http://www.thesamba.com/vw/forum/viewtopic.php?t=412120
| Tram wrote: |
| "Friends are God's way of apologizing for relatives." |
| Tram wrote: |
| People keep confusing "restored" and "restroyed". |
|
|
| Back to top |
|
|
Cschenkel
Samba Member
Joined: February 20, 2013
Posts: 114
Location: San Bruno, CA
|
| Posted: Thu Mar 30, 2023 1:38 pm Post subject: Re: "Magnificent Marge"-1968 Squareback |
|
|
I think a hitch might be right thinking about it now. there looks to be a dent that was bondo'd over above the bumper on the drivers side, I can see the evidence with the motor out and looking into the air ducting on that side. The bumper also has a dent in it that looks like it was straightened some, possibly re-chromed as there are two nuts welded(one on each end).
Sunday the motors coming out again and we're going to see if we can straighten things out a bit more. I don't love the way the rear end is sitting at the moment but its really close to being good enough. air cleaners fit but the tops don't 
I've been looking around for some measurements of the luggage area, bumper brackets, anything really to help cross-reference to see where things should be. I found a basic luggage area measurements but its not a precise as I'd like |
|
| Back to top |
|
|
Cschenkel
Samba Member
Joined: February 20, 2013
Posts: 114
Location: San Bruno, CA
|
| Posted: Wed Apr 19, 2023 10:30 pm Post subject: Re: "Magnificent Marge"-1968 Squareback |
|
|
Well that Sunday was over a week ago now and I've got some updates.
The air cleaners are fitting!!!! We decided not to push/pull the car anymore but make a set of slim spacers for the subframe. mainly due to cost. these are about $10. They are wall plate washers from home depot measured at roughly 60mm in diameter after spinning em down in my mini lathe.
the shots you've all been waiting for, or at least I have haha
The 1-2 side is just barely tighter than the 3-4 side. leading me to believe the work I did on the trans carrier is not identical left to right but it very close.
Check out the huge stack of spacers for the rear carrier that are needed now.
After getting everything all dialed in and fitting it was time for start up! My friend came over and helped me get it running again. It didn't really take much other than correcting the plug wires on the dizzy
No oil leaks no fuel leaks. but the exhaust was leaking baaaaaad at the heater boxes. As a get me by for now and pops not too keen on welding to get the pitting taken care of on the exhaust, I turned to some aluminum tape. this is the heavy duty thick type. I've used it previously to patch up minor exhaust leaks before but never quite like this.
the pitting:
to start I place small pieces of the tape in the deepest pits and sanded the high spots. and repeated and repeated and repeated. Once I was satisfied with the pits being filled in I started layering full wraps of the tape over lapping about a 1/4" and then sanding in between layers with emery cloth to knock any high spots down and find any lows. I did this until the exhaust gasket juuust slid on.
some shots during the layering upon layering:
I neglected to take a photo of the end result until the heater boxes were back in the car whoops:
This fix did pretty well. it sealed about 99% of the leak I think the exhaust gasket clamps are giving me a bit of trouble and not sitting just right. I'm seeing it leak on the outside side of each heater box. Next time I'm up working on the car I'm going to attempt to get these stopped up 100%. I also need to still get the timing and carbs dialed in. I used the Cb performance bench test settings minus the mixture screw setting as 3 turns out is just wildly rich I opted for a base setting of 1.5 turns out and the idle speed set at .040 with a feeler gauger at the butterfly.
I'll leave this update with a final shot of the engine all put together. note the return spring I added as the carbs/linkage was just a bit slow on closing.
Ps don't powder coat your generator strap unless you don't want it to ground ask me how I know |
|
| Back to top |
|
|
Cschenkel
Samba Member
Joined: February 20, 2013
Posts: 114
Location: San Bruno, CA
|
| Posted: Mon May 01, 2023 9:28 am Post subject: Re: "Magnificent Marge"-1968 Squareback |
|
|
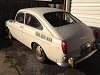
This week I got her tuned up enough to make a run over to the coast for Half Moon Bay airports Dream Machine show. Still getting a slight pop right off idle and the engine bogs just a bit. Im thinking its somewhere in the timing. The distributor I have in the car now has an odd vac can on it that points the vacuum line off into the generator Anyways I have a spare that Im going to try soon and see how it goes.
For now enjoy Marge at the show
I ended up taking 3 friends with me and we had a blast |
|
| Back to top |
|
|
squaretobehip
Samba Member

Joined: August 23, 2004
Posts: 3686
Location: San Jose, CA
|
| Posted: Mon May 01, 2023 9:42 am Post subject: Re: "Magnificent Marge"-1968 Squareback |
|
|
| Cschenkel wrote: |
I ended up taking 3 friends with me and we had a blast |
This is what matters most. Nice updates!
_________________
1963 Notchback - Ruby Red
1963 Squareback - Pearl White
1965 Squareback - Baltic Blue
Follow ISP West on:
Facebook - www.facebook.com/ispwest
Instagram - @ispwest - www.instagram.com/ispwest |
|
| Back to top |
|
|
Bobnotch
Samba Member
Joined: July 06, 2003
Posts: 22413
Location: Kimball, Mi
|
| Posted: Mon May 01, 2023 10:21 am Post subject: Re: "Magnificent Marge"-1968 Squareback |
|
|
Absolutely. That's the best time to be had of all. I agree on the updates as well. You're probably right about a timing issue. I've run into that before. 
_________________
Bob 65 Notch S with Sunroof
71 Notch ...aka Krunchy; build pics here;
http://www.thesamba.com/vw/forum/viewtopic.php?t=249390 -been busy working
64 T-34 Ghia...aka Wolfie, under construction... http://www.thesamba.com/vw/forum/viewtopic.php?t=412120
| Tram wrote: |
| "Friends are God's way of apologizing for relatives." |
| Tram wrote: |
| People keep confusing "restored" and "restroyed". |
|
|
| Back to top |
|
|
Cschenkel
Samba Member
Joined: February 20, 2013
Posts: 114
Location: San Bruno, CA
|
| Posted: Mon Dec 11, 2023 4:43 pm Post subject: Re: "Magnificent Marge"-1968 Squareback |
|
|
Gosh its been a while since I've updated anything on the square....
To start I was previously using the OG FI dizzy in the car and thought that the vacuum advance wasn't being activated at all or enough, so I purchased a rebuilt 009 dizzy to use in the mean time till I decide to pull the trigger on going crank trigger. My Aluminum tape fix on the heater boxes only lasted about maaaaybe 100mi if I'm being generous. I ordered up a different set of heater boxes that looked better than mine, those were also worn out unfortunately. sooo I got some J-tubes to hold me over till I can fix those up properly and get heat back in the car. I found the exhaust system had been... settling... so I tightened that all up.
Next I purchased an ISP oil gauge and got that installed, quickly found out that the oil was definitely getting a bit hot for my liking. This led me down the good ol rabbit hole of carb tuning... with the 009 on the car now I didn't have any vacuum to worry about I could also get a better grasp of what was going on.
1. it uses a bit more fuel than I like
2. I was getting some starvation/leaning/popping happening, mainly on the Idle circuit
3. I really don't love the linkage set up.
4. 40 IDF's in a type 3, VERY VERY tight clearance
5. its still very fun learning new old technology.
With some testing and tweaking and frustrations I found the carbs were a bit on the lean side for the mains causing the lean popping. the Idle circuits were pretty rich. Lastly I twisted one of the carb throttle shafts while dealing with trying to get them to return with out stopping half way open. partly the linkage catching partly the springs getting caught in between the throttle linkage plates on the carbs.
Ended up going with
Main 120 - stock was 115
Idle 55 - stock was 60
With driving it around recently and getting a feel for it. I think I may need to go up to 57.5 on the idle or adjust the float bowl from 14mm closer to 12/11mm. I'm still getting some more mild popping right off the first 1/8-1/4 throttle and while its cold. I also need to up the idle a bit. Kind of got to a point where close enough was good enough. life's been very busy over the past few months
Hauling the OG engine down from my mums
Installed some new Isp west hinge covers
purchased my self a yakima roof rack to haul some bikes around, I know I know its no Pedros rack
Some job situations over the past months have sparked my need and want to be a bit more self sufficient and I started my own side business doing mobile bike repair
I got some Maguire's paste wax and some Grotts (Gotts?) detail spray and went to town getting it all spruced up
And then lastly but not leastly. I got Married! and Marge was the get away car.
|
|
| Back to top |
|
|
Cschenkel
Samba Member
Joined: February 20, 2013
Posts: 114
Location: San Bruno, CA
|
| Posted: Mon Dec 11, 2023 4:57 pm Post subject: Re: "Magnificent Marge"-1968 Squareback |
|
|
some more wedding shots
|
|
| Back to top |
|
|
Bobnotch
Samba Member
Joined: July 06, 2003
Posts: 22413
Location: Kimball, Mi
|
| Posted: Tue Dec 12, 2023 12:50 pm Post subject: Re: "Magnificent Marge"-1968 Squareback |
|
|
Congrats on both the car and the wedding. My son used his Roadster at his wedding for the outdoor wedding shots. The car looks good, and is doing what you need it to do (hauling stuff).
_________________
Bob 65 Notch S with Sunroof
71 Notch ...aka Krunchy; build pics here;
http://www.thesamba.com/vw/forum/viewtopic.php?t=249390 -been busy working
64 T-34 Ghia...aka Wolfie, under construction... http://www.thesamba.com/vw/forum/viewtopic.php?t=412120
| Tram wrote: |
| "Friends are God's way of apologizing for relatives." |
| Tram wrote: |
| People keep confusing "restored" and "restroyed". |
|
|
| Back to top |
|
|
Cschenkel
Samba Member
Joined: February 20, 2013
Posts: 114
Location: San Bruno, CA
|
| Posted: Wed Dec 13, 2023 6:13 pm Post subject: Re: "Magnificent Marge"-1968 Squareback |
|
|
| Thanks Bob! |
|
| Back to top |
|
|
Scotty D
Samba Member
Joined: February 08, 2020
Posts: 129
Location: Claremont CA
|
| Posted: Thu Dec 14, 2023 4:21 am Post subject: Re: "Magnificent Marge"-1968 Squareback |
|
|
Wow, great post! Just read through this and I gotta say great job and congratulations!
I also work on bikes, but mostly older/vintage BMX from the 70s and 80s. I got all excited seeing that truing stand in your cargo space. 😂 |
|
| Back to top |
|
|
Tram
Samba Socialist

Joined: May 02, 2003
Posts: 22711
Location: Still Feelin' the Bern- Once you've felt it you can't un- feel it.
|
| Posted: Thu Dec 14, 2023 3:04 pm Post subject: Re: "Magnificent Marge"-1968 Squareback |
|
|
Beautiful car, beautifuler wife
Here's to a beautiful life!
_________________
Немає виправдання для війни! Я з Україною.
| Bryan67 wrote: |
| Just my hands. And a little lube. No tools. |
To best contact me, please use the EMAIL function in my profile |
|
| Back to top |
|
|
|


