| Author |
Message |
Buggeee
Samba Member

Joined: December 22, 2016
Posts: 4416
Location: Stuck in Ohio

|
|
| Back to top |
|
 |
kimkinzie
Samba Member
Joined: December 12, 2021
Posts: 145
Location: Maui, HI
|
 Posted: Tue Dec 06, 2022 11:35 am Post subject: Re: 1969 Karmann Ghia restomod Posted: Tue Dec 06, 2022 11:35 am Post subject: Re: 1969 Karmann Ghia restomod |
 |
|
thanks so much, @Buggeee
Beyond the driving experience, the gentle slope of a volcano is a photographer's dream. Add to this the quasi-round nature of an island, and you can find absolutely perfect lighting conditions at different times of the day, with unobstructed rays able to highlight any landscape and bring out subtle details in the Karmann Ghia's sculpted chassis. After countless months of greasy engine and underbody shots, it's nice to be able to treat the car more like a model to place in a scenic backdrop.
Yup, just another excuse to cruise ...
_________________
'69 Ghia |
|
| Back to top |
|
|
kimkinzie
Samba Member
Joined: December 12, 2021
Posts: 145
Location: Maui, HI
|
| Posted: Thu Dec 08, 2022 4:32 pm Post subject: Re: 1969 Karmann Ghia restomod |
|
|
Shifter Reverse Lockout fix
I got impatient waiting for the EMPI shifter replacement, so I pulled the broken part to take a closer examination. Two 13mm bolts were holding the shift plate down, and unscrewing the ball above the trigger mechanism revealed the issue: the wire attached to the inside upper part of trigger was no longer anchored and had broken where normally one would find a tiny J-hook bend. This is what the setup normally looks like and was the first attempt at a fix:
A 1mm steel wire feeds through the hollow shift rod and remains under tension - as it pokes out the bottom near the ball in a small channel. Ideally, this would require a 19 gauge wire to fit properly, but I was able to find some 20 gauge steel wire at the local hardware store. The .88mm sizing is OK, enough to fit through the passages, but not nearly as robust as the OEM wire it replaced. Right next to it is a groove in the washer that is used to lock the wire into place by bending it over and ensuring that all slack is taken up at the reverse lockout trigger. Below you can see that it is helpful to use a pair of needle nose pliers into the spring plate to make insertion of the replacement wire easier.
The new setup was immediately tested by screwing back the repaired mechanism and checking how easily reverse worked. Too easily. The tiny J-bend was not enough to hold the tension and unravelled. The fix was to use the pliable nature of the wire to tie a knot in the end. This held properly. The other subtle adjustment that turned out to be key was to ensure that unlike the setup shown immediately above, is to keep the needle nose pliers inserted with the internal spring under tension, leaving about a 3-4mm gap of "free play" before locking the wire into place This made for a great improvement in shift quality smoothness - rowing through the gears is now quite pleasant with zero binding.
_________________
'69 Ghia |
|
| Back to top |
|
|
kimkinzie
Samba Member
Joined: December 12, 2021
Posts: 145
Location: Maui, HI
|
| Posted: Sat Dec 10, 2022 6:09 pm Post subject: Re: 1969 Karmann Ghia restomod |
|
|
After a couple days of driving with the rebuilt shifter, the clutch mechanism started to fade once again, making it difficult to fully dis-engage the engine. I pulled the pedal assembly and found the culprit: a worn shifter cable connection. This seems to be a common failure point, and the replacement part can either employ the OEM hook mechanism, or one which bolts in place with a sleeve collar to prevent chafing in the future.
While in the same area, I noticed that the accelerator cable was frayed and down to the last two strands holding it into the latching mechanism. Will add this to the parts list on order, but it looks like the Ghia is off the street for a couple of weeks ...
_________________
'69 Ghia |
|
| Back to top |
|
|
kingkarmann
Samba Member

Joined: November 05, 2003
Posts: 4111
|
| Posted: Sun Dec 11, 2022 6:41 am Post subject: Re: 1969 Karmann Ghia restomod |
|
|
I broke the clutch cable on my coupe a couple of years ago.
Upon removing the cluster I found the clutch shaft hook nearly worn through as yours.
I found these guys, Classic Bug Parts.
They had a great solution for the clutch hook.
I ended up buying the accelerator pedal upgrade too.
If youre interested heres their link.
https://www.classicbugparts.com/
_________________
"Depression is a malfunction of the instrument we use to determine reality.
Mike Gerson
What is your "Bespoke Reality"? |
|
| Back to top |
|
|
kimkinzie
Samba Member
Joined: December 12, 2021
Posts: 145
Location: Maui, HI
|
| Posted: Sun Dec 11, 2022 9:10 am Post subject: Re: 1969 Karmann Ghia restomod |
|
|
thanks so much for the link, @kingkarmann. This is *exactly* what I was looking for - the improvement over the OEM design is clearly visible. The other nice feature is the option to extend the rod length a bit, in order to provide folks with "big feet" a bit more room in the pedal cluster by moving the clutch pedal further left, away from the brake pedal.
_________________
'69 Ghia |
|
| Back to top |
|
|
kimkinzie
Samba Member
Joined: December 12, 2021
Posts: 145
Location: Maui, HI
|
| Posted: Sun Dec 11, 2022 10:40 am Post subject: Re: 1969 Karmann Ghia restomod |
|
|
Carburetor checkup
Since the Ghia is grounded for a bit, I decided to re-measure the carburetor fuel levels in the bowl for operational consistency. Everything was fine until I saw the gasket fit - it was horrid. Gasoline soaking of the paper membrane extended all the way to the outer flanges. I purchased some gasket material and made some new ones with smaller bore. Then it hit me - the dual intake manifolds are for a Weber 48 carburetor, which also explains the ripped membranes found during the rebuild in August. The extra volume on the intake runners and mismatched sealing area are not very efficient at maintaining a consistent pressure gradient. A set of KIPA 44mm from Amazon added to the Christmas shopping list ...
_________________
'69 Ghia |
|
| Back to top |
|
|
kimkinzie
Samba Member
Joined: December 12, 2021
Posts: 145
Location: Maui, HI
|
| Posted: Sun Dec 11, 2022 11:25 am Post subject: Re: 1969 Karmann Ghia restomod |
|
|
| Buggeee wrote: |
Wish I had mountain  . Gorgeous pictures. . Gorgeous pictures. |
Wish I had a Puma GTS  and your mad manufacturing skills (brilliant threads) and your mad manufacturing skills (brilliant threads)
~ cheers ~
_________________
'69 Ghia |
|
| Back to top |
|
|
kimkinzie
Samba Member
Joined: December 12, 2021
Posts: 145
Location: Maui, HI
|
| Posted: Sun Dec 11, 2022 3:06 pm Post subject: Re: 1969 Karmann Ghia restomod |
|
|
The hit parade continues
Scrubbing the pedal assembly yielded another failure point: the clutch pedal was shearing at the base where it connects with the linkage rod. To a certain degree, I am relieved since this explains the poor pedal action after taking out 1.5" of end play. Presumably that tightened up the cable, but set up another metal part for failure (the pedal). At this juncture, I believe I can avoid having to drop the engine to inspect the clutch throw out bearing. More items for the Ghia under the Christmas tree ...
_________________
'69 Ghia |
|
| Back to top |
|
|
kimkinzie
Samba Member
Joined: December 12, 2021
Posts: 145
Location: Maui, HI
|
| Posted: Mon Mar 20, 2023 9:40 pm Post subject: Re: 1969 Karmann Ghia restomod |
|
|
Clutch Petal Assembly
All the parts for the petal assembly came in and went together without much fuss. The clutch 'hook' replacement from https://www.classicbugparts.com/ worked like a charm, provided very smooth movement, and was very easy to adjust to 1" of clutch play before engagement point. The accelerator cable went in easily and was a timely replacement having frayed to a final strand of wire. Very satisfying fixes.
Intake Runners
The opening on the old intakes was verified to be almost 4mm too large - meant originally for a 48mm bore.
The other head scratcher I encountered was the gasket on cylinder #2 - it was completely deformed and reduced the intake volume by almost 15%. Never mind the turbulence to get around the blockage ...
After coming up to temperature, I noticed that the fuel in the bowls were being cooked (evaporated petrol) when the engine was shut off. To forestall the heat soak, I ordered up a set of 1/4" 'phenolic insulating' spacers to manage the exhaust ports as the engine cools. I left the old paper gaskets in place to monitor the fitting, but assume they can probably be removed in the future.
After the new KIPA 44mm intake runners and fresh metal gaskets were installed, it took some fine tuning to get the linkage geometry squared away. The idle jets were dropped in size from 60 to 55, and fresh rubber gaskets fitted. Cylinder #4 came to life - it seems there was a kink in the rubber gasket as the idle jet was screwed in, resulting in a oversaturated non-firing cylinder. This was verified by testing the temperature on the intake - it was previously running much cooler than all the other cylinders. Once everything was tuned, I noticed the oil temperature jumped from 180 up to 200 degrees ... this might be the time to justify an upgraded 1 5/8" exhaust, as @Rome has suggested many times in the past.
_________________
'69 Ghia |
|
| Back to top |
|
|
jeffrey8164 
Samba Member
Joined: January 06, 2018
Posts: 3817
Location: Georgia
|
| Posted: Wed Mar 22, 2023 1:45 pm Post subject: Re: 1969 Karmann Ghia restomod |
|
|
Where did you get the spacers from?
The kind Im using are too squishy.
No matter what I try, the carb base nuts and/or studs become loose.
_________________
Volkswagen!
Turning owners into mechanics since 1938.
Let he that is without oil throw the first rod
(Compression 8.7:1) |
|
| Back to top |
|
|
kimkinzie
Samba Member
Joined: December 12, 2021
Posts: 145
Location: Maui, HI
|
| Posted: Wed Mar 22, 2023 3:14 pm Post subject: Re: 1969 Karmann Ghia restomod |
|
|
@jeffrey8164, I know exactly what you mean about questioning the rigidity of the spacers and the seal against the metal mating surfaces.
The current versions were purchased on EBAY from user "ecdezz". You can also try search for "phenolic insulating spacer" along with your carburetor type for further qualification. The material is very solid, and fit is tight - I am monitoring for any leakage at the seams but everything is OK so far ...
_________________
'69 Ghia |
|
| Back to top |
|
|
kimkinzie
Samba Member
Joined: December 12, 2021
Posts: 145
Location: Maui, HI
|
| Posted: Wed Mar 22, 2023 9:10 pm Post subject: Re: 1969 Karmann Ghia restomod |
|
|
Speedometer Refresh
When I originally purchased the Ghia, most of the chrome bezels around the instrument panel were pitted, the glass would often fog up on cold mornings, and just look a bit dingy with scratches on the inside surface.
Over time, I've monitored EBAY and managed to pick up a speedometer for cheap, since it was originally designated as "broken, for parts only". I pulled the nice chrome bezels (gently prying with a taped-off flathead screwdriver), and cleaned up the glass on the inside with a microfiber towel. Made sure to line up the tick marks on the outside with the numbers, then bent the bezel back into shape.
I also pulled out the worn-out, faded warning indicator plastic and turn signal indicators from the housing by twisting the corner tabs holding the dial face in place a bit and lifting the instrument panel to get at the metal cavity beneath. These were also transferred over to the rebuilt speedometer.
_________________
'69 Ghia
Last edited by kimkinzie on Tue Mar 28, 2023 12:04 pm; edited 1 time in total |
|
| Back to top |
|
|
kimkinzie
Samba Member
Joined: December 12, 2021
Posts: 145
Location: Maui, HI
|
| Posted: Mon Mar 27, 2023 7:36 pm Post subject: Re: 1969 Karmann Ghia restomod |
|
|
Front Turn Signals
Perhaps for aerodynamics or aesthetic reasons, the front turn signal indicators were replaced by LED blinkers buried beneath the front intake vents. It may look slick, but it severely limits visibility for traffic approaching at a 90 degree angle (any intersection - especially when turning left), and most likely caused changes to the wraparound lighting configuration for safety reasons in the 1970 model year.
I actually really like the 'beehive' OEM 1969 Karmann Ghia signals - they are a classic 1950-60's marquee. Over time, I've collected the metal housing, rubber gaskets, orange and white Hella plastic covers, along with hardware from EBAY. Looking inside the fenders, it seems that the spot welds weren't treated with a paint protector when the mounting points were sealed. This actually works to my advantage, so I can grind the metal down a bit before drilling out the mounting holes.
_________________
'69 Ghia
Last edited by kimkinzie on Tue Mar 28, 2023 12:06 pm; edited 3 times in total |
|
| Back to top |
|
|
kingkarmann
Samba Member
Joined: November 05, 2003
Posts: 4111
|
| Posted: Tue Mar 28, 2023 3:30 am Post subject: Re: 1969 Karmann Ghia restomod |
|
|
You're really doing this right.
I'm enjoying seeing the progress
_________________
"Depression is a malfunction of the instrument we use to determine reality.
Mike Gerson
What is your "Bespoke Reality"? |
|
| Back to top |
|
|
kimkinzie
Samba Member
Joined: December 12, 2021
Posts: 145
Location: Maui, HI
|
| Posted: Thu Mar 30, 2023 11:16 am Post subject: Re: 1969 Karmann Ghia restomod |
|
|
Carburetor Tuning Results
Since August of last year, considerable time has been spent on the dual Weber 44 carburetors. Fuel delivery is directly responsible for miles per gallon (MPG) efficiency for any given engine configuration. Once the fuel hose splits past the pump, every effort was focused keeping the carburetors perfectly balanced in order to avoid stumbles, hesitations, and performance degradations. I highlighted in the the last 3 fuel-ups with economy jumping up to 27 MPG. This is a direct result of the work on the 44mm intake runners and resized idle jets. encouraging ...
For the first time in months, took the car out for a series of dyno runs with consistent results. As expected, there is no net gain in maximum torque or horse power but the curve has shifted upwards in the lower RPM range - usable power for everyday driving.
Engine Oil
The Ghia was given a diet of Motul 20W-50 engine oil for most of the time I've been taking care of it. Most recently, a switch was made to using Valvoline VR1 20W-50 oil with high Zinc content, specifically formulated for pushrod and flat tappet engines. This stuff is fantastic - noticed the difference in how it quiets down the various mechanical engine noises to a sweet purr. I realize that oil choice can lead to overzealous discussions and opinions, but this stuff works for me.
_________________
'69 Ghia |
|
| Back to top |
|
|
kingkarmann
Samba Member
Joined: November 05, 2003
Posts: 4111
|
| Posted: Fri Mar 31, 2023 5:34 am Post subject: Re: 1969 Karmann Ghia restomod |
|
|
| kimkinzie wrote: |
The Ghia was given a diet of Motul 20W-50 engine oil for most of the time I've been taking care of it. Most recently, a switch was made to using Valvoline VR1 20W-50 oil with high Zinc content, specifically formulated for pushrod and flat tappet engines. This stuff is fantastic - noticed the difference in how it quiets down the various mechanical engine noises to a sweet purr. I realize that oil choice can lead to overzealous discussions and opinions, but this stuff works for me. |
I wonder if the Valvoline is easier to come by than Brad Penn?
_________________
"Depression is a malfunction of the instrument we use to determine reality.
Mike Gerson
What is your "Bespoke Reality"? |
|
| Back to top |
|
|
kimkinzie
Samba Member
Joined: December 12, 2021
Posts: 145
Location: Maui, HI
|
| Posted: Fri Mar 31, 2023 10:28 am Post subject: Re: 1969 Karmann Ghia restomod |
|
|
| kingkarmann wrote: |
I wonder if the Valvoline is easier to come by than Brad Penn? |
Quite honestly, once you get outside of California, the regulations of hazardous materials always seem more laissez-faire. Valvoline is available off the shelf from local Napa and O'Reilly Auto stores in Hawaii, along with weirder stuff like Pentosin for ZF transmissions. From the looks of things, it seems Brad Penn oil is distributed mostly in the central portion of the USA: https://penngrade1.com/where-to-buy/
_________________
'69 Ghia |
|
| Back to top |
|
|
kimkinzie
Samba Member
Joined: December 12, 2021
Posts: 145
Location: Maui, HI
|
| Posted: Wed Apr 19, 2023 5:28 pm Post subject: Re: 1969 Karmann Ghia restomod |
|
|
Phenolic Gaskets
After monitoring the newly installed phenolic spacers, it seems there was always a bit of fuel weeping at the sealing surface to the intake runners. I tried to order some Hylomar Blue, but the shipment was taking forever to arrive. A trip down to the local Autozone gave me two alternatives - I chose the orange 'direct replacement' from Permatex.
The old paper gaskets were also thrown away, a thin coating applied to both sides of the spacers with a paint roller, and the goopy mess was pressed back into place. I let the material settle overnight, and re-torqued the anchor bolts in the morning. It is possible to clean up the non-hardening blue gasket material using 91% rubbing alcohol and rubbing briskly.
_________________
'69 Ghia |
|
| Back to top |
|
|
kimkinzie
Samba Member
Joined: December 12, 2021
Posts: 145
Location: Maui, HI
|
| Posted: Wed Apr 19, 2023 5:38 pm Post subject: Re: 1969 Karmann Ghia restomod |
|
|
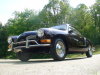
C&H sugar mill as backdrop. Last images before front running lights go on
_________________
'69 Ghia |
|
| Back to top |
|
|
|


