| Author |
Message |
panicman
Samba Member
Joined: December 18, 2011
Posts: 2673
Location: Canby, OR

|
 Posted: Sun Jan 22, 2017 1:03 am Post subject: Re: Tonka Beetle restoration Posted: Sun Jan 22, 2017 1:03 am Post subject: Re: Tonka Beetle restoration |
 |
|
Today, I used chemical stripper on the body and pan....
And wound up using a brass brush, red scotchbrite pad, and spot applications of stripper to get everything clean.
I found stubborn rust on the undersides of the front fenders and inside edges of both windows. I used steel wool and lemon juice to remove it.
After everything was clean and prepped, I gave the body and chassis a coat of SEM self etching primer.
Like volktales, I found some scratches and a dent that would show through the paint. I used a build primer in a beer cap, and dabbed it onto the bad areas, then sanded and then primered the whole body again.
The chassis got painted gloss black over the self etching primer. The body was painted using Wolfsburg West rattlecan Anthracite, and I followed that with 2 coats of clear. The seats were masked and painted Krylon Georgia Clay, which is a great mimic for Indian Red.
Before reassembly, I'll try to get the glass as clear and glossy as I can. |
|
| Back to top |
|
 |
Volktales
Samba Member

Joined: June 21, 2013
Posts: 546
Location: Nanaimo, B.C. CANADA
|
| Posted: Sun Jan 22, 2017 10:20 am Post subject: Re: Tonka Beetle restoration |
|
|
That is going to look nice. I haven't tried painting the interior of mine yet, but I think I just might have to now...
_________________
1974 "Restfalia" Camper 2000 cc EFI 2001-
1970 Beetle first car, rotten, yard art 1985-
1966 Sunroof Beetle, restored 1998-
1964 Ghia, ongoing project 2007-
1962 Beetle Beryl,original paint survivor 2012-
1970 Savannah Beige Beetle 2012-
1992 16v GTI, 100% stock 2006-
1991 "Terseo", wife's old daily 1995-
1969 Chevrolet CST/10 (family owned since new)
1965 Gold Corvair Monza 2021-
1966 and 1965 Monza 2022- |
|
| Back to top |
|
|
panicman
Samba Member
Joined: December 18, 2011
Posts: 2673
Location: Canby, OR
|
| Posted: Mon Jan 23, 2017 1:32 am Post subject: Re: Tonka Beetle restoration |
|
|
Here it is assembled.
The paint took a long time to dry on the plastic. I would try a different kind of paint if I did this again, but I'll see how it holds up. At least nothing will touch or scratch it.
Thanks volktales, for the inspiration. This is fun- I may have to do another!
Last edited by panicman on Wed Jan 25, 2017 11:31 pm; edited 1 time in total |
|
| Back to top |
|
|
Volktales
Samba Member
Joined: June 21, 2013
Posts: 546
Location: Nanaimo, B.C. CANADA
|
| Posted: Mon Jan 23, 2017 10:39 pm Post subject: Re: Tonka Beetle restoration |
|
|
That looks very nice. Tonkas are relatively simple and fun to restore. I know I will do some more in the future too. Wish Tonka had made a baywindow bus then I could have some more fun!
_________________
1974 "Restfalia" Camper 2000 cc EFI 2001-
1970 Beetle first car, rotten, yard art 1985-
1966 Sunroof Beetle, restored 1998-
1964 Ghia, ongoing project 2007-
1962 Beetle Beryl,original paint survivor 2012-
1970 Savannah Beige Beetle 2012-
1992 16v GTI, 100% stock 2006-
1991 "Terseo", wife's old daily 1995-
1969 Chevrolet CST/10 (family owned since new)
1965 Gold Corvair Monza 2021-
1966 and 1965 Monza 2022- |
|
| Back to top |
|
|
vdubmyk
Samba Member

Joined: October 24, 2008
Posts: 508
Location: Corona, CA
|
| Posted: Sun Feb 14, 2021 3:01 pm Post subject: Re: Tonka Beetle restoration |
|
|
Reviving an old thread, I just bought a red one and it’s missing the headlights. Any recommendations on what to use?
_________________
64 stock bug, 12V (converted 6v unit), 40 hp, all documents even sales contract and dealer window sticker! |
|
| Back to top |
|
|
Volktales
Samba Member
Joined: June 21, 2013
Posts: 546
Location: Nanaimo, B.C. CANADA
|
| Posted: Sat Feb 20, 2021 11:11 am Post subject: Re: Tonka Beetle restoration |
|
|
Usually lots listed on e-bay at any time. These are reproduced as well. Probably would be possible to make one using your remaining light as a pattern. These Tonkas are fun to restore! Post up your pictures on this thread when done!
_________________
1974 "Restfalia" Camper 2000 cc EFI 2001-
1970 Beetle first car, rotten, yard art 1985-
1966 Sunroof Beetle, restored 1998-
1964 Ghia, ongoing project 2007-
1962 Beetle Beryl,original paint survivor 2012-
1970 Savannah Beige Beetle 2012-
1992 16v GTI, 100% stock 2006-
1991 "Terseo", wife's old daily 1995-
1969 Chevrolet CST/10 (family owned since new)
1965 Gold Corvair Monza 2021-
1966 and 1965 Monza 2022- |
|
| Back to top |
|
|
panicman
Samba Member
Joined: December 18, 2011
Posts: 2673
Location: Canby, OR
|
| Posted: Sun Aug 03, 2025 11:19 pm Post subject: Re: Tonka Beetle restoration |
|
|
I found a couple more of these Tonkas on eBay last year, and one was a candidate for stripping and painting.
This blue beetle showed signs of abuse. The roof had several deep dents, and the front of the beetle was pushed in. I'm surprised the bumper was intact.
I first used a mallet to try to get the worst of the dents straightened out. Then I used stripper and got the body down to bare steel.
More metal bumping with the hammer and sometimes a dolly, and then filing, heavy sanding, and then wet sanding. I think the roof is straight now.
Now I'm trying to make my mind up on a color. Thinking either a light gray (Mouse or Fontana) or something like Turkis, Beryl, Jade, or Mignonette. |
|
| Back to top |
|
|
panicman
Samba Member
Joined: December 18, 2011
Posts: 2673
Location: Canby, OR
|
| Posted: Sun Aug 03, 2025 11:33 pm Post subject: Re: Tonka Beetle restoration |
|
|
| Also, this one came missing a headlight, and eBay is coming up empty, as is Etsy. If anyone has some of the headlights for sale, let me know! |
|
| Back to top |
|
|
Blue Baron
VW Aficionado

Joined: June 16, 2006
Posts: 28322
Location: Free State of Florida
|
|
| Back to top |
|
|
panicman
Samba Member
Joined: December 18, 2011
Posts: 2673
Location: Canby, OR
|
| Posted: Sun Aug 17, 2025 11:39 am Post subject: Re: Tonka Beetle restoration |
|
|
Those videos are great.
Just about done with my second Tonka. This one I finished in Jade Green.
Waiting for the pan to fully dry, and on a "parts" Tonka for the missing headlight and a new rear axle and wheels.
|
|
| Back to top |
|
|
panicman
Samba Member
Joined: December 18, 2011
Posts: 2673
Location: Canby, OR
|
| Posted: Sun Sep 07, 2025 2:00 pm Post subject: Re: Tonka Beetle restoration |
|
|
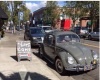
Here's the fleet at present- the new jade green at left, a factory red in the middle, and my anthracite bug at right.
I found another rather badly beaten red Tonka for pretty cheap, so I bought it for some parts that were missing or in bad shape on my Jade beetle. Right after that another helpful Sambanista (Thank you, Blue Baron!!) sent me an old spare headlight he had.
It was painted silver and the clip is broken off. So, I used one of the intact headlights on the jade beetle and cleaned up the junker that I bought, which has broken plastic, and had bent body panels. I straightened and fixed what I could, and then used a bead of hot glue to fasten the donor headlight.
Actually turned out pretty good. This will be a "parts" beetle, but will look fine sitting on a shelf.
|
|
| Back to top |
|
|
|


