| Author |
Message |
82WestyMan
Samba Member

Joined: December 28, 2006
Posts: 1098
Location: Western OR

|
 Posted: Sun Oct 28, 2007 7:35 am Post subject: H&R lowered springs on Westy, nose down 1 inch Posted: Sun Oct 28, 2007 7:35 am Post subject: H&R lowered springs on Westy, nose down 1 inch |
 |
|
Thought I'd run this post past the group and see if anyone has any experience or advise
I have an 82 Westfalia and I put H&R lowering springs (and Bilsteins) on all four corners and the ride is a little 'bouncy' in the front.
I have a feeling I'm hitting the shock bumpstops a little sooner than I would like
I really like the setup (sway bars are planned for the not too distant future but that's another subject...) but the front is about an inch lower than the rear (measured from the ground to the roof rain gutter)
I would like to put some spring spacers/shims between the springs and frame or control arms to bring the front up the 1" and level out the Westy
I've done some various searches of the Vanagon forums for "front spring spacers" & "front spring shims" with less than 'stellar' results.
It can't be too difficult to fabricate some shims but I thought it would be a good idea to find if anyone has blazed this trail before me
As always, I appreciate and respect the collective wisdom of this group. The Bentley may be the 'bible' of how it was designed and assembled, but this group is about what works in the 'real world'.
(UPDATE!!! - see below for pictures of the shim install and the bumpstop mod)
_________________
"The floggings will continue until morale improves"
"I never did give anybody hell. I just told the truth and they thought it was hell" - Harry S. Truman
82 Westfalia - w/ a Raby 'Camper Special' engine
Last edited by 82WestyMan on Sat Nov 03, 2007 6:32 pm; edited 1 time in total |
|
| Back to top |
|
 |
pete000
Samba Member

Joined: July 29, 2004
Posts: 642
Location: Ocala FL
|
| Posted: Sun Oct 28, 2007 8:49 am Post subject: |
|
|
You need to cut at least one coil off the front bump stops. FYI the Carat bump stopes are shorter than the regular ones and I run those with one coil cut off. This makes them ride a lot better. I also think the Bilstien HD's work good and have heard the Koni's work even better on lowered Vanagons.
_________________
1990 Vanagon RS 2.1
1967 Deluxe 21 window
--------------------
Koni Shocks
H & R Red Springs
Addco Sway Bars Front-Rear
18 X 7.5 and 18 X 8 OEM Porsche Wheels
Recaro Power-Heated seats |
|
| Back to top |
|
|
82WestyMan
Samba Member
Joined: December 28, 2006
Posts: 1098
Location: Western OR
|
| Posted: Sun Oct 28, 2007 9:39 am Post subject: |
|
|
Thanx 'pete'... that was a mod i forgot to mention I was planning to do when I pull the front springs and add the shims... i figured between adding a inch of of height (play) to the front suspension along with shortening the bump-stop, the ride should greatly improve
I'm still hoping for some feedback on the shims. I don't doubt I can fab them myself but I was hoping for some directions from someone who's 'been there... done that'
In reading the threads about 'westy lean', various spring combinations, 'tail-draggin' fixes, etc....
one of the most interesting mods i read was someone who took that white cutting board material to custom makes some rear spring shims
wondered how that worked out in the long run. it seemed like it should work without the worry of putting a metal shim in and getting a possible squeak as the spring goes thru its range of motion
especially considering i shouldn't have to put a full inch in at the springs to acheive the inch out at spindle
_________________
"The floggings will continue until morale improves"
"I never did give anybody hell. I just told the truth and they thought it was hell" - Harry S. Truman
82 Westfalia - w/ a Raby 'Camper Special' engine |
|
| Back to top |
|
|
snoop
Samba Member

Joined: June 22, 2007
Posts: 351
Location: SW Oregon
|
|
| Back to top |
|
|
pete000
Samba Member
Joined: July 29, 2004
Posts: 642
Location: Ocala FL
|
| Posted: Sun Oct 28, 2007 8:57 pm Post subject: |
|
|
I think you should just trim the bump stops and skip the shiming idea. H & R designed the springs to have a sligt front drop to put some rake to the stance. Looks Nice !
_________________
1990 Vanagon RS 2.1
1967 Deluxe 21 window
--------------------
Koni Shocks
H & R Red Springs
Addco Sway Bars Front-Rear
18 X 7.5 and 18 X 8 OEM Porsche Wheels
Recaro Power-Heated seats |
|
| Back to top |
|
|
82WestyMan
Samba Member
Joined: December 28, 2006
Posts: 1098
Location: Western OR
|
| Posted: Mon Oct 29, 2007 2:01 am Post subject: |
|
|
| Quote: |
| p.s. if you're gonna paint the louvers, 'ya gotta paint the pop-top too |
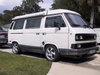
the picture may not show it very well... but it did paint the poptop too...
and the bumpers, mirrors and front grill...
was going for the 'monochrome / monolith' look
Bodywork
http://82westy.com/pic_pages/12_BodyWork.htm
Paint
http://82westy.com/pic_pages/13_Paint.htm
_________________
"The floggings will continue until morale improves"
"I never did give anybody hell. I just told the truth and they thought it was hell" - Harry S. Truman
82 Westfalia - w/ a Raby 'Camper Special' engine |
|
| Back to top |
|
|
zohami
Samba Member

Joined: June 01, 2006
Posts: 123
Location: Kailua
|
| Posted: Tue Oct 30, 2007 1:02 pm Post subject: |
|
|
Check this out, spacer trick for the rear, but would also work on the front with cutouts for the shock to go through the center...
http://www.knology.net/~vw/vanagon/sag |
|
| Back to top |
|
|
82WestyMan
Samba Member
Joined: December 28, 2006
Posts: 1098
Location: Western OR
|
| Posted: Tue Oct 30, 2007 1:17 pm Post subject: |
|
|
thanx zohami (and everyone else)... that's exactly the road i'm probably going to take
have to check out the selection of cutting boards at 'wally-world' and a few other places next time i'm over on that side of town...
i think the secret will be finding a good thick cutting board to use
the only mod to that process i was thinking of making is as follows:
- i'd put the shim at the top of the spring, since it should have less movement as opposed to the bottom spring seat (since the lower arm moves)
- make a cardboard template of the max dia. up inside the upper / frame seat to ensure its a good fit
- cut the inside hole out so its just a bit larger than the actual spring coils to ensure the spring has a good 'seat'
- cut across the 'disk' so the shim can conform to the end of the coil and seat properly
- tape the 'disk' to the coils before installation to so i'm sure the 'cut' remains aligned with the end of the coils
when i get around to doing the fix (and trimming the bumpstop as well for increased suspension travel), i'll take the pics and post the process
thanx again for all the advise... definately have a good idea the road i'm headed down now
_________________
"The floggings will continue until morale improves"
"I never did give anybody hell. I just told the truth and they thought it was hell" - Harry S. Truman
82 Westfalia - w/ a Raby 'Camper Special' engine |
|
| Back to top |
|
|
brooklynvanagon
Samba Member
Joined: September 05, 2007
Posts: 177
|
| Posted: Tue Oct 30, 2007 2:30 pm Post subject: |
|
|
| You can also buy hdpe at a plastics shop. |
|
| Back to top |
|
|
snoop
Samba Member
Joined: June 22, 2007
Posts: 351
Location: SW Oregon
|
| Posted: Tue Oct 30, 2007 8:26 pm Post subject: |
|
|
WestyMan, I strongly encourage you to use a compressible material for (at least the cap encountering material of) your front spring shims.
Cuspate cap.
_________________
87 Westy Camper |
|
| Back to top |
|
|
82WestyMan
Samba Member
Joined: December 28, 2006
Posts: 1098
Location: Western OR
|
| Posted: Sat Nov 03, 2007 1:14 pm Post subject: |
|
|
Just finished pulling my front springs out and adding a 10mm shim on top (talk about 'the part cost $2, but it takes 2 hrs to put it in place'... lol) and trimming my front shock bump-stops.
What a difference that made to the ride
Have to clean up and meet some friends for dinner but I did take a lot of pictures so when I get a chance this weekend, I'll post the process.
As always, the advise and council of this forum was invaluable
_________________
"The floggings will continue until morale improves"
"I never did give anybody hell. I just told the truth and they thought it was hell" - Harry S. Truman
82 Westfalia - w/ a Raby 'Camper Special' engine |
|
| Back to top |
|
|
[email protected]
Samba Member
Joined: April 12, 2003
Posts: 1839
Location: Englewood, FL
|
| Posted: Sat Nov 03, 2007 1:30 pm Post subject: |
|
|
| 82WestyMan wrote: |
Just finished pulling my front springs out and adding a 10mm shim on top (talk about 'the part cost $2, but it takes 2 hrs to put it in place'... lol) and trimming my front shock bump-stops.
What a difference that made to the ride
Have to clean up and meet some friends for dinner but I did take a lot of pictures so when I get a chance this weekend, I'll post the process.
As always, the advise and council of this forum was invaluable |
Good to hear, I need to trim my bumpstops but can't till I get off my duff and install the Porsche wheels. My Ronals WILL meet with the body because of their offset if I trim the stops down. Still the rides not bad, even took it on a couple of 1600+ mile trips up to your neck of the woods this way. But I'm looking forward to a little cushier ride. Unfortunatly I only have the wheels right now, tires and adapters have to wait till the wallet fills up again 
_________________
Markus |
|
| Back to top |
|
|
82WestyMan
Samba Member
Joined: December 28, 2006
Posts: 1098
Location: Western OR
|
| Posted: Sat Nov 03, 2007 6:29 pm Post subject: |
|
|
So I started this thread with my lousy ride (felt like I was almost riding on the bumpstops) and my Westy down in the front about 1".
I stopped by Target and picked up 4 little cutting boards for about $2.50 each. They measured about 10mm/1cm (.39") thick. I also had a larger cutting board at home I could sacrifice that was a little thicker but ended up deciding against it as you will see below.
This is what the upper spring seat looked like before I started
and this is what it looked like before I started tearing it apart
Tie-rod end and speedo cable out of the way
Caliper pulled and hung out of the way
Then just jack the weight off the spring, pull the spindle and the spring
As you can see, the upper seat for the spring is only 20mm/2cm deep (why I used the 10mm/1cm material)
Used the upper spring cusion to get diameter and placement on the material
Simple task of using a caliper (not that kind...lol) to draw inner & outer circles and cut with a jigsaw. Used a very coarse blade, patience and a 4-way wood working file to clean it up. I also camfered the upper outer edge because the spring seat is rounded
Used black electrical tape to hold the spring cusion and shim in place before installing
Just a reminder to get the lower tang of the spring in the proper spot on the lower control arm
This is what the upper spring seat looks like with the shim installed
This is my Bilstein bottomed out
How much I have to play with on the stock bumpstop
Bumpstop cut down
After I reinstalled everything and remeasured, the front in now only about 1/4" lower than the front instead of the original full inch
Oh... and now the ride is great.
_________________
"The floggings will continue until morale improves"
"I never did give anybody hell. I just told the truth and they thought it was hell" - Harry S. Truman
82 Westfalia - w/ a Raby 'Camper Special' engine |
|
| Back to top |
|
|
pete000
Samba Member
Joined: July 29, 2004
Posts: 642
Location: Ocala FL
|
| Posted: Sun Nov 04, 2007 12:57 pm Post subject: |
|
|
Ride would probably be just as good even at the 1" lower height without the spacers. Cutting the bump stops is key !
Nice work...
_________________
1990 Vanagon RS 2.1
1967 Deluxe 21 window
--------------------
Koni Shocks
H & R Red Springs
Addco Sway Bars Front-Rear
18 X 7.5 and 18 X 8 OEM Porsche Wheels
Recaro Power-Heated seats |
|
| Back to top |
|
|
snoop
Samba Member
Joined: June 22, 2007
Posts: 351
Location: SW Oregon
|
| Posted: Mon Nov 05, 2007 9:42 pm Post subject: |
|
|
Looks great WestyMan! Very nice photo-documentation. Have you got a post shim side shot of your rig you could share?
_________________
87 Westy Camper |
|
| Back to top |
|
|
brooklynvanagon
Samba Member
Joined: September 05, 2007
Posts: 177
|
| Posted: Sun Dec 23, 2007 4:28 pm Post subject: |
|
|
| van-cafe says the vans handling in compromised even with bilsteins, what's your take on the lowering springs? More than a few people have taken them out after installing them. |
|
| Back to top |
|
|
82WestyMan
Samba Member
Joined: December 28, 2006
Posts: 1098
Location: Western OR
|
| Posted: Sun Dec 23, 2007 5:53 pm Post subject: |
|
|
| Quote: |
| van-cafe says the vans handling in compromised even with bilsteins, what's your take on the lowering springs? More than a few people have taken them out after installing them. |
Well, I've had them in for a couple of months and a few hundred miles now ( ... it's not my daily driver )
First off, I'm not planning to take them out. It lowered my Westy about 1.5-1.75" and that's on a camper with all the 'gear' installed and curb weight of about 4,500-5,000 lbs.
Admittedly, before I put the shims in, I still had the original height front shock bumpstops installed and there was NO play before you bottomed out. Any little bump in the road was immediate rebound on the bumpstops.
Now that I have the shims in and cut the bumpstops down, I both like the more level stance, the ride and the handling. I have 205 / 70 / 14 H95 tires with lowered springs and the bilsteins (stock front sway bars only / ...for the moment). It rides pretty smooth, handles pretty well and has a very acceptable ride for lowered vehicle. There's always a trade off when you lower a vehicle and it's not for everyone, but for me, I like it and plan on keeping it.
One thing to remember, the front suspension on a vanagon is 25 year old, 'old school' design, (not something you find on passenger vehicles any more / some trucks still use the upper & lower control arms with the spring between). It will never ride like a late model passenger vehicle so don't expect it to.
One of these days, I would like to get rid of the stock 14" alloys and find nice set of 16" rims what I don't have to put too large of a space in and go for some really low profile (60 series) tires.
But as the old saying goes... "to each his own" ... and this set up works for me
_________________
"The floggings will continue until morale improves"
"I never did give anybody hell. I just told the truth and they thought it was hell" - Harry S. Truman
82 Westfalia - w/ a Raby 'Camper Special' engine |
|
| Back to top |
|
|
Christopher Schimke
Samba Member

Joined: August 03, 2005
Posts: 5391
Location: PNW
|
| Posted: Sun Dec 23, 2007 6:58 pm Post subject: |
|
|
| 82WestyMan wrote: |
| Quote: |
| van-cafe says the vans handling in compromised even with bilsteins, what's your take on the lowering springs? More than a few people have taken them out after installing them. |
Admittedly, before I put the shims in, I still had the original height front shock bumpstops installed and there was NO play before you bottomed out. Any little bump in the road was immediate rebound on the bumpstops.
|
In that Van-Cafe article, they mention that the ride was "horrible" when combined with KYB's and was most pleasant when combined with the Koni's. It stands to reason that Van-Cafe neglected to trim the bump stops as well. The reason I say this is because the Koni's are actually shorter than the standard shocks and are meant for use with lowering springs therefore automatically giving them more suspension travel. Even the bump stops in the Carat's are shorter than the standard Vanagon bump stops.
You have to trim the bumpstops in order to get a good ride in a Vanagon with lowering springs, period.
As for shocks, the H&R springs feature a higher spring rate than either the standard Vanagon springs or the Carat springs. Therefore, they need a shock that has higher rebound valving than a stock replacement shock. Even Bilsteins are marginal with stock rate springs. Combine them with the H&R springs and the springs can easily over tax the rebound valving Bilsteins. This is where the Koni's shine. They are rebound adjustable so you can fine tune the rebound to your liking. Now I'm not saying the Bilsteins are a bad choice to use with the H&R's but I do think that the Koni's are better.
_________________
"Sometimes you have to build a box to think outside of." - Bruce (not Springsteen)
*Custom wheel hardware for Audi/VW, Porsche and Mercedes wheels - Urethane Suspension Bushings*
T3Technique.com or contact me at [email protected] |
|
| Back to top |
|
|
|


