| Author |
Message |
Loren
Samba Member

Joined: January 10, 2004
Posts: 1701

|
 Posted: Sat Mar 13, 2010 2:06 pm Post subject: December 58 Ghia cabriolet lifetime restoration project Posted: Sat Mar 13, 2010 2:06 pm Post subject: December 58 Ghia cabriolet lifetime restoration project |
 |
|
A little over ten years ago, after driving a 73 Super Beetle since I was 16, I decided I wanted to find either a Porsche 356 or a Karmann Ghia cabriolet. After looking at my savings acount I decided a Porsche was not in my budget, so a Ghia cabriolet it would have to be. I found a few Ghia books and started educating myself on what I wanted and what to look for. I loved the look of the lowlight Ghias, but they were far too rare and expensive for my budget, so I decided on a 61-67 Cabriolet.
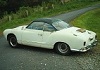
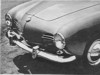
I was still in the "thinking about looking for a Ghia" mode when my brother called and said he and his wife saw a Ghia cabriolet in a driveway. He said it was a project car, with flat tires, the top down and full of leaves. He didn't know what year it was, they all look the same to him. Well, a few days later I drove down to take a look at the car. It was backed into the driveway and looking at the nose it looked like a 60-63 Ghia, with large nostrils and 60-63 front turn signals. The nose was dented in and the car was painted at some point so I imagined it was full of bondo. I built up my courage and knocked on the front door. An older lady answered, barely opening the front door, a small herd of little yapping dogs going crazy at her feet. I inquired about the Ghia and she told me it was her daughter's car. She didn't know if it was for sale, but she gave me her daughter's phone number and told me to give her a call. I thanked her and as I was leaving I took a closer look at the back of the car. My heart skipped a few beats when I saw the rear tail lights, they were lowlight lights! Excited, I raced back home and called the daughter. She told me that it was a 58 Ghia and she didn't know if she wanted to sell it, but she was working on a 65 Lincoln 4 door and she might need the money. She told me to keep calling her and eventually she would make up her mind. So, to make a long story a little shorter I called and called her until she agreed to sell me the car. Here are some pics of the car when I got her
She was rough and missing lots of original parts, but what did I care, I had a December 1958 Karmann Ghia cabriolet! I was so excited the first thing I did was clean the car out and make a list of parts she needed, and it was a long list. After looking into buying parts I decided it was cheaper to buy parts cars and sell what I didn't need to finance the project. I ended up buying a 58 (too nice to part out, ended up selling it and it's back on the road) two 57s (both very rusty, both cut up) and a 59 (very rusty but too nice to cut up. It will have to wait its turn). I also went to VW swap meets and bought every affordable early Ghia part I could find, including a 58 steering wheel for $10!
After cleaning out the car I stripped all the parts off and got the body plastic media blasted. To my suprise the body was fairly rust free, especially for a cabriolet. Here are some nude pics for you Ghia pervs out there 
After I got it media blasted I determined it needed a new driver side fender, correct nose section (ok, I noticed this before media blasting the car  ) and a rear apron. I found a 57 front clip at a swap meet, a rear apron on the internet and John Kelly provided the nose section, thanks John! ) and a rear apron. I found a 57 front clip at a swap meet, a rear apron on the internet and John Kelly provided the nose section, thanks John!
With the replacement panels in hand I looked around for a body guy and found a "hack". He came well recomended so I had him do the work. Unfortunately, he didn't do a very good job and I got discouraged.
The work looks good in the picture, but close up it is not the quality I wanted.
Fast forward 8 years or so to today and the car is in about the same condition as in the picture above, still bare metal, still in need of repair. Since I bought the car I have found a lot of parts for her and met a lot of fellow Ghia fans along the way.
I finally found a good body guy so if all goes as planned I will start making some progress on my December 58 Ghia and post pics of the progress.
Here is a little jem I found a few years ago at a swap meet, enjoy.
|
|
| Back to top |
|
 |
Paul_Revere's Ghia
Samba Member

Joined: May 11, 2007
Posts: 973
Location: South Wales, UK
|
|
| Back to top |
|
|
RockStock
Samba Member

Joined: November 26, 2004
Posts: 3929
Location: England
|
| Posted: Sun Mar 14, 2010 4:45 pm Post subject: |
|
|
best of luck loren
_________________
-StockRocks- |
|
| Back to top |
|
|
djkeev
Samba Moderator

Joined: September 30, 2007
Posts: 32634
Location: Reading Pennsylvania
|
|
| Back to top |
|
|
John Moxon 
Samba Moderator

Joined: March 07, 2004
Posts: 13958
Location: Southampton U.K.

|
|
| Back to top |
|
|
slafa
Samba Member

Joined: December 29, 2008
Posts: 944
Location: Where getting a real beer is like winning the lotto
|
| Posted: Mon Mar 15, 2010 4:15 pm Post subject: |
|
|
Very excited about your project Loren, loved the back story and look forward to your new progress 
Loved the nude pics too 
_________________
'63 KG Roadster proj.
1973 Mercury Montego MX Brougham
1977 Dodge Tradesman 200 "shorty" Van
1983 Ford 350 Econoline Ambulance
1997 Mercedes S500 W140
1976 BMW 75/6 bike
various Honda, GMC daily drivers |
|
| Back to top |
|
|
Toddball
Banned

Joined: November 13, 2008
Posts: 216
Location: Calgary Alberta Canada
|
| Posted: Mon Mar 15, 2010 9:36 pm Post subject: |
|
|
| Very exiting project Loren! Please post lost of progress pics (parts too) . I love the bio on the car! |
|
| Back to top |
|
|
61TXghia
Samba Member

Joined: July 17, 2009
Posts: 950
Location: El Paso, TX
|
| Posted: Mon Mar 15, 2010 10:15 pm Post subject: |
|
|
| Great writing, it's exactly what we love to hear as ghia owners. Some may think it's silly, but it's almost romantic hearing the stories of how we found our cars and what they mean to us. LOL. I am blushing. |
|
| Back to top |
|
|
cande83821
Samba Member
Joined: July 24, 2005
Posts: 243
Location: Sunny California
|
| Posted: Tue Mar 16, 2010 9:36 pm Post subject: 58 Low Light |
|
|
Hey Loren, your way father ahead than me! I just bought this car and it will need a lot more work than yours and yours is a Vert!
_________________
1966 Slammed Vert Gone 
1955 Hardtop Oval OG Gone
1966 Sea Sand Sunroof #2 Gone
1955 Hardtop Semaphore Oval #2 
1966 Sea Sand Sunroof #3
1958 L41 Black Vert
Precious metal...Vintage VW's |
|
| Back to top |
|
|
Loren
Samba Member
Joined: January 10, 2004
Posts: 1701
|
| Posted: Mon Mar 22, 2010 7:41 pm Post subject: |
|
|
Well, my little 58 Ghia went off to the body shop on Sunday! There is a lot of work for the body guy to do and unfortunately he has to undo a lot of the work I had done to the car so it can be done right. Here are some pics of damage that will need to be attended to.
I used a 57 fender as a replacement and the previous body guy lapped in a patch for the front turn signal! this will have to be cut out and a new piece of metal butt welded in. This will be easy since the whole fender will be removed and welded back on correctly.
Here is a shot of the shoddy welding that was done. He used way too much wire and he also used brazing rod along the hood seam and inside the fresh air intakes. I told him not to use brazing rod, but he did it any way! Brazing rod is never a good choice for welding on these cars. The flux used will react with paint and the bronze in the rod will steal electrons away from the steel and eventually rot the metal (I am sure it would never happen in my life time, but it is a concern many, many years down the road. Yeah, I'm a bit anal, but I want it done right)
Luckily I brought the car home before he could weld the patch in for the radio hole. I guess when you don't know how to weld you do a lap joint. I guess he would just fill the depression in with bondo to flatten out the dash. The new body gut is going to make a new patch and tig weld it in.
Yep, more brazing rod and he use the grinder a bit too much. Don't know what to do with this section. It's a shame because the rear apron section I had was great. I don't know if the body guy will be able to fab up new metal or want me to find another section, if anyone out there has a good rear apron for a lowlight let me know.
Here is a nice rust hole and I believe it is the worst spot of rust on the car. Not too bad for a cabrio. The other side looks ok, but I think there is a little bubbling under the under coating that will need to be addressed.
Swiss cheese anyone? Not too bad, just a small patch needed.
Just a few pin holes on this side.
Here you can just see her peeking around the side of the car on the trailer. I think she really liked getting back on the road (even if she was on a trailer) after all these years. She looked really happy in the body shop and she had good company (two ghias and a few bugs).
Here is the side badge for the car. I just got it and new cabrio door glass from Jerry Heldt. It looks like there are scratches on the badge, but that is just smearing from my finger trying to clean it for the photo. It is a great reproduction and the door glass is flawless. I have a rear decklid script on the way from Jerry too, can't wait for it to get here. Thanks Jerry!
I noticed the cabrio's pan has a little rust through, so new floor pans are in order. I bought new Danish pans, but they don't have the same pressings as the original pan. Luckily, I found a great rust free 66 Ghia pan with great pan halves. I will start removing spot welds this week and carefully remove the pan halves to transplant onto the 58 pan.
On saturday I picked up an extra decklid and a pair of 59 doors just in case I needed them and after the body guy looked at the car it is a good thing I did, my cabrio needs a new driver side door. The door could be fixed, but it was replaced at some point, so I am not concerned about loosing a number matching door. |
|
| Back to top |
|
|
slafa
Samba Member
Joined: December 29, 2008
Posts: 944
Location: Where getting a real beer is like winning the lotto
|
| Posted: Tue Mar 23, 2010 5:59 am Post subject: |
|
|
Frustrating having to redo that work but cool to see you are up to the challenge
_________________
'63 KG Roadster proj.
1973 Mercury Montego MX Brougham
1977 Dodge Tradesman 200 "shorty" Van
1983 Ford 350 Econoline Ambulance
1997 Mercedes S500 W140
1976 BMW 75/6 bike
various Honda, GMC daily drivers |
|
| Back to top |
|
|
fuscavw
Samba Member

Joined: April 28, 2004
Posts: 270
Location: SE Idaho
|
| Posted: Tue Mar 23, 2010 7:00 am Post subject: |
|
|
| Keep the progress going and pics coming. You give me hope for my '58 vert that has now been sitting 4 years, just waiting... |
|
| Back to top |
|
|
52brezelfenster
Samba Member
Joined: August 02, 2005
Posts: 761
Location: OR
|
| Posted: Wed Mar 24, 2010 6:52 am Post subject: |
|
|
Great project!
I'm also restoring an early vert. Very expensive proposition do to one of these cars right. Also very rewarding when they are finished.
Looking forward to seeing more picutres as progress takes place.
Dustin |
|
| Back to top |
|
|
retrowagen
Samba Member
Joined: October 11, 2004
Posts: 1856
|
| Posted: Thu Mar 25, 2010 12:05 pm Post subject: |
|
|
Having heard about this car for the last ten-odd years while sitting around the campfire with Loren and friends, it's nice to see some pictures and hear news of accelerated progress! Well done, Loren.
Are you headed to Kelley Park next month? We are...
_________________
David Ruby
President, Karmann-Ghia World Club |
|
| Back to top |
|
|
Loren
Samba Member
Joined: January 10, 2004
Posts: 1701
|
| Posted: Sun Mar 28, 2010 6:04 pm Post subject: |
|
|
Well, I headed down to the body shop today to do some grinding. The guy doing the body work hates grinding and I love grinding, especially since my time is way cheaper than his and I like to have a hand in the restoration process and make sure the job is done right. I spent about four hours grinding.
Here you can see what I had to do, grind on either side of the bad welds. The body guy is going to TIG weld extra metal to the fenders to make up for the metal I am removing. I also found out that the fender and nose were lap welded! A hard lesson learned and $1000 down the drain, the guy I had weld the nose and fender on did a crappy job and I get to undo all his bad work  The fender is tack braized to the inner fender so I still have to use a dremel to remove the brazing to get the fender off. The fender is tack braized to the inner fender so I still have to use a dremel to remove the brazing to get the fender off.
After a lot of grinding the nose is back off the car! Unfortunately, there is a lot of damage to the driver side inner fender from a previous accident. I will have to replace the front half of the inner fender, thankfully I have a good section in the backyard! The fresh air vent metal behind the nose grill is also badly damaged and there is rust where the nose attaches to the bulkhead. The metal where the hood latches is also damaged and will be replaced. Seems like the more I work on the car the more work I find it needs.
Here you can see a tear in the metal and lots of rust. I also had to cut some of this section out to remove the nose. Why the "body" guy used brazing rod I don't know. It is a major pain in the butt removing braized panels.
Here is the damaged inner fender panel. Unfortunately, it is too damaged to pull out and it will be much easier to replace it.
I also removed the patch section that was tack welded in the radio hole. Thankfully the the bad body guy did not finish this hack job. The new body guy is going to cut the area out, TIG weld in flat steel and cut out the openings for the ash tray and radio. A lot of work, but it will cut down on warping. |
|
| Back to top |
|
|
Loren
Samba Member
Joined: January 10, 2004
Posts: 1701
|
| Posted: Sun Mar 28, 2010 6:31 pm Post subject: |
|
|
Made some more progress on the Ghia last week. I finally finished making a new rear seat. I know there are a few reproductions available out there, but they are lacking some details that I wanted to retain. I was able to borrow a seat bottom from a friend's 58 cabriolet and another Ghia owner sent be a seat back from another 58 cabriolet. My reproduction is not 100% accurate, but very close. The seat back was a pain in the butt to reproduce and I don't recomend making them on your own. Cabriolet seat backs are very different than coupe backs and there are a lot of details that neet to be routed in. I made them using maple and birch plywood. I duplicated the tongue and groove construction and used screws, nails and glue to hold it all together, just like the original one I had for a pattern.
|
|
| Back to top |
|
|
Toddball
Banned
Joined: November 13, 2008
Posts: 216
Location: Calgary Alberta Canada
|
| Posted: Sun Mar 28, 2010 10:12 pm Post subject: |
|
|
| Nice work Loren! Glad to see you are getting rid of the Sh!tty work that had been done. Great work on the rear seat parts. I have plans to remake the back seat frames for my 58 coupe, I still need to get a original one to template . |
|
| Back to top |
|
|
slafa
Samba Member
Joined: December 29, 2008
Posts: 944
Location: Where getting a real beer is like winning the lotto
|
| Posted: Mon Mar 29, 2010 6:11 am Post subject: |
|
|
Very nice Loren, love your attention to detail, an inspiration
_________________
'63 KG Roadster proj.
1973 Mercury Montego MX Brougham
1977 Dodge Tradesman 200 "shorty" Van
1983 Ford 350 Econoline Ambulance
1997 Mercedes S500 W140
1976 BMW 75/6 bike
various Honda, GMC daily drivers |
|
| Back to top |
|
|
KarmannMarco
Samba Member
Joined: January 03, 2010
Posts: 263
Location: Woodland Park CO
|
| Posted: Thu Apr 01, 2010 12:27 pm Post subject: |
|
|
| this is very inspirational , expecially since my Ghia needs this much bodywork also. Very nice write up! |
|
| Back to top |
|
|
Loren
Samba Member
Joined: January 10, 2004
Posts: 1701
|
| Posted: Sun Apr 11, 2010 3:33 pm Post subject: |
|
|
I was able to get back down to the body shop yesterday. I had to use a small rotary tool with thin cut off wheel to remove the brazing rod between the fender and the inner fender panels. It took about an hour to carefully cut the brazing rod between the two panels and remove the fender without damaging the fender or inner panel. I also had to remove the hood latch panel. It was damaged and so badly welded that there was no other option. Luckily, I have this section in the shed and with a little work removing spot welds and adding some metal to the leading edge it will be ready to weld back in place when the time comes.
This shows the damage to the inner fender panel from the fender side. It will be cut back about 20" and replaced with a good used section.
Some rust that will have to be taken care of and a good view of the work the previous "hack" did to my car. Looks like he used a quite a few feet of brazing rod to tackle this section. This will all have to be cut out, a new patch panel made and welded in. Yeah, more work to do!
Here is another view of the rusty section behind the driver side front wheel. |
|
| Back to top |
|
|
|


