| Author |
Message |
ernstben
Samba Member

Joined: April 30, 2005
Posts: 621
Location: Manchester, Mi

|
 Posted: Sat May 29, 2010 10:57 am Post subject: Ben's '63 Ghia project (with lots of pics!) Posted: Sat May 29, 2010 10:57 am Post subject: Ben's '63 Ghia project (with lots of pics!) |
 |
|
Ive been a VW owner since before I had a drivers license and have forayed into the worlds of Bugs and Busses, but this is the first time that I have taken the plunge into the Karmann Ghia world. I had been keeping tabs on craigslist and thesamba for the past year and a half, looking for a reasonably priced project car.
Well, you know how the story goes, this 63 Ghia came up on thesamba about 2 hours away from home and I convinced (read: promised a fancy dinner to) the girlfriend to come with me after work in the middle of the week. We got there and the car was as it was described; a bit wavy here and there on the fenders, some old patchwork gone awry, swiss-cheese floor pans and a few missing parts. The heater channels and battery panel appeared to be remarkably solid. Also: The owner Chris was just an absolutely fantastic individual throughout this whole interaction.
The owner said that he had already had some interest in the car and a few people had come to take a look. During the two-hour drive back, I made a deal with the VW Gods that I would buy the car the coming weekend if no one had snapped it up at that time. That coming Friday I called and, lo and behold, it was still there. A non-eventful trip back from mid-Ohio and its on with the restoration. Ive ordered floor panel sections and started to collect brake parts. I removed the body from the floors this last weekend.
Like I said, Im new to the whole Ghia scene, so this project is going to be a long-term learning experience. Im hoping to do just about everything myself. Well see. If anyone has any advice that theyre willing to impart, or even insults to hurl at my ignorance, please feel free!
First impressions:
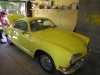
Picking her up:
Her new home:
Body off:
Last edited by ernstben on Thu Jul 01, 2010 11:01 am; edited 2 times in total |
|
| Back to top |
|
 |
ernstben
Samba Member
Joined: April 30, 2005
Posts: 621
Location: Manchester, Mi
|
| Posted: Sun May 30, 2010 6:03 am Post subject: |
|
|
Over the last couple of weekends, I have taken the pans off of the chassis and stripped it almost completely. At this point, I'm ready to start MIG welding the new KGPR pan halves on.
They came in the mail a couple of days ago and I was kind of disappointed by their quality, although I suppose if there's one manufacturer of them, that's just the way it is. The lines don't seem to be crisp and apparently they have started cutting in relief cuts at various points around that need to be welded up. Also, the fit was iffy.
I also am about to start tearing into the front beam. I have never worked on one before and am wondering how deeply I should delve into it. Should it be completely disassembled, or would it be ok to leave as is with a sandblasting and paint?
Also: at the end of the rear outriggers on the chassis, I can't tell where the old part of the pan was and what part should stay with the car. I chiseled one up pretty well getting the old pan off. there appears to be a small rectangular piece there that I will probably just end up leaving. Any advice on what to do there?
|
|
| Back to top |
|
|
Mark33563
Samba Member
Joined: November 13, 2005
Posts: 1667
Location: Tampa Bay. FL
|
| Posted: Sun May 30, 2010 7:31 am Post subject: |
|
|
why does the front end have coil over shocks? perhaps the springs inside the beam are shot?
_________________
----------------
"That's an ultra-rare Dung Beetle... in reverse, it rolls up giant balls of crap. " - Dave24 |
|
| Back to top |
|
|
ernstben
Samba Member
Joined: April 30, 2005
Posts: 621
Location: Manchester, Mi
|
| Posted: Sun May 30, 2010 6:07 pm Post subject: |
|
|
| Man, I hope not. They look like the exact same thing on the rear, maybe someone put the same on front and back for some reason? |
|
| Back to top |
|
|
rayandraka
Samba Member
Joined: April 24, 2010
Posts: 51
Location: Rhode Island
|
| Posted: Mon May 31, 2010 5:59 pm Post subject: |
|
|
| Is that a TR-6 in the background? |
|
| Back to top |
|
|
ernstben
Samba Member
Joined: April 30, 2005
Posts: 621
Location: Manchester, Mi
|
| Posted: Wed Jun 02, 2010 11:38 am Post subject: |
|
|
| Yep, it's the brother's toy. I don't think they speak the same language though... |
|
| Back to top |
|
|
seanboy69
Samba Member
Joined: October 22, 2008
Posts: 1107
Location: Templeton PA
|
| Posted: Fri Jun 18, 2010 6:39 am Post subject: My '63 Ghia project |
|
|
Nice work so far....anything new??
_________________
In a sea of american muscle there is alittle bug hiding in the corner...
Oh, and I am 39 years old.....I am supposed to know better......ha!!!
1956 oval ragtop
1962 baha
2276 in progress |
|
| Back to top |
|
|
ernstben
Samba Member
Joined: April 30, 2005
Posts: 621
Location: Manchester, Mi
|
| Posted: Fri Jun 18, 2010 5:28 pm Post subject: |
|
|
Work has been a little slow these last couple of weeks, mainly because I started a class this week and combined with work and the girlfriend, the Ghia gets left out. 
I have managed to clean the frame up to be ready for the new pan halves. My brother (who very graciously has allowed me use of his garage) has a nice MIG welding set-up that he has borrowed from his work. He grabbed it tonight, so I will hopefully have a pan half or two welded in place by next week. I have ordered 2 pints of Masterseries silver to hit them as soon as they're in.
I have uploaded a few more pictures that give a few more views of the work I've done and all that there still is to do.
It's current home:
Rust issues:
Seat tracks and scruffy beam:
Together with her garagemates:
|
|
| Back to top |
|
|
ernstben
Samba Member
Joined: April 30, 2005
Posts: 621
Location: Manchester, Mi
|
| Posted: Mon Jun 21, 2010 5:19 am Post subject: |
|
|
Over the weekend, I finally was able to put the first new, shiny part on the Ghia. Definitely exciting to finally be putting something together instead of taking it apart.
My brother's MIG welding arrangement from work was impressive, on a little cart and with one of those huge, 150 lb canisters of Argon. I even was able to use an auto-dimming welding mask, which was just amazing; I've only ever welded the old-fashioned way.
The fit, as I said earlier, could have been better, and I was forced to kind of mess with the passenger side more than I would have liked to in order to get it to fit. You can see the larger relief cut I made in the very back in the pictures. I know I should be thankful that reproductions exist at all, but do they have to be of this quality?  Or maybe I just didn't know what I was doing. Wouldn't be the first time. Or maybe I just didn't know what I was doing. Wouldn't be the first time.
Next step is rocker skin replacement!
|
|
| Back to top |
|
|
sputnick60
Samba Moderator

Joined: July 22, 2007
Posts: 3915
Location: In Molinya Orbit
|
| Posted: Mon Jun 21, 2010 6:55 am Post subject: |
|
|
I dig your restoration and your willingness to make a go of it. I have to make comment about your lack of safety.
Welding emits huge amounts of UV energy. You need to protect your arms and legs and avoid getting deep burns on your skin. It may cause cancer if it is serious enough. Also the hot metal can seriously burn your feet. So if you are welding wear long sleeves and long trousers. Cover your feet with shoes.
Injuries can get serious and take the fun out of this hobby. Look after number one. Please
Nicholas
_________________
'66 Karmann Ghia Cabriolet...
'65 Porsche 356C Coupe...
2005 Mecedes Benz C180 Kompressor Estate
Stop dead photo links! Post your photos to The Samba Gallery! |
|
| Back to top |
|
|
ernstben
Samba Member
Joined: April 30, 2005
Posts: 621
Location: Manchester, Mi
|
| Posted: Mon Jun 21, 2010 2:50 pm Post subject: |
|
|
Thanks for the concern. Luckily, this round of welding was mostly small spots which didn't build up enough heat for me to notice. In the future though, I will definitely be a bit more prepared.  |
|
| Back to top |
|
|
ernstben
Samba Member
Joined: April 30, 2005
Posts: 621
Location: Manchester, Mi
|
| Posted: Tue Jun 29, 2010 1:38 pm Post subject: |
|
|
I have finally got the seat tracks welded on and 3/4 of the seam sealing done. I still have to clean up the rear of the floors where they meet the chassis, but as soon as that is done, I'll hit it with the Masterseries I bought and call it a floor.
When I need a break from welding, I have been scraping off the old undercoating with a screwdriver and then taking a wire wheel to the wheel wells and underside. I've about 1/4 done maybe; this takes forever and is a serious workout! You can see some of the nice shiny metal in the pictures.
At some point, the driver's side fender was replaced. There are some issues with it still. The previous owner loved brazing:
|
|
| Back to top |
|
|
ernstben
Samba Member
Joined: April 30, 2005
Posts: 621
Location: Manchester, Mi
|
| Posted: Thu Jul 01, 2010 11:00 am Post subject: |
|
|
Over the last couple of days, I became good friends with the angle grinder and smoothed the last of my welds down. When I was done, I finished up laying down seam sealer. After it was dry, I hit the chassis with 2 coats of Masterseries. This morning I put down a coat of flat black Rustoleum.
I'm toying with the idea of spraying down a layer of undercoating while it's so accessible. Thoughts on that? Am i better off just leaving it the way it is? I kinda am digging the flat black undercarriage look.
For the next week and a half I'll be out of town, but when I get back, it'll be full steam ahead on the rusted body parts.
|
|
| Back to top |
|
|
dv8
Samba Member

Joined: March 17, 2004
Posts: 35
Location: Bucyrus Ohio
|
| Posted: Thu Jul 01, 2010 1:29 pm Post subject: |
|
|
Holy new floors Batman!
Nice work Ben, at this rate you'll have her back on the road in no time.
(By the way, your welding attire bears a strong resemblence to mine....)

_________________
desired speed > disposable income |
|
| Back to top |
|
|
Altema
Samba Member
Joined: June 20, 2010
Posts: 2904
Location: Lower Michigan
|
| Posted: Thu Jul 01, 2010 2:39 pm Post subject: |
|
|
Yes, good work. Glad to see it coming together.
By the way, I replaced the front clip from a hatchback years ago, and had to cut up the remains of the donor car using a welder with cutting rods. It was a lot more than exposure than just a few spot welds, and I was in pain from the burns for a week... felt like a sunburn under the skin!
Paul |
|
| Back to top |
|
|
ernstben
Samba Member
Joined: April 30, 2005
Posts: 621
Location: Manchester, Mi
|
| Posted: Wed Jul 14, 2010 12:20 pm Post subject: |
|
|
I got back from vacation yesterday morning and have had a little time since then to do a few things to the car. I painted the top of the pan with the black Rustoleum and then opened up a large package from KGPR with rust repair panels in them. I am going to focus on getting the parts that are inaccessible with the body on done so I can have one car taking up space at my brother's place and not two.
I cut off the rear portion of the front fender, the front section of the rear fender, and then drilled out the spot welds on the rocker clip. After I removed it, I took pictures of the rusty pieces next to their shiny new replacements.
Naturally, I uncovered quite a bit more rust, but not much more than I was expecting.
|
|
| Back to top |
|
|
ernstben
Samba Member
Joined: April 30, 2005
Posts: 621
Location: Manchester, Mi
|
| Posted: Mon Jul 26, 2010 2:42 pm Post subject: |
|
|
I've been working slowly at getting the heater channel under control. First I cut out everything cancerous and was left with basically the inside curve and most of the bottom plate with the captive nuts. I decided that since no one would ever see the inside of the heater channel, I would make up my own channels using what was there as a guide. Here's a diagram of what I ended up doing taken from KGPR's site:
Yellow = parts I created
Blue = bought part
Green = original
I'm up to the point where I can weld on the outside panel:
I also worked a bit on the front of the car, where the lower parts of the inner fenders had rotted away. I made a panel and welded it in:
I think, however, that it swoops down too low, so I'm going to have to recut it and try again. I didn't have anything to go on because the other side is gone as well. Oh well, trial and error. |
|
| Back to top |
|
|
mexico
Samba Member
Joined: January 04, 2008
Posts: 67
Location: guadalajara
|
| Posted: Mon Jul 26, 2010 4:51 pm Post subject: |
|
|
| Congrats, wonderful work, I have to learn how to do it my self, thats one of my dreams. |
|
| Back to top |
|
|
ernstben
Samba Member
Joined: April 30, 2005
Posts: 621
Location: Manchester, Mi
|
| Posted: Wed Jul 28, 2010 7:35 pm Post subject: |
|
|
I have had a bit of time to devote the Ghia as of late, so I was able to almost complete the installation of the new rocker panel and fender parts. Here are the crappy cell phone pics:
I'm a bit worried about the butt weld joints on the fenders. I read a lot before I attempted it about going slowly and spacing out the welds so as not to build up any excess heat. When I ground the welds down, I moved around a lot and tried not to let heat build up here either.
However, I still think there is a little bit more distortion in the panels than I was expecting. Running one's hand down the side, it is very evident where the panels meet. Is that something that the body filler can rectify? Am I screwed? |
|
| Back to top |
|
|
ernstben
Samba Member
Joined: April 30, 2005
Posts: 621
Location: Manchester, Mi
|
| Posted: Wed Aug 04, 2010 1:34 pm Post subject: |
|
|
Work continues very slowly on the ol' Ghia. I welded up some pinholes over her fresh air grill:
And then trimmed and the welded in the new fender support thingy. Fit was AWFUL.
Before:
Part:
After:
|
|
| Back to top |
|
|
|


