| Author |
Message |
Studt's 73
Samba Member
Joined: April 09, 2010
Posts: 145
Location: Pacific, Missouri

|
 Posted: Sat Aug 21, 2010 7:29 pm Post subject: READ ME (1973 Riviera Resto Project) Posted: Sat Aug 21, 2010 7:29 pm Post subject: READ ME (1973 Riviera Resto Project) |
 |
|
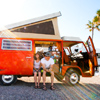
This is our thread about our restoration project (Fairsbanks) on a 1973 VW Bus Riviera. A little about this bus, it was purchased in Juneau Alaska in 1973, then moved the northern Mishigan in 1979, and now to Pacific Missouri in 2010. Our plan is to restore this bus back to a semi-rust-free van, we know you can't get then all, but we can get most. I know people say this bus will take way to much time, just find another one. Just keep in mind that time is not money for me. This time is something that I can learn from, and have fun doing no matter how difficult it might be.
So, this bus has already had one big project done, he is the thread; http://www.thesamba.com/vw/forum/viewtopic.php?t=423099&highlight=. This is our thread about the camper top restore, here a couple pictures of the finished product.
Now we are onto the project at hand, fixing the rust problems on the passenger rear of the bus. Here are some before pictures;
Need to cut below the blue tape
As you can see, there is a lot of rust on this bus, most likely the rustiest bus you will ever see.
Here are some pictures of the removing of the rear wheel arch section.
Some cutting
Small section removed
Another view
The rear section, going to need a battery tray and maybe a new corner
Now the fully removed skin
The donor wheel arch from the juck bus we got
We are also going to be replacing the c-pillar on the passenger side, which we also got from the donor bus (will post a picture soon). Long story longer, we're going to be placing a big section of the rear wheel arch, then replacing the b-pillar, next onto the door track assembly, to the c-pillar, onto the rear wheel skin, and then the finishing touches. More pictures to come.
By the way, this is "Project Fairbanks." |
|
| Back to top |
|
 |
Chazbot
Samba Member

Joined: August 30, 2009
Posts: 197
Location: New Jersey
|
| Posted: Sat Aug 21, 2010 7:55 pm Post subject: |
|
|
| Have a great time working on that project and keep the pictures coming. We love it. |
|
| Back to top |
|
|
Studt's 73
Samba Member
Joined: April 09, 2010
Posts: 145
Location: Pacific, Missouri
|
| Posted: Sun Aug 22, 2010 5:56 am Post subject: |
|
|
| Thanks Chazbot, we'll be sure to have fun taking on this project. I almost forgot, on the picture titles another view you can see the donor c-pilar that is going to be used (has some orange on it). |
|
| Back to top |
|
|
brotha bran
Samba Member

Joined: January 30, 2006
Posts: 345
Location: Maine
|
| Posted: Sun Aug 22, 2010 9:28 am Post subject: |
|
|
Nice! A hands free cutoff tool! Where does one acquire something like this?   
Kidding of course...nice start so far! Keep it coming.
_________________
1976 Transporter "Betsy" [Reef Blue, Rebuilt 2L w/ Raby CS heads, 010 Auto. ]
1968 Single Cab "Neptune" [Neptune Blue, stock, stock, stock] |
|
| Back to top |
|
|
Studt's 73
Samba Member
Joined: April 09, 2010
Posts: 145
Location: Pacific, Missouri
|
| Posted: Sun Aug 22, 2010 11:04 am Post subject: |
|
|
| brotha bran wrote: |
Nice! A hands free cutoff tool! Where does one acquire something like this?
Kidding of course...nice start so far! Keep it coming. |
Now there is something to think about! |
|
| Back to top |
|
|
fogoo
Samba Member

Joined: November 29, 2009
Posts: 100
Location: Toronto
|
| Posted: Sun Aug 22, 2010 11:19 am Post subject: |
|
|
Nice work so far... I've been pondering picking up a 70 Sportsmobile I found that needs the same sort of bodywork - not quite as much rust though! Would be great to see your progress....
_________________
64 Single Cab
71 Bug.....sold
73 Bus......sold
75 Panel Bus - converting to Subi power http://www.thesamba.com/vw/forum/viewtopic.php?t=651073&highlight=
78 Kombi Camper |
|
| Back to top |
|
|
chazz79
Samba Member

Joined: August 15, 2008
Posts: 2268
Location: ohio
|
| Posted: Sun Aug 22, 2010 1:05 pm Post subject: |
|
|
Are you re-inforcing the top? I have a riviera top on my bus and It's got a bit of sway in the middle If you're going through the repaint process please detail that for me. I still have to remove my top for some repairs. I'm thinking of lining it with some oak strips with stainless ribs (like an old truck bed) and building an overhead console to make my Dvd screen look a bit more finished out.
_________________
One day as a lion, or a lifetime as lamb
The green monster in bits and peices: http://www.thesamba.com/vw/forum/viewtopic.php?t=332556&highlight=green+monster |
|
| Back to top |
|
|
guanella74
Samba Member
Joined: March 13, 2009
Posts: 520
Location: Boulder, CO
|
| Posted: Sun Aug 22, 2010 1:08 pm Post subject: |
|
|
Much respect for takign on this bus - loving the photos - keep em coming!
_________________
- Travis
1974 Westy CampMobile - the OG!
1979 Transporter
1979 Transporter
1977 Transporter
1974 Transporter
1973 Transporter
1971 Westy |
|
| Back to top |
|
|
Studt's 73
Samba Member
Joined: April 09, 2010
Posts: 145
Location: Pacific, Missouri
|
| Posted: Sun Aug 22, 2010 3:27 pm Post subject: |
|
|
| chazz79 wrote: |
| Are you re-inforcing the top? |
Yes the top was re-inforced by some 3/4" hickory wood that I had left over from a woodworking project. Actually you can check out the forum at the top of this thread, there is a link that takes you to the camp rebuild, but here is some infomation. I take one end off of the camper to use for a mold.
Bad picture, but here are to new arches for support where we had a crack
The arches are under the wood-slat top, and are where the new handles are going to be placed.
With the painting, I lightly sanded the entire fiberglass camper, filled and sanded all holes. We used an normal automotive body paint, but it was an enamal paint (don't mess up). I've heard of people using boat paint, but we went with an auto paint, has instructions on the can, and there is no instruction that can help you, you just have to do it. Let me know if you need more information and I can type something up on the other forum about the painting process. |
|
| Back to top |
|
|
Studt's 73
Samba Member
Joined: April 09, 2010
Posts: 145
Location: Pacific, Missouri
|
| Posted: Sun Aug 22, 2010 3:33 pm Post subject: |
|
|
Chaz79, almost forgot, after screwing the new arches in place. I used two, not one, but two tubes of Liquid-Nails Construction Adhesieve to make sure that the arches were glued in place. We have moved the newly paint top a couple, including standing it upright on the side, and the top had no play in it.
I didn't get much done today, the wife was doing laundry so I couldn't get any welding done. But on a brighter note, I was able to make two custom cedar handles, once again from some left-over wood from a previous project.
|
|
| Back to top |
|
|
chazz79
Samba Member
Joined: August 15, 2008
Posts: 2268
Location: ohio
|
| Posted: Mon Aug 23, 2010 8:56 am Post subject: |
|
|
You can see where mine has a sway in the backbone like a worn out trail nag.
It also has a 1.5 inch hole init where a tree limb was sticking out so I assume a tree has fallen on it once upon a time. If you check out my thread most of my labor mirrors what you're doing. I lucked out in getting a 73. Now that I've studied all the other variations of bus, there's no other year I'd rather have.
_________________
One day as a lion, or a lifetime as lamb
The green monster in bits and peices: http://www.thesamba.com/vw/forum/viewtopic.php?t=332556&highlight=green+monster |
|
| Back to top |
|
|
rumplestilskin
Samba Member

Joined: January 13, 2007
Posts: 963
Location: los banos,CA
|
| Posted: Mon Aug 23, 2010 12:56 pm Post subject: |
|
|
if u are going to be pulling and pushing on the handles u will want to use screws ceder in not the strongest wood. so be sure to pre drill
_________________
currently 71 super auto-stick, 73 ghia, 71 yellow ghia , a 68 square w71 fi, a 77 bus station wagon deluxe. and finaly finaly a 74 riveria with volvo pawer .ITS AN ADDICTION!!! |
|
| Back to top |
|
|
Studt's 73
Samba Member
Joined: April 09, 2010
Posts: 145
Location: Pacific, Missouri
|
| Posted: Mon Aug 23, 2010 4:32 pm Post subject: |
|
|
| rumplestilskin wrote: |
| if u are going to be pulling and pushing on the handles u will want to use screws ceder in not the strongest wood. so be sure to pre drill |
I actually have wooden pegs going through the center of both the handle and the block under it, and the block under the handle has a screw running through it attahing the the supports undern the wood slats. The handles "shouldn't" come flying off, but you never know. |
|
| Back to top |
|
|
jl74supercab
Samba Member

Joined: April 13, 2007
Posts: 172
Location: Flemington, NJ
|
| Posted: Mon Aug 23, 2010 5:41 pm Post subject: |
|
|
That top looks great. Did the wood planks add any extra weight? I would be concerned about the springs being able to hold it up.
I just finished my 73 Riviera restore.
_________________
73 Riviera Camper - "Julius"
74 Super Convertible - "Someday" |
|
| Back to top |
|
|
Studt's 73
Samba Member
Joined: April 09, 2010
Posts: 145
Location: Pacific, Missouri
|
| Posted: Tue Aug 24, 2010 5:34 am Post subject: |
|
|
| jl74supercab wrote: |
| That top looks great. Did the wood planks add any extra weight? I would be concerned about the springs being able to hold it up. |
I think with the two extra supports and the slat wood, I "might" have gained an extra 5lbs at the most. From what I remember about my top, I'm pretty sure that I took quite a bit of pulling down to get it to come down. I "think" that the extra wieght should be fine, but we'll find out once we get the new seals for it.
On the that note, we've been looking for a new seal kit but have not had much luck find one for a 73, any ideas? I was think about getting this in black or white http://www.jcwhitney.com/colored-flexible-interior...386y1973j6
with this seal http://busdepot.com/details.jsp?partnumber=231070709. Everything I find is for a Westy, would that kit fit on mine? |
|
| Back to top |
|
|
jl74supercab
Samba Member
Joined: April 13, 2007
Posts: 172
Location: Flemington, NJ
|
| Posted: Tue Aug 24, 2010 5:38 am Post subject: |
|
|
5 lbs should be no problem at all.
I used that seal from bus depot. No issues with fit.
_________________
73 Riviera Camper - "Julius"
74 Super Convertible - "Someday" |
|
| Back to top |
|
|
Studt's 73
Samba Member
Joined: April 09, 2010
Posts: 145
Location: Pacific, Missouri
|
| Posted: Tue Aug 24, 2010 2:26 pm Post subject: |
|
|
| jl74supercab wrote: |
5 lbs should be no problem at all.
I used that seal from bus depot. No issues with fit. |
Your Bus turned out nice, would love to see some pictures of it, and it is about the same color we are going to paint ours. |
|
| Back to top |
|
|
Studt's 73
Samba Member
Joined: April 09, 2010
Posts: 145
Location: Pacific, Missouri
|
| Posted: Tue Aug 24, 2010 5:44 pm Post subject: |
|
|
Si I had about an hour to work on Fairbanks tonight, not a ton done, but a c-pillar removed. This is going to be the removing and soon install of the slightly used c-pillar from a 34 year old donor.
Before cutting out the rusted c-pillar, I have to remove the spot-welds from the cargo area of the bus. I use a cheapo Harbor Frieght spot-welder cutter bit. I start by either using a punch and a small drill bit the center a hole on the spot-weld. Here's a picture of both.
Before the cut, will be cutting below the tape again.
After the cut
My next task will be removing all the old metal from the donor c-pillar, pictures to come soon.[/img] |
|
| Back to top |
|
|
Studt's 73
Samba Member
Joined: April 09, 2010
Posts: 145
Location: Pacific, Missouri
|
| Posted: Mon Sep 06, 2010 3:40 pm Post subject: |
|
|
| Ok, so I'm going to need some help with this camper top of mine. After having a nice long weekend in Colorado we came home to an f-ed up camper top. While we were gone I guess there was a storm that brought some rain. We have our newly restored camper top sitting on a couple of sawhorses. There was about three inches of standing water on the top when we got home (and it was covered by a tarp that kept the water off of the top, but not the wieght of the water) and the fiberglass top is now molded to the shape of the sawhorse. In other words the top has a big f-ing dent in it where the sawhorse was. The new wood on the inside needs to be completely done again and the "dented" finberglass needs to be un-dented. Does anyone know a way that you can pull dents from the fiberglass. I was thinking about putting some wieght on the top and heating it with a heatgun, would this work. Any input would be great. |
|
| Back to top |
|
|
jl74supercab
Samba Member
Joined: April 13, 2007
Posts: 172
Location: Flemington, NJ
|
| Posted: Mon Sep 06, 2010 3:43 pm Post subject: |
|
|
Ouch!. I don't have any advice, but I do have lots of sympathy. Someone will chime in with advice.
_________________
73 Riviera Camper - "Julius"
74 Super Convertible - "Someday" |
|
| Back to top |
|
|
|


