| Author |
Message |
fflood
Samba Member
Joined: June 29, 2006
Posts: 36

|
 Posted: Wed Feb 02, 2011 2:05 pm Post subject: Single cab: work in progress Posted: Wed Feb 02, 2011 2:05 pm Post subject: Single cab: work in progress |
 |
|
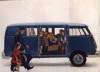
I have had this single cab for a while now, but I am trying to make a push to get it on the road this year. I'm hoping that starting this thread will help keep me motivated and will possibly serve as a little inspiration to those of you out there that started with rusty metal.
I apologize if this thread is a bit heavy on the pictures.
Now for the story:
I acquired the single cab from one of my friends. He had bought up a few busses from a local VW guy. In the deal he had gotten a panel and a subhatch westy but he was really looking for a single cab.
While he was on the hunt for a single cab, he came across KevinMc who was looking to get rid of an old single cab in trade for a camper. They worked out a trade and we went a grabbed the single cab and we dropped off the subhatch. It was a shame to see the subhatch go, but at the time a single cab was the goal. In the mean time my friend gets a deal on another single cab so he let me take the older single cab.
When I first got the single cab, we wheeled it into the shop and we got own to business trying to figure out what all it needed. We actually spent one night just getting it drivable, but decided we needed to attack all of the rust. This should give you an idea of what all was bad:
The chassis number is 225168. I'm not sure if ths makes it a '56 or '57, but either way it's cool to me.
More to come... |
|
| Back to top |
|
 |
fflood
Samba Member
Joined: June 29, 2006
Posts: 36
|
| Posted: Wed Feb 02, 2011 2:13 pm Post subject: |
|
|
Time to get to work:
I started by removing the old floor of the truck bed. The metal was very thin. Getting this out would allow me to get to the cargo area so I could repair it.
|
|
| Back to top |
|
|
Ian
Samba Moderator

Joined: August 28, 2002
Posts: 4932
Location: 713
|
| Posted: Wed Feb 02, 2011 2:18 pm Post subject: |
|
|
yes, yes, yes!! nice early truck!!!!
_________________
All your Buses are belong to us.
Love and good roads!
IN LOVING MEMORY OF ROB CRESS 1968-2012
**ACHTUNG DO NOT USE AA BRAND PRODUCTS OR BUY ANYTHING FROM PACIFIC PARTS INTERNATIONAL IN CALIFORNIA** |
|
| Back to top |
|
|
sventinker
Samba Member
Joined: June 10, 2009
Posts: 1481
Location: the sandbox
|
| Posted: Wed Feb 02, 2011 2:20 pm Post subject: |
|
|
there is no such thing as too many pictures! thanks for sharing and good luck on that very vice single
_________________
April 3rd 62 standard mgr/pw
374 North American equipment
Includes 6 popouts
025 Safety belts
195 Adjustable bench seat/backrest (until 1963)
| dawerks wrote: |
| Perfection only comes with delusion. |
http://www.oacdp.org/ |
|
| Back to top |
|
|
srfndoc
Samba Member

Joined: August 21, 2010
Posts: 3275
Location: SoCal
|
| Posted: Wed Feb 02, 2011 2:23 pm Post subject: |
|
|
| fflood wrote: |
Time to get to work:
I started by removing the old floor of the truck bed. The metal was very thin. Getting this out would allow me to get to the cargo area so I could repair it.
|
Nothing like drilling out a shitload of spot welds. Nice SC, good luck on the project.
_________________
RPM=(MPH*336* (R&P*4th*1.26))/Tire Diameter in inches |
|
| Back to top |
|
|
fflood
Samba Member
Joined: June 29, 2006
Posts: 36
|
| Posted: Wed Feb 02, 2011 2:23 pm Post subject: |
|
|
I took the rotten cargo floor out, cleaned up all of the structural metal pieces and sprayed a coat of Por15 on everything. Then I started on replacing the cargo floor.
|
|
| Back to top |
|
|
Ian
Samba Moderator
Joined: August 28, 2002
Posts: 4932
Location: 713
|
| Posted: Wed Feb 02, 2011 2:30 pm Post subject: |
|
|
lovin the stance!!
_________________
All your Buses are belong to us.
Love and good roads!
IN LOVING MEMORY OF ROB CRESS 1968-2012
**ACHTUNG DO NOT USE AA BRAND PRODUCTS OR BUY ANYTHING FROM PACIFIC PARTS INTERNATIONAL IN CALIFORNIA** |
|
| Back to top |
|
|
fflood
Samba Member
Joined: June 29, 2006
Posts: 36
|
| Posted: Wed Feb 02, 2011 2:31 pm Post subject: |
|
|
| Quote: |
| Nothing like drilling out a shitload of spot welds. Nice SC, good luck on the project. |
Yeah, it wasn't fun drilling all of those. Some were so rusty I couldn't even tell where they were so I could drill them. Usually the rusty ones just would peel up when we lifted up on the sheetmetal.
It took quite a bit of time though...
|
|
| Back to top |
|
|
d-rick
Samba Member

Joined: May 14, 2006
Posts: 889
Location: Columbia,MO
|
| Posted: Wed Feb 02, 2011 2:42 pm Post subject: |
|
|
Nice man ,more the pics the better 
Whats the plans for the paint? going with the orig. color?
_________________
1959 mango-trailerbus
1962 single cab *1/2
1966 13 window
1967 panel/camper
1968 cig-panel *1/2
1968 passenger bus *1/2
1969 beetle
1969 dormobile
1978 sage green Westy
1990 DoKa
2002 Golf TDI |
|
| Back to top |
|
|
fflood
Samba Member
Joined: June 29, 2006
Posts: 36
|
| Posted: Wed Feb 02, 2011 2:46 pm Post subject: |
|
|
I found a donor for the bed, so I could put it back together. I plan on using the single cab for work and hauling stuff around, so I decided a used bed would be o.k. I'd hate to mess up a pristine floor that's for sure.
Did I mention that I hate drilling spot welds?
Sorry no before picture of the donor.
These images are before it was welded in. I was worried about it being too warped but I put bags of sand on the various sections while we tacked it down. It worked great! |
|
| Back to top |
|
|
fflood
Samba Member
Joined: June 29, 2006
Posts: 36
|
| Posted: Wed Feb 02, 2011 2:49 pm Post subject: |
|
|
| Quote: |
Nice man ,more the pics the better
Whats the plans for the paint? going with the orig. color? |
Yeah, I think I'm going to go with the Dove Blue. I don't want to mess this bus up for anyone who might own it after me. It seems there are a TON of Dove Blue singles cabs out there though. I need to pick up it's birth certificate though so I can find out more about it. |
|
| Back to top |
|
|
twinwindows
Samba Pimp

Joined: December 08, 2000
Posts: 4086
Location: So.Cal. Highland Park GFK!
|
| Posted: Wed Feb 02, 2011 2:59 pm Post subject: |
|
|
Takes lots of dedication to do what your doing, keep hammering it out. It`ll be worth it when your done.
_________________
CRG
My builds
BAD TEMPER 11
CHRISTINE
GFK LIFER!
| myzamboni wrote: |
| Yeah, everyone's now doing it GFK style . . . everythinig is covert until the finished product is revealed. |
|
|
| Back to top |
|
|
Culito
11010101

Joined: December 07, 2006
Posts: 5866
Location: Columbia Missourah
|
| Posted: Wed Feb 02, 2011 9:45 pm Post subject: |
|
|
Nice! I remember seeing this one in the classifieds (I think) when I was shoppin' for an SC. Too much of a project for me at the time. Glad to see it's getting some some well-deserved justice!
_________________
Copyright CJ Industries, Inc.
'64 standard w/2.0L type 4
'62 bug
| johnnypan wrote: |
| ...dont pay no attention to Culito,he's a cornhole.. |
|
|
| Back to top |
|
|
sventinker
Samba Member
Joined: June 10, 2009
Posts: 1481
Location: the sandbox
|
| Posted: Wed Feb 02, 2011 10:21 pm Post subject: |
|
|
Question? how does welding the new (used) bed on with the por 15 coating everything work can you weld through it?
_________________
April 3rd 62 standard mgr/pw
374 North American equipment
Includes 6 popouts
025 Safety belts
195 Adjustable bench seat/backrest (until 1963)
| dawerks wrote: |
| Perfection only comes with delusion. |
http://www.oacdp.org/ |
|
| Back to top |
|
|
fflood
Samba Member
Joined: June 29, 2006
Posts: 36
|
| Posted: Wed Feb 02, 2011 10:28 pm Post subject: |
|
|
| Quote: |
| Question? how does welding the new (used) bed on with the por 15 coating everything work can you weld through it? |
No, you can't weld through it. I took a flap wheel and sanded it off anywhere I was welding. |
|
| Back to top |
|
|
GDOG57
Samba Member

Joined: March 19, 2006
Posts: 1065
Location: Gilbert,Arizona
|
| Posted: Wed Feb 02, 2011 10:40 pm Post subject: |
|
|
Nice thread. Looks like from the vin # it's a late January or February '57.
_________________
'57 oval window deluxe,Agave green(L240) 2276cc w/51.5 IDA's
'57 type 2 panel ( L31 dove blue) project daily driver,Singleport 1955cc
'69 Squareback (L30A Royal Red) |
|
| Back to top |
|
|
Chris Paterson
Samba Member
Joined: February 21, 2010
Posts: 1068
Location: Newbury Park, CA
|
| Posted: Wed Feb 02, 2011 11:27 pm Post subject: |
|
|
Hey cool stuff man! I've got a 57' dove blue single cab!
It's awesome so see so many photos. Right now my SC is my driver, but it definitely needs some sheet metal attention, especially the floors and lower nose area. It's good to see you tackling the job, and helps me know what I'd need to get into if I decide to tackle that stuff! I'll be watching!
_________________
- Chris
58' PGSG |
|
| Back to top |
|
|
fflood
Samba Member
Joined: June 29, 2006
Posts: 36
|
| Posted: Wed Feb 02, 2011 11:29 pm Post subject: |
|
|
| Man, that looks awesome! I hope mine looks half as good as yours. |
|
| Back to top |
|
|
aaronr25
Samba Member

Joined: September 06, 2009
Posts: 267
Location: NW Arkansas
|
| Posted: Thu Feb 03, 2011 7:18 pm Post subject: |
|
|
Nice score.
Keep us updated with progress.
_________________
65 Bug
66 Landcruiser FJ40
Life's too short to drive a stock VW |
|
| Back to top |
|
|
fflood
Samba Member
Joined: June 29, 2006
Posts: 36
|
| Posted: Fri Feb 04, 2011 11:39 pm Post subject: |
|
|
Interior metal is in pretty good shape. I had a few small cracks in the door, but nothing too bad. I'll have to patch the floor on the pass and driver side eventually. Need to get some proper patches for these though.
|
|
| Back to top |
|
|
|


