| Author |
Message |
bquigs
Samba Member
Joined: March 01, 2008
Posts: 116
Location: Kittery, ME

|
 Posted: Sun Feb 13, 2011 8:10 am Post subject: Adding a Poptop, Hole Only w/bed Posted: Sun Feb 13, 2011 8:10 am Post subject: Adding a Poptop, Hole Only w/bed |
 |
|
I got my Syncro 3 years ago, just a passenger van but from CA and nearly rust free, rare here in the northeast. It immediately became an obsessive project. So far I have dealt with most of the common Vanagon and Syncro issues and put in Zetec. The huge body of info here has been indispensable. This is my first real attempt to add to it and I thought that my version of putting a pop-top on a passenger Syncro may be of interest to some. I went with hole in the roof rather than the full roof skin mostly because of time but also so I could do something a bit unique. Besides, I could still do the full roof someday if I wanted. I was inspired by what I saw in this thread from the Brickwerks,
http://www.brick-yard.co.uk/forum/westy-poptop-fit_topic49144.html
this is what I came up with:
After cutting the hole I re-created the flange that rest just below the stock westy roof line and caries the pop top lift strut. I also needed this to support the front part of the bed and the metal trim ducts that have the nice curtain tracks in them. I did this with a two part assembly of angle stock, one modified and riveted to the roof and the other to the upper frame of the van that lies just below the roof skin. I used big wide steel rivets on the bottom and many small ones on the top to tie it into the existing roof skin. The result is a lower flange more than strong enough to support the pop top and front part of the bed.
To trim the front and back of the hole I sandwiched the sheet metal edge between three layers of ½ Baltic birch plywood bent to fit the curve of the roof and cut to fit the curve of the hole. The Baltic birch has no gaps so the edge can be finished and it looks good, especially with amber shellac. I would have loved to have this all the way around the opening but it would have been too thin along the sides and would have been in the way of that lower support flange.
I tore out my headliner a long time ago because of mice infestation so I needed a ceiling. For the front headliner I simply got a piece of 1/8 Baltic birch plywood, traced the original westy plywood, cut it out, and attached it the same way as a stock Now I think you can get an idea of what im going for here. I like the look of the birch plywood with amber shellac, kinda 50s camper. The back required a bit more custom fitting. I prefer the gentle arch to the flat ceiling of the westy. I was able to reuse the rubber trim on the plywood ceiling just the original westy did. I had to trim the curtain ducts to make them fit against the ceiling and trim correctly but its these sort of details that can make the whole thing look like crap.
I made a level platform for the bed by spacing out th edges but its just sort of hanging out up there for now. One I get the top on and have a better hanfdle on clearance I will make some sort of double fold hinge and front support.
I will let you all decide how you think its coming out but im happy with it so far. I still have to do the cabintry and some more interior stuff, I will post more as I go.
_________________
-----------------
87 Syncro Zetec |
|
| Back to top |
|
 |
ragnarhairybreeks
Samba Member

Joined: October 26, 2009
Posts: 1890
Location: Sidney B.C. Canada
|
| Posted: Sun Feb 13, 2011 8:42 am Post subject: |
|
|
Very nice work! More pictures please 
alistair
_________________
'86 7 passenger syncro, converted to westy pop top, project still in progress
'82 westy, diesel converted to gas in '94, now gone...
https://shufti.blog/
Old address still works...
http://shufti.wordpress.com |
|
| Back to top |
|
|
syncroid
Samba Member

Joined: May 30, 2006
Posts: 312
Location: CA
|
| Posted: Sun Feb 13, 2011 9:02 am Post subject: Re: Adding a Poptop, Hole Only w/bed |
|
|
Looks like the metal edge is rolled over in this shot. How did you do that? |
|
| Back to top |
|
|
?Waldo?
Samba Member

Joined: February 22, 2006
Posts: 9752
Location: Where?
|
| Posted: Sun Feb 13, 2011 10:41 am Post subject: |
|
|
| I think what looks like a rolled metal edge in that photo is actually the hump where the next cross member occurs and the wood piece in front of it overlaps the rest of the metal and is flush with the top of the cross member hump. |
|
| Back to top |
|
|
bquigs
Samba Member
Joined: March 01, 2008
Posts: 116
Location: Kittery, ME
|
| Posted: Sun Feb 13, 2011 1:41 pm Post subject: Re: Adding a Poptop, Hole Only w/bed |
|
|
| windwing wrote: |
Looks like the metal edge is rolled over in this shot. How did you do that? |
Yup, as Andrew pointed out its just the edge of hump that is already in the roof. The opening in the westy roof cuts into this hump by about an inch, to the edge of the support thats in there. I needed flat metal to sandich in between the plywood so I went right up to it.
_________________
-----------------
87 Syncro Zetec |
|
| Back to top |
|
|
akyrie
Samba Member
Joined: March 24, 2010
Posts: 519
Location: Driftless, Wisco
|
| Posted: Mon Feb 14, 2011 9:04 am Post subject: |
|
|
Looks great, I am started on this same process, but so far I only have the luggage rack on. I am thinking about trying to make the brackets like you did to allow the bed frame and pop top to work normally without modifying the front supports. As you said,"I re-created the flange that rest just below the stock westy roof line and caries the pop top lift strut" Do you have more pictures of this mechanize? was it difficult to create? I don't have a lot of experience with metal fabrication but would be willing to try just about anything. Also, bquigs I might be interested in buying a pair if you could fabricate it at a reasonable price. Thanks
A. |
|
| Back to top |
|
|
bquigs
Samba Member
Joined: March 01, 2008
Posts: 116
Location: Kittery, ME
|
| Posted: Mon Feb 14, 2011 10:28 am Post subject: |
|
|
akyrie,
Ill try and find a few more pics of the flange under construction. The first three pictures pretty much show the assembly though. The lower flange is just steel angle stock available at most any hardware store. The other piece is 2" aluminum angle stock ripped down using a table saw to about a 1/4 inch on one side (wear your safety goggles for this one!) This edge is what gets riveted onto the remaining roof skin while the wider edge is riveted between the angel iron and the body of the van. Its very sturdy. The aluminum is NOT the best material for this though because it cant be worked that much before it will break. You have to bend it down to an angle less than 90 to mach the curve of the roof and form it over the "hump" in the roof that s about midway through where you cut the hole. Honestly it was kind of a pain. It would be better to use a sheet metal bending machine to make this out of steel but I dont have access to one of those.
Keep in mind that I wanted this lip not only to mount the pop-top struts but to mount the curtain trim ducts and for the bed. There is more than one way to do this depending on what you want. As I was making this I was also thinking how cool it would be to have the wood trim all the way around, like a boat hatch or something. All you would need to do is cut the hole a bit smaller, leaving yourself some metal to sandwich.
As for the bed working normally, not quite. While there is clearance for the two pieces of plywood up there without a mattress there will not be enough clearance for the front section to swing out using a single hinge, it will have to do so in two sections, or slide out. I haven't quite tackled this problem yet.
_________________
-----------------
87 Syncro Zetec |
|
| Back to top |
|
|
ragnarhairybreeks
Samba Member
Joined: October 26, 2009
Posts: 1890
Location: Sidney B.C. Canada
|
| Posted: Mon Feb 14, 2011 3:28 pm Post subject: |
|
|
bquigs,
did you attach the Al angle to the box section part of the van, where the roof meets the wall? It sort of looks like you might have, or am I just looking at the rivets holding both angles together?
alistair
_________________
'86 7 passenger syncro, converted to westy pop top, project still in progress
'82 westy, diesel converted to gas in '94, now gone...
https://shufti.blog/
Old address still works...
http://shufti.wordpress.com |
|
| Back to top |
|
|
edgood1
Samba Member
Joined: September 30, 2004
Posts: 2049
Location: Plymouth, MA
|
| Posted: Mon Feb 14, 2011 6:53 pm Post subject: |
|
|
bquigs -
that looks awesome! Thats exactly how I envisioned doing it as an alternative to grafting the entire roof skin..maybe on the next one.
I'd love to see your van. Hopefully when the weather gets nicer there will be a meet up in the area.
p.s. thanks again for the rear seat!
_________________
1987 Syncro Westfalia powered by Subaru
1963 Panel to Deluxe Bus project :::: (photo album)
'65 Westfalia |
|
| Back to top |
|
|
bquigs
Samba Member
Joined: March 01, 2008
Posts: 116
Location: Kittery, ME
|
| Posted: Tue Feb 15, 2011 9:04 am Post subject: |
|
|
| ragnarhairybreeks wrote: |
bquigs,
did you attach the Al angle to the box section part of the van, where the roof meets the wall? It sort of looks like you might have, or am I just looking at the rivets holding both angles together?
alistair |
Alistair, Here is a cross section. The large rivets go through both angle pieces so that downward loads on the steel piece is distributed to both the structural part of the van and the roof skin.
_________________
-----------------
87 Syncro Zetec |
|
| Back to top |
|
|
ragnarhairybreeks
Samba Member
Joined: October 26, 2009
Posts: 1890
Location: Sidney B.C. Canada
|
| Posted: Tue Feb 15, 2011 9:28 am Post subject: |
|
|
bquigs,
that diagram is incredibly useful. For some reason, I was having a tough time visualizing exactly where to cut the roof skin. Mark Drillock pointed me to pics where more of the roof skin was left on, and the pop top strut was shortened to fit. But I like your method better.
I also really like the "stacked" ply treatment of the front and rear edges. Have you installed the pop top hold down latch yet?
cheers
alistair
_________________
'86 7 passenger syncro, converted to westy pop top, project still in progress
'82 westy, diesel converted to gas in '94, now gone...
https://shufti.blog/
Old address still works...
http://shufti.wordpress.com |
|
| Back to top |
|
|
bquigs
Samba Member
Joined: March 01, 2008
Posts: 116
Location: Kittery, ME
|
| Posted: Wed Feb 16, 2011 5:55 pm Post subject: |
|
|
| ragnarhairybreeks wrote: |
bquigs,
that diagram is incredibly useful. For some reason, I was having a tough time visualizing exactly where to cut the roof skin. Mark Drillock pointed me to pics where more of the roof skin was left on, and the pop top strut was shortened to fit. But I like your method better.
I also really like the "stacked" ply treatment of the front and rear edges. Have you installed the pop top hold down latch yet?
cheers
alistair |
Thanks alistair, glad you like it and hope it helps you on your project. I have attached the latch, it sits back a few inches from the edge
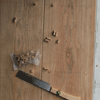
I know this will make it a bit difficult to use but I wanted to attache it the same way as the westfalia did. Unfortunatly i didnt take any pictures but its very easy because the its sits right up against the forward most roof support that is shared by both vans. I do have this pic of a westy without the headliner
You can see the silver threaded bar which the latch screws into. The bolts go through both the roof skin and the flat part of the support. The holes in the roof are elongated left to right and the holes in the latch are elongated front to back, allowing for adjustment in all directions. One thing that was different, I had to add a about a 3/32 spacer between the roof skin and the support as there was a gap betwen them and the roof would have buckled when the latch was tightned down. Hard to explain without a pic, sorry.
--Brendan
_________________
-----------------
87 Syncro Zetec |
|
| Back to top |
|
|
ragnarhairybreeks
Samba Member
Joined: October 26, 2009
Posts: 1890
Location: Sidney B.C. Canada
|
| Posted: Wed Feb 16, 2011 7:44 pm Post subject: |
|
|
Brendan,
your pics are very inspiring. I have to admit to being reluctant to cut into the roof of my van, even though (and this fact doesn't do anything to make me look skilled) I have a stripped westy in my driveway!
But... the latch region on your conversion, it looks like it might be difficult to get your fingers up into the release bar with the latching piece set back as shown. And the ply. lam. doesn't help.
Please tell me you have checked this
alistair
_________________
'86 7 passenger syncro, converted to westy pop top, project still in progress
'82 westy, diesel converted to gas in '94, now gone...
https://shufti.blog/
Old address still works...
http://shufti.wordpress.com |
|
| Back to top |
|
|
bquigs
Samba Member
Joined: March 01, 2008
Posts: 116
Location: Kittery, ME
|
| Posted: Thu Feb 17, 2011 8:30 am Post subject: |
|
|
Alistair is right. I did a simple test this morning on the stock westy by holding an additional 2" piece of wood at the edge of the opening and it will be very difficult if not impossible to operate the latch as intended. The additional height of the plywood trim (only about 1/8" above the roof) is not a problem but the 2" setback from the edge is. Although I didn't think it would be this bad I didn't entirely overlook this. I was going to add a handle of some sort to the back of the latch housing to pull down, I will also have to add an eye bolt though the housing connected to the latch mechanism, like a trigger pull. That should do the trick.
I just need a bit of warm (above freezing) weather to bleach and wash the top before I put it on. The winter conditions have been harsh this year and my unheated garage is getting a bit old.
Question for those that have had the top off: Better to put the tent on with the top off or OK to do while on the van? Is it like a LOT esier on one way or another or just a bit esier. I would like to save the tent for the warm weather but want to get the top on ASAP.
--Brendan
_________________
-----------------
87 Syncro Zetec |
|
| Back to top |
|
|
MarkWard
Samba Member

Joined: February 09, 2005
Posts: 17122
Location: Retired South Florida
|
| Posted: Thu Feb 17, 2011 9:11 am Post subject: |
|
|
Brendan, what year is the top from? Either version, I think since you have the top off attach the canvas to the top first. If you have an early top that uses vinyl and staples, for sure you will want to a install the canvas to the top first. On my 82, I was unable to reuse the factory vinyl for a couple reasons. I bought some wood half round, primed it and used that to secure the canvas to the fiberglass top. The material folds over the attachment and completely hides it from view. You will need to drill a ton of holes into the steel roof to attach the canvas retaining straps. You may want to pre drill and temporarily install the tracks. It will be way easier than when the top is installed. Especially in the back rear corners. Great project. mark
_________________
☮️ |
|
| Back to top |
|
|
wbx
Samba Member
Joined: April 11, 2005
Posts: 1254
Location: Monterey, CA
|
| Posted: Thu Feb 17, 2011 10:43 am Post subject: |
|
|
| rsxsr wrote: |
| Brendan, what year is the top from? Either version, I think since you have the top off attach the canvas to the top first. If you have an early top that uses vinyl and staples, for sure you will want to a install the canvas to the top first. |
Good advice. My only input is that my canvas installation experience (going on 9 years ago, now  ), was that installing bottom first was the correct approach because the canvas was a little too tall. I took up the slack up high where it is much less noticeable and was able to get it nice and straight/evenly taut. Maybe canvas QC is better these days where you can just toss it in... ), was that installing bottom first was the correct approach because the canvas was a little too tall. I took up the slack up high where it is much less noticeable and was able to get it nice and straight/evenly taut. Maybe canvas QC is better these days where you can just toss it in...
_________________
'84 Westy (first owner).......but my daily driver has pedals
My "perspective" mantra:
A Volkswagen Vanagon is just a material thing,
As such, it is of the earth,
And if i need to, I can let my Van go. |
|
| Back to top |
|
|
?Waldo?
Samba Member
Joined: February 22, 2006
Posts: 9752
Location: Where?
|
|
| Back to top |
|
|
ragnarhairybreeks
Samba Member
Joined: October 26, 2009
Posts: 1890
Location: Sidney B.C. Canada
|
| Posted: Thu Feb 17, 2011 11:34 am Post subject: |
|
|
Hey, that Frank G. mod is from my old website!
Been thinking about Brendan's idea of an eye bolt. I can see if you take apart latch and cut off the narrow section of the latch pin, then drill and tap for bolt,it might work out great.
top view of latch assembly, idea is narrow section that protrudes through rear part of latch is removed.
another angle of the narrow section
then something like this (perhaps larger one) threaded in
here is a shot of the stationary part of latch showing the curve that fits the curve of the roof. The backing plate doesn't seem to be curved.
alistair
_________________
'86 7 passenger syncro, converted to westy pop top, project still in progress
'82 westy, diesel converted to gas in '94, now gone...
https://shufti.blog/
Old address still works...
http://shufti.wordpress.com |
|
| Back to top |
|
|
bquigs
Samba Member
Joined: March 01, 2008
Posts: 116
Location: Kittery, ME
|
| Posted: Thu Feb 17, 2011 12:54 pm Post subject: |
|
|
Ha! I have that old site bookmarked, hadn't made the connection though. Lots of good info there alistair, and on your new blog page.
Im thinking of a cross between the Frank G mod and the eyebolt as you described it. Probably two relativity small eye bolts, one fixed on each side of the operating lever for the latch, with a small threaded rod through both. Then a larger handle on the outside to pull down on. This would give you a bit more to grab onto. I will have to get that latch off and fiddle with it.
--Brednan
_________________
-----------------
87 Syncro Zetec |
|
| Back to top |
|
|
ragnarhairybreeks
Samba Member
Joined: October 26, 2009
Posts: 1890
Location: Sidney B.C. Canada
|
| Posted: Thu Feb 17, 2011 4:53 pm Post subject: |
|
|
Brendan,
You're probably right in making a more sturdy and easier to grip release mech. The eyebolt, even with a short lanyard attached may result in more down pull than back pull.
Although, a braided/"sinneted" lanyard with monkey's fist at end would add to the nautical feel.
alistair
_________________
'86 7 passenger syncro, converted to westy pop top, project still in progress
'82 westy, diesel converted to gas in '94, now gone...
https://shufti.blog/
Old address still works...
http://shufti.wordpress.com |
|
| Back to top |
|
|
|


