| Author |
Message |
MarkWard
Samba Member

Joined: February 09, 2005
Posts: 17155
Location: Retired South Florida

|
 Posted: Tue Jan 10, 2012 7:49 am Post subject: Posted: Tue Jan 10, 2012 7:49 am Post subject: |
 |
|
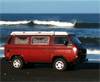
Jon why would you not mount the unit in the side closet again? Just curious. Jed, here is a picture of my floor area under the stock camper seat in my 82.
The tape on the one rib was where I had decided on cutting the holes for the intake and exhaust, but stopped short of doing anything permanent until I checked here and thought it through a little more.
I like Dan's idea of installing it to the rear firewall and routing the intake and exhaust out the firewall. Still trying to imagine up, a proper bracket in my mind. mark
_________________
☮️ |
|
| Back to top |
|
 |
Jon_slider
Samba Member
Joined: April 11, 2007
Posts: 5091
Location: Santa Cruz, Crowdifornia
|
| Posted: Tue Jan 10, 2012 8:03 am Post subject: |
|
|
> Jon why would you not mount the unit in the side closet again?
Because the location of the heat output I chose, is not ideal. Above the closet door is not as useful as heat output at the floor.
The hot air duct also gets hot, so I dont really want any clothing in contact with the duct.
the heater itself is fine in the closet, once you build a shelf over it, and box the heater duct so it cant singe a nylon sleeping bag or down jacket. (not sure the duct gets hot enough to melt nylon, but its hot to touch)
Regardless of the location of the heater, I would want the heat to come out at the floor, somehow. I miss being able to sit on the bench seat with the door open, while the heater blasts into my towel draped legs.
I also dont like the heat output above the closet because it either blows at the stove, or at my head when I sit in the back seat. Messes up my hair, and my toes are still cold after surfing. Also the floor dries faster if there is heat blowing accross the floor. |
|
| Back to top |
|
|
danfromsyr
Samba Member

Joined: March 01, 2004
Posts: 15144
Location: Syracuse, NY
|
| Posted: Tue Jan 10, 2012 8:05 am Post subject: |
|
|
Mom's bringing her van out on thursday, I'll update *this post* then with images of my install location and routing that night.
_________________
| Abscate wrote: |
| These are the reasons we have words like wanker |
|
|
| Back to top |
|
|
MarkWard
Samba Member
Joined: February 09, 2005
Posts: 17155
Location: Retired South Florida
|
| Posted: Tue Jan 10, 2012 8:31 am Post subject: |
|
|
| danfromsyr wrote: |
| Mom's bringing her van out on thursday, I'll update *this post* then with images of my install location and routing that night. |
Dan, that would be helpful. Look forward to seeing what you came up with.
Jed the Spread, In the video, it shows getting the fuel supply after the filter, which makes sense, but I have a question.
I was concerned about introducing a suction leak by "T"ing in to the injection pump supply. I was considering adding a small check valve between the espar supply pump and the engines fuel supply circuit. The video makes no mention of adding a check valve, so I am wondering if the electric pump acts like a check valve when it is off. If not, is the Espar fuel system sealed in such a way that air could not enter the system. It makes sense that it would need to be, but I have no experience with this unit. thanks
_________________
☮️ |
|
| Back to top |
|
|
fixedgear
Samba Member

Joined: November 09, 2006
Posts: 300
Location: Clear Lake, Manitoba, Canada
|
| Posted: Tue Jan 10, 2012 8:46 am Post subject: |
|
|
Jed's been of help to me as well putting a D2 in a gas van in my case.
My floor seems to be somewhat different than Jed's or maybe the '82 diesel.
I have enough flat floor space to only accomodate the silicone seal but not the
included flat plate, so I used a 1 1/8 inch hole saw and drill arbor to drill the two large holes. The unit will just clear the vertical seat support, and the electrical harness can be moved to the other side if needed.
For those with a gas van, I found a garden tractor tank 13" by 8" by 8 " that holds
8 1/2 litres. It fits nicely behind the right rear tail light. jed though mentions the option of putting a tank in the hollow of the spare wheel in the clamshell, what a great idea!
Spoke to the rep at Cool-it concerning mounting as the pump will be slightly higher than the heater, but apparently it is OK to have the small plastic tube after the pump coil down, as long as the pump is in the upward angle range.
The rep. emphasised making sure the clear tube buts into the pump outward nipple
within the black connecting hose with clamps as being important.
Barnaby
_________________
1986 Wolfsburg Weekender |
|
| Back to top |
|
|
MarkWard
Samba Member
Joined: February 09, 2005
Posts: 17155
Location: Retired South Florida
|
| Posted: Tue Jan 10, 2012 8:56 am Post subject: |
|
|
| Quote: |
| My floor seems to be somewhat different than Jed's or maybe the '82 diesel. I have enough flat floor space to only accomodate the silicone seal but not the included flat plate |
I would have thought all the the Vanagons would have the same floor stamping through all the years. Interesting to know their are some differences. Does the weekender have the same type of rear seat as the Westy? The Westy rear seat is really a box with no back. Under it is a fiberboard to level the seat against the Westy's floor. I don't recall, but when I had the water tank out, maybe that area had a flat area. Anyhow, a picture of your install would be nice if you have one. mark
_________________
☮️ |
|
| Back to top |
|
|
fixedgear
Samba Member
Joined: November 09, 2006
Posts: 300
Location: Clear Lake, Manitoba, Canada
|
| Posted: Tue Jan 10, 2012 9:12 am Post subject: |
|
|
I drilled one pilot hole to get an orientation underneath. Measuring from that there was only a small flat area within the storange area. In Jed's video it shows cutting off thicker "ears" off of the flat plate gasket, that I think would be for sealing the
dip in the floor level. Maybe not though. I could not see how the floor plate included would be of help to me as long as the thickness of the floor made spec.
I thought the silicone seal would work the best.
My Weekender is a Westy as well, if the term applies to the pop-up roof. It has the Westalia decal on the pop-up. As far as the seat design I think it would be the same as your unit. Sloping rear wall and vertical support in front.
I left the stock heater underseath as well. My idea is to put a false floor above the
D2 to accomodate storage.
_________________
1986 Wolfsburg Weekender |
|
| Back to top |
|
|
MarkWard
Samba Member
Joined: February 09, 2005
Posts: 17155
Location: Retired South Florida
|
| Posted: Tue Jan 10, 2012 9:24 am Post subject: |
|
|
| Quote: |
| My Weekender is a Westy as well, if the term applies to the pop-up roof. It has the Westalia decal on the pop-up. As far as the seat design I think it would be the same as your unit. Sloping rear wall and vertical support in front. |
When the seat bottom is up in your weekender, what do you see when you look down? My rear seat from my 82 has a wood floor. Under the seat is another peice of fiber board that acts as a "shim". To mount the unit directly to the Vanagon sheetmetal floor, I would need to cut out a fairly large hole in the seat floor and the fiberboard shim just to access the Vanagon sheetmetal. I'll take a couple more pictures tonight. I don't mind mounting the unit to the seat's floor, but really want to be sure of the install location before I start making permanent changes. Barnaby, if you have a picture of your install that would be helpful too. thanks mark
_________________
☮️ |
|
| Back to top |
|
|
danfromsyr
Samba Member
Joined: March 01, 2004
Posts: 15144
Location: Syracuse, NY
|
| Posted: Wed Jan 25, 2012 11:55 am Post subject: |
|
|
OK so here's finally our install images.
there were a few things we were after on this install.
#1 minimize lost space
#2 minimize extra holes in the body metal
#3 keep ALL of the ESPAR unit & pump INSIDE the vehicle, it's too valuable to lose to corrosion.
#4 while these are very nice they are still only ~6k BTUs so keep the heat output where it can be most enjoyed. direct access for cold hands, bodies and feet.
the T-fitting and ventout the face of the seat was a afterthought but I'm very pleased with it's help in minimizing concerns of mom blocking the heater with bedding. though in the images you can see a cardboard insert where I'm trying to get a 60/40 balance to the heat.. the upper one was initially intended to be the primary outlet.. if I had access to a heat vent that was able to close I'd be more happy but it's easy to block the upper duct if the feet need more heat.
it was a little BFH & cutting to get the paper duct past the lower corner of the seat base & hinges, but not too much to feel destructive. just regular "installer" adjustments were needed.
I had to raise the AUX battery on the wood platform anyways, so then I figured to add the T-fitting under it.
in my images we do take care to not allow the seat belt to drape on th hot exhaust. the hot exhaust makes another 90* turn with some galvanized EMT to exit by the DS rear wheel well. Diesel fumes are stinky & mom's nose is sensative.
I'd like to make a nicer panel to mount the vent in the sidepanel but I had that laminate flooring scrap readily available.
the plan is to completly box in the heater & Aux battery with a Pegboard panel to keep gear out of both of them.
while it is a noisy sucker, it does provide very frugal heat. and mom's not keen on running any heater all night, no where anyways..
we chose the Diesel heater for mom's for a few reasons
#1 we already had it.
#2 we can know exactly how much fuel is in the tank with a quick look w/o opening anything
#3 we can refill it at any hour of the night with Diesel or Kero even from Walmart @ 3am if needed. we carry a 1L MSR bottle with Kero in it which is good for 8~10hrs of operation anyways as a backup.
_________________
| Abscate wrote: |
| These are the reasons we have words like wanker |
|
|
| Back to top |
|
|
MarkWard
Samba Member
Joined: February 09, 2005
Posts: 17155
Location: Retired South Florida
|
| Posted: Wed Jan 25, 2012 12:44 pm Post subject: |
|
|
Dan, thank you for taking the time to post your moms install. Had mine had the holes for the rear heater coolant lines, I probably would have done something similar based on your original description. Last weekend after confirming where to drill my holes in the floor, I made the plunge. I cut a 4" hole in the floor of the seat and the fiber board underneath. I cut two 1 3/4" holes in the sheet metal next to each other and cut out the center peice coming up with an oval shaped hole on top of the sheet metal rib.
I then took a peice of thin aluminum and cut two 1 1/2' holes in it and removed the connecting peice between the holes. This will sandwich between the sheetmetal and the fiberboard to give me a small lip to seal the sheetmetal. Pictures are at home. I cut two 2 3/8th" holes in the face of the seat for a return and outlet. I am going to bend up some .063 aluminum to make a cover to protect the heater. So far so good. I mounted the controller in the tray above the sink where I can reach from above and from the driver's seat. Still need to hook up the fuel pump and route the intake and exhaust.
Trying to figure out the best way to tie into the diesel fuel system. I have a spare banjo bolt for the fuel filter outlet that I am going to try and modify for a fuel pickup. This would be neat and supply filtered fuel. Just not sure if the espar pump may somehow let air into the supply side of the injection pump. We are going camping this weekend and figured on using Mr Buddy one more time, but I may push to finish the install this week. Nice installation job Dan. Thanks for posting. mark
edit: The banjo bolt on top of the stock fuel filter worked out fine. I used a 3/16th 90 degee 1/8 brass pipe fitting. I will add the picture next time I have the engine hatch open. Here are some pictures.
_________________
☮️ |
|
| Back to top |
|
|
davevickery
Samba Member
Joined: July 16, 2005
Posts: 2887
Location: Fort Collins, CO
|
| Posted: Tue Dec 25, 2012 5:25 pm Post subject: |
|
|
This is an older post but I wanted to add some comments about testing a used Espar D2 heater for reference. I think a lot of people who wind up these heaters buy them used as they are plentiful and the first thing you should do is test it. This is what I learned going through that process:
1) Get a gallon kerosene from home depot. Kerosene helps to clean the heater and people including Espar say you should run some through the heater every now and then to clean it. So it works for testing. If you have diesel, you could use that.
2) Prime the fuel line as best you can before hooking it up. I sucked kerosene into the line. Every time mine failed to light it was not fully primed or had air leaks. The hose clamps need to be very tight or you will get air leaks. The clear fuel hose is nice because you can see if there is air or air bubbles in the line (some air bubbles are o.k. the heater can deal with it). Another tip is if the pump is ticking loudly there is probably air getting into it. These 2 posts below are pretty good regarding priming and fuel issues. http://letonkinoisvarnish.co.uk/Eberspacher_Fuel_1.html http://www.vwt4forum.co.uk/showthread.php?t=104242&page=2
3) The plug on the D2 has a lot of wires (12 wires in a 16 pin plug plus 2 from the fuel pump). Most of them you don't need for testing. Some are for diagnostics, or go to the controller thermostat, or go to a remote thermostat, etc. I just cut the plug off and spliced on some longer wire. It is too hard trying to connect to the tiny plug pins and I will need longer wiring anyway. A complete harness would be nice they are $90 on ebay, so I just cut the plug. If you bought a used heater most likely you didnt get the harness.
4) Connect the fatter red wire to battery +. Connect brown to battery -. But put a 15A fuse on one of those connections. Don't skip this step or you may destroy the ECU if you touch the wrong wire somewhere.
5) Hook the fuel pump brown wire to battery . Hook the other fuel pump wire (green/red) to the green/brown wire from the plug.
6) Use the yellow wire from the plug to turn on the heater. When you touch it to battery + the start sequence will begin. (use a clip or something so you don't need to hold it the whole time as the heater takes a while to get going).
I found that the heater draws 12 amp for a few seconds, then drops to 8 while the glow plug is heating up. Once the glow plug stops being energized (~60-90 seconds), the amp draw drops to .4 to 1.0A.
Disconnecting the yellow wire from battery + acts like the thermostat has reached its set temp and the heater will go into cool down mode with the fan still running for a minute. Don't disconnect main power to the heater as it needs to cool down after it has been heating.
When you first connect yellow to power, you'll hear one relay click. The fan will come on slow. The fan speed ramps up over the next minute. Around a minute, the fuel pump should start to tick. Once the fuel lines are primed, the heater should ignite and you will definitely hear it. If the heater doesnt ignite and the fan slows down, it will try one more time I think (I switched mine off at that point and tried again in a few minutes). If it doesnt start on the 2nd try, you can disconnect power and wait 5 minutes and try again. You apparently don't want to get a bunch of error codes as it may lock up at some point. If it doesn't start on the 2 or 3 try double check that it is getting fuel.
The heater does not seem to be sensitive to the exhaust/intake hoses lengths or even being on there although I did connect the exhaust hose so it wouldnt be sucking fumes into the intake and I could direct the heat away. Assuming your heater is working, you will want to read up on the wiring of the controller/thermostat and all the other installation requirements. Here are some of the sites I found helpful.
http://letonkinoisvarnish.co.uk/Eberspacher_Wiring_1.html
http://www.ourexcellentadventures.com/wp-content/documents/AirtronicManualAug09.pdf
http://www.youtube.com/watch?v=7RpFZ3vpIs4
www.youtube.com/watch?v=X_rYGNySEQw
http://www.espar.com/tech_manuals/AIRTRONIC%202-4/!Airtronic%20Flame%20Tube%20Carbon%20Removal.pdf
There are a lot of sites about installing one of these, including good posts here but just getting past the testing step is nice.
Hope this helps, Dave |
|
| Back to top |
|
|
CHARLIE-DONT-SURF
Samba Member
Joined: November 16, 2007
Posts: 332
Location: Cow County, UK
|
| Posted: Wed Dec 26, 2012 3:56 am Post subject: |
|
|
Under rear seat on passenger side on US van. There is part of the floor pan with no pressings in so is perfectly flat and the right size and shape to mount a D2 in/on. Lends itself for a good and easy install and easy to route the fuel lines and also route the inlet/exhaust so they are protected by the chassis rail(s)  |
|
| Back to top |
|
|
davevickery
Samba Member
Joined: July 16, 2005
Posts: 2887
Location: Fort Collins, CO
|
| Posted: Fri Dec 28, 2012 11:05 am Post subject: |
|
|
Here are some more testing tips for a used Espar D2.
Once you confirm the heater works using just the basic wiring, you will want to connect up the mini-controller. This is what I did. The mini-connector is the non-programmable switch that is the least expensive Espar option. I found one on epay for $60. There are five wires coming out of the controller harness. They connect up to the main harness as follows:
1. red from mini controller goes to red of the 16 pin main harness wires
2. yellow from controller goes to yellow from harness
3. grey from controller goes to grey/red from harness (not to the solid grey-that is for a remote thermostat sensor located on the controller and is supposed to be less accurate - you might use that wire, if you're heater is stowed away in a cold space). The grey/red wire reads temp sensor located in the air intake end of the heater.
4. Put the brown and yellow/violet wires from controller together and connect them to the brown/white harness wire (not to the fat brown wire).
I didn't use the pink, blue, blue/black, blue/white,grey, or grey/black wires. They are for diagnostics and other things.
I ran into problems with the wiring. Trying to create temporary jumper wires caused it not give enough power the glow plug and it wouldnt ignite. Either the wires were too thin, too long, or didnt have secure connections. I also was running the wiring through my multimeter to see the amp draw so that may have delivered less current. I also ran into a problem using a 10A fuse initially, and it blew the fuse after a while. That turned off the fans while it was still very hot. Not a good thing. They say use a 20A fuse, and thats what I am using now.
I found a small lawnmover tank with a nice mounting bracket on ebay for $10. Snowblowers and other power equipment have nice gas tanks if you are using the heater in a gas vanagon. I plan to test gasoline in the heater at some point and see if that works.
These things are pretty darn loud, especially when not running on low. A muffler seems like a requirement. Maybe there are posts about making these as quieter I'm not there yet.
This was the test stand I made for it.
|
|
| Back to top |
|
|
ripvanagonwinkle
Samba Member
Joined: July 07, 2010
Posts: 97
|
| Posted: Mon Dec 31, 2012 7:26 am Post subject: |
|
|
| davevickery wrote: |
I plan to test gasoline in the heater at some point and see if that works.
This was the test stand I made for it.
|
You have a great post!!! except for this... the diesels use a glow plug, and gas version of this heater (b1lc) is a spark plug. I can't imagine that it's somehow going to work. |
|
| Back to top |
|
|
davevickery
Samba Member
Joined: July 16, 2005
Posts: 2887
Location: Fort Collins, CO
|
| Posted: Mon Dec 31, 2012 9:05 am Post subject: |
|
|
From: http://www.espar.com/html/products/technology_air.html
How an Espar AIRTONIC Air Heater works
As soon as the heater receives its starting pulse, the following processes are triggered by the central control unit:
Automatic safety check.
The burner motor starts, the combustion space in pre-ventilated, the glow plug is warmed up, the metering pump conveys fuel.
The glow plug ignites the fuel-air mixture, the flame is formed.
The hot combustion gases flow through the heat exchanger.
The hot air fan draws in room air or fresh air.
The heat of the combustion gases is transferred by the heat exchanger to this hot air.
Looking at the B4 vs the D4, I see most of the parts are the same, including the glow pin. The comparison is for the B4 to D4 as I don't I don't see the B2 in their manual, maybe they don't make it anymore. The fuel pump is the same for the D2,B4,D4. The fuel rate is adjusted differently for the gas version. The burner is a different part number, otherwise they seem to share everything. It would be nice to see a B4 burner and a D4 burner side by side.
The difference in fuel metering is listed below for the bigger gas and diesel units, but I assume the percentages would be the same for the smaller one. It is also supposed to adjusted for high altitude (Espar calls that anything above 4900 feet). My question is how much does the heater automatically compensate for in terms of fuel type and fuel delivery. It is the ECU that triggers the fuel pump. It appears to be running fine on Kerosene at 5,000 feet. And I've seen posts saying people have run them on gas, just haven't seen any details. Worst case, I imagine the safety features of the unit will shut it down if it is running too rich or too hot or if it doesn't like any of the sensor inputs. It has several safety shutoffs built in.
Below is the difference in fuel metering between the B/D4 units.
5.0 ml and 6.0 ml. on AIRTRONIC D4
6.8 ml and 7.6 ml. on AIRTRONIC B4
http://www.espar.com/tech_manuals/AIRTRONIC%202-4/...0ESPAR.pdf
In the parts listing above the B4 is the 20-1812 unit, the others are the D2 or D4 versions, in 12V and 24V with various installation kits. Dave |
|
| Back to top |
|
|
ripvanagonwinkle
Samba Member
Joined: July 07, 2010
Posts: 97
|
| Posted: Mon Dec 31, 2012 11:22 am Post subject: |
|
|
| I stand corrected... it seems the gas versions use a glowplug too, perhaps the same one. |
|
| Back to top |
|
|
davevickery
Samba Member
Joined: July 16, 2005
Posts: 2887
Location: Fort Collins, CO
|
| Posted: Tue Jan 08, 2013 5:12 pm Post subject: |
|
|
I tried running the D2 heater on gasoline and it does not run right. It will fire up but it runs rough and the flame intermittently goes out. I think I could feel the fuel pulses through the exhaust. The glow pin fires it back up when it goes out, but it sounds really rough compared to running it on kerosene. My guess is it isn't getting enough fuel. I know people have said it works for them, so maybe it is a matter of adjustments to the fuel pump, or perhaps the colorado altitude is adding another variable. And my D2 is used so it may not be 100%.
I decided it isn't a big deal to run a separate tank. Probably need minimum of a 1 gallon tank for the heater, which will easily run all night and probably a few 3 days. Plus a refill jug for a longer trip. I used about a cup+ of kerosene in 5 hours with a 30 degree temp difference as a rough estimate. Maybe someone else has better real life numbers.
Heaters suck if they aren't working perfect. |
|
| Back to top |
|
|
IrideWheelies
Samba Member
Joined: July 09, 2009
Posts: 386
Location: Olympia, WA
|
| Posted: Tue Jan 08, 2013 5:32 pm Post subject: |
|
|
Any ideas on where you'll mount the kerosene tank? I still haven't found an acceptable solution.
_________________
89' Dove Blue Syncro Hightop |
|
| Back to top |
|
|
davevickery
Samba Member
Joined: July 16, 2005
Posts: 2887
Location: Fort Collins, CO
|
| Posted: Tue Jan 08, 2013 5:42 pm Post subject: |
|
|
Good point, hadn't really thought about it. Between the frame rails under the bench seat under the van with the filler neck coming up through the floor? Under the bench? One gallon wouldn't take up a lot of space. But you don't want to smell it or have it leak.
Where did you consider putting it and what were the pros/cons? |
|
| Back to top |
|
|
ripvanagonwinkle
Samba Member
Joined: July 07, 2010
Posts: 97
|
| Posted: Wed Jan 09, 2013 9:25 pm Post subject: |
|
|
| davevickery wrote: |
I tried running the D2 heater on gasoline and it does not run right. It will fire up but it runs rough and the flame intermittently goes out. I think I could feel the fuel pulses through the exhaust. The glow pin fires it back up when it goes out, but it sounds really rough compared to running it on kerosene. My guess is it isn't getting enough fuel. I know people have said it works for them, so maybe it is a matter of adjustments to the fuel pump, or perhaps the colorado altitude is adding another variable. And my D2 is used so it may not be 100%.
I decided it isn't a big deal to run a separate tank. Probably need minimum of a 1 gallon tank for the heater, which will easily run all night and probably a few 3 days. Plus a refill jug for a longer trip. I used about a cup+ of kerosene in 5 hours with a 30 degree temp difference as a rough estimate. Maybe someone else has better real life numbers.
Heaters suck if they aren't working perfect. |
I wonder if you could use a spare O2 sensor to see if your are running lean. |
|
| Back to top |
|
|
|


