| Author |
Message |
hans j
Samba Member

Joined: May 06, 2006
Posts: 2714
Location: Salt Lake City UT

|
 Posted: Wed Apr 25, 2012 10:28 pm Post subject: My syncro westy: 3 months so far with LOTS of pics. Posted: Wed Apr 25, 2012 10:28 pm Post subject: My syncro westy: 3 months so far with LOTS of pics. |
 |
|
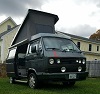
I decided I had to have one after a vanagon came into the shop with an ALH TDI. And if I was going to have one, I wanted a syncro westfalia. Hey, if you're going to go, go big.
I was watching The Samba like a hawk and had searches from Craigslist saved and would immediately email me when the key word "syncro" would come up. Called on one in Vancouver, emailed about a westfakia in Arizona but struck a deal with one in upstate New York. Sight unseen except for pictures, I bought it. 1986 syncro westfalia. Savhanna beige metallic. 280000 KM (173K miles)I HAD to have one NOW! Now to get it here...
It ran, but poorly (turns out all the intake pipes were rusted out), it needed a brake line and park brakes were weak. These are things shipping companies just LOVE! Well my neighbor is a truck driver and he had me call his dispatcher, now to wait for people to bid on it. I don't remember how long it took now, but the sell was VERY patient and had the room for it and luckily it didn't snow much up there this year.
Finally a truck show up to pick it up!!!! They said it wouldn't fit and refused it 
Finally another truck showed up!!! This trucker likes a challenge apparently, and he made it work. They picked it up at the PO's house, delivered it right to my work. $1300 shipping bill later, I finally had possession of my very own syncro westfalia. My first car was a 1980 vanagon. I was back.
It's rusty, barely runs and no brakes. They call these "mechanics specials" for a reason.
Interior was pleasantly complete though, down to one ice cube tray!
First order of business was cleaning. Then cleaning. And more cleaning.
Pressure washing...
What I vacuumed out...
It's a few inches deep 
Then used almost half a costco pack of disinfectant wipes on EVERY single surface I could put my fingers on. Took home all the curtains and cushion covers to wash. Spring fresh! Did I mention when I drained the water tank little mouse bones poured out? Oh yeah... I think I bleached my fingers a little after cleaning the tank out. After sitting for almost 3 years, I am surprised only one mouse went for a swim.
Stove and sink work!
I had to pull the little toggle switch apart and press it back together, now it works great.
Cleaned up beautiful!
Still don't know if the fridge/cooler works yet, planning a truckfridge anyway in the future. I'll check this weekend maybe.
_________________
1986 Canadian Syncro Westy TDI - 1989 Syncro Single Cab - 2001 Audi S4 - 1981 VW Caddy ABA - 1980 VW Caddy EV - 1973 VW T-181 |
|
| Back to top |
|
 |
hans j
Samba Member
Joined: May 06, 2006
Posts: 2714
Location: Salt Lake City UT
|
| Posted: Wed Apr 25, 2012 10:28 pm Post subject: |
|
|
Ok so it's clean! Now to make it run... Smoke test reveals it's just leaking out the intake pipes. And the valve cover that's rusted through. And the injector seals.
Take care of all that and clean all the goop off the engine that has built up. Removed the P/S pump (rack has been converted to manual  ) and got everything working. Won't pass emissions, O2 sensor isn't reading. Found out the cat had been installed backwards so I fixed that and tried several O2 sensors. Still nothing. Bought a new sensor. Still nothing. Finally cut back the corrosion of the green wire and how about that, it works! Get the timing set and everything is working well... ) and got everything working. Won't pass emissions, O2 sensor isn't reading. Found out the cat had been installed backwards so I fixed that and tried several O2 sensors. Still nothing. Bought a new sensor. Still nothing. Finally cut back the corrosion of the green wire and how about that, it works! Get the timing set and everything is working well...
Hard intermittent start, like it's flooding... Turns out my coolant temp sensor for the ECU is bad. Well the connection is bad, sometimes. New connector on it and it runs great! I pull a working idle module and bypass valve out of the parts bin and it works great! Definitely one of the smoothest vanagons I have dealt with Also changed the plugs (NGK BP6ET), cap, rotor, fuel filter and one wire that was bad. Just stuff I end up doing when I buy a new car. Pretty sure there was lots of other stuff but that was months ago now.
Random pic: Apollo awning deployed and works!
Fiamma brackets are on the way to modify to hold this thing, the one inch wide, 25 year old brackets are cutting it anymore. Also replacing one of the body holder brackets that's missing.
Random pic: I washed it!
Scrubbed the top, gave it a hot bath, looks 100 times better and I feel good about myself.
_________________
1986 Canadian Syncro Westy TDI - 1989 Syncro Single Cab - 2001 Audi S4 - 1981 VW Caddy ABA - 1980 VW Caddy EV - 1973 VW T-181 |
|
| Back to top |
|
|
hans j
Samba Member
Joined: May 06, 2006
Posts: 2714
Location: Salt Lake City UT
|
| Posted: Wed Apr 25, 2012 10:29 pm Post subject: |
|
|
It needs brakes. Bad. Why replace with stock when I have bigger stuff lying around and seemingly lots of time on my hands? I replaced the brake line that was broken so I could at least drive it around the block, but everything needed freshing up...
I'll put these on
VW/Audi 288x25mm with single piston calipers. Basically the Van-Cafe kit? Modern parts that are cheap and easy to obtain are why I went with these parts.
Mocking it up
Barely fits under the 15" steel Eurovan wheels I am using!
Brakes with the caliper carriers modified, 10.9 bolts and stainless braided brake lines I had made locally. These will actually be installed much later.
_________________
1986 Canadian Syncro Westy TDI - 1989 Syncro Single Cab - 2001 Audi S4 - 1981 VW Caddy ABA - 1980 VW Caddy EV - 1973 VW T-181 |
|
| Back to top |
|
|
hans j
Samba Member
Joined: May 06, 2006
Posts: 2714
Location: Salt Lake City UT
|
| Posted: Wed Apr 25, 2012 10:30 pm Post subject: |
|
|
So wheels... The Eurovan wheels I used are ET44. I want to use these because they THICK! Shouldn't be any tacos for me on the trail  Plus we have 6 of them at the shop... Anyway, I need to use spacers to get close to correct syncro offset ~ET30. This means I need longer wheel studs (Thanks Chris at T3Technique!!). After talking with him, I decided on the 65mm front and rear. That way, I can run just about anything I want in the future too. I thought they were going to be a little long but they ended up fitting perfect! Plus we have 6 of them at the shop... Anyway, I need to use spacers to get close to correct syncro offset ~ET30. This means I need longer wheel studs (Thanks Chris at T3Technique!!). After talking with him, I decided on the 65mm front and rear. That way, I can run just about anything I want in the future too. I thought they were going to be a little long but they ended up fitting perfect!
So longer wheel studs means pulling the front hub out of the wheel bearing. What did I say about going big earlier? Well, if I'm in there, may as well do x and x and x...
I disassembled EVERYTHING in the front suspension, sandblasted, cleaned and used rustbullet on everything. Installed new bushings (stock for now), ball joints and wheel bearings. And of course my longer wheel studs which is what I REALLY wanted...
I also welded these tabs on for future limiting straps if needed.
All ready to go in!
Looking awesome if I say so myself.
Ebay tires from discounttiredirect show up
Sandblast, self etch, prime donor wheels
Wet sand and paint with Krylon industrial semi-gloss black
yup
Loving it!
_________________
1986 Canadian Syncro Westy TDI - 1989 Syncro Single Cab - 2001 Audi S4 - 1981 VW Caddy ABA - 1980 VW Caddy EV - 1973 VW T-181 |
|
| Back to top |
|
|
hans j
Samba Member
Joined: May 06, 2006
Posts: 2714
Location: Salt Lake City UT
|
| Posted: Wed Apr 25, 2012 10:30 pm Post subject: |
|
|
Front brakes installed!
They look awesome.
They don't fit under the thick wheels.
Just needed a little haircut.
Now the brakes are still soft as I broke off the left rear bleeder when I first did the front brake hose. Turns out that was probably a good thing it didn't work.
(pic from the future of what I would come to find)...
Pretty sure if the brakes did work, it would have ripped the backing plate right off.
Did I mention it was rusty?
I had been planning rear disc brakes for a while now. I knew I needed them. I could have gotten parts off a parts van for drums, but what do I stupidly do? Oh yeah, go big...
_________________
1986 Canadian Syncro Westy TDI - 1989 Syncro Single Cab - 2001 Audi S4 - 1981 VW Caddy ABA - 1980 VW Caddy EV - 1973 VW T-181 |
|
| Back to top |
|
|
hans j
Samba Member
Joined: May 06, 2006
Posts: 2714
Location: Salt Lake City UT
|
| Posted: Wed Apr 25, 2012 10:31 pm Post subject: |
|
|
I don't want to commit to doing the rear brakes just yet so I built some fun stuff...
3/16" 2x2" sliders
Tubes that slid into the stock location and have pinch threads welded in
I was nearly able to jack the side of the car up with minimal deflection (from the center of the sliders), I have since welded a couple tabs to help out with the load. I also welded on some tube to be able to slide the stock jack just under the sliders at the stock mounting points as well as a smaller tab that "could" hold a high-lift in place. I plan on getting an x-jack anyway, but it's nice to have there.
How do I get on top to secure my kayak in the future? I'll build a ladder!
Hangs in the rain gutter and is just bolted to the slider.
Don't weld galvanized conduit...
Been to the gas station twice, been complimented each time 
_________________
1986 Canadian Syncro Westy TDI - 1989 Syncro Single Cab - 2001 Audi S4 - 1981 VW Caddy ABA - 1980 VW Caddy EV - 1973 VW T-181 |
|
| Back to top |
|
|
hans j
Samba Member
Joined: May 06, 2006
Posts: 2714
Location: Salt Lake City UT
|
| Posted: Wed Apr 25, 2012 10:31 pm Post subject: |
|
|
Ok so rear brakes. How about these? As compared to stock syncro front rotors
Audi URS6 front brakes 276x25mm
I wanted big vented rotors. So I needed vented capable rear calipers. I chose Audi B5S4 rear calipers because I follow the forums and found a car that was being parted out. $60 later they were mine.
I had to first grind the caliper carrier to fit the larger width. Stock rear rotors are 22mm wide, so I ground them to fit 25mm wide. Easy. Now to make the caliper fit under the 15" steel wheel. Hahaha, I osuld have stopped there...
Is what I ended up with.
I love that we have a mill capable drill at work! I just wish it drilled straight holes....
Almost there
I will end up sanding them down to fit with my electric angle grinder and a sand flap thingy.
I wasn't sure how to attach them though, brackets were kind of too big, so I ended up welding a new bracket to the hub. Here's a mock up.
Ok well that's actually welded on so I'm committed!
I got them to fit well enough to satisfy me, (I'm picky about this too, and if you think grinding on the calipers was unsafe, they still have more material than the calipers used in the solid rear disc conversion).
I also converted the connection to a banjo bolt to make it run over the top of the trailing arm.
Finished calipers sans paint with more stainless braided hose goodness.
Installed! First and last set I will EVER make!
Still have to make park brake cables, but that won't be nearly as hard! And while I was in there, new rear bearings of course
_________________
1986 Canadian Syncro Westy TDI - 1989 Syncro Single Cab - 2001 Audi S4 - 1981 VW Caddy ABA - 1980 VW Caddy EV - 1973 VW T-181 |
|
| Back to top |
|
|
hans j
Samba Member
Joined: May 06, 2006
Posts: 2714
Location: Salt Lake City UT
|
| Posted: Wed Apr 25, 2012 10:31 pm Post subject: |
|
|
I took apart my CV joints to lean them out and repack them. I was a little weary about one but it feels 100% better with new grease. I used Red Line CV joint grease and love it. Sorry no pics, use your imagination. Did I mention we have a super heated parts washer at work? Oh it's awesome.
While installing my axles (which I painted with rustbullet ), I noticed my rear brake caliper was leaking out of the bleeder. I go to tighten it and it strips right out...
I JUST SPENT HOURS MODIFYING THOSE!!!!
An hour and a half later, I sucessfully modified the helicoil install tool enough to get one in.
phew...
Go to bleed it, I'm super excited. I hardly slept I was so excited!
Tee above the trans is leaking... I'm going home... I go get parts the next day, (Hose and Rubber supply by the way, they made my other hoses too), I get 6 feet of nickle plated brass brake line, a new tee and some fittings. Install couldn't have gone any easier. Remind me to get a pic of this up later!
_________________
1986 Canadian Syncro Westy TDI - 1989 Syncro Single Cab - 2001 Audi S4 - 1981 VW Caddy ABA - 1980 VW Caddy EV - 1973 VW T-181 |
|
| Back to top |
|
|
hans j
Samba Member
Joined: May 06, 2006
Posts: 2714
Location: Salt Lake City UT
|
| Posted: Wed Apr 25, 2012 10:32 pm Post subject: |
|
|
I know I am missing LOTS of work I have done, but I have been working on this thing at least 3 hours after work almost every day and usually 4-5 hours a day on the weekend. I'm bound to forget something 
Anyway, it's ready to drive. It drives AWESOME! Stock springs, Boge shocks up front, KYB gas adjusts in the rear. Feels good to me! Fix the connecter on the fuel gauge and fill it up with gasoline! 91 octane, maybe that will help with emissions. That was yesterday, still haven't been able to drive it much, doesn't like a headwind but drives 90-100 kph on the freeway just fine. Did I mention it was Canadian? I'm going to have to work on my math conversions...
Drive it to hockey after work today, awesome. Come out to go home. Won't start. F**K Feels like the starter wire from the ignition switch fell off or something. No crank, no clunk. Push started it by myself, drove it to the shop, rode my bicycle home. F**K Did I mention it's a syncro?
_________________
1986 Canadian Syncro Westy TDI - 1989 Syncro Single Cab - 2001 Audi S4 - 1981 VW Caddy ABA - 1980 VW Caddy EV - 1973 VW T-181 |
|
| Back to top |
|
|
hans j
Samba Member
Joined: May 06, 2006
Posts: 2714
Location: Salt Lake City UT
|
| Posted: Wed Apr 25, 2012 10:34 pm Post subject: |
|
|
Oh here's something I forgot to mention. I also replaced these water pipes, there were VERY rusty! Found a clean set, sandblasted them and POR15 coated them. They shouldn't rust now.
_________________
1986 Canadian Syncro Westy TDI - 1989 Syncro Single Cab - 2001 Audi S4 - 1981 VW Caddy ABA - 1980 VW Caddy EV - 1973 VW T-181 |
|
| Back to top |
|
|
slo356
Samba Member

Joined: February 18, 2002
Posts: 365
Location: Central Calif Coast
|
| Posted: Wed Apr 25, 2012 11:15 pm Post subject: Synro 3-Month Progress |
|
|
Yes, I feel happy about yourself as well. You guys in the East are amazing taking on these Vanagons with what looks like is a lot rust...I honor your great optimism. Your project looks good. The won't start thing might be the electrical part of the ignition switch. I always carry one in the tool box.
Good luck with your Syncro project. Keep you progress and photos coming.
_________________
'65 T1 Sedan
'87 T3 Syncro |
|
| Back to top |
|
|
slo356
Samba Member
Joined: February 18, 2002
Posts: 365
Location: Central Calif Coast
|
| Posted: Wed Apr 25, 2012 11:19 pm Post subject: Synro 3-Month Progress |
|
|
Yes, I feel happy about yourself as well. You guys in the East are amazing taking on these Vanagons with what looks like is a lot rust...I honor your great optimism. Your project looks good. The won't start thing might be the electrical part of the ignition switch. I always carry one in the tool box.
Good luck with your Syncro project. Keep you progress and photos coming.
_________________
'65 T1 Sedan
'87 T3 Syncro |
|
| Back to top |
|
|
Mickyfin
Samba Member

Joined: July 04, 2011
Posts: 96
Location: Kuopio, Finland
|
| Posted: Thu Apr 26, 2012 12:07 am Post subject: |
|
|
| Gotta love your bling items there, nicely done brother! |
|
| Back to top |
|
|
Mickyfin
Samba Member
Joined: July 04, 2011
Posts: 96
Location: Kuopio, Finland
|
| Posted: Thu Apr 26, 2012 12:07 am Post subject: |
|
|
| Gotta love your bling items there, nicely done brother! |
|
| Back to top |
|
|
juanb
Samba Member

Joined: December 03, 2009
Posts: 535
Location: San Francisco, CA
|
| Posted: Thu Apr 26, 2012 12:13 am Post subject: |
|
|
This is awesome, it's looking great!
Always makes me happy to see one more Westy being given a new life.
_________________
1989 Westy AT, 2.2 GoWesty.
We drove it to Argentina: http://www.vanenvan.com |
|
| Back to top |
|
|
Syncroincity
Samba Member

Joined: April 15, 2007
Posts: 1557
Location: New York City
|
|
| Back to top |
|
|
GBA 88West LA
Samba Member
Joined: September 04, 2008
Posts: 1279
Location: New Hampshire
|
| Posted: Thu Apr 26, 2012 6:16 am Post subject: |
|
|
nicework diving right in , looks like it had a maineiac tag on it , another one saved, cant wait too see it when your done, love the sliders and ladder fab.....keep on it!! 
_________________
88 Westy GL Vanaru 07 2.5 EJ25/AA Trans/oiling plates, 1.14 3rd-.77-4th..solar powered cabin |
|
| Back to top |
|
|
bosruten
Samba Member
Joined: February 11, 2011
Posts: 550
|
| Posted: Thu Apr 26, 2012 6:30 am Post subject: |
|
|
Awesome! Will you design and build your bumpers? If not, there are lots of options available.
Happy Rebuilding!
_________________
'87 Syncro Weekender |
|
| Back to top |
|
|
joetiger 
Samba Member

Joined: January 27, 2005
Posts: 5078
Location: denver
|
| Posted: Thu Apr 26, 2012 7:14 am Post subject: |
|
|
There's nothing like coming in to work on a slow morning and enjoying my breakfast burrito and tea with some amazing Vanagon rebuild porn! Thanks for sharing and keep up the great work!
_________________
Joe T.
'86 NAHT Vanagon GL Syncro/ supercharged ABA 2.0 "Pigpen"
'04 GTI 1.8T
'04 Golf R32
"get metaphysical with it. if it's simply a means to get to and from places, it will let you down. if it becomes your zen, it can't fail you." -dabaron
"Still, it's good to be afield."--VWagabond
Available Now! Vanagon to Louisiana--A Two-Lane Reckoning Through Past and Present
www.josephtrussell.com |
|
| Back to top |
|
|
purplepeopleeater
Samba Member

Joined: July 23, 2005
Posts: 3117
Location: E. Washington
|
| Posted: Thu Apr 26, 2012 7:19 am Post subject: |
|
|
Very nice brake setup, sometime you should post part numbers or what you stole the parts off of.
I'm stalling on replacing my brakes, I need to do this. |
|
| Back to top |
|
|
|


