| Author |
Message |
baxsie
Samba Member
Joined: August 09, 2005
Posts: 606
Location: Eastern Washington State

|
 Posted: Fri Sep 21, 2012 8:59 pm Post subject: Posted: Fri Sep 21, 2012 8:59 pm Post subject: |
 |
|
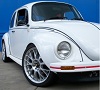
Was going through some old pictures, and found a shot of my 1968 bug:
I only had it a few years (~1990), it was my hang rig after I traded the '72 on a Jetta. |
|
| Back to top |
|
 |
baxsie
Samba Member
Joined: August 09, 2005
Posts: 606
Location: Eastern Washington State
|
| Posted: Sun Sep 30, 2012 9:24 am Post subject: |
|
|
My son has been working hard on stripping all the parts off the White 1975 LaGrande Super Beetle. It is now showing a lot of its original green (compare to the pic in this post):
The weather here has been a bit of an atypical hot dry fall. Many years by now it would be much cooler and rainy. We took advantage of the good weather to do a full, hard pressure wash of the body and pan:
Here is a quick photo tour of the bug, still wet after washing.
Driver side:
Front:
Passenger Side:
Rear:
Detail of "foam of death" rust above right rear wheel well:
That rust extends down into the wheel well also:
Interior view of the same rust area:
Here is the "foam of death" area above the left rear wheel well:
There is also a perforation by the back window, near the lower edge on the driver side:
The right pan is a complete mess. The battery box is rusted out, as you would expect:
There is a hole near the outer seat track:
Up in the passenger footwell area, the rust is rampent, many small perforations:
There is a good size hole near the inner edge of the passenger seat pylon:
In contrast, the driver side pan is near perfect:
Here is a shot of the luggage tray. The car had been re-upholstered. There was foam attached using spray adhesive, and under that area there was surface rust:
Here is a shot of the sunroof tray. I am a little surprised by how thick it is--that is how far it extends down into the passenger compartment:
The drain that empties the fresh air box was rusted out, and there is a second rust area there a bit to the left:
Here is a shot of the fresh air box from the front, rust indicated:
There is some surface (not all the way through) rust in the windows channels. Left rear quarter:
Windshield:
The channels around the sunroof will also need some rust removal/reprime:
The driver's door pillar has some perforated rust. We also ended up drilling out the bottom hinge bolt on both sides. We will have to deal with that at at some point:
Here is a walk around the car. Passenger side rear wheel well. You can see the foam of death holes:
Some blown fender mounting holes to fix:
Right rear bumper mount:
Engine compartment, right side:
Engine compartment, left side:
Left rear bumper mount:
Driver side rear wheel well:
Drivers side front wheel well:
Passenger side front wheel well:
Looking closer into the drivers side front wheel well, you can see a pretty crappy repair of the front apron. They did not remove the old apron, and the new apron is not lined up very well. I have a new front apron and spare wheel tray, so this will get repaired. I needed to replace the front apron with one that was vented, since behind the vent is where one of the the A/C condensor goes:
More blown fender mounting holes, and some impact damage to fix:
Inside the trunk on the driver side, the PO has made the fender nuts by brazing them in place:
Here is a shot inside the trunk showing the the left side repair of some front impact. We have a new spare wheel well so this should all go away:
Right side impact repair:
Looking at the repair from the outside, in front of the passenger side front tire, you can again see that the original apron was not removed. There is also some kind of nasty weld or cutting torch slice:
There was some hole patched with palstic near the fuel filler. The pressure washer excels at discovering this kind of stuff:
|
|
| Back to top |
|
|
baxsie
Samba Member
Joined: August 09, 2005
Posts: 606
Location: Eastern Washington State
|
| Posted: Sun Sep 30, 2012 5:28 pm Post subject: |
|
|
Another beautiful fall day here. The boy got the pan and body separated this morning:
We then tilted it up so we could give the underside a good scrubbing. Having the pans backlit REALLY shows how the passenger pan is COMPLETELY shot, while the driver pan has only one small hole:
Next we lifted up the body so we could get all the underside bits clean:
The fuel pump had been hanging from the hose in front under the front of the car. Now that it is all clean, you can clearly see the rubber mounting that the fuel pump was intended to be mounted to:
|
|
| Back to top |
|
|
dubllyou
Samba Member

Joined: May 24, 2012
Posts: 1251
Location: Jack & Cee Motors
|
| Posted: Sun Sep 30, 2012 7:27 pm Post subject: |
|
|
Nice work. Those farm implements come in handy for a lot more than farming I see! 
My Grandpa used to say 'there's nothing you can't do with a good tractor'.. I guess he was right! 
_________________
Two wrongs don't make a right...
three lefts do.
Wade
| vwo60 wrote: |
| You cannot polish a turd, but you can roll it in glitter. |
|
|
| Back to top |
|
|
baxsie
Samba Member
Joined: August 09, 2005
Posts: 606
Location: Eastern Washington State
|
| Posted: Mon Oct 01, 2012 9:08 pm Post subject: |
|
|
For the fenders and running boards, here is the approach I am currently thinking of:* pressure wash the dirt and loose paint off
* bead blast down to the bare metal
* have them dipped in zinc chromate (thread here)
* have the body shop prep/prime/paint as normal
* undercoat the bulk of the fender
* truck bed liner sprayed in the area behind the wheel that tends to get hammered by gravel We got all the ICEAC parts today. We did a quick "hold it in place" look at how the evaporator mounts. I am not sure that it will not take up an uncomfortable amount of the footwell space. I almost want to take it apart and see if I could jam all the components into the center console area . . . maybe start with something like this:
ref: http://www2.cip1.com/ProductDetails.asp?ProductCode=ACC-C10-3494-11
We would have to look at airflow, the size of the evaporator, source for fans, whether to make ducts. Bleh.
We were trying to decide where to cut to get access to the foam of death area. I think we are going to have to go back to Nepenthe88's foam article to revise this first doodle:
When we pressure washed, we hit this area hard and long. It will be interesting to see how much of the foam was removed.
For kicks we looked at one of the many rear window actuators that I have collected from Pull-and-Save:
Interesting . . . especially since that area has to be gone into for the foam rust issue anyway.
My son got the rack-and-pinion out:
That is on the list of things that need to be done: clean, check, new boot, re-grease.
Well, there is still lots to do  most of my time is still going into working on the shop insulation so we can get the heater installed for the upcoming long winter nights. most of my time is still going into working on the shop insulation so we can get the heater installed for the upcoming long winter nights. |
|
| Back to top |
|
|
baxsie
Samba Member
Joined: August 09, 2005
Posts: 606
Location: Eastern Washington State
|
| Posted: Sun Oct 07, 2012 8:33 pm Post subject: |
|
|
We took some time off to make the Farm Boy Chassis Rotisserie.
He is now back on the chassis disassembly, but now with the chassis at a nice work height |
|
| Back to top |
|
|
baxsie
Samba Member
Joined: August 09, 2005
Posts: 606
Location: Eastern Washington State
|
| Posted: Tue Oct 09, 2012 12:08 pm Post subject: |
|
|
My CAD guy took some time to make a preliminary design for a VW logo center cap for the Porsche Boxster wheels. This first model is printed on our MakerGear Mosaic in silver PLA.
We probably mill the final parts out of aluminum.
We know the logo is perfect, thanks to this awesome drawing:
That image comes from this way-cool blog post:
http://imjustcreative.com/recreated-vintage-vw-logo-specification-sheet/2011/08/03/
There is something to be said of the Volkswagen philosophy when the entire logo can be dimensioned by using only four numbers. |
|
| Back to top |
|
|
joebennettPA
Samba Member

Joined: August 09, 2012
Posts: 149
Location: USA 19054
|
| Posted: Thu Oct 11, 2012 1:50 pm Post subject: |
|
|
Awesome thread!! I am not worthy! Are you going with the stock green??? It is crazy beautiful in the sun!!! Just saying!! My 73 had the foam rust of death. I cut a 3" x 6" on the inside, grubed out the foam,, cleand and coated with por 15, primer fiberglass inside, tiger hair on the outside. Not sure if this was the proper way to fix,, Nice tools by the way!!
_________________
75 "La Grande" super <10k miles, ac,sport shifter,sport steering wheel,sunroof, chrome sport wheels, Viper Green, All original factory/Dealer options! (sold)
73 super, ON THE ROAD!! 14month rehab!
1982 rabbit caddy! |
|
| Back to top |
|
|
baxsie
Samba Member
Joined: August 09, 2005
Posts: 606
Location: Eastern Washington State
|
|
| Back to top |
|
|
Joel
Samba Member
Joined: September 04, 2006
Posts: 11099
Location: NSW Australia
|
| Posted: Thu Oct 11, 2012 3:39 pm Post subject: |
|
|
Excellent colour choice.
It really suits curved windscreen Supers
_________________
Quick little bug, you got a Porsche motor in that?
1974 Germanlook 1303 2.5 Suba-Beetle |
|
| Back to top |
|
|
baxsie
Samba Member
Joined: August 09, 2005
Posts: 606
Location: Eastern Washington State
|
|
| Back to top |
|
|
joebennettPA
Samba Member
Joined: August 09, 2012
Posts: 149
Location: USA 19054
|
| Posted: Thu Oct 11, 2012 4:31 pm Post subject: |
|
|
Very nice, im going with the WRX pearl blue on my 73! enjoy the build!
_________________
75 "La Grande" super <10k miles, ac,sport shifter,sport steering wheel,sunroof, chrome sport wheels, Viper Green, All original factory/Dealer options! (sold)
73 super, ON THE ROAD!! 14month rehab!
1982 rabbit caddy! |
|
| Back to top |
|
|
Joel
Samba Member
Joined: September 04, 2006
Posts: 11099
Location: NSW Australia
|
| Posted: Thu Oct 11, 2012 5:13 pm Post subject: |
|
|
| baxsie wrote: |
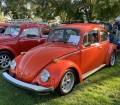
| Cool pictures Do you have any information on what the vents on the first bug are used for? |
Yep, its the mythical Porsche powered bug everyone talks about at bars.
Seriously though...
it's got a 911 flat 6 shoe horned into the back.
_________________
Quick little bug, you got a Porsche motor in that?
1974 Germanlook 1303 2.5 Suba-Beetle |
|
| Back to top |
|
|
baxsie
Samba Member
Joined: August 09, 2005
Posts: 606
Location: Eastern Washington State
|
| Posted: Tue Oct 16, 2012 8:20 pm Post subject: |
|
|
My son has been working on getting the chassis stripped, it is looking pretty naked:
Today he took on removing the floor pan. He only got about half way before we had to break for dinner. Tomorrow it should be out.
He also removed the seat tracks and pylon off the new pan. The plan is to install some aftermarket seats to custom cross-members that tie into the roll cage. Here is the concept for the seats:
Hopefully those seats work out.
_________________
1975 LaGrande Super Beetle Build Log / Farm boy hinge pin puller / Farm Boy Chassis Rotisserie
"I'm not getting older, I'm getting bitter." |
|
| Back to top |
|
|
baxsie
Samba Member
Joined: August 09, 2005
Posts: 606
Location: Eastern Washington State
|
| Posted: Thu Oct 18, 2012 10:11 pm Post subject: |
|
|
My son finished cutting the floor pan out. We got a cheapo Harbor Freight air chisel which (somewhat surprisingly) worked very well for cleaning off the spot welds:
After he gave it a bit with a wire brush on the drill it is looking pretty good:
The new pan has the rear support arm as part of the pan. Our support is in good shape, so we plan on removing the new support from the new pan and anchoring the new pan to the it to the existing support arm. Is that the right way to go about it? Removing the support from the backbone tunnel and suspension seems like it would be a big, critical operation and and very easy to get wrong.
The new pan also has a nice reinforcement for the jack point. Hopefully we can save that:
In the end, it looks like the pan I ordered might not have been the ideal part for this repair. I think a simpler pan might have been a better match. Oh well, live and learn.
_________________
1975 LaGrande Super Beetle Build Log / Farm boy hinge pin puller / Farm Boy Chassis Rotisserie
"I'm not getting older, I'm getting bitter." |
|
| Back to top |
|
|
19-VW-74
Samba Member
Joined: June 28, 2009
Posts: 757
Location: Utah
|
| Posted: Fri Oct 19, 2012 12:12 am Post subject: |
|
|
The original rear cross-member is much thicker than the one welded to the pans. I just cut it off the new pan and welded to the original cross-member. Makes aligning the pan to the body much easier.
_________________
-Austin
My 1974 Standard Beetle Build:
http://www.thesamba.com/vw/forum/viewtopic.php?t=492617 |
|
| Back to top |
|
|
baxsie
Samba Member
Joined: August 09, 2005
Posts: 606
Location: Eastern Washington State
|
| Posted: Tue Oct 23, 2012 9:49 pm Post subject: |
|
|
Been going a bit slow, but we got some more work done on the pan. In the rear, my son removed the support that was part of the pan. I think we figured out how to trim the jack point reinforcing plate to where it will not interfere and can be anchored to work with the factory support:
The new pan edge is prepped. He used a flange tool (cheaper here) to punch holes every ~inch along the edge ~90 places ):
The idea will be to fill each of those perfectly with the MIG. I'm thinking he better practice a bit first.
The edge of the pan on the other side was pretty twanged, like someone had jacked the car in a couple of places and flattened the flange out some. We used hammers and buck-bars to do some farm-boy straightening of it.
Next up is for him to weld the pan in
_________________
1975 LaGrande Super Beetle Build Log / Farm boy hinge pin puller / Farm Boy Chassis Rotisserie
"I'm not getting older, I'm getting bitter." |
|
| Back to top |
|
|
legotech7
Samba Member
Joined: May 09, 2009
Posts: 879
Location: North Carolina
|
| Posted: Wed Oct 24, 2012 5:28 am Post subject: |
|
|
| Great thread. I'll be doing the same to mine as soon a s the pans come in. Keep posting, good read...... |
|
| Back to top |
|
|
baxsie
Samba Member
Joined: August 09, 2005
Posts: 606
Location: Eastern Washington State
|
| Posted: Thu Oct 25, 2012 9:54 pm Post subject: |
|
|
The boy and I decided to do some practice welding before tackling the pan.
We played with the MIG for a bit, but it still tended to blow through the thin metal, even at the lowest setting.
// start goofy welding story
We then got brave and hooked up the TIG, which I had only used once, and he had not touched. What resulted was a frustrating hour of completely crappy and embarrassing welds. We had to re-profile the tip like 5 times. Blowing through the metal or the weld laying on top. Just complete garbage. I got frustrated and went back to working on the shop, thinking: "The kid is bright and will figure it out better than me anyway, I'm too old for this learning BS."
As I was working away from the welder on the shop and he was continuing to try to get something useful out of the TIG, I thought to myself: "Maybe the gas is not adjusted correctly, I don't remember setting that." I walked over to the regulator and saw that BOTH GAUGES READ ZERO. We had hooked up the gas but never actually opened the valve on the cylinder. D'oh!
// end goofy welding story
Once the gas was flowing things went much better. TIG is still much fussier than MIG or stick (MIG has to be the easiest) but after a few more tries we could at least join two pieces of relatively thin metal. This is still very far from saying that either of us can TIG weld, but at this point at least I think we can learn.
Here is a couple of our first butt welds using the TIG on the thin sheet metal:
_________________
1975 LaGrande Super Beetle Build Log / Farm boy hinge pin puller / Farm Boy Chassis Rotisserie
"I'm not getting older, I'm getting bitter." |
|
| Back to top |
|
|
EugenFJR
Samba Member
Joined: October 24, 2012
Posts: 12
Location: Marietta GA
|
| Posted: Thu Oct 25, 2012 11:25 pm Post subject: |
|
|
| I like the blue, but I think the orginal green is awsome. The paint on the inside of the trunk looks really good, I'd love a close up of the orginal paint, if you have the time. I'm not a purest buy any means, but the orginal paint would be really retro cool IMHO. If the car was orginally white, I'd say paint it blue. But I'm really diggin' the green, just my .02 cents. Great build BTW. |
|
| Back to top |
|
|
|


.jpg "Image may have been reduced in size. Click image to view fullscreen.")


