| Author |
Message |
ChilliConCarnage
Samba Member

Joined: September 12, 2011
Posts: 156
Location: PNW

|
 Posted: Sat Nov 03, 2012 1:10 pm Post subject: My 86 Westy Upgrade/Mod Pic Thread Posted: Sat Nov 03, 2012 1:10 pm Post subject: My 86 Westy Upgrade/Mod Pic Thread |
 |
|
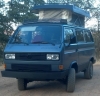
Weve spent a good amount of time and money with upgrades/mods to our Westy, so I thought Id post a pictorial of them here like so many others in the hope that our decisions, mistakes, and triumphs may be of help to fellow West owners. Almost every idea here came from the Samba, so I have you guys to thank for them.
Background: Weve owned a few VWs. In fact, I used a 62 lowrider Type II as a daily-driver for almost ten years (and I loved it). Weve also owned a 72 bay window, as well as a Passat, GTI, and Jetta, so you can definitely call us a VW family. After selling the 62 and 72, my wife really wanted a T3 Westy, so I got her one for our 20th anniversary. Its an 86 full camper in merian brown. In its first year of our ownership, we took it on 10 camping trips, and loved every minute of it. We bought the van at a great price; it came with a smooth running (and very recently rebuilt) 2.1 WBX in it, as well as the 15" GoWesty wheels and excellent 205-70/R15 Nokian WRC Van tires. The PO had just replaced the fuel lines as well.
The day after we got the Westy. A moldy tent canvas and general dirty-ness were remedied with many hours of scrubbing.
_________________
Now:
86 Westy
00 GTI VR6
03 Passat V6 4Motion
Sold:
62 T2 Double Door panel
72 T2 7-passenger
98 Jetta
97 Passat VR6
87 Audi 5000
Last edited by ChilliConCarnage on Sat Nov 03, 2012 4:15 pm; edited 4 times in total |
|
| Back to top |
|
 |
ChilliConCarnage
Samba Member
Joined: September 12, 2011
Posts: 156
Location: PNW
|
| Posted: Sat Nov 03, 2012 1:13 pm Post subject: |
|
|
MODS AND UPGRADES
FRIDGE
First up: Ask most people what they think is the most useful feature in an RV and the most likely answer would be Toilet or bed. I disagree. I think the most useful thing in a camper is a refrigerator. Its the thing that lets you get out into the wilderness for extended stays and not have to exist on freeze dried food or drink warm beer. The original Dometic fridge that came with our Westy was in good shape and it worked in all three modes, but it was small and inefficient so it was the first thing to get upgraded. A local marine shop had a Vitrifrigo C51iSAC in stock for a good price, so I picked it up.
Fridge all installed
Installation was straight-forward using the information here on the Samba. The hardest part was actually maneuvering the old fridge out of the space. One caveat: I hadnt seen it mentioned anywhere, but if you want to have a flush install, youll have to delete the city water inlet. It pokes out too far, and keeps the fridge sticking out. We did not want to delete the city water, so our fridge door pokes out a bit.
City Water outlet prevents a flush install
To install, I screwed a couple of boards into the sides of the cabinet opening, then wrapped 4 L-brackets that I had lying around with foam and covered them over with electrical tape to support it from the bottom. I then bought an enclosure for the 110V AC outlet in the cabinet and installed it into the under-sink cabinet. I shoved the fridge in and turned it on - it worked just great, and automatically switches from 12VDC to 110VAC when the van is plugged into shore power. The fridge sits so tightly in the space that I didnt even need the L-brackets underneath. Per other posts here, I looked into upgrading the 120mm fan on the fridge to a quieter or more electrically efficient unit, but the X-Fan that came installed on mine (fan model RDL1225S, rated at 0.18a, 28dBA and 70.18CFM) was tough to beat, so it is still installed.
L-brackets wrapped in foam then covered in electrical tape make the feet
About to slide it into place
The Vitrifrigo has worked nicely, has so much more space than the original Dometic, and is more energy-efficient. All-in-all, wed highly recommend this upgrade.
_________________
Now:
86 Westy
00 GTI VR6
03 Passat V6 4Motion
Sold:
62 T2 Double Door panel
72 T2 7-passenger
98 Jetta
97 Passat VR6
87 Audi 5000 |
|
| Back to top |
|
|
ChilliConCarnage
Samba Member
Joined: September 12, 2011
Posts: 156
Location: PNW
|
| Posted: Sat Nov 03, 2012 1:16 pm Post subject: |
|
|
SOLAR / BATTERIES / CHARGING
The next thing to get upgraded was the electrical system. When you add a nice fridge like we did, youre going to need to power it. Our approach was as follows:
We picked up two FullRiver 60ah batteries from NorthWesty. The first one went under the drivers seat, the second one into the small cabinet next to the rear bench. To fit the FullRiver in the battery compartment under the drivers seat, I had to remove the stock battery cover and make my own.
FullRiver 60ah battery in the small cabinet next to the rear bench
To keep the house batteries isolated from the starter battery, I bought a Stinger 80A relay and installed it behind the lower dash cover. Two bundled 8GA wires connect the relay to the under-passenger-seat starting battery and the under-the-driver-seat house battery. I then ran a 4GA wire from the FullRiver under the driver-seat to the FullRiver in the back. The relay is wired so that the batteries are connected when the key is turned. Its very simple, and has worked well.
Stinger 80amp relay installed under dash cover
To keep the batteries charged, I knew I wanted a solar panel. GoWesty sells a 50 watt panel kit, but that is extremely underpowered in my opinion. Before eventually upgrading to a 145W panel thats permanently installed, I started out with an 80W panel from Amazon and kept it in the upper bunk area when we traveled. I had a long length of 10GA outdoor rated cable so I could deploy the panel wherever there was sun when we reached our camp-spot. But the panel is really large, so moving it around turned out to be a little bit of a hassle, and I was worried about the panel becoming a guillotine in the event of a crash. So I ended up having Jeff at PeaceVans permanently install the 145W panel on the roof. The wiring goes from the panel down through one of the engine vents and into the cabin from there. I also have portable 20W panel that I can use if the roof panel is not aimed directly at the sun.
Original 80w panel was mobile, but was replaced by a permanent mounted one
145 watt solar panel permanently attached to pop-top
To regulate the incoming power from the sun, I bought a 10amp HQRP solar charge controller from Amazon (http://www.amazon.com/HQRP-Controller-Digital-Display-Radiation/dp/B002GIWMJG/ref=sr_1_2). It has a Low Voltage Disconnect (LVD), and its insanely cheap (at about $30). I use the LVD to connect to a set of relays. The relays then feed power to the fridge, inverter, and 12V outlets. If the voltage in the battery gets too low, the LVD shuts off power, turning off the relays and thus turning off all the accessories attached to them. This protects our expensive batteries from getting dragged down too low. The charge controller is mounted under the rear bech on top of the heater.
HQRP 10amp solar charge controller installed under bench
For 110V AC power, a 1000 watt inverter Ive had for years was installed in the space under the new fridge. There is enough room next to it for a later Propex heater install. For 12V power, theres a triple outlet installed on the rear bench, and one at the front as well. Both have integrated USB outlets, which we find extremely useful as we have a lot of charging needs: laptop, two phones, two 12V rechargeable lanterns, video camera, Garmin bike computer, bike lights, and more.
Front 12V outlets and USB adapters
Rear triple 12V outlets + USB
You can never have too many outlets
The last part of the charging system upgrade was a ProMariner 12amp ProSport Gen 2 dual bank battery charger; GoWesty uses these units in all of their refurbished vans. Its installed on the cabinet right behind the driver seat and is permanently plugged into the 110V outlet under the sink. Whenever Im in a campground with shore power, the ProMariner has more than enough juice to keeps the batteries charged and everything running. When we dont have shore power and were relying on solar, Im a little more careful about using higher-power items like the stereo, especially at night, but we havent run into any issues yet.
ProMariner ProSpor12 dual bank battery charger
_________________
Now:
86 Westy
00 GTI VR6
03 Passat V6 4Motion
Sold:
62 T2 Double Door panel
72 T2 7-passenger
98 Jetta
97 Passat VR6
87 Audi 5000 |
|
| Back to top |
|
|
ChilliConCarnage
Samba Member
Joined: September 12, 2011
Posts: 156
Location: PNW
|
| Posted: Sat Nov 03, 2012 1:19 pm Post subject: |
|
|
AUDIO / VIDEO
After shelling out cash for the van itself, as well as all of the upgrades we were doing to it, I found the budget running a bit thin when it came time to start on the audio/video system. Being something of a self-proclaimed audiophile, I was having a hard time putting together a system with the amount of money I had left.
To that end, I ended up with something an audiophile would normally never be caught dead with: a Jensen head unit and amp. Why Jensen parts? They cost a fraction of them amount I had spent on the system in my GTI, theyre still better than most of the off-brand parts, and they met all of my functional requirements. I needed a head unit that did Bluetooth, GPS, and had iPod control, and the Jensen VM9414 did so while costing 1/3rd of the Pioneer DVD/GPS unit I had in my GTI (http://www.crutchfield.com/S-HrGyT3dQwV9/p_130AVIC130/Pioneer-AVIC-Z130BT.html). And the Jensen Power760 (75W x 4) amplifier was all I needed to power the front speakers and subwoofer (the head-unit powers the rear), while costing 1/10th the amount of the JL Audio amps in the GTI!
Head-unit
There are obviously drawbacks. Sound quality and radio reception of the Jensen parts are good, but not great. The GPS section is very slow. The iPod controls are not great either, and the SDCard compatibility sucks. But everything works as its (eventually) supposed to. The Bluetooth has no trouble connecting to my phones, the GPS eventually finds routes (and shows me my actual speed as opposed to my un-calibrated speedo), and the iPod controls give me access to 160GB of music. The amp gets awfully warm (it is mounted above the rear heater!), so Id like to upgrade to a cooler-running Class-D amp at some point.
As far as speakers, I had two Infinity Kappa 4 inchers to install in the rear (note that the passenger side grill has to be trimmed to fit). I went to Car Toys and had them cut holes and install a pair of Infinity 6.5 two-ways in the lower part of the front doors. While they sound good, the low door position blocks a lot of the tweeters sound. I thought that the aim-able tweeter would compensate, but it appears as though Ill need to go to a component set in the future, and install the tweets higher in the doors or somewhere on the dash.
Infinity reference 2-way 6.5 inchers low in the front doors
Infinity Kapp 4 rear speakers
For a subwoofer, I chose the Polk Audio MM1040 (http://www.crutchfield.com/S-Il6HNPWlAau/p_107MM1040/Polk-Audio-MM1040.html). Its very shallow, has great T/S parameters including an impressive xmax, and works well in small boxes; plus its also marine certified. Car Toys had a Bassworx SW10B enclosure for the Polk that is a perfect fit under the rear bench. While its 0.54cf volume is less than the recommended .66cf volume for the sub, I stuffed the box loosely with Dacron poly-fill to simulate the space of a larger box and it sounds decent. Not quite as good, punchy, or as loud as the JL Audio 12W3 in my GTI, but good enough to fill in the bottom end of music at reasonable volume levels and at 1/6th the price of the JL!
Polk Audio MM1040 subwoofer in Bassworx enclosure
The last piece of the A/V system is a TV. With the price of slim LED TVs getting so low lately, I figured it made more sense to buy a stand-alone than installing one of the roof-mounted ones. To that end, I found an LCD desk-mount arm that I figured I could modify to work as a TV mount in the Westy (http://inlandproduct.com/singlearmdeskmountstock05327.aspx). As it turns out, I didn't need to do any modifying to make it work! The mount consists of an articulating arm that slides over a vertical tube; the tube then clamps to your desk. By tossing out the vertical tube and using the Westy's middle table mount, I simply slid the articulating arm clamp on and tightened it.... perfect fit! By tilting the TV down, I can even still use the table. The best part is that it can swing inconspicuously behind the driver seat for theft deterrence, and stays stowed there while driving.
TV in deployed position
TV stowed
_________________
Now:
86 Westy
00 GTI VR6
03 Passat V6 4Motion
Sold:
62 T2 Double Door panel
72 T2 7-passenger
98 Jetta
97 Passat VR6
87 Audi 5000
Last edited by ChilliConCarnage on Sat Nov 03, 2012 1:34 pm; edited 1 time in total |
|
| Back to top |
|
|
ChilliConCarnage
Samba Member
Joined: September 12, 2011
Posts: 156
Location: PNW
|
| Posted: Sat Nov 03, 2012 1:21 pm Post subject: |
|
|
LIGHTING (EXTERIOR)
As every Westy/Vanagon owner knows, the stock headlights on 86+ vans have a very poor light output pattern. The VW community have come up with a couple of great solutions: 1) installing a relay and higher-power bulbs (https://sites.google.com/site/vanagonheadlightrelays) or 2) installing a South African grill with a set of dual round lights with a much better light output pattern (http://www.gowesty.com/ec_view_details.php?id=3636). The first solution is inexpensive and easy to install. The second if fairly expensive and a bit harder to install. I plan on doing both in the future, but I went with a simpler solution at first. I went down to the local FLAPS and picked up a set of $39.99 Pilot Driving Lights (http://www.autozone.com/autozone/accessories/Pilot...ier=413384). About 30 minutes later, I had them installed, and they make a world of difference.
Driving lights
I always have a bike rack installed on the back of my van, and it unfortunately partially blocks the brake lights, particularly when Im actually hauling bikes on the rack. Harbor Freight has a really cheap red LED light strip at only $9.99 (http://www.harborfreight.com/9-inch-led-red-strip-lamp-98408.html), so I bought it and followed the easy GoWesty YouTube video to install it (http://www.youtube.com/watch?v=JxV16yx7gFM). It was only a 30 minute install, and I feel much safer now.
_________________
Now:
86 Westy
00 GTI VR6
03 Passat V6 4Motion
Sold:
62 T2 Double Door panel
72 T2 7-passenger
98 Jetta
97 Passat VR6
87 Audi 5000
Last edited by ChilliConCarnage on Sat Nov 03, 2012 1:34 pm; edited 1 time in total |
|
| Back to top |
|
|
ChilliConCarnage
Samba Member
Joined: September 12, 2011
Posts: 156
Location: PNW
|
| Posted: Sat Nov 03, 2012 1:23 pm Post subject: |
|
|
LIGHTING (INTERIOR)
To be useful as a camper, you really need more lighting in a Westy. With todays super-efficient LED lights (and my 120ah of house batteries) I was able to put some additional lighting in the van that helps out quite a bit, and plan on installing even more.
I modded the stock interior lamp in the back by pulling out the original bulbs and installing two LED light strips inside. I also installed a magnetic reed switch on the sink cover, so opening it automatically turns on an LED light strip hidden inside the cover. I did the same for the under-sink cabinet; a magnetic reed switch turns on two light strips when the cabinet door is opened.
LED light strips are so much more efficient than either incandescent or florescent bulbs
A magnetic reed switch turns the light on when you open the sink cover
Cabinet lighting
We also have two LED lanterns: a Wind N Go Camp lantern (http://www.amazon.com/Wind-N-Go-Camp-Lantern/dp/B001AVS3NY) and a Coleman CPX 6 (http://www.amazon.com/Coleman-Family-Sized-Rugged-...amp;sr=1-3). Both are rechargeable via 12V, and the Wind-n-Go has the added ability to charge by a hand crank.
LED lanterns can both be charged by 12V
We also use a set of Christmas lights that we hang on the awning for exterior campsite lighting, but Id like to change that soon to a solar powered LED rope light.
_________________
Now:
86 Westy
00 GTI VR6
03 Passat V6 4Motion
Sold:
62 T2 Double Door panel
72 T2 7-passenger
98 Jetta
97 Passat VR6
87 Audi 5000
Last edited by ChilliConCarnage on Sat Nov 03, 2012 4:21 pm; edited 1 time in total |
|
| Back to top |
|
|
ChilliConCarnage
Samba Member
Joined: September 12, 2011
Posts: 156
Location: PNW
|
| Posted: Sat Nov 03, 2012 1:26 pm Post subject: |
|
|
CAMPING ACCESSORIES / BIKE-RACH-HITCH
The fridge tops our list of mods, but coming in a close second is the Fiamma F45s 10 foot awning from GoWesty. Having a quality awning enhances the camping experience so much, as it adds so much virtual space and provides great protection from the elements. There are a lot of good options for awnings, but after doing much research here on the Samba, it really appeared that the Fiamma (while very expensive) was the Rolls-Royce of awnings, so we went with it. The 10 foot is a great size.
Fiamma awning extends virtual space
We have a lot of bikes: road race, cyclocross, mountain, vintage, etc., so we put bike racks on most of our cars. Weve had roof racks, strap-mounted trunk racks and hitch mounted bar racks, but the best one Ive ever found is the SportWorks hitch mount. SportWorks provides the bike racks for busses throughout the country, so you know that theyre built tough. The company was bought by Thule and they continue to sell a version of the SportWorks, but there are some complaints that the original was built better, so Im glad we found one of the originals; we were even fortunate enough to get one of the rare 4-bike versions in perfectly new condition on Craigslist. The 4-bike model is the same as the 2-bike, but includes two additional addons so it can be configured as a 2, 3, or 4 bike version as needed. To mount a bike, you simply sit it on the tray and move the holding hoop over the front wheel. Its so fast and easy, and works with big or small wheels; no other rack compares.
SportWorks bike rack
Since it required a 2 receiver, I went to Jeff at PeaceVans who happened to have a used under-bumper receiver that he sold to me for a fair price; he even painted it black for me. Its worked out fine, but the 4-bike rack extends so far out that Id like to have the receiver higher up. A number of custom bumpers exist that have the hitch integrated into the bumpers (thus sitting higher than an under-the-bumper style), so Ill be upgrading someday to one of those.
As most Westy owners know, the exterior camper hook-ups are prone to breaking and over the last several years the replacement units were absolute junk. There is a long story to explain the quality of replacements (which were at one point apparently being assembled by a single Mexican guy until he retired and moved back to Mexico), but the good news is that the original molds were purchased and restored by Trevor and Cheri at SkyLightGuy.com (http://theskylightguy.com/products-page/camper-parts-delta-six-line). They also make a replacement Delta Six OEM faucet that we bought. Unfortunately the camper hook-ups were not available yet from them when we needed replacements so we went with some GoWesty units (http://www.gowesty.com/ec_view_details.php?id=23582&category_id=127). The GoWesty parts are made of much thicker plastic, and have worked fine. They are spendy though at $140, considering they are just hunks of plastic!
GoWesty Camper Outlets, plus aluminum block-off plate under the flue cover
We also purchased a replacement water pump for the sink from GoWesty, but it turns out the original pump was fine - it was the faucet that was blocked. After attempting to blow the blockage out of the faucet with a compressor, we gave up and bought the Delta Six unit as mentioned above, so now we have a new OEM pump and OEM faucet. Many people upgrade the faucet to a modern ShurFlo unit (http://www.gowesty.com/ec_view_details.php?id=23570), but I like the look and functionality of the original parts. As mentioned in the fridge comments above, we also kept the city-water hook-up that many people delete. We enjoy having it, and use it with an inline water filter and pressure regulator to get nice clean water into the van.
_________________
Now:
86 Westy
00 GTI VR6
03 Passat V6 4Motion
Sold:
62 T2 Double Door panel
72 T2 7-passenger
98 Jetta
97 Passat VR6
87 Audi 5000
Last edited by ChilliConCarnage on Wed Dec 12, 2012 7:15 pm; edited 3 times in total |
|
| Back to top |
|
|
ChilliConCarnage
Samba Member
Joined: September 12, 2011
Posts: 156
Location: PNW
|
| Posted: Sat Nov 03, 2012 1:28 pm Post subject: |
|
|
HEATING
We carry two heaters with us when we camp, a Pelonis ceramic 110V heater for times we have shore power (http://www.amazon.com/Pelonis-NTK15A-Ceramic-Safety-Furnace/dp/B000HU4FKY/ref=sr_1_3), and a Mr. Heater Portable Buddy (http://www.amazon.com/Mr-Heater-F232000-Indoor-Safe-Portable/dp/B002G51BZU/ref=sr_1_1) that runs on propane for times were without shore power. Weve used the Pelonis in mid-30 ° weather and were quite comfortable. We havent had the chance to fire up the Mr. Heater yet.
Pelonis ceramic 110V heater
Next to the Mr. Heater weve installed a Kidde fire extinguisher - a must have for any RV, or any vehicle that comes equipped with LP accessories (or an engine bay prone to catching fire!).
Mr. Heater Portable buddy and Kidde fire extinguisher
OTHER
The shifter extension and wood shift knob from Van Café are really nice, but the shift extension was silver, and my shifter is all black, so I had to wrap it in electrical tape to match. Im going to check for some black heat-shrink wrap tubing to pretty it up a little.
Just installed the shifter extension and wooden knob
_________________
Now:
86 Westy
00 GTI VR6
03 Passat V6 4Motion
Sold:
62 T2 Double Door panel
72 T2 7-passenger
98 Jetta
97 Passat VR6
87 Audi 5000
Last edited by ChilliConCarnage on Sat Nov 03, 2012 1:37 pm; edited 1 time in total |
|
| Back to top |
|
|
ChilliConCarnage
Samba Member
Joined: September 12, 2011
Posts: 156
Location: PNW
|
| Posted: Sat Nov 03, 2012 1:28 pm Post subject: |
|
|
COMING SOON
Id love to get an on-demand LP water heater and shower. Id also like to get some wood veneer from GoWesty to cover the black fridge door so it matches the rest of the interior. I believe theres enough space under the fridge to mount a Propex heater next to the inverter, so I definitely want to look into that. Finally, I want to upgrade to the Morningstar Sunsaver 15a MPPT solar charge controller with optional meter to see real-time charging data.
_________________
Now:
86 Westy
00 GTI VR6
03 Passat V6 4Motion
Sold:
62 T2 Double Door panel
72 T2 7-passenger
98 Jetta
97 Passat VR6
87 Audi 5000 |
|
| Back to top |
|
|
ChilliConCarnage
Samba Member
Joined: September 12, 2011
Posts: 156
Location: PNW
|
| Posted: Sat Nov 03, 2012 1:29 pm Post subject: |
|
|
TOTAL LIST OF UPGRADES
Jensen VM9414 7 touchscreen AM/FM stereo, CD/DVD w/MP3, GPS, iPod control, Bluetooth
Jensen Power 7604, 4x75 watt-channel audio amplifier
Polk Audio MM1040 10 Subwoofer in Bassworx box
Infinity Reference 6032 6.5" coaxial front door speakers
Infinity Kappa 4 coaxial speakers in rear
DP Video rear view camera w/night vision
Coby 19 LED LCD TV / Inland articulating monitor mount
Clifford Matrix Alarm
20W Mono-crystalline portable solar panel
145W Mono-crystalline solar panel (installed on roof)
30 feet large gauge outdoor rated solar cable with MC4 connectors
20amp Tracer 2215-RN MPPT Solar Charge Controller with MT5 remote display
10amp HQRP charge controller for portable solar panel (w/ LVD used to power relays for fridge, inverter, 12V outlets, etc.)
Vitrifrigo C51iSAC AC/DC fridge
300 watt DC->AC watt inverter
Car-PC (Windows 8, AMD E-350, 8GB DDR3 RAM, 60GB SSD)
Pilot PL-2202C auxiliary halogen driving lights mounted on front bumper
Third brake light (red LED light strip)
Dual house-bank FullRiver DC60-12 60ah batteries (120ah total!)
ProMariner Pro Sport 12, 12amp dual battery bank charger
Stinger 80amp dual battery isolator
Rewired interior and dual batteries with large gauge wiring, multiple relays
Wood shift knob and shifter extension
New windshield wiper arms and hardware
Fiamma F45s Awning, 10 foot with GoWesty mounting brackets
GoWesty exterior camper hookups
Heavy duty 2 receiver hitch, class?
Sportworks 4-bike hitch mount carrier
Triple 12V outlet with USB charger (rear), Single 12V outlet (front)
Replaced fluorescent bulb with dual LED strip lighting in rear
LED Lighting for sink and under-sink cabinets (automatically activated with magnetic-reed switch)
New AC outlets in cabinet
New in-tank pump for sink
New Delta Six (oem-style) faucet
Pressure regulated water hose for city-water hookup
Propane filler extension
30amp -> 15amp campsite hookup adapter
Wood shift knob and shifter extension from Van-Cafe
Mr. Heater Buddy propane heater
AllergyLuxe fiber bed
IKEA rug (for under awning), smaller rug for front, IKEA baskets and storage containers
Pelonis ceramic AC heater (for use with campsite hookups)
REI Camp Stove cooking set, REI campfire grill, French press, Bialetti Moka pot, tea pot
Coleman enamelware plate / dish / silverware set
Camp chairs, bag style
Serenity and Firefly vinyl decals, Peace emblem (replaces front VW emblem)
A Passat, Westy, Passat, and GTI parked in front of the house. You could definitely call us a VW family.
_________________
Now:
86 Westy
00 GTI VR6
03 Passat V6 4Motion
Sold:
62 T2 Double Door panel
72 T2 7-passenger
98 Jetta
97 Passat VR6
87 Audi 5000
Last edited by ChilliConCarnage on Sat Dec 08, 2012 6:44 pm; edited 1 time in total |
|
| Back to top |
|
|
kbeefy
Samba Member
Joined: March 10, 2006
Posts: 600
Location: Central Oregon
|
| Posted: Sat Nov 03, 2012 3:25 pm Post subject: |
|
|
Nice post, good work.
_________________
86 syncro CHC, NorthWesty subbie 2.5, decoupler, locker, custom interior, 225/75r16 Duratrack's on CLK's, Toyo cabin heater, ARB fridge, 300w Zamp Solar, Gowesty bumpers/skid/rails, Fiama awning
'86 Syncro Westy. Stock for now.
2000 F350 7.3 CC LB 11' Northland Cabover
2006 Subbie OBXT
2002 Tacoma DoubleCab 4x4
1969 Mustang Basket Case 351c/FMX/9
http://kbeefy.blogspot.com/ |
|
| Back to top |
|
|
b00t
Samba Member

Joined: February 08, 2011
Posts: 157
Location: Asheville, NC
|
| Posted: Sun Nov 04, 2012 7:02 am Post subject: |
|
|
| You have done some nice work here....great stuff and well documented. Congrats... |
|
| Back to top |
|
|
wemfam
Samba Member

Joined: July 15, 2012
Posts: 137
Location: Central Illinois
|
| Posted: Sun Nov 04, 2012 7:26 am Post subject: |
|
|
| Good job man, lots of good information here! |
|
| Back to top |
|
|
singler3360
Samba Member

Joined: February 25, 2009
Posts: 1191
Location: Corvallis, Oregon
|
| Posted: Sun Nov 04, 2012 9:01 am Post subject: |
|
|
| Thanks for your posts and thoughts on the decisions you've made. Good stuff. |
|
| Back to top |
|
|
shadetreetim
Samba Member

Joined: January 10, 2011
Posts: 1994
Location: Riverside, California
|
| Posted: Sun Nov 04, 2012 11:23 am Post subject: |
|
|
Nicely written post. Cool upgrades. Reading it makes me want to go camping. Thanks for sharing.
_________________
Tim Potts
Doing my best every time I drive it to dispel the myth these Vanagons have to be slow!
'89 Vanagon Bluestar/Country Homes 1.8T & .77 4th
'74 Jeep CJ5 |
|
| Back to top |
|
|
goshanego
Samba Member

Joined: March 17, 2009
Posts: 11
Location: Maryland
|
| Posted: Sun Nov 04, 2012 1:17 pm Post subject: |
|
|
Nice work. Nice Van. Just a quick thought. I have used a heat buddy inside our house (much bigger than van of course) during a power outage and it made my wife and I feel sick (loopy) - personally I would not use one of those in such a small space. Maybe save up and get a propex from Karl. Just one unsolicited opinion. Happy & safe travels.
_________________
Current ride: 1985 Wolfsburg weekender and Salsa Fargo!
Previous rides:
1987 Syncro Van
1984 Rabbit Truck Diesel
1983 Rabbit Truck Diesel
1996 Passat TDI
2002 Golf TDI
Too many bikes to list!!! |
|
| Back to top |
|
|
insyncro
Banned

Joined: March 07, 2002
Posts: 15086
Location: New York
|
| Posted: Sun Nov 04, 2012 1:25 pm Post subject: |
|
|
Great post.
Good lookin van, enjoy. |
|
| Back to top |
|
|
ChilliConCarnage
Samba Member
Joined: September 12, 2011
Posts: 156
Location: PNW
|
| Posted: Sat Dec 08, 2012 6:32 pm Post subject: Updates |
|
|
Since my last posting, I've made a couple of updates.
First, I attended the Westy Meet down in Marymoor and was very inspired by all of the nice Westies there. In particular, there was a white 91 owned by Steve who had some really nice LED lighting on his Fiamma awning and in the cabin. I'd already planned on purchasing the cery same lights from Amazon that he has, and now I know how I'm going to install them.
_________________
Now:
86 Westy
00 GTI VR6
03 Passat V6 4Motion
Sold:
62 T2 Double Door panel
72 T2 7-passenger
98 Jetta
97 Passat VR6
87 Audi 5000 |
|
| Back to top |
|
|
ChilliConCarnage
Samba Member
Joined: September 12, 2011
Posts: 156
Location: PNW
|
| Posted: Sat Dec 08, 2012 6:34 pm Post subject: |
|
|
Next, I installed a Car PC into the van. It's running Windows 8 with a 60GB SSD. I bought a Mini-Box M2-ATX-HV 12V regulated power suuply board so I could run the PC directly off the house batteries. This saves power over
having to run it through an inverter. (http://www.mini-box.com/M2-ATX-HV-140w-Intelligent-Automotive-DC-DC-Power-Supply_2). It sits under the fridge, and the low power AMD-E350 CPU runs very cool. A remote keyboard with touchpad let me control it.
_________________
Now:
86 Westy
00 GTI VR6
03 Passat V6 4Motion
Sold:
62 T2 Double Door panel
72 T2 7-passenger
98 Jetta
97 Passat VR6
87 Audi 5000 |
|
| Back to top |
|
|
ChilliConCarnage
Samba Member
Joined: September 12, 2011
Posts: 156
Location: PNW
|
| Posted: Sat Dec 08, 2012 6:36 pm Post subject: Rear View Camera |
|
|
I picked up a rear vew camera from DP Video. Since I already had a head unit with a screen, it made for an easy install. It's hooked up to a relay that is triggered by the amplifier turn on wire fro the head unit. It works even in very low light (notice the lens surrounded by IR LEDs).
Since we live in the city, we're often having to parallel park on busy and packed city streets, so this camera will be very useful. Also, we have a very long bike rack (up to 4 bike capacity!), so this will allow us to keep an eye on the bikes as well.
_________________
Now:
86 Westy
00 GTI VR6
03 Passat V6 4Motion
Sold:
62 T2 Double Door panel
72 T2 7-passenger
98 Jetta
97 Passat VR6
87 Audi 5000
Last edited by ChilliConCarnage on Sat Dec 08, 2012 6:45 pm; edited 1 time in total |
|
| Back to top |
|
|
|


