| Author |
Message |
laneven28
Samba Member

Joined: January 09, 2007
Posts: 312
Location: Cedar Hills, Utah

|
 Posted: Mon Oct 29, 2012 9:52 am Post subject: Posted: Mon Oct 29, 2012 9:52 am Post subject: |
 |
|
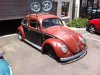
Paint is so close to being done. It wasnt ready and waiting in the garage when Wade got there Friday like Id hoped, but I did take him by the shop and let him see paint on the backsides of the decklid, hood, doors, and fenders. All the small parts were also painted, and we took them home with us. Trent was planning to spray the front sides of all lids and fenders Saturday night, and finish the body shell last night, so it may be done right now - fingers crossed! Id love to have it back in my garage tonight.
Heres a few shots from our visit Friday night.
_________________
1950 Pearl Grey Hoffman Standard Split Window
1954 Iceland Green Euro 3-Fold Oval
1955 Strato Silver Transitional 3-Fold Oval
1956 Iris Blue Convertible
1958 Pearl White Lowlight KG Convertible
1961 Turkis Ragtop |
|
| Back to top |
|
 |
OvalinAz
Samba Mini Tech
Joined: June 09, 2009
Posts: 1078
Location: AZ
|
|
| Back to top |
|
|
templeofspeed
Samba Member
Joined: June 06, 2007
Posts: 279
Location: Central midwest
|
| Posted: Mon Oct 29, 2012 3:10 pm Post subject: |
|
|
| Rome wrote: |
Appears that your connecting rods for cylinders #1 & 2 (the tow for the right side of the engine) are installed upside-down. IN the crank photo with the cam drive gear on, those two rods (closest to camera, then the 2nd furthest one) should have the small rectangular "pad" on the shank facing upward. This pad can be clearly seen on the rod for #3 which is the farthest one from the camera (closest to flywheel). If my observation is correct on your engine, hope you can correct that before you close the case.
Stock-type connecting rods have this pad to clearly indicate the assembly orientation, due to a very slight offset of the rod.
|
X2 Please revisit this... nice build, a shame to have motor difficulties at this stage.
Check the shop manual for correct connecting rod orientation, you will kill yourself when you try to install the cylinders. This was bothering me from the get go. |
|
| Back to top |
|
|
laneven28
Samba Member
Joined: January 09, 2007
Posts: 312
Location: Cedar Hills, Utah
|
| Posted: Mon Oct 29, 2012 3:43 pm Post subject: |
|
|
| templeofspeed wrote: |
| Rome wrote: |
Appears that your connecting rods for cylinders #1 & 2 (the tow for the right side of the engine) are installed upside-down. IN the crank photo with the cam drive gear on, those two rods (closest to camera, then the 2nd furthest one) should have the small rectangular "pad" on the shank facing upward. This pad can be clearly seen on the rod for #3 which is the farthest one from the camera (closest to flywheel). If my observation is correct on your engine, hope you can correct that before you close the case.
Stock-type connecting rods have this pad to clearly indicate the assembly orientation, due to a very slight offset of the rod.
|
X2 Please revisit this... nice build, a shame to have motor difficulties at this stage.
Check the shop manual for correct connecting rod orientation, you will kill yourself when you try to install the cylinders. This was bothering me from the get go. |
Already fixed the issue, thanks. This is why I love the samba - so many people willing to jump in and help out.
_________________
1950 Pearl Grey Hoffman Standard Split Window
1954 Iceland Green Euro 3-Fold Oval
1955 Strato Silver Transitional 3-Fold Oval
1956 Iris Blue Convertible
1958 Pearl White Lowlight KG Convertible
1961 Turkis Ragtop |
|
| Back to top |
|
|
laneven28
Samba Member
Joined: January 09, 2007
Posts: 312
Location: Cedar Hills, Utah
|
| Posted: Tue Oct 30, 2012 8:35 am Post subject: |
|
|
Stopped by the paint shop last night to check on status. Trent was in the middle of spraying first coat of paint on the fenders, doors, hood, and decklid when I showed up. It looks so good!! 
_________________
1950 Pearl Grey Hoffman Standard Split Window
1954 Iceland Green Euro 3-Fold Oval
1955 Strato Silver Transitional 3-Fold Oval
1956 Iris Blue Convertible
1958 Pearl White Lowlight KG Convertible
1961 Turkis Ragtop |
|
| Back to top |
|
|
roadkingdoc
Samba Member

Joined: May 16, 2009
Posts: 911
|
| Posted: Sun Nov 04, 2012 4:58 am Post subject: |
|
|
i have enjoyed following your project. great for the boys to learn some practical skills in this age of video games. the pictures bring back memories for me as i was short of 4 years doing mine. i did all the work on mine except shoot the two stage. welcome to the 61 turkis ragtop group!
|
|
| Back to top |
|
|
Soul Built
Pimpin' Aint Easy

Joined: August 28, 2004
Posts: 1636
Location: SoCal
|
| Posted: Sun Nov 04, 2012 9:22 am Post subject: |
|
|
Just wanted to chime in and say thanks for sharing this with us.
I don't have son's but this entire thread has been an inspiration. Not only because you guys have taken on a great project, but that you did it as a family. And personally, I cannot tell you how much I love the fact you went back to Turkis. One of my favorite VW Colors. Never had a Type 1 in Turkis but a I have had a few Buses. |
|
| Back to top |
|
|
laneven28
Samba Member
Joined: January 09, 2007
Posts: 312
Location: Cedar Hills, Utah
|
| Posted: Mon Nov 05, 2012 10:57 am Post subject: |
|
|
Thanks roadkingdoc. Your 61 looks fantastic! I wandered through your pictures and enjoyed seeing the before and after. I'll be glad when we're at the same point you are. As much as I've loved the project and spending time with my boys, I'm ready to wrap it up and move on. It's consumed me for the better part of 2 years now, and was on and off for 2 years before that. I'm sure you understand 
Soul Built - hard to describe how great it's been working with my boys on this car, and how involved they've been. My 12 year old has developed a love for early VW's throughout the process, and got his heart set on a low light Karmann Ghia for his project car. A couple weeks ago I found a 58 coupe here locally, made a deal so we officially have another project to tackle in the near future. There WILL be a break in between though - Dad's a bit worn out, and so is the bank account. Here's a peek at the next project.
Our painter finished spraying the shell last Wednesday, and immediately began color sanding & buffing. By Saturday, the shell and decklid were completed so I took them home and began the reassembly process. I have to say, I'm more than impressed with our painter, Trent, and his skills. Every panel is like a mirror, and he's been so good to work with. I wouldn't hesitate recommending him to anyone that may be looking for quality body & paint work.
One of the first things I installed was a clear-needle 90mph speedo I picked up from Ryan Ousley at Orange Empire Speedo a while back. Although early 61 models actually came with a white needle speedo, these clear needle 90's were built from May - July '60 so they're period correct, hard to find and definately cool.
Also mounted an original Dehne fuel guage that I have. Unfortunately, it needs some $$ parts to be operational so we won't be running it initially. Once I'm done hemorraging cash to get it running & driving, I'll come back to it.
Also installed an NOS ignition and NOS 1-year wiper switch & pump, side trim, and the antenna. It's starting to look like a real car again!
_________________
1950 Pearl Grey Hoffman Standard Split Window
1954 Iceland Green Euro 3-Fold Oval
1955 Strato Silver Transitional 3-Fold Oval
1956 Iris Blue Convertible
1958 Pearl White Lowlight KG Convertible
1961 Turkis Ragtop
Last edited by laneven28 on Mon Nov 05, 2012 6:54 pm; edited 2 times in total |
|
| Back to top |
|
|
Jon65
Samba Member

Joined: September 29, 2012
Posts: 2417
|
| Posted: Mon Nov 05, 2012 2:39 pm Post subject: |
|
|
Awesome car. I like the clear needle speedo. Keep up the good work.  |
|
| Back to top |
|
|
jzjames
Samba Member
Joined: September 27, 2007
Posts: 1921
Location: Windy Point, WA
|
| Posted: Tue Nov 06, 2012 9:32 am Post subject: |
|
|
| When will that odometer start moving? |
|
| Back to top |
|
|
laneven28
Samba Member
Joined: January 09, 2007
Posts: 312
Location: Cedar Hills, Utah
|
| Posted: Tue Nov 06, 2012 3:05 pm Post subject: |
|
|
| jzjames wrote: |
| When will that odometer start moving? |
Fingers crossed - Thanksgiving
Got the new wiring loom installed last night
_________________
1950 Pearl Grey Hoffman Standard Split Window
1954 Iceland Green Euro 3-Fold Oval
1955 Strato Silver Transitional 3-Fold Oval
1956 Iris Blue Convertible
1958 Pearl White Lowlight KG Convertible
1961 Turkis Ragtop |
|
| Back to top |
|
|
mykidsbug
Samba Member

Joined: April 07, 2011
Posts: 473
Location: SoSo Cal LA
|
| Posted: Tue Nov 06, 2012 8:16 pm Post subject: |
|
|
| Love the work!! i had my son helping. that didnt last. football season, baseball season and track keeps him from helping.. now that he turned 16, its girls. |
|
| Back to top |
|
|
roadkingdoc
Samba Member
Joined: May 16, 2009
Posts: 911
|
| Posted: Wed Nov 07, 2012 5:38 am Post subject: |
|
|
| those springed hood hinges were a 62 item according to the vw timeline. were those original to the car? wish my rag had them. they probably help prevent the driver side hood kink or bend common to the 61 and earlier. i am the only hood operator of my car! |
|
| Back to top |
|
|
laneven28
Samba Member
Joined: January 09, 2007
Posts: 312
Location: Cedar Hills, Utah
|
| Posted: Wed Nov 07, 2012 11:19 am Post subject: |
|
|
| roadkingdoc wrote: |
| those springed hood hinges were a 62 item according to the vw timeline. were those original to the car? wish my rag had them. they probably help prevent the driver side hood kink or bend common to the 61 and earlier. i am the only hood operator of my car! |
Good eyes! No, those spring hinges are not factory, although a PO used them at some point on this car as there were holes drilled in the trunk for the spring mounts. I decided to run them so my son or one of his friends doesn't jack up the hood with the prop.
_________________
1950 Pearl Grey Hoffman Standard Split Window
1954 Iceland Green Euro 3-Fold Oval
1955 Strato Silver Transitional 3-Fold Oval
1956 Iris Blue Convertible
1958 Pearl White Lowlight KG Convertible
1961 Turkis Ragtop |
|
| Back to top |
|
|
obfuscurity
Samba Member

Joined: December 01, 2012
Posts: 320
Location: Westminster, MD, USA
|
| Posted: Mon Dec 17, 2012 10:26 pm Post subject: |
|
|
Just read this thread from start to finish. Disappointed to see no updates in over a month. What's the latest?  |
|
| Back to top |
|
|
OvalinAz
Samba Mini Tech
Joined: June 09, 2009
Posts: 1078
Location: AZ
|
|
| Back to top |
|
|
laneven28
Samba Member
Joined: January 09, 2007
Posts: 312
Location: Cedar Hills, Utah
|
| Posted: Tue May 28, 2013 12:56 pm Post subject: |
|
|
This update is long overdue. While the project has taken longer than expected, were steadily marching towards the finish line. The devil really is in the details, and those details seem to eat up a lot of time! Regardless, were still enjoying every step of the process.
Once we dropped in a 12V armature into the wiper motor, the wiring wrapped up fairly quickly. During reassembly, I found that 3 of the 4 fenders had burn through on the paint, so they had to go back to the painter to be resprayed and color sanded & buffed. At this point, many months later, Im still waiting for those to wrap up. Its time to turn up the heat as Im ready for them now.
We then installed the front beam but ran into an issue with one of the securing bolts when it snapped off in the chassis frame as we were tightening it. Many frustrating hours and drill bits later, we got the broken piece out and moved onto installing the brake system. That was not fun!
Wade chose BRMs for his wheels, and was anxious to get them on once the brakes were all done. While I personally like my cars stock, I gotta say that the look of these rims has really grown on me
_________________
1950 Pearl Grey Hoffman Standard Split Window
1954 Iceland Green Euro 3-Fold Oval
1955 Strato Silver Transitional 3-Fold Oval
1956 Iris Blue Convertible
1958 Pearl White Lowlight KG Convertible
1961 Turkis Ragtop |
|
| Back to top |
|
|
laneven28
Samba Member
Joined: January 09, 2007
Posts: 312
Location: Cedar Hills, Utah
|
| Posted: Tue May 28, 2013 3:19 pm Post subject: |
|
|
One cold night in February, the boys and I stayed up late and finished assembling the stale air 40hp engine. We had a local VW machine shop set the end play, but we did everything else.
Heres what we started with:
Heres where it is now:
_________________
1950 Pearl Grey Hoffman Standard Split Window
1954 Iceland Green Euro 3-Fold Oval
1955 Strato Silver Transitional 3-Fold Oval
1956 Iris Blue Convertible
1958 Pearl White Lowlight KG Convertible
1961 Turkis Ragtop |
|
| Back to top |
|
|
laneven28
Samba Member
Joined: January 09, 2007
Posts: 312
Location: Cedar Hills, Utah
|
| Posted: Tue May 28, 2013 3:31 pm Post subject: |
|
|
By the end of March, with the completed engine mounted to the transaxle, we were ready to test fit the body to the chassis. We rounded up a few friends and moved the body from the donor chassis to the restored one. We were very lucky as everything lined up as expected. It was great to see the painted body mated up with the restored chassis lots of high fives, and smiles that night as we were all proud and excited that it was all coming together.
_________________
1950 Pearl Grey Hoffman Standard Split Window
1954 Iceland Green Euro 3-Fold Oval
1955 Strato Silver Transitional 3-Fold Oval
1956 Iris Blue Convertible
1958 Pearl White Lowlight KG Convertible
1961 Turkis Ragtop |
|
| Back to top |
|
|
laneven28
Samba Member
Joined: January 09, 2007
Posts: 312
Location: Cedar Hills, Utah
|
| Posted: Tue May 28, 2013 3:47 pm Post subject: |
|
|
We final prepped the chassis & body by adding the pan gasket, installing rattle trap on the chassis tunnel and body, installing front seat belts, and adding new tar board to the engine firewall.
_________________
1950 Pearl Grey Hoffman Standard Split Window
1954 Iceland Green Euro 3-Fold Oval
1955 Strato Silver Transitional 3-Fold Oval
1956 Iris Blue Convertible
1958 Pearl White Lowlight KG Convertible
1961 Turkis Ragtop
Last edited by laneven28 on Tue May 28, 2013 10:13 pm; edited 1 time in total |
|
| Back to top |
|
|
|


