| Author |
Message |
Nigelbug
Samba Member
Joined: November 13, 2010
Posts: 166
Location: England

|
 Posted: Sun Jan 27, 2013 10:35 am Post subject: Unity spotlight installation Posted: Sun Jan 27, 2013 10:35 am Post subject: Unity spotlight installation |
 |
|
I have always had a thing for american classics from the 1940s and 50s and like the features on many of the cars that never made it over to this side of the Atlantic. One feature is the directional spotlight that can be adjusted by the driver or passenger. I have therefore recently installed a Unity spotlight www.unityusa.com on my 1974 1303 Super Beetle to give it a flavour of these old american icons.
Whilst the instructions supplied by Unity are quite poor the installation was trouble free. I bought my light as a NOS on ebay from an American seller who was happy to ship to England, whilst the printed paperwork in the box suggests that my kit is from 1985 the vintage kits sold by Unity appear to be much the same.
This is the process.
Tools required:
1/2" Drill bit
3/3" Drill bit
Screwdrivers
3/8" socket or spanner/wrench
Hammer and punch (i don't have a punch so used a large screw)
masking tape if required
So what is in the kit?
The Kit
Photo showing the kit (lamp and installation kit) minus the paperwork. The instructions in my kit involved black and white photos making it difficult to readily identify all the main parts in one go. Unity makes kits to fit most cars sold in the USA and tailors each kit for that car, as a result the shaft lengths measured from centre of handle to centre where the gears mesh in the lamp varies from 9 1/8" to 26". They make mounting brackets for different cars and mounting brackets for left hand or right hand side installation. I waited a while for the right kit to come up on ebay but came to the conclusion a lamp in good condition with the right fitting kit and shaft length would rarely be available, I have compromised by installing a kit with a slightly longer shaft 10 1/4 as opposed to the 9 1/8" reccommended for a Beetle. http://search.unityusa.com/application.php
Fix template
The paper template in my kit did not include the location for a Beetle. So I figured it out by offering up the lamp to ensure when the door opened the door mirror would clear the lamp. I used the template from another car to help locate the first two screw holes.
Punch the location of the holes and drill two 3/8" holes for fixing the mounting bracket with the self tapping screws supplied. I was not happy with the angle that the lamp shaft and handle would be entering the cabin, this was made worse by the fact that my lamp shaft is slightly longer than that recommended by Unity for my Beetle. I carefully filed the outside edge of the bracket down to pull the seating angle closer to the dash and away from the steering wheel prior to installation.
Fix mounting bracket
The mounting bracket in place minus the rubber gasket. It is essential that this bracket is really secure to the car as it will also act as the guide for drilling the 1/2" hole for the lamp shaft.
Drill 1/2" hole
Insert the drill bushing in the lamp bracket and tighten fully. I oiled the inside of the bushing to allow the drill bit to freely rotate in the bushing. Drill the 1/2" hole through the outer skin. Remove the drill and check in the hole to ensure the cable to the mirror lamp is not in the way. Drill the remain way through the wind shield pillar. Relax the scary part is now done.
Install shaft
Remove drill bushing guide and offer the lamp and shaft through the bracket and newly formed hole. Secure shaft externally by tightening bracket screw.
Secure shaft to inner pillar
Slip rubber wedged shape bushing over shaft, cable bracket and secure with chrome collar. Tighten flat headed screw on chrome collar. Note position of groove on end of shaft, for the handle to function fully the groove must align with a spigot on the internal gears.
Alignment of handle on shaft
The only way I could be certain that the handle had locked over the groove on the shaft was to remove the end switch mechanism held on by 3 Philips screws. Check alignment.
Assemble handle
Secure handle to shaft using the handle assembly wedge and bolt using 3/8" socket or wrench. Secure and fix chrome end switch mechanism with the 4 Philips screws.
Route cable
Route the cable to dash and fix to positive supply.
Check clearances
If you have installed the lamp in the correct position the lamp should clear the mirror when the door opens and there should be room to operate the steering wheel without your knuckles fouling the handle. I was not entirely happy with the location of the handle to the steering wheel due to the 1 1/8" longer shaft on my lamp so I added a 3/8" 10mm rubber sleeve (by cutting down the long rubber sleeve in the kit) between the lamp and the fixing bracket. Adding the rubber sleeve has the affect of pulling the handle towards the windscreen pillar by 10mm.
Completed assembly
Front view |
|
| Back to top |
|
 |
cletus_zuber
Samba Member

Joined: January 08, 2010
Posts: 2408
Location: Gladstone, Ore
|
| Posted: Sun Jan 27, 2013 1:42 pm Post subject: |
|
|
As y'all say "jolly good"
_________________
1972 1302
HPMX 40's & 019 |
|
| Back to top |
|
|
Miklo
¡Chale!
Joined: August 27, 2008
Posts: 2058
Location: Antelope Valley, Ca
|
| Posted: Sun Jan 27, 2013 2:11 pm Post subject: |
|
|
Very nice write up! 
I've always wondered about the installation of one these for a Bug.
_________________
✠Miklo✠
'55 Type1 "Ozma"
'66 Type1 "Charlotte" RIP
Antelope Valley's Mobile Air-Cooled Guru
| Dr OnHolliday wrote: |
| As I remember it, lowriding was not one of the criteria that Adolf gave to Dr. Porsche... |
|
|
| Back to top |
|
|
early
Samba Member

Joined: January 19, 2012
Posts: 187
Location: Glen Carbon, IL
|
|
| Back to top |
|
|
jhicken
Samba Member
Joined: October 24, 2003
Posts: 9466
Location: Fallbrook, CA
|
|
| Back to top |
|
|
Nigelbug
Samba Member
Joined: November 13, 2010
Posts: 166
Location: England
|
| Posted: Sun Feb 03, 2013 7:21 am Post subject: |
|
|
Thanks for the compliments.
Just added the last three photos to complete this write up. When I fitted the light last weekend the car battery had gone dead due to lack of use over the winter, so whilst I had completed the job last weekend I could not get to play with it. Having charged up the battery I was pleased to discover that the light worked even though it has been kicking around in various garages etc for 27 years as a NOS item before being sent across the pond to me in England
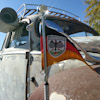
Handle position in car
The handle projects on my car by 135mm or 51/4 " into the cabin. This would have been 10mm or 3/8" more if it were not for the additional rubber sleeve I added to the outside of the shaft.
Type in www.unityusa.com/application_search.asp to find out which lamp and shaft length fits your car.
Chart taken from Unity USA showing comparison of spotlight shaft lengths. My reckoning is that the handle would project 105mm or 41/8" into the cabin with the correct sized shaft (with no rubber spacer). This would make the handle very close to the wind shield / windscreen pillar with little or no shaft being visible. I have 22mm of chrome shaft visible between the handle and the chrome collar, it would have been 32mm without the exterior rubber spacer.
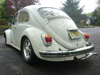
The Lamp in Parked Position
Showing the lamp turned back on the car in a parked position. This can be done from within the car simply by twisting the handle and then rotating the whole handle upwards. The parked position tucks the lamp in and out of the way to protect the lamp lens from chips or knocks but does place the chrome body in a more vulnerable position.
The finished working lamp. |
|
| Back to top |
|
|
68IHscout
Samba Member
Joined: March 10, 2010
Posts: 3122
Location: santa ana ca
|
| Posted: Sun Feb 03, 2013 8:51 am Post subject: |
|
|
| Bloody done right!!! Looks good |
|
| Back to top |
|
|
|


