| Author |
Message |
Tom Powell
Samba Member
Joined: December 01, 2005
Posts: 4855
Location: Kaneohe

|
 Posted: Sun Feb 02, 2014 2:03 pm Post subject: Chaining with a harp Posted: Sun Feb 02, 2014 2:03 pm Post subject: Chaining with a harp |
 |
|
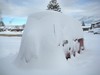
I use my '69 camper for skiing and sometimes have to chain the tires. This is an illustration of the technique using a "chain harp" that a friend suggested to me.
Step #1
Lay out the chain beside the tire with the non-lock end of the chain in the harp and the lock on the outside.
Step #2
Put the chain and harp over the tire with the harp near the ground and around the tire tread.
Step #3
Move the vehicle forward over the chains until the chains and harp are behind the tire. I prefer to push the vehicle with brute strength rather than drive it, but don't let it get away downhill.
Step #4
Remove the harp and hook the inside loop and the lock the outside loop.
Step #5
Attach the tensioners or spider.
Step #6
Move the vehicle forward a bit more to get the chains even and attach and adjust the spider or tensioners.
Step #7
Drive a bit and then check the chains and adjust the tensioners or spider as necessary.
Practice on the driveway will make the technique duck soup in the snow. Chaining in the parking lot the night before it snows is smart. It is way easier to chain and unchain in dry conditions than chaining when it is snowing and blowing in the morning.
I haven't tried using the harp for removal. I am so happy to get unchained that I have just undone the the hook and lock and wrestled them off the axle and brake lines. Perhaps the harp could be used for a painless chainectomy.
Aloha
tp |
|
| Back to top |
|
 |
SGKent 
Samba Member

Joined: October 30, 2007
Posts: 41031
Location: Citrus Heights CA (Near Sacramento)
|
| Posted: Sun Feb 02, 2014 2:21 pm Post subject: |
|
|
excellent write up Tom
FWIW -
1. Get the best chains you can. The cross link V bar style work really well on ice compared to the cable style. V's go outwards towards the ice and snow.
2. When you have time, considering that you have the tire size you want and won't be changing it anytime soon, pull a tire off and make sure it is inflated to the proper pressure. Fit the chains to it and cut off the extra links. What you want is to link to the last link to make it easy rather than trying to guess which end link to use or having links flailing around.
3. Practice fitting them a couple times before you cut off the excess links. When you are done, put them into the box in a manner they can be easily pulled out. What you want is a box or something that you can just pick up the ends and lift without having to untwist etc. You might even consider tying the ends to a shoe lace or something to make it easy to spot to pick up out of the box.
4. Carry spare links and cross links plus the tools to fix them.
5. If a chain breaks stop immediately gently. I had one break on the 1971 bus while we were doing about 20 mph. The broken link wrapped around a brake line. When I stopped which was immediately, the chain was about 1/2" from destroying the brake line which it had already bent considerably.
By fitting the chains to the tires and checking the condition before you leave, it will make it easier when you need to use them. Be aware that there is not much clearance between the rear fender wells and the tire chains so be sure to check yours fit before you need them.
6. If you live in an area where there is ice and snow often, and your state laws allow it, carbide studded tires work well.
Some trips when we have room we will take a floor jack along to lift the tire quickly to put the chain on. With the chain the exact length and marked left and right, it only takes a minute or two to put each chain on.
_________________
Most people dont know what theyre doing, and a lot of them are really good at it. - George Carlin
Last edited by SGKent on Sun Feb 02, 2014 4:51 pm; edited 1 time in total |
|
| Back to top |
|
|
Wasted youth
Samba Member

Joined: July 06, 2012
Posts: 5134
Location: California's Hot and Smoggy Central Valley
|
| Posted: Sun Feb 02, 2014 4:47 pm Post subject: |
|
|
Nice write up, guys! I had heard about the harp process, but didn't get a very good explanation.
I hadn't seen those V bar chains before...thanks Mr. Kent!
 |
|
| Back to top |
|
|
TomWesty
Samba Member
Joined: November 23, 2007
Posts: 3482
Location: Wyoming,USA
|
| Posted: Sun Feb 02, 2014 8:12 pm Post subject: |
|
|
I carry a cheap plastic trash can liner in the pocket of my parka. I throw my cable chains over the top, flop the bag on the ground so I can crawl under to buckle the inside as tight as possible, then buckle the outside and tension. Done.
_________________
If you haven't bled on them, you haven't worked on them.
Visit: www.tomcoryell.com and check out my music! |
|
| Back to top |
|
|
Desertbusman
Samba Member

Joined: June 03, 2005
Posts: 14655
Location: Arizona
|
|
| Back to top |
|
|
richparker
Samba Member

Joined: November 24, 2011
Posts: 6981
Location: Durango, CO
|
| Posted: Mon Feb 03, 2014 8:26 am Post subject: |
|
|
Thanks for showing us the chain harp, you had wrote about it on my winter camping thread. Looks like you have those chains on backwards. You shouldn't put the pinched part against the tire, it could cause a side wall puncture.
_________________
__________
71 Westy build
Adventure thread
65 Deluxe Build
63 Deluxe Build |
|
| Back to top |
|
|
Tom Powell
Samba Member
Joined: December 01, 2005
Posts: 4855
Location: Kaneohe
|
| Posted: Mon Feb 03, 2014 10:26 am Post subject: |
|
|
| richparker wrote: |
| Thanks for showing us the chain harp, you had wrote about it on my winter camping thread. Looks like you have those chains on backwards. You shouldn't put the pinched part against the tire, it could cause a side wall puncture. |
Thanks for the comment. I'll have to throw my chains out on the driveway again and see if my installation was backwards/insideout. I forgot to mention that the harp was made from copper grounding wire for AC circuits. The heavy copper wire is available from hardware stores.
Aloha
tp |
|
| Back to top |
|
|
Tom Powell
Samba Member
Joined: December 01, 2005
Posts: 4855
Location: Kaneohe
|
| Posted: Mon Feb 03, 2014 12:24 pm Post subject: |
|
|
| richparker wrote: |
| Thanks for showing us the chain harp, you had wrote about it on my winter camping thread. Looks like you have those chains on backwards. You shouldn't put the pinched part against the tire, it could cause a side wall puncture. |
I pulled out both chains and they are identical.
My choice is to put the lock on the outside of the wheel and tire. The result will be that one side will have the pinched part against the tire. Having the lock on the outside makes for easier installation and removal. Life and ACVW's are about risk management. Your comments are valid and we shall all make our own decisions. In a parking lot chain installation I would seriously consider having the lock on the inside of one wheel, but in the wind and snow I would most likely do both locks on the outside.
An alternative is to rebuild one of the the chains to make it a mirror image of the other and have left and right chains with both locks on the outside.
I keep my chains and Mr Buddy heater in the icebox. I hacked out the insulation and put in shelves. The icebox is easily accessible with the slider opened slightly. Firing up the heater when I grab the chains keeps the interior a bit warmer and warms the hands when the chains have been installed.
Aloha
tp |
|
| Back to top |
|
|
SGKent
Samba Member
Joined: October 30, 2007
Posts: 41031
Location: Citrus Heights CA (Near Sacramento)
|
| Posted: Mon Feb 03, 2014 12:31 pm Post subject: |
|
|
this show the chain links should look when done.
_________________
Most people dont know what theyre doing, and a lot of them are really good at it. - George Carlin |
|
| Back to top |
|
|
Tom Powell
Samba Member
Joined: December 01, 2005
Posts: 4855
Location: Kaneohe
|
| Posted: Mon Feb 03, 2014 1:10 pm Post subject: |
|
|
| SGKent wrote: |
this show the chain links should look when done.
|
Dagnabit!
That photo is sure a lot prettier than any of mine and I'm seriously reconsidering the proper chain installation and procedure. My first consideration will be rebuilding one of the chains to make it lock and pinch on the outside. The main concern will be: Will that make the rebent part weaker?
I can use the chains as they are and have the lock on the outside of the left tire and on the inside of the right tire. But the muffler is on the right side and would make the lock on the inside difficult to reach. Or I could put the right side on by rolling backwards.
The plan was to be able to put both chains on with one forward movement of the vehicle. It is bright and sunny here in SoCal and I'll be doing some procedural investigation on the driveway before heading to the mountains.
Aloha
tp |
|
| Back to top |
|
|
SGKent
Samba Member
Joined: October 30, 2007
Posts: 41031
Location: Citrus Heights CA (Near Sacramento)
|
| Posted: Mon Feb 03, 2014 1:40 pm Post subject: |
|
|
| Quote: |
Dagnabit!
That photo is sure a lot prettier than any of mine and I'm seriously reconsidering the proper chain installation and procedure. My first consideration will be rebuilding one of the chains to make it lock and pinch on the outside. The main concern will be: Will that make the rebent part weaker?
I can use the chains as they are and have the lock on the outside of the left tire and on the inside of the right tire. But the muffler is on the right side and would make the lock on the inside difficult to reach. Or I could put the right side on by rolling backwards.
The plan was to be able to put both chains on with one forward movement of the vehicle. It is bright and sunny here in SoCal and I'll be doing some procedural investigation on the driveway before heading to the mountains.
Aloha
tp |
Latch goes on the outside. Both wheels
Link clip on inside
_________________
Most people dont know what theyre doing, and a lot of them are really good at it. - George Carlin |
|
| Back to top |
|
|
richparker
Samba Member
Joined: November 24, 2011
Posts: 6981
Location: Durango, CO
|
| Posted: Mon Feb 03, 2014 2:21 pm Post subject: |
|
|
Both chains should be identical. I think that you can sucussfuly get the lock on the outside of both wheels while still having the smooth side agains the sidewall of the tire. If you put the one on the right in your picture on the passanger side tire with the lock on the outside, the lock should be in front of the tire. Take the one on the left in your pic and out it on the drivers side tire with the lock out the lock should be on the rear of the tire. It might be the other way around but either way the locks should be opposite one another. That's how it is on the chains for my delivery truck, my personal pickup and my bus.
When you have the chains fully tighten on the tire I'm sure you have at least one maybe two links of chain on the inside of the tire flopping. How do you stop them from hitting the spring plate? I use a couple of zip ties to hold the flopping links to the tire chain. This is only an issue on my bus, not on my other trucks.
_________________
__________
71 Westy build
Adventure thread
65 Deluxe Build
63 Deluxe Build |
|
| Back to top |
|
|
Tom Powell
Samba Member
Joined: December 01, 2005
Posts: 4855
Location: Kaneohe
|
| Posted: Mon Feb 03, 2014 4:02 pm Post subject: |
|
|
I switched the lock on one of the chains and now they are fraternal not identical. The smooth side on both chains will be against the tire and the lock at the rear and outside of the tire.
My logic is: The locks are easiest to fasten and unfasten when they are on the outside of and behind the wheel and tire. It is also easier to remove snow for installation and work behind the wheel than in front of it. With the modified right chain lock I can put both chains on with one forward movement of the vehicle.
Additionally:
Always carry a spare clutch cable of the proper length when traveling in cold weather.
It is easier to change a broken cable if you can park with the left wheels on a curb.
It is more comfortable to use the correct weight oil and/or oil pan heater in cold weather than do an oil change lying on the ice.
Thanks for the comments/advice/corrections to the original post.
Aloha
tp |
|
| Back to top |
|
|
SGKent
Samba Member
Joined: October 30, 2007
Posts: 41031
Location: Citrus Heights CA (Near Sacramento)
|
| Posted: Mon Feb 03, 2014 4:23 pm Post subject: |
|
|
Hi Tom - make sure there are no kinks in the chain. I can't tell in the photos. Sometimes one of the ends will loop back through one of the ladders and cause the links to twist. It happens to me when I take them off and toss them in a bag or something to deal with them later.
We have one car we could only find cable chains for and another that has these funky diamond chains that are a PITA to put on.
One word of caution to all. We broke a chain in an area of the country where it only snows heavy once every 5 to 7 years. Auto parts stores don't carry chains if they only sell them once every 5 - 7 years. That means no parts, no chains to fix them etc. We ended up digging through old worn out chains at a truck stop to find pieces we could use to make them work again. Now we carry chains and ample parts to fix them on any trip where we MIGHT encounter snow deep enough to need chains.
_________________
Most people dont know what theyre doing, and a lot of them are really good at it. - George Carlin |
|
| Back to top |
|
|
Tom Powell
Samba Member
Joined: December 01, 2005
Posts: 4855
Location: Kaneohe
|
| Posted: Tue Feb 04, 2014 10:55 am Post subject: |
|
|
| SGKent wrote: |
| ... make sure there are no kinks in the chain. ... we carry chains and ample parts to fix them on any trip where we MIGHT encounter snow deep enough to need chains. |
No kinks in the chains and I carry spare links, extra tensioners, and a cellphone.
Aloha
tp |
|
| Back to top |
|
|
WestyPop
Samba Member
Joined: February 08, 2005
Posts: 1732
Location: SoCal
|
| Posted: Wed Feb 05, 2014 4:46 am Post subject: |
|
|
Lived in the mountains for several years, and tried all kinds of methods of 'chaining-up', with varying degrees of success or lack of same (including the harp & even jacking & swapping to already-chained snow tires, etc). Then an much older friend whod grown up in the mountains from the early 1900s & lived there all his life showed me his way: its kind of a combo of Steves and Tom Westys techniques
and a subtle trick thrown in.
First, as Steve recommended, fit the chains up nice & tight when its warm & dry, with an actual tire youll be running
off the vehicle. Remove, then re-connect, leave them hooked up & gently lower them into their traveling container (surplus steel ammo boxes work well; nice rubber gaskets to seal the snow & mud in till youre back home or have to chain up again). That way you can reach in, grab the fastening points & lift em out with no hassles.
Second, as Tom Westy said, lay down on your trash bag, old carpet piece, burlap bag, etc
and (after disconnecting the fastening links, drape the chains over the tire so that you can cinch up the inside links. The pull/tug/wiggle the outside links so that the flip-lock connector will just hook on its target link, but without flipping/locking.
Final step: If you do this to both drive wheels, then slowly move a few tire revolutions (15-20 feet) forward & park, youll find that the outside links have gained enough slack that you can easily re-attach the locking mechanisms & latch them securely. Tensioners
cant hurt, and may prevent some fender & wheelwell nicks, since tires seem to get smaller in circumference the more we drive on them!
My older mountain man friend had me convinced right off, when he said that his wife could chain-up all four wheels of their Jeep Wagoneer in less than 5 minutes! I was shamed & embarrassed at that point, but his method has never failed me yet on a wide variety of vehicles.
X2 on the spare links, hardware, etc. to bring along. All the spares go in plastic bags at the bottom of the chain container, on top of about 20 ft of coiled 'mechanics wire' & and old pliers. So far, only needed the extras to help out others; better good karma than bad, I guess.
_________________
Never underestimate the power of stupid people in large groups.
______________________________________
J.R.
68 Westy
(+ others) |
|
| Back to top |
|
|
Wildthings
Samba Member

Joined: March 13, 2005
Posts: 50338
|
| Posted: Wed Feb 05, 2014 5:25 am Post subject: |
|
|
I have a piece of nylon parachute cord or starter cord hooked to the free link end where the latch will attach. I lay the chain over the tire, snag the hook on the back of the tire and then use the cord to temporarily close the gap on the outside of the tire. Once all the tires are done this way I move the vehicle a foot or so and go back through, fasten the latches, and tie the cord across to the opposite side as a chain tightener.
This method will allow you to install chains that are not much longer than the absolute minimum they need to be. You can either just cut off any extra links on the inside or leave them permanently zip tied so they can't eat up the brake lines, etc.
Beware of using reinforced chains, the extra bars can do serious damage to the tire if the links get bend and the bars end up running against the tread. |
|
| Back to top |
|
|
Tom Powell
Samba Member
Joined: December 01, 2005
Posts: 4855
Location: Kaneohe
|
| Posted: Sun Feb 09, 2014 1:06 pm Post subject: |
|
|
| SGKent wrote: |
| Hi Tom - make sure there are no kinks in the chain. I can't tell in the photos. Sometimes one of the ends will loop back through one of the ladders and cause the links to twist. It happens to me when I take them off and toss them in a bag or something to deal with them later. ... |
I thought that I had no kinks in the chains, but decided to check them again. There was a kink in one chain and two in the other. They had gotten there from loading and unloading them from the box. I laid them out on the driveway and made the ends climb through the ladder to get the kinks out. After that I laid them out on top of a large garbage bag, flopped an end of the bag over an end of the chain and rolled them up. I put the two chain sausages into a tool bag instead of the box they came in.
Dagnabit!
The chain sausages in the tool bag don't fit in the icebox like the heater and chain box did. Guess I'll have to put the cooking utensils in the closet and make room for chains, heater and oil in the icebox.
Aloha
tp |
|
| Back to top |
|
|
|


