| Author |
Message |
kiomon
Samba Member
Joined: April 01, 2012
Posts: 97
Location: chicago

|
 Posted: Sun Mar 23, 2014 3:36 am Post subject: Meet SyncroBo our Expedition Syncro build Posted: Sun Mar 23, 2014 3:36 am Post subject: Meet SyncroBo our Expedition Syncro build |
 |
|
We have read many posts and build logs from folks who have taken a modest bus and turned it into something cool. Whether it's the minimalist of VanenVan or the perfectionist of the Drive Nacho Drive crew, we have been inspired and learned a lot over the past two years.
So we wanted to share with the community our build, SyncroBo. This is going to be a long post so you may want to grab a coffee or bookmark it for later. I am going to post up this in waves because its a lot to write!
Preamble (this is background, if you just want to get to the build, skip it)
We volunteer for a small non-profit called a Filmmaker For A Cause (www.fmfac.org) that makes free short films for other non-profits to help them tell their story to gain awareness and support for their mission. We are all volunteers and do it for free for other non-profits. We are all passionate about filmmaking and helping others so this is our skill we are donating. About 2 years ago we got the idea to do a bit of a global tour and try to combine a long period of time to work on the road. To date we were a team of weekend warriors, scrounging together vacation days and weekends to make it happen. We wanted to take a year and tackle a larger project. We researched around the world airline tickets coupled with car rentals to haul all of our gear, and hotels to lodge us and the cost were through the roof. It wasn't a smart approach. When we looked at our spreadsheet, the car rentals and lodging were the biggest expenses. We abandoned the idea.
One day while driving through downtown Chicago, I saw a Bay Window Westy parked at a Whole Foods (cliché right?), and the idea dawned on me. How about living in a van? I thought I could sell my SUV, buy a van and make some small "tweaks" and I could let the FMFAC team do a test run in the US and if that worked, look into shipping it abroad. At this time, I knew nothing of VWs or busses, except that Bay Windows looked awesome, and roomy enough. I figured I could spend <$10k and have a reliable home base on wheels for our project work, and if I paid personally for the van, it would just cost our organization food, and gas which would allow us to reach more organizations and cheaper.
So with the idea hatched, I went to eBay to buy a bus. Yeah yeah I know, but I didn't know any better. I found a bay window in Humboldt County (who's seller didn't get their reserve), and a buddy and me flew out to make the deal and drive 1800 miles back. I'll save that long story, but basically I learned; I am too big to fit in a bay window comfortably and that bus was in horrible shape. But I was determined to drive back a bus, I found another in Seattle. A 1980 air cooled Vanagon. Second owner, claiming it has only 60,000 original miles. We drove up from CA to Seattle, WA bought the van on April Fool's day and headed east. We did change the oil before we left! But other than that, we just put her on the road. I hadn't read all of the horror stories on thesamba yet about melting air cooled engines, the need for a temp gauge, certain fuels, changing fuel lines, etc. etc. I just drove. We went up and over mountains, though slow, and beyond the fuel tank seals leaking in North Dakota, we made it all the way back to Chicago without issue.
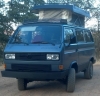
Here is Baby Blue!
IMG_0850 by RandallBrownIII, on Flickr
Back here in Chicago, I discovered thesamba, and set out to make "Baby Blue" perfect. Changed brakes, lines, fluids, battery, etc. overhauling basically anything we could find that needed it, then proceeded to use Baby Blue as my primary vehicle and also for our org to complete projects. It was a huge success and the community of people we began to meet was amazing,
With the "test" complete, we went back to planning a larger and longer project tour. We set our sights on Europe and Africa. After much debate and research, we deemed Baby Blue not robust enough being 2wd for Africa, had we found Drive Nacho Drive then, we may have reconsidered. While reading my Bentley, I kept seeing the reference to Syncro, and then YouTube video watching ensued. I was hooked. I would buy a "cheap" Syncro, fix it up (I would spend less than $20k!), and then volunteer it to FMFAC for a year for the project. Easy
. So I thought
.
Before
IMG_0027 by RandallBrownIII, on Flickr
After
DSC_6507 by RandallBrownIII, on Flickr
Baby Blue & SyncroBo
IMG_1934 by RandallBrownIII, on Flickr
We took Bo to Moab for a few days to test out some equipment and figure out what works and doesn't. We did about 150 miles off-road in 4 days. Was awesome. We no longer carry that tray on the back 
Link
We are currently wrapping up the Europe chapter of our project. We have been all over Europe working with organizations and living in the van. From FREEZING Belarus to windswept Wales and Portugal, its been an amazing journey. A huge set of thanks to Bostig and Burleys Motorsports. They have gone way above and beyond to help us make this a reality, and support their products and us overall in a no BS way. We literally lived at both of their places for a while while we were getting this together and couldnt have done it without them.
We have met a ton of awesome people on this journey, from Joseph928 who opened his home to us when we had an unfortunate issue with our front locker, to the crew at Das Mule, and Peter at Van-Café who dealt with our constant badgering for parts!
We are excited about the work we are doing at Filmmaker For A Cause, and getting to reap the rewards of all the planning that has gone into this. You can follow SyncroBo journeys in pictures on instagram.com/syncrobo or Facebook.com/syncrobo, and you can hear more about our organizations work at Facebook.com/fmfac.
THE BUILD DETAILS
. I am going to post it up in sections so going to reserve some space for the details below.
_________________
SyncroBo - 1987 VW Syncro Expedition Camper
MogTug - 1987 Mercedes Unimog Expedition Camper
Build & Travel Blog - www.nicknameinternational.com
Last edited by kiomon on Tue Mar 25, 2014 4:55 pm; edited 1 time in total |
|
| Back to top |
|
 |
kiomon
Samba Member
Joined: April 01, 2012
Posts: 97
Location: chicago
|
| Posted: Sun Mar 23, 2014 3:37 am Post subject: BUILD DETAILS |
|
|
The Base
With the new plan hatched, and loads of confidence from the Baby Blue project, I found a Syncro tintop listed here on thesamba. It already had a Subaru engine swap installed by a forum sponsor. Owned by a Syncro lover, and pretty low miles and a great price! Body was purportedly rust free. I immediately called the owner and told him I would be out the next day for it. Got there and the van was indeed rust free, ran like the bejesus, and looked solid. I had previously looked at shops to do a tintop to westy conversion, and factored that cost into my build budget. Went to the bank, got the money, and drove home to Chicago without issue. The van was previously named "Britney". And needed some body work for some small nicks and parking lot dings, and a respray from the clear peeling off.
2012-07-21-0008.jpg by RandallBrownIII, on Flickr
Exterior Chassis/ Body Preparations
We immediately set out to prep the foundational elements. On the exterior, we took the van to a pro and had it prepped for paint. We wanted to take it back to dove blue metallic, but a slightly darker version, but something that wouldn't clash when you opened the door to the old paint (which was perfect on the interior). Painting it proved challenging. There were two main options, a restoration level paint job, where it would be a full strip of the vehicle inside and out and then paint it all. The estimates were in the 8-15k for that. All the way to just a scuff and spray option on the other end for a grand. I decided to fully strip the exterior, pull the windows, and paint the exterior and put in new seals all around. The paint turned out great.
IMG_0594 by RandallBrownIII, on Flickr
new paint 000044 by RandallBrownIII, on Flickr
The Engine
Our van came with a Subaru 2.2 engine installed by a major vendor and we were mulling a lot of potential options for the van, from moving to a 2.5, Subaru Diesel, TDi, and the 1.8T. We spoke with most of the vendors and a bunch of owners, in addition to reading every thread we could find on thesamba. We were looking for a solution that was proven, simple, and well understood. We even contemplated staying with the 2.2. But small issues slowly started to crop up with our 2.2. Erroneous sensor readings, wiring gremlins, just small items tied to the initial conversion and simply time passing. But the problem was we couldnt figure out what had been done and why/ how, so we had a terrible time trouble shooting and figuring out the system. Even when we called the original installation shop, they couldnt remember exactly what had been done and how. And while they were very helpful and tried to help us, it was simply a matter of each Subaru conversion being slightly different from the next. We could drive the van several states over and get their help, but what would happen in Mozambique if this happened. We needed to be self-reliant. Ultimately we decided to go with a Bostig. We wanted a simple conversion, worldwide parts availability, full documentation of the system, and of course reliability. We are super happy with our choice. The biggest thing is that every nut and bolt and wiring diagram is known in detailed in their "blue Bentley. We are 100% independently capable of sorting problems if/when they arise on the road without Bostigs help. There is no chain back to the shop. And if we cant fix it ourselves, we can pass the book to someone else who can. After dealing with gremlins in our suby conversion, we learned quickly this is a huge asset if you are truly taking your vehicle far away from home, whether on a single trip or an expedition. And of course Zetec engines and parts are CHEAP This has worked wonderfully for us. Bo is not a light van, and the Bostig has taken us 20+k miles, on and off road without issue. One day we hope to add a turbo to the set-up but for now it gets us where we need and want to go and still manages 17-20 miles per gallon. In addition the guys at Bostig are REALLY into support and think like a small car company. They have answers for every aspect of their conversion and have been an awesome resource.
Our old set-up
IMG_0305 by RandallBrownIII, on Flickr
Empty
IMG_0304 by RandallBrownIII, on Flickr
The new Bostig
IMG_0022 by RandallBrownIII, on Flickr
_________________
SyncroBo - 1987 VW Syncro Expedition Camper
MogTug - 1987 Mercedes Unimog Expedition Camper
Build & Travel Blog - www.nicknameinternational.com
Last edited by kiomon on Tue Mar 25, 2014 8:32 am; edited 1 time in total |
|
| Back to top |
|
|
kiomon
Samba Member
Joined: April 01, 2012
Posts: 97
Location: chicago
|
| Posted: Sun Mar 23, 2014 3:37 am Post subject: BUILD DETAILS |
|
|
The Suspension/ Wheels/ Tires
After the engine this was one of the hardest systems to finalize, and one of the most important. From the beginning we knew we were going to be heavy. With the addition of skid plating, full expedition gear, and a chest full of spares, we were going to be carrying a lot of weight. Couple this with the need to handle rough roads for thousands of miles; we needed a bulletproof solution. Burley of Burley Motorsports was monumental in helping us get this right. Burley is a two time unlimited class desert racing champion, he knows how to prep for rough road conditions.
First we knew were going to go up to 16 inch wheels to give us more light and ground clearance. We decided on steel wheel vs. an alloy because steel would be more forgiving of bush repairs, you can always bang it back true, vs. an alloy, which is stronger, but when stressed, it cracks vs. bends and cant easy be repaired. We went with a set of steel wheels and had them powder coated black. For tires we landed on BFG AT/KOs based on a bunch of trans Africa trip reports.
The real challenging option was the suspension. There arent a lot of options for vanagons. First up was the stock suspension, which was way too soft for the weight of our rig when loaded. We initially purchased the GoWesty +2 Lift Springs and the adjustable Fox Shocks. We were really excited about this set-up based on the description and some of the early user reports, but once we installed it and had the van fully loaded, the spring in the set-up were simply too soft in the front. It sucks that it was impossible to get true spring rate specifications before purchase. In addition the Vanagon spring perches are an odd size, leaving spring options very limited vs. using a standard 2.5 inch spring, of which there are a ton of options. This was before Burl had finished his new Burley Motorsports adjustable spring kit that allows you to use a different diameter spring on the vanagon perches. But in hindsight, the exposed ram of the Fox shock worried me from day one with the dirt and grime that could potentially blow past or out one of the seals. We cant afford to be on the road and try and deal with a RMA issue as some one the forums have had. So we sold our like new GW/Fox set-up and went searching for another solution.
We read every forum we could find and posts on syncro suspensions and went with Burley's custom version 16 rear trailing arms, Burleys front tubular upper control arms, these all pivot on Burleys urethane bushings. We finally found the guys at gmb and their shock /spring set-up. This is the shock / spring set-up at the Tiger Bus used for their trip, and had been updated and advanced since then. We went over detailed specs of our rig and the team was confident their shocks/ springs could handle our weight and requirements. So with the decision made, we went through the slightly complex task of importing the parts from Germany (customs, duty, etc, installing it, and then testing it all out in Moab and Baja. Simply put, we LOVE the combo of the Burley suspension parts and the gmb springs and shocks. Its proven to handle our weight, provide excellent handling on and off road, and a comfortable ride. Highly recommended! But its not cheap. Burley now has his own shock brand that is currently in prototype testing but it was not ready when we did our build.
New Suspension
IMG_0713 by RandallBrownIII, on Flickr
DSC01951 by RandallBrownIII, on Flickr
DSC01979 by RandallBrownIII, on Flickr
DSC01965 by RandallBrownIII, on Flickr
Driveline
We did the no-brainer and had the front diff and transmission rebuilt by Daryl (RIP) with all of the goodies added. We added a front locker, but decided on an aggressive VC in the front diff instead of a solid shaft. We combed the threads on different perspectives, and spoke at length with a ton of different owners, and we decided that for us, an aggressive VC with a front locker would be what we needed. The axles were top shelf 930 kits front and rear from Burley Motorsports. The axle system needed to be able to handle the additional articulation and added abuse given to the suspension and drivetrain.
Pretty
IMG_0273 by RandallBrownIII, on Flickr
Interior Insulation/ Sound Proofing
To tackle sound and thermo insulation we researched a wide range of different products and decided on a hybrid approach. We sprayed the entire interior with Noxudil, it's a spray in sound deadener, which also has anti rust properties. On top of this we when with a closed cell foam insulation that we sourced from a hot rod building company. It's pretty thin but our test showed great results against radiant heat transfer. For areas where we were concerned about resonance we put down fatmat before sealing under the Noxudil, this included the footwells, rest hatch, doors, and upper dash. For the fiberglass top we had he roof spray foamed and then covered in a soft fabric. The only item left was the windows. They are by far the largest source of heat gain and loss. We ordered a full curtain set from SewFine. We tinted all of the side windows limo dark, the rear hatch and driver and passenger front windows a slightly lighter level, as there are limits in Illinois. I would have liked to go limo all around for the international travel and stealth camping. Thus far this has kept us pretty comfortable in the van. We have camped down to 28 degrees without heat and the top popped and we were comfortable with just a comforter.
IMG_0251 by RandallBrownIII, on Flickr
IMG_0259 by RandallBrownIII, on Flickr
IMG_0252 by RandallBrownIII, on Flickr
_________________
SyncroBo - 1987 VW Syncro Expedition Camper
MogTug - 1987 Mercedes Unimog Expedition Camper
Build & Travel Blog - www.nicknameinternational.com
Last edited by kiomon on Thu Mar 27, 2014 3:33 pm; edited 1 time in total |
|
| Back to top |
|
|
kiomon
Samba Member
Joined: April 01, 2012
Posts: 97
Location: chicago
|
| Posted: Sun Mar 23, 2014 3:37 am Post subject: BUILD DETAILS |
|
|
Interior Design/ Layout
Since our van started as a tintop, we didn't have any of the camper items. We researched a lot of different options. We looked at buying a Westfalia interior, but the more we researched the more we didn't like that option. For our use, a lot of the Westy design choices didn't line up with our subsystem (water, power, heat) choices. So that set us up for a search for a custom interior that could fit our choices and configuration. We found a European vendor that was willing to ship to the US and configure the unit for our use. They shipped the unit flat packed, but the ordering process took forever and shipping constantly got delayed. We are happy with the final product and quality but the process took 6+ mos. given we are filmmakers we need as much storage as possible. So where possible we have moved tanks, appliances, etc. out of the cabinets and place themed in "dead" space in the van. Inside the cabinets we had custom boxes made that fit the interior dimensions of the cabinets. For border crossings you often have to empty the van. By having custom boxes in each area of the cabinet you can just pull them out and quickly empty the cabinets of the van. In addition, it just makes life easier to get items in the cabinets and keep them from rolling all over off road.
For the actual interior panels, we ordered a set from Sewfine. We chose to go with a black interior, as it would be easy to match several different vendors and I personally like black. Working with Sewfine was a pleasure, since they do every order individually you can ask for custom stuff and it doesnt really cost you any extra. We went with mainly black with a gray horizontal stripe and inset in the seat to tie it all together.
To round out the interior we went with a bamboo floor with a proper vapor barrier and reused the factory cork underpayment as ours was in perfect condition and it prevents the floor from being hard on the knees. In the front we went with carpet to help with sound, and then rubber mats on top of the carpet to help with cleaning. We then wrapped the ceiling headliner in a black brushed metal look material, and had the interior exposed metal covered in a matching black vinyl with a insulating backing to bring the interior together visually. At first we were concerned about going with such dark colors and heat, but with the tint this hasn't been an issue and it always looks clean!
Flat packed interior
Interior Boxes 000033 by RandallBrownIII, on Flickr
Main Cabinet (minus rear cabinet)
2012-07-28-0066 by RandallBrownIII, on Flickr
All together
IMG_0590 by RandallBrownIII, on Flickr
Electrical/ Power
Since we are filmmakers, electricity is our livelihood. Without it, we can't charge the cameras, edit footage, upload, etc. the design approach we took for this was redundancy and weight focused. Here were our goals
- Multiple ways to charge batteries both starting and house batteries
- Batteries can't take up any cabinet space
- Have to be able to self-recover from a dead starting battery
- Stationary boon docked power supply of ten days of no driving
I'll spare you the long journey to why each component but be assured we tested a bunch of different options as well as spoke with most of the manufacturers and other users.
First up are batteries. We wanted at least 300ah of useable power in the van to meet our requirements. If you try and get that from standard AGMs then prudence says you plan for 50% discharge to prolong battery life, so then we are hunting for 600ah of battery power. While you can get 3 225 amp hr Trojan batteries and achieve that, we get hit with where to put them and the associated weight. It simply wasn't going to work. So we moved to looking at Lithium batteries. They promised a lot less weight and the ability to use 90%+ of the capacity without much life impact and the big feature is that short cycle charging doesn't hurt them (charging them only part way to full). This is a big one because traditional battery chemistries want to be charged to 100% every time and then when discharged they want to be charged right up. This is fine if we defined a generator as part of our design but we didn't. We found an awesome vendor through the technonomads.com for lithium battery bulk cells. The company typically deals with people in the EV market but will sell to anyone. We purchased two 200amp hr. batteries and the accompanying battery monitoring system. This is important to note that the batteries should have a battery monitoring system (BMS) attached to track cell voltages, provide under and over current protection and fault detection. Lithium batteries are robust but can be fatally killed by being over discharged. Lead acid batteries are more tolerating. The battery monitoring system drives a series of external relays so if the BMS detects an issue it can disconnect the battery from the system on it's own. These two batteries would serve as the main house batteries giving us 360ah of useable power. The BMS system has a video out port that shows the capacity remaining, and a host of different information on each battery. In addition to the main house battery we wanted to have an emergency battery that would basically sit off line charged and ready for action when needed. This would be our emergency back up battery in the event the house was drained and we still needed to self-jump the starting battery or some other unforeseen circumstance. We decided to go lithium for this one as well so all of the house batteries have the same charging profile. For this we went with a different vendor. This battery looks like a standard battery and has the BMS features built in, but lacks some of the advanced features of the other batteries' bms. But for an emergency battery it's perfect, small and dead simple to install. With the batteries selected we needed to find a home For them. We long decided that a heater was going under the rear seat, so we decided the emergency back-up battery would live there with the heater as it could fit. For the main house batteries we made a steel battery box, painted it, and installed it as a center console between the front seats. This was the perfect size for the width of the batteries. We created a door on the top and rear of the console so you can open it to service the batteries. The shelf separating the batteries is removable as well. While our batteries use a lithium chemistry that is not prone to catching fire when shorted or punctured, it was still comforting to make the console of steel. This location also put the house batteries close to the starting battery, which is convenient for alternator charging, self recovery, etc. and allowed us to use smaller gauge of wire than if the batteries were in the rear of the van. Having decided this was our "power substation" we made another box out of wood, and put our inverter in that. This vertical stack allowed the cables to be pretty simple. We carpeted is all to make it a useable arm rest and use it to put drinks, food, and other items on top while driving.
Lithium battery
IMG_0281 by RandallBrownIII, on Flickr
Battery box/ Center Console
IMG_0270 by RandallBrownIII, on Flickr
IMG_0321 by RandallBrownIII, on Flickr
Battery Box in Place and carpeted
IMG_0392 by RandallBrownIII, on Flickr
Inverter
For our inverter we chose a Magnum Energy MMS1012, which is a 1000watt pure sine wave inverter and charger and it's fully programmable to fit the charging profile of our lithium batteries. We looked at others but when we actually called manufactures with detailed questions it was only Magnum Energy and Mastervolt who got back to us in a timely manner and seemed really interested in their products and our needs. Also the user reviews and feedback is very strong. It has performed flawlessly for us and actually delivers better performance than it's rating. We cut the connection ports into the side of the van and one of them is our AC in.
IMG_0572 by RandallBrownIII, on Flickr
Solar
We knew from the beginning that solar was going to be a big part of our electrical system. We basically wanted to go as big as possible. We decided on a 255-watt monocrystalline panel, tied to a Morningstar MPPT, and remote meter so we can see what the panel is producing. We purchased an uprated controller for some network and logging features as I am a huge dork and wanted to see what we produced over time. The panel is not removable; it is mounted directly to the fiberglass top with z brackets. We were worried about these being robust enough mounting points but they have held perfectly find on all of the places we have come. In addition to the top mounted panel we also wanted the option to put some panels outside in a better position if we parked in the shade. Though with the awning, we find that parking to face the sun when the top is parked puts the van to have the narrowest footprint in the sun during the evening hours when we are hanging out side. But I digress. We decided to install a second charge controller and wire a "solar port" as one of the connections on the side of the van. This would be an easy plug where we could plug in the second set of foldable / moveable panels and out them out in the sun to augment our charging. We investigated a ton of proprietary plug and ports, but we settled on the ubiquitous 12v plug, as it was cheap and common and was easily wired for the purpose. We purchased 120 watts of foldable mono crystalline solar panels that pack up flat and small. We worked with the guys at CTSolar.com on our set up. The system performs great. In sunny summer conditions we produce more energy than we ever need. A good sunny day the roof panel puts back 90 -115+ ah back into the batteries. We don't have the same logging capability on the second controller but we have seen the rated output of the panels. If we are somewhere sunny we can boondock indefinitely from an electricity perspective.
IMG_0733 by RandallBrownIII, on Flickr
Alternator Charging
To charge both the house and the emergency battery we used Blue Sea Systems range of Automatic Charging Relays. We initially had their simple model, but what we found out is that because of the higher resting voltage of the lithium batteries (~14.4 when full) the relays stays connected even when turned off. So then the starting battery was pulling on the lithium batteries. So we swapped that model out for a model that allowed manual switch control so we could manually disconnect the batteries. We looked at the more sophisticated alternator battery chargers from Sterling power and they look awesome but we decided for our system to stick with this set up. Since the lithiums don't mind being short cycled it doesn't matter for us to go multistage charging off the alternator.
Wiring/ Switches/ Breakers
We have taken a lot of inspiration from the boat world, and for our wiring we went with all marine grade products. We found a decently priced supplier of marine wire and layed-out the wiring schematic. We measured runs and used voltage drop calculators and ampacity tables to come up with the right wire gauges. This was by far the most surprising cost line item for the build. I really didn't think about the costs of high quality wire. We decided we wanted a fuse free van as we could be in places where fuses could be hard to come by. All disconnects for the batteries and relays are marine breakers, for the main loads we built a custom panel with Blue Sea Systems that had circuits for every appliance and load in the DC system. We also used their VSM system to monitor a bunch of information, more on that in the remotes and monitor system. The panel comes pre wired to your specifications and makes install a lot easier. You feed one major power and then connect the circuits to their breaker. It includes a negative bus bar and everything you need to install it. Not cheap but nice for a clean install that's reliable.
Breaker Panel
2012-07-28-0047 by RandallBrownIII, on Flickr
Wiring is fun
IMG_0508 by RandallBrownIII, on Flickr
All the wires are labels at key inspection points to aid in any future issues
IMG_0389 by RandallBrownIII, on Flickr
Power Distribution
IMG_0329 by RandallBrownIII, on Flickr
_________________
SyncroBo - 1987 VW Syncro Expedition Camper
MogTug - 1987 Mercedes Unimog Expedition Camper
Build & Travel Blog - www.nicknameinternational.com
Last edited by kiomon on Tue Apr 08, 2014 9:39 am; edited 1 time in total |
|
| Back to top |
|
|
kiomon
Samba Member
Joined: April 01, 2012
Posts: 97
Location: chicago
|
| Posted: Sun Mar 23, 2014 3:38 am Post subject: BUILD DETAILS |
|
|
Water
Compared to the electrical system the water system is very basic. We have a water tank mounted between the frame rails on the driver side of the van (~13 gallons) that feeds a General Ecology Water filter and via a Shurflo pump mounted under the rear seat. The faucet and filter are mounted on the side of the cabinet behind the front seat. This preserved cabinet space, and makes servicing very easy. The fill has been cut in on the driver side and hoses run through the frame to the tank. The sink drain runs into the front driver wheel well. Due to the tank being underneath the van the drain couldn't run straight down as it would be on top of the tank. We can screw on a hose to the fitting and direct the grey water into a container if we need to. We do not have a city water connection on the side of our van, as we never used water hook ups.
Fill & Drain
IMG_0485 by RandallBrownIII, on Flickr
Compressed Air
The air system was an integral need from the beginning of the design. We wanted the ability to run air tools and air up the tires as needed. We decided on the dual compressor ARB CTMKA12, the unit is rated for a 100% duty cycle that was important to use because you dont want to worry about it overheating at the time of need. We plumbed a quick release to one of the side Westy ports for our air hose building on the idea from GoWesty. For capacity we mounted two small air tanks in series underneath the van. This gives us a bit of reserve pressure for air tools. The air compressor is mounted at the rear underneath the closet. There is sufficient airflow and it has never overheated. The airline runs forward and then down and through the floor through some waterproof bulkhead fittings to the tanks and then comes back from the tanks to a water separator, filter, and then regulator. From there we have two "loops" we can connect to. One is a straight connect to the port on the side of the can and then other is a oiling loop, it has an inline oiler for air tools and then runs to the quick connect. When we aren't using air tools we don't connect the oiling loop. We have am assortment of air tools and blowguns to use on the go. The biggest asset has been a simple air gun, it's the best tool to blow out dirt and dust from the interior and dry off dishes.
Ports
IMG_2891 by RandallBrownIII, on Flickr
Tanks (not the drain valves were changed to a lower profile type for impact resitance)
IMG_0159 by RandallBrownIII, on Flickr
Hoses
IMG_0156 by RandallBrownIII, on Flickr
Heating/ Climate Control
We installed a gasoline burning Eberspacher (B3LP) underneath the rear seat. This unit was sorted from Europe as a NOS item. We considered and purchased a Propex, but ultimately decided we didn't want another fuel source and also were tight on space underneath the van for space. Mounting this turned out to be a pain in the butt. We needed to create a flat surface for the heater to mount to and cut holes into for the intake, exhaust, and fuel to come into. We ended up creating a plate that lines up with the pipes on the heater and then cutting that section out of the floor of the van and welding in the flat plate. Turned out awesome but was way more work than anticipated. The other issue is that the ducting and vent sizes were the same as most small heater so we had to source high temp ducting from an aeronautics supply company. Wasn't expensive but it took time. The heater came with a very basic on/ off switch to attach to the loom. Well we studies and studied and the switch simply didn't fit the harness. Given it was summer we moved on with the rest of the build. But we finally got it sorted in Europe at a campervan builder. They hooked us up with a new controller and we used the manuals wiring diagram to patch it together and it works amazingly well now. Highly highly recommend this heater if you want to stay gasoline. It burns about .1 gallons an hour and draws about 2 amps when running. Start-up draws about 25 amps for 60 seconds or so, and the same when you shut off. And this sucker gets HOT. In 35-degree weather it will sweat you out of the fan in about 20 minutes with the top popped. It's also very quiet except for the ticking of the fuel pump. Doesn't sound like the jet engine Eber's on YouTube. We are going to write more about this in our travel section, but this has been the killer upgrade to the van, and the decision going with one fuel source for the van shouldnt be taken lightly. We have been significantly more mobile and capable as a result of this heater being able to burn common gasoline. If we were propane, it would have added so many additional headaches to our travel. I would STRONGLY recommend you go with a furnace that burns the same fuel as your engine.
Heater under seat
IMG_2888 by RandallBrownIII, on Flickr
Aux Fuel
To extend our range and easily fuel additional appliances, we imported an auxiliary fuel tank that mounts under the passenger side of the van between the frame rails. We used a vanagon fuel filter and then plumbed in a Syncro fuel pump and it pumps into the vent line of the Syncro filler neck in the rear. So it acts as a transfer tank. We have to manually hit a button for the transfer to take place. Also, by using a Syncro fuel pump as the transfer pump we are carrying another live spare. The tank is fitted with a fuel tank sender than is connected to the VSM display. This tank holds 13.5 gallons. In addition to this tank we also have jerry cans on our expedition rack (see exterior modifications)
IMG_2924 by RandallBrownIII, on Flickr
_________________
SyncroBo - 1987 VW Syncro Expedition Camper
MogTug - 1987 Mercedes Unimog Expedition Camper
Build & Travel Blog - www.nicknameinternational.com
Last edited by kiomon on Sat May 10, 2014 10:24 am; edited 1 time in total |
|
| Back to top |
|
|
kiomon
Samba Member
Joined: April 01, 2012
Posts: 97
Location: chicago
|
| Posted: Sun Mar 23, 2014 3:38 am Post subject: BUILD DETAILS |
|
|
Exterior Modifications
As we looked to the outside of the rig we were mainly focused on storage, lighting, and recovery tools. Burley was our main partner in the design and production of most of the custom exterior accessories of Bo, with the exception of the front bumper from Bostig! We got the Burley Motorsports awesome swing out tire carrier to hold our 16" spare, xjack, and trasharoo. In addition we wanted Burley to come up with an expedition rack for us. Something we could put jerry cans in or anything else we came across. We decided we liked rotopaxs as they are small, can be easily mixed and matched and weren't too bulky. We challenged Burley to come up with something that would hold them securely but also be versatile when we wanted to put something else there. What he came up with is a work of art. There is a rod that slides through the center of the packs to keep them from being removed and the bottom rail fits perfectly to hold them upright. Take the packs out and we have a basket that we can fill with firewood or a Honda generator . Beyond the rack, we asked Burley for a simple rear bumper that was more focused on functionality. I wanted something that complimented the front Bostig bumpers elegant design lines yet wanted it to say Im serious dont mess with me and definitely not tubey looking. This unit also needed to be able to store a hi-light and feature true recovery points that could handle the weight of BO when pulled on. In addition we wanted a hitch for the odd trailer. Again Burley pulled out the stops, the bumper goes deep into the frame grabbing all of the mounting point with square tube and then exits into a solid recovery point on each side. We tried the GoWesty plate bumper and it just doesn't compare. He made dual perches for the hi-lift on the bumper with integrated holes for the shackle of locks to go through to ensure no one walks away with your jack. He made us flat washer and twist nuts to attach from the top to prevent vibrations and noise, but the fit has been so precise we haven't used them. We have been on rough stuff and it doesn't move. Burley also made us up one of his custom front and mid section skid plate systems that he custom blended to the heavy duty Bostig trans and engine rear skid plate section. The Bostig and Burley skid plate units are definitely an awesome heavy-duty compliment to each other.
Rear bumper
DSC_6479 by RandallBrownIII, on Flickr
Carriers
DSC_6489 by RandallBrownIII, on Flickr
Plated
DSC_6521 by RandallBrownIII, on Flickr
IMG_2925 by RandallBrownIII, on Flickr
Moving to the front of the van, we had to tackle the front bumper. Jim and the guys at Bostig were putting the final touches on the NFB bumper, and we were pumped to get a prototype. Its fully integrated into the frame of the van and has a winch mounting plate and recovery points that you can actually use. Its a beast for sure, and while its significantly heavier than the Plate Bumpers, its because its actually functional for mounting accessories and recovery. We went with a Xeon 10-S winch and it fit like a glove. Luckily the guys at Bostig put their CAD to work and spun around a computer model before we pulled the trigger on the Warn to be sure it would clear. Most winches will work.
NFB Taking Shape
IMG_0212 by RandallBrownIII, on Flickr
Front Kit
DSC_6513 by RandallBrownIII, on Flickr
We also needed to tackle lighting. We decide on a large 50-inch light bar from the guys at a Rigid Industries and some smaller sidelights and smaller light bar for the front bumper. The challenge was how to mount the big light bar above the windshield. Most other off roaders use the front pillars beside the windshield but on a vanagon there isn't very much metal there to attach to. Burley came up with an awesome solution coming off the rain gutters but I wanted a solution that we could also remove. So we asked him to fab something designed back on standard mounting components that would allow us to quickly take it all down if we wanted. Or even move the lights to another type of vehicle.
50 Light Bar
DSC_6482 by RandallBrownIII, on Flickr
Side lights
DSC_6485 by RandallBrownIII, on Flickr
_________________
SyncroBo - 1987 VW Syncro Expedition Camper
MogTug - 1987 Mercedes Unimog Expedition Camper
Build & Travel Blog - www.nicknameinternational.com
Last edited by kiomon on Tue May 13, 2014 1:53 pm; edited 1 time in total |
|
| Back to top |
|
|
Steve M.
Samba Member

Joined: July 30, 2013
Posts: 6829
Location: Fort Lauderdale, Fl.
|
| Posted: Sun Mar 23, 2014 5:17 am Post subject: |
|
|
| Congratulations on handling your addiction well! |
|
| Back to top |
|
|
steewoz
Samba Member

Joined: November 12, 2009
Posts: 170
Location: Boston
|
| Posted: Sun Mar 23, 2014 6:44 am Post subject: |
|
|
YESSS! I've been waiting for this since the first time I heard about syncrobo!
_________________
87 Syncro
15 Rubicon
Vans With At Least One Wheel In the Air
www.facebook.com/driveslowtakechances |
|
| Back to top |
|
|
benandmj
Samba Member
Joined: October 29, 2012
Posts: 550
Location: Atlanta
|
| Posted: Sun Mar 23, 2014 6:49 am Post subject: |
|
|
Been curious of this story for a while as well. Looking forward to it!!
_________________
85 Westfalia Weekender
91 Syncro Westy |
|
| Back to top |
|
|
insyncro
Banned

Joined: March 07, 2002
Posts: 15086
Location: New York
|
| Posted: Sun Mar 23, 2014 6:56 am Post subject: |
|
|
Way better coverage on FB  |
|
| Back to top |
|
|
dipple
Samba Member
Joined: April 09, 2005
Posts: 135
Location: Whistler BC
|
| Posted: Sun Mar 23, 2014 8:19 am Post subject: |
|
|
Great to see the culmination of this project. I know one of the syncros I had for sale was in contention to become syncrobo. That would have been really cool based on the finished product.
_________________
1987 Syncro
1998 Syncro TDI Passat |
|
| Back to top |
|
|
rmcd
Samba Member
Joined: October 29, 2010
Posts: 1348
Location: PNW - its a dry rain.
|
| Posted: Sun Mar 23, 2014 10:41 am Post subject: |
|
|
A ton of work went into that. Very cool. Do u store water, fuel, Grey water or hooch in the spare tank? What toilet facilities do u employ?
What other mods for expedition services?
_________________
VW LT40 build. Like a Vanagon but 30% larger in every direction and 40% slower even in metric.
https://www.thesamba.com/vw/forum/viewtopic.php?t=749359&highlight= |
|
| Back to top |
|
|
kiomon
Samba Member
Joined: April 01, 2012
Posts: 97
Location: chicago
|
| Posted: Sun Mar 23, 2014 11:39 am Post subject: |
|
|
@rmcd yup, I am writing it all up now and have a ton of pictures to cover each of the major systems and choices. Hopefully it will help the next person as they do their build. @insyncro heck yeah! Lots of photos there. The good details will be here though. More to come, should have the next big chapter up tomorrow.
_________________
SyncroBo - 1987 VW Syncro Expedition Camper
MogTug - 1987 Mercedes Unimog Expedition Camper
Build & Travel Blog - www.nicknameinternational.com |
|
| Back to top |
|
|
Skip Laubach
Samba Member

Joined: December 13, 2011
Posts: 237
Location: Elgin, Illinois
|
| Posted: Sun Mar 23, 2014 5:54 pm Post subject: |
|
|
We would love to get a first-hand view! Do you take bribes?
Steaks on the grill, etc., if you would drive out to our woods west of Elgin!
Could also stoke the fire pit.
Campsite in the woods, too (Vanagon content).
_________________
Skip
1984 Westy 1.9 case WBXR Manual (now with 2200cc GoWesty kit)
Since 26 July 2011 |
|
| Back to top |
|
|
kbeefy
Samba Member
Joined: March 10, 2006
Posts: 600
Location: Central Oregon
|
| Posted: Sun Mar 23, 2014 9:07 pm Post subject: |
|
|
nice rig!
_________________
86 syncro CHC, NorthWesty subbie 2.5, decoupler, locker, custom interior, 225/75r16 Duratrack's on CLK's, Toyo cabin heater, ARB fridge, 300w Zamp Solar, Gowesty bumpers/skid/rails, Fiama awning
'86 Syncro Westy. Stock for now.
2000 F350 7.3 CC LB 11' Northland Cabover
2006 Subbie OBXT
2002 Tacoma DoubleCab 4x4
1969 Mustang Basket Case 351c/FMX/9
http://kbeefy.blogspot.com/ |
|
| Back to top |
|
|
SyncroChrick
Samba Member
Joined: January 10, 2005
Posts: 1010
Location: San Francisco, CA
|
| Posted: Sun Mar 23, 2014 9:30 pm Post subject: |
|
|
Awesome!
Are-you heading into Africa? I need to learn more about your project |
|
| Back to top |
|
|
burleymotorsports
Samba Member

Joined: July 17, 2005
Posts: 332
|
|
| Back to top |
|
|
mariusstrom
Samba Member

Joined: March 29, 2010
Posts: 745
|
|
| Back to top |
|
|
kiomon
Samba Member
Joined: April 01, 2012
Posts: 97
Location: chicago
|
| Posted: Tue Mar 25, 2014 8:33 am Post subject: |
|
|
Just updated a more details. And @mariusstrom yep, the bostig NFB is dope, and one of the few truly function bumpers that you can pull on and mount a winch too. More on that later.
_________________
SyncroBo - 1987 VW Syncro Expedition Camper
MogTug - 1987 Mercedes Unimog Expedition Camper
Build & Travel Blog - www.nicknameinternational.com |
|
| Back to top |
|
|
SCP_Austin
Samba Member
Joined: November 04, 2009
Posts: 366
Location: Tacoma, WA
|
| Posted: Tue Mar 25, 2014 9:28 am Post subject: |
|
|
Where is that Bostig NFB website? They are conspicuously quiet on the interwebs.
It looks SOOOOOO good on that van.
_________________
#leftlanelife |
|
| Back to top |
|
|
|


