| Author |
Message |
Bala
Samba Member

Joined: December 04, 2003
Posts: 2613
Location: Austin, TX

|
 Posted: Mon May 12, 2014 3:50 pm Post subject: Posted: Mon May 12, 2014 3:50 pm Post subject: |
 |
|
I think yours may be backwards. Take a look:
Oh, and while I'm here how well does your leaf "snap" in to it's folded up position? I really have to use some force to latch and unlatch it. I think I even put t small amount of grease on it, but that did nothing.
_________________
1976 Westy
1966 Beetle |
|
| Back to top |
|
 |
eche_bus
Samba Member
Joined: October 07, 2007
Posts: 1318
|
| Posted: Mon May 12, 2014 5:36 pm Post subject: |
|
|
@Bala - thanks for the great photo! It's funny, your plate doesn't look like it has a small bevel on the end nearest the leaf's hinge edge. Actually, I'd ended up turning mine around so it's oriented like your photo shows. This way seems to support the leaf better as it had less play against the sliding arm. I definitely have to use force to latch/unlatch mine, despite also using a dry spray lubricant on all sliding surfaces. I fiddled with the tightness of the mounting hardware, but that didn't seem to make much difference before it was too loose.At least laying upside down on my workbench, it's easier to latch than unlatch and I was going to try some lithium grease to see if it would make it easier. I'll let you know if I have any breakthroughs with lubrication.
@Krautski - yeah, I guess I'm trying to broaden the circle a bit.  Seems a real good idea to pass the word. I know what you mean about gloves. Not many that will stand up to that solvent, but the disposable ones are ok for this job with frequent changes. Seems a real good idea to pass the word. I know what you mean about gloves. Not many that will stand up to that solvent, but the disposable ones are ok for this job with frequent changes. |
|
| Back to top |
|
|
eche_bus
Samba Member
Joined: October 07, 2007
Posts: 1318
|
| Posted: Sun Jun 29, 2014 4:56 pm Post subject: |
|
|
Closet Restoration Part I - original condition
The closet is done. Long live the closet. It seemed like it would be so simple to restore, but oh, it was so un-simple. I feel like I've tamed a lion :2gunfire: and now it sits with it's mane combed and wearing a top hat. 
-----------------------------------------------------------------------------------
Let's take a look at the wild lion in its natural habitat ...
The "tail" doesn't look too awful, but you can see a couple extra holes drilled into the laminate and hints at wear in the shelf area.
It's never pretty behind the "tail" (OK, I'll stop with the wild lion stuff), and this was just plain ugly. A PO seemed to think the cubby holes were a great place to store oil or some other staining liquids. Oh yeah, that's going to be real fun to try to remove. 
Look closely near the bottom of the photo, near the "water" stains. At the back side of the bottom box ... a mouse chewed a nice little notch!
Let's mosey around to the side.
All kinds of stuff to see. Edge trim cracked in half, cubby hole trim shrunk, and what's that down near the bottom? A home-brew table retaining strap made from gen-u-wine leather!
The broad view shows the daylight around the cubbies and shrunken edge molding on the right. Still, the laminate looks in pretty good shape, right?
Right? Ummm ... not so much. Looks like a PO didn't get around to fixing that edge trim before the laminate got damaged. Did a real fine job with color matching that putty, too. 
Rounding the bend to the front, we see the shrunken trim and that the laminate really isn't in bad overall shape.
Not so fast ... that door trim is wave-ing hello! Let's take a look inside. 
Hey, it's our good ol' friend, Mr. Oil Stains!  
Oh yeah, the front laminate was also coming unglued along one edge.
... and that's what I saw before taking it apart. |
|
| Back to top |
|
|
eche_bus
Samba Member
Joined: October 07, 2007
Posts: 1318
|
| Posted: Sun Jun 29, 2014 9:24 pm Post subject: |
|
|
Closet Restoration Part II - teardown, repair, and refinish
OK, so you've had a look around. Let's tear into it. 
Off goes the plastic trim ...
Then we remove the shelves. The shelves are held in at the back by the large curved panel that forms the back of the closet. This panel was likely the last part installed when the closet was originally built. There's no need to remove the panel. All you need to do is cut tiny notches at the edge of the panel where it overlaps the two shelves, then slide the shelves out.
With the shelves out, we can get a better look at the work ahead. It wasn't encouraging; there were stains and scratches all over.
DaleNW's generous gift of used OG laminate included a perfectly good rear panel, so I decided to pull the old one with all the "bonus holes". The surface will be sanded to remove the glue residue, and the holes filled.
While we're at it, let's flip the beast on its side to have a good look at the well-used top. This will need to be cleaned, sanded, and re-varnished.
Here is where I need to explain that I got real busy with the cleaning and sanding, not really knowing as I went just what it would take to get rid of all the oil and water stains in the dark mahogany veneer. So, you're not going to get photos, just a bunch of words. Sorry...
I began by hitting the wood with a household cleaners, Formula 409. The stains were both oily and waxy, so it took a LOT of soaking and scrubbing. Once the paper towels started coming up clean, I let it dry and proceeded to hit it with lacquer thinner, wiping and reapplying until the paper towels came up clean again. I was then convinced it was clean enough to be sanded.
CAUTION: the mahogany veneer is very thin. Do not use a power sander, and be aware of how much material you are removing or you will be a very unhappy camper. I block sanded it with 180, then 220 grit. I cleaned once more with lacquer thinner, repeating until paper towels came up clean. Tedious? You bet your a** it was. The grease and oil had really saturated the wood in places!
The wood in the shelf area was clean. Before going any further, there was a small matter of fixing that mouse-chewed hole.
I'm big on doing things once and doing them right. I wanted to patch this thing and have it stay, so after cleaning the hole up a bit, I drilled anchor holes in the edge.
I used an epoxy-based wood repair called "PC-Woody" (nyuk, nyuk) to form and fill a patch, pressed deep into the anchor holes. Once shaped, I finished the repair with a glaze of conventional wood filler. This would be later stained to "match" the old mahogany.
Another wall inside the shelf area had an extra hole, drilled by an ingenious PO. Using a small dowel stub and wood filler, the area was repaired and later stained.
Once everything in the shelf area was given a final sanding, it was given 3 coats of varnish.  Transformation #1! : Transformation #1! :
The back panel was also sanded with 180 and given a few coats of varnish, just to seal it.
Inside the closet, the oil-stained mahogany veneer at the back got the same intensive cleaning, sanding, and re-varnishing. The rest of the pine was sanded and re-varnished as well.
Transformation #2!
By this time I discovered another, hidden problem. Some of the cabinet faces are created by sandwiching thinner panels together, and along two of the edges, once covered up by edge trim, seams were coming apart. In order to halt the problem, I had to clean out the old glue along the seam, force glue down into the crack, and clamp the works to get things back in shape.
|
|
| Back to top |
|
|
eche_bus
Samba Member
Joined: October 07, 2007
Posts: 1318
|
| Posted: Sun Jun 29, 2014 10:41 pm Post subject: |
|
|
Closet Restoration Part III - refinish (cont.) and laminate
With the cabinet body repaired and refinished, it was ready for shelves. The oil-stained shelves got the same 409/Lacquer Thinner/Sanding treatment as the other mahogany veneer areas, but I had to go a step further and use a little gel stain to even out the color, before giving them several coats of varnish.
Throughout the cabinet I used Minwax Satin Polyurethane brushed on for the first two coats (to seal and build), followed by several coats of Minwax Satin Wipe-On Poly (to control dust and air bubbles). I tried at first to just use the brush-on, but could never get a bubble/dust-free finish. I found though that the wipe-on gives a glossier finish than expected, which I wouldn't really call "satin". I was happiest with the finish of the Minwax Spray-on satin poly I've used elsewhere, but couldn't really use it in this cabinet's narrow spaces.
The shelves turned out very well.
Let's get 'em in. On the left side where I cut out the back panel to remove each shelf, I wood glued a cut off matchstick which I would later stain so it wouldn't stand out (a bit was visible from the front). I also put a drop of glue at the right just to make sure things stayed put.
Transformation #3!
On to laminate...
The laminate at the front was just starting to come loose on one edge. I thought about trying to re-glue just that edge, but since perfecting a system for removing and re-installing the OG laminate, decided to bite the bullet and "do it right". So after the whole hot iron, glue removal, sanding thing, it was ready and waiting.
... and so was the backside. Funny to see mahogany veneer soon covered up by laminate.
The cabinet was set on the floor and clamped to THE RACK (tm) that guides the laminate into precise alignment as it is glued. The blue things you see are stacks of Post-It notes that serve as precise spacers. We even installed the carriage bolts to serve as alignment pins, to get it right. Believe me, with contact cement, you either get it right or wrong. Right is good.
Each panel has different alignment challenges. The table was used with rulers as spacers along with bits of THE RACK (tm)  to get things right. The blue tape is holding the plastic edge bead out of the way and the blue Post-It is doing its precision spacer thing. to get things right. The blue tape is holding the plastic edge bead out of the way and the blue Post-It is doing its precision spacer thing.
All that precise alignment only counts for so much when replacing a laminate panel with one from another Westy. It's unlikely two are the same as the laminate would be trimmed to fit each individual wooden cabinet. Here I break out the file to remove excess laminate from the rear edge, before resorting to power tools.
Getting tired of reading?
Well, by this point I was getting awfully tired of working on a "stupid closet", 'cause it sure as heck wasn't done yet. The side laminate was in pretty good shape, but it was coming unglued along the back edge and had a chunk missing. It's a huge panel, and I had neither replacement nor inclination to remove and reglue all of it as 95% was still well glued.
So, "the plan" was to unglue a little more of the loose edge, pry the edge up, and using toothpicks as spacers, brush contact cement onto both surfaces, let set, roll, clamp, and hope for good results.
But first I had to deal with that darn missing chunk. I cut the damaged area out into an easily duplicated shape that aligned with and then diagonally across grain lines. Then I made a template from the new shape, transferring it to another piece of scrap laminate, and aligned to the same location on the scrap (believe me, this only works when you have a lot of OG laminate on hand) so the grain lines would line up. The patch was cut out with an X-Acto, test-fit, and set aside.
The lifted edge was glued down as per "the plan", the patch installed, and the seam around the patch filled with Formica filler mixed to some semblance of a color match. It was a ton of work, and the results didn't entirely suck. Because the patch came from another panel, the tone didn't match great, but I figured it would get a little better once the laminate was polished and waxed.
If you stand at the front of the closet, looking up at the top of the cabinet, just at the back of the top storage area, there's a small strip of laminate. With that back in place, all the laminate was secured. Sorry - photo turned out oddly red.
Coming next ... trim and final assembly. |
|
| Back to top |
|
|
DaleNW
Samba Member

Joined: March 29, 2012
Posts: 169
Location: Boulder, CO
|
| Posted: Tue Jul 01, 2014 4:12 pm Post subject: |
|
|
As usual, I am amazed at your tenacity and incredible results! it makes me want to go back and do mine all over again (but I won't). 
_________________
'78 Deluxe Westy - Loose Lucy (where I rest peacefully)
'77 Transporter (may it rest in peace) |
|
| Back to top |
|
|
RONIN10
Samba Member
Joined: April 30, 2007
Posts: 594
Location: Seattle, WA
|
| Posted: Tue Jul 01, 2014 4:39 pm Post subject: |
|
|
You know this does bring up a good reminder: salvage any and all Westy cabinets you can get your hands on. You never know when you're going to need a patch.
I've got a 75 rear closet sitting in my garage for just this reason. But then again, my closet resto is a ways off yet.
Excellent work as always. I've referenced this thread several times so please keep it up! Even if we don't always chime in, you are doing a great service to the VW community.
_________________
Andrew
Oscar: 1976 Westfalia Deluxe Camper, 2.0L FI, Manual Transaxle |
|
| Back to top |
|
|
eche_bus
Samba Member
Joined: October 07, 2007
Posts: 1318
|
| Posted: Wed Jul 02, 2014 1:11 pm Post subject: |
|
|
Thank you both for the very kind support.
This wood work and refinishing is all new to me - metal and auto paint is what I knew how to finish before taking on this camper. Learning a few techniques from the other cabinets really helped, but this closet had so much surface area and so many little challenges that at a point it seemed like it would never be done. It really got pretty demoralizing, realizing so much remains to do before this bus gets back on the road. But it will, and your moral support helps keep me pluggin' away!
Delayed due to travel - will have the last set of photos showing trim and final assembly in just one more day or two. It really turned out nice! |
|
| Back to top |
|
|
notchboy
Samba Member

Joined: April 27, 2002
Posts: 22445
Location: Escondido CA
|
|
| Back to top |
|
|
khalimadeath
Samba Member
Joined: June 24, 2014
Posts: 768
Location: Reno, NV
|
| Posted: Wed Jul 02, 2014 5:19 pm Post subject: |
|
|
| Wow very meticulously done. Just curious though.. why not strip all the old laminate, fix the wood, then replace with new laminate? |
|
| Back to top |
|
|
seventyfo
Samba Member

Joined: February 13, 2007
Posts: 916
Location: Ocoee FL
|
| Posted: Wed Jul 02, 2014 5:50 pm Post subject: |
|
|
^^^^ You have much to learn grasshopper.
_________________
85 Vanagon GL Westy GW 2.2 (Rebuilt by YT)
"I don't know you well enough to care about your comments". Watkins Cravey |
|
| Back to top |
|
|
eche_bus
Samba Member
Joined: October 07, 2007
Posts: 1318
|
| Posted: Fri Jul 04, 2014 10:43 am Post subject: |
|
|
| khalimadeath wrote: |
| Wow very meticulously done. Just curious though.. why not strip all the old laminate, fix the wood, then replace with new laminate? |
| seventyfo wrote: |
| ^^^^ You have much to learn grasshopper. |
You can do that khalimadeath, so long as you're OK with the color tone and grain you can find in new laminate. Nothing wrong with that, but there's no close match to OG laminate any more.
However ... I've recently found a source in the UK for the panels that run along the rear/side doors and walls. These use thin custom printed laminate copied from OG laminate glued over 3mm plywood. Once these arrive in a couple of weeks, I'll start a thread with photos and more details. |
|
| Back to top |
|
|
Wasted youth
Samba Member

Joined: July 06, 2012
Posts: 5134
Location: California's Hot and Smoggy Central Valley
|
| Posted: Fri Jul 04, 2014 10:56 am Post subject: |
|
|
Totally impressed. Really. Comparing your work to my child-like attempt at making new front door panels for my '77, I am ashamed in being in your presence.
Your tenacity is kind of frightening, actually.
|
|
| Back to top |
|
|
eche_bus
Samba Member
Joined: October 07, 2007
Posts: 1318
|
| Posted: Fri Jul 04, 2014 12:08 pm Post subject: |
|
|
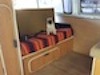
Closet Restoration Part IV - trim and final assembly
With the laminate replaced or repaired, and reglued it was time to buff out all the little scratches that accumulated over time. Each panel was given the "standard treatment" of Meguiar's Mirror Glaze #1 Medium-Cut Cleaner, then #9 Swirl Remover 2.0, each applied with a random orbital polisher, followed by a coat of MinWax "Special Dark" Paste Finishing Wax. Once dry, the wax was machine buffed smooth. It's no miracle worker system, but it really does bring back the color and remove a lot of the aged appearance. The results look even better than my photos, as the flash has a tendency to show things the eye does not.
Ah, but there was still all that black trim to deal with. "Dealing with" the trim begins with cleaning the old glue residue off as that's the only way it's going to fit back in the groove. Lacquer Thinner works well for general cleaning and OG glue removal, whereas Acetone works for removing some of the POs previous sins. I even had to resort to sandpaper for some of those. 
Of course, that's not all your trim will require. Nope, there's all the dipping into boiling water and maintaining a slight tension on it while it cools in order to keep it straight. Now multiply this by 8, 'cause that's how many strips are used in this closet assembly. Between the glue removal and the boiling ... trust me, you'll be at it a while.
With a final wipedown and polishing with Acetone (see my previous posts about that one), we had nice, straight, nearly-like-new trim ready to install. We've applied wood glue to each channel before pushing/hammering/cajoling the trim. It's not that the glue sticks to the trim, but sticks to the wood and then holds the trim by hardening around the its barbs/ridges. A blow dryer is used as the trim is installed to make the it bendy for going around corners.
The process of boiling and straightening often adds length to the stuff, which is usually great as it almost always shrunken by time. Sometimes it grows too much. Here, the trim around the cubby holes needed a little trimming, and my wife is quite an expert with an X-Acto knife. :
With the trim installed (yeah, just a snap of the fingers ), we go on to put the door back together. Nothing too exciting here, but the cabinet is really starting to look nice!
All of my cabinet doors had these thin strips of foam installed as anti-rattle pads. Somewhere I believe there is a service bulletin showing these being installed by dealers in this era. With a sketch to illustrate where they were located, it was a simple matter of sticking new stuff back on. Hey, it's nice to have an easy task for a change.
What the photo doesn't show is the work to get the latch back in place and working. A PO had thrown some oversized hardware store screws at it and the one that holds the latch to the door was stripped loose. Inside, the release push rod was actually bent so the button didn't really work well at all. With a matchstick, wood glue and a hardware salvaged from my "parts latch", it was back in OG shape!
It felt good to reuinite the door with its original mirror again. The silvering is looking pretty tired, but it's really not important or visible enough to worry about. See, I'm not that anal.
With the door installed, everything was back together. The very last step was to polish the black trim with Meguiar's Mirror Glaze #17 Clear Plastic Cleaner. Amazing stuff.
Let's see how it turned out ...
Below, you don't see the small black plastic strap installed just below the bottom cubby hole, as the original was long gone and I don't want to try to size one from a curtain strap (same type of strap, different length) until the cabinet is installed to make sure the big table will be held tightly in place.
The photo shows a few smudges in the wax from handling the cabinet. As the wax dries more hopefully that'll be much less of an issue. Also, although buffed and polished, you can still see the small laminate patch at the left edge, as its just light enough to show, but all things considered, we're very happy with the results.
Yeah, I'm pretty sick of looking at it, too. but thanks for following along!
Next ... Putting the rear subfloor and carpet back in
or ... refinishing the rear seat back
or ... installing new side paneling
Last edited by eche_bus on Fri Jul 04, 2014 12:52 pm; edited 1 time in total |
|
| Back to top |
|
|
eche_bus
Samba Member
Joined: October 07, 2007
Posts: 1318
|
| Posted: Fri Jul 04, 2014 12:32 pm Post subject: |
|
|
| Wasted youth/adulthood wrote: |
Totally impressed. Really. Comparing your work to my child-like attempt at making new front door panels for my '77, I am ashamed in being in your presence.
Your tenacity is kind of frightening, actually.
|
 Man, thank you for both the compliments and the uproarious laughter! Can I use any of this in a quote below my posts? Seriously laugh-out-loudable! Man, thank you for both the compliments and the uproarious laughter! Can I use any of this in a quote below my posts? Seriously laugh-out-loudable!
Seriously, if we compared your exhaust system to mine at the present, I would be the ashamed one. Perhaps I could hold my replacement parts in front to block the view, but it wouldn't fool anyone.
Did you post photos of your door panels or were they too embarrassing ? |
|
| Back to top |
|
|
wcfvw69 
Samba Purist

Joined: June 10, 2004
Posts: 13389
Location: Arizona
|
| Posted: Fri Jul 04, 2014 12:37 pm Post subject: |
|
|
That cabinet turned out fantastic! Nice job!
_________________
Contact me at [email protected]
Follow me on instagram @sparxwerksllc
Decades of VW and VW parts restoration experience.
The Samba member since 2004.
**Now rebuilding throttle bodies for VW's and Porsche's**
**Restored German Bosch distributors for sale or I can restore yours**
**Restored German Pierburg fuel pumps for sale or I can restore yours**
**Restored Porsche fuel pumps or I can restore yours**
**Restored Porsche distributors or I can restore yours** |
|
| Back to top |
|
|
Stuartzickefoose
Samba Post Whore

Joined: February 07, 2008
Posts: 10350
Location: SoCal for now...
|
| Posted: Mon Jul 07, 2014 1:13 am Post subject: |
|
|
looking fabulous!
_________________
Stuart Zickefoose
2011 Jetta Sportwagen TDi 6 speed manual
206-841-7324
[email protected] |
|
| Back to top |
|
|
seventyfo
Samba Member
Joined: February 13, 2007
Posts: 916
Location: Ocoee FL
|
| Posted: Mon Jul 07, 2014 8:58 am Post subject: |
|
|
Awesome job on the cabinet, super nice.
_________________
85 Vanagon GL Westy GW 2.2 (Rebuilt by YT)
"I don't know you well enough to care about your comments". Watkins Cravey |
|
| Back to top |
|
|
eche_bus
Samba Member
Joined: October 07, 2007
Posts: 1318
|
|
| Back to top |
|
|
eche_bus
Samba Member
Joined: October 07, 2007
Posts: 1318
|
| Posted: Wed Jul 09, 2014 9:32 pm Post subject: |
|
|
Rear Hatch Overhaul - lock, latch, insulation and trim panel
I decided to do something easier today for a change. Those other harder jobs will have to wait a little longer. When I last showed you the rear hatch area, it looked like this:
Yeah, not a pretty sight.
It wasn't just ugly; the pushbutton had a frustrating issue. You could rotate the pushbutton and lock freely without a key. And, in order to actually open the hatch, you had to rotate the pushbutton just so. It usually took a few tries before pushing on the button would do anything. You couldn't actually lock the hatch with the key either.
Pulling the panel I found the latch mechanism still working and the pushbutton arm still tight. However you could easily turn the pushbutton 360 degrees and the arm would follow right along. I figured something in the lock/pushbutton barrel must be messed up for that to happen. 
Discovery
I feared the worst, as these late bay pushbuttons aren't supposed to be serviceable and used ones rarely show up for sale here. With it on the table and the grease wiped off, I could see the source of the problem!
The lock barrel sits inside of a cylinder and this cylinder has a single slot on its O.D. The pushbutton body slides over this cylinder, and this body has a springy tab that must engage that slot to ensure the pushbutton body and lock cylinder rotate together. Along the way, some PO must have forced things and bent this little springy tab. All it took was a small screwdriver and needle nose pliers to put things right! The photo shows the tab sitting down in the slot as it needs to.
Clean and lube
Of course, now that we were "in there" ... it was a good time to clean out and re-lubricate the lock cylinder and the rest of the bits that move together. Let's take a look at the condition of that latch mechanism.
It's a miracle that it still actually worked!
Well, lacquer thinner and brushes can work wonders. The plating was in amazingly good shape! (lubed using spray and brushed white lithium after taking the photo)
With a set of freshly cleaned and lubed parts, I was armed for reassembly.
Insulation
What's this shaggy stuff? That's the old tired possibly-mouse-abused insulation from inside the hatch.
With that out of the way, it was time to begin cleaning the old residue in preparation for the new stuff.
New foil-backed insulation was sprayed with 3M Super77 spray glue and pressed into place.
Reassembly
Time to get that latch and pushbutton stuff back in. Cleaned the are up a bit.
Latch and lock back in place, pushbutton arm lubed (a little too much, cleaned some off after photo). Looks and works so much better now!!!
Didn't forget to add a moisture barrier. Attached to the green painted areas (not to insulation) using Krylon Easy-Tack Repositionable Adhesive 7020.
New Panel
A brand new panel replaces worn out one. Grain and color like OG.
Panel details here ---> http://www.thesamba.com/vw/forum/viewtopic.php?p=7274474#7274474
So much ...
... NICER!
Not just a pretty face. Now well-insulated, vapor-sealed, and most importantly I can now reliably open, lock, and unlock it! |
|
| Back to top |
|
|
|


