| Author |
Message |
glideking
Samba Member

Joined: February 02, 2013
Posts: 990
Location: California

|
 Posted: Fri Sep 19, 2014 7:35 pm Post subject: 1965 21 Window Restoration Thread (From old photos) Posted: Fri Sep 19, 2014 7:35 pm Post subject: 1965 21 Window Restoration Thread (From old photos) |
 |
|
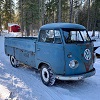
I have been updating progress on "Funky Truck" a 1959 single cab here on TheSamba. I recently found my stash of old photos for my other project a 1965 21 window. I will start this thread from the oldest photo and post them here as I scan them into my computer.
This is what it looked like in 1994
I paid $2,000 for it in this disassembled condition. The previous owner said it was "complete", body work was done and all the parts are in the boxes. It had all new rubber and all I had to do was paint and assemble. Nothing could be further from the truth. I did not know how to put it back together. I had never owned or driven a VW before this one so it sat for a while. There was no internet VW community back then. The middle and rear seats were from a later bay window bus. I learned that early and found the correct ones. I am glad I did. They can be pricey these days. The sad thing is that bay middle seat went to the dump! Shoot me now. Who knew?
I started work on this bus in 1994 following the Bentley manual. Good thing it had lots of pictures.
This is the engine. The number starts with a zero or an O 317618 Could this be the original engine?
Kurt
_________________
"The more I get done the less it looks like I did anything"
1959 Single Cab Restoration"Funky Truck"
http://www.thesamba.com/vw/forum/viewtopic.php?t=5...highlight=
1965 21 Window Restoration Thread (From old photos)
http://www.thesamba.com/vw/forum/viewtopic.php?t=6...highlight=
1963 Panelvan build "Tyvanosaurus Wrecks"
http://www.thesamba.com/vw/forum/viewtopic.php?p=8351639#8351639 |
|
| Back to top |
|
 |
Stuartzickefoose
Samba Post Whore

Joined: February 07, 2008
Posts: 10350
Location: SoCal for now...
|
| Posted: Fri Sep 19, 2014 9:05 pm Post subject: |
|
|

_________________
Stuart Zickefoose
2011 Jetta Sportwagen TDi 6 speed manual
206-841-7324
[email protected] |
|
| Back to top |
|
|
dmuis
Samba Member
Joined: September 01, 2004
Posts: 381
Location: Sunny Alberta, Wild Rose Country.
|
| Posted: Fri Sep 19, 2014 9:34 pm Post subject: Re: 1965 21 Window Restoration Thread (From old photos) |
|
|
| glideking wrote: |
This is the engine. The number starts with a zero or an O 317618 Could this be the original engine?
Kurt |
That number would put it at a Sept 63 1500.
Looking forward to more "vintage" photos! |
|
| Back to top |
|
|
glideking
Samba Member
Joined: February 02, 2013
Posts: 990
Location: California
|
|
| Back to top |
|
|
Brian
Samba Moderator

Joined: May 28, 2012
Posts: 8340
Location: Oceanside
|
|
| Back to top |
|
|
glideking
Samba Member
Joined: February 02, 2013
Posts: 990
Location: California
|
| Posted: Fri Sep 19, 2014 10:51 pm Post subject: |
|
|
The first problem with my new "ready for paint" bus was the Bondo was applied over paint and was easily plucked off with a screwdriver.
Multiple mirror mount holes needed to be welded.
So I sanded off all the paint and learned how to apply "real" body filler directly to clean sanded metal. I pounded out the dents so the filler would be as thin as possible.
At some point the front seat bulkhead had been removed with captain's chairs added to make it a walkthrough. Blechhh! So I found a replacement but my M code plate must have gone with it. I wonder what it said? I had to weld in original seat mounts. Back then I had a $150 Sears welder. It was terrible! That is why I learned to love grinding!
How nice it was back in those days. You could find a bus with little or no rust.
The heater log had been removed so I welded in another. I wonder if the guy who cut up this bus ever thought that someone would be putting it all back together someday?
Even though the bus had little or no damage I wanted to try and get that perfectly flat reflection so I glued three sheets sandpaper to a long board.
"Guidecoat" is your friend!
I was going through a lot of sandpaper that would clog quickly so I did some of it with paint stripper. That proved to be tedious in it's own way. There is that underpowered Sears welder. I put it on the front lawn with a free sign on it.
The sun roof had been covered with plywood so I had a few holes to weld up.
Thanks for looking at my old photos with me. More to come.
Kurt
_________________
"The more I get done the less it looks like I did anything"
1959 Single Cab Restoration"Funky Truck"
http://www.thesamba.com/vw/forum/viewtopic.php?t=5...highlight=
1965 21 Window Restoration Thread (From old photos)
http://www.thesamba.com/vw/forum/viewtopic.php?t=6...highlight=
1963 Panelvan build "Tyvanosaurus Wrecks"
http://www.thesamba.com/vw/forum/viewtopic.php?p=8351639#8351639 |
|
| Back to top |
|
|
glideking
Samba Member
Joined: February 02, 2013
Posts: 990
Location: California
|
|
| Back to top |
|
|
mandraks
Samba Member

Joined: November 28, 2004
Posts: 7047
Location: Lawrenceville, Ga
|
| Posted: Sat Sep 20, 2014 9:23 am Post subject: Re: Carb thingy |
|
|
| glideking wrote: |
Carb has a lot of thingies on it. The electric choke? The rev limiter? Buses had them for a few years. I will keep them both.
Link
|
i used to driver a 1500 with the governor on it, never occurred to me to pull the wires off and peak inside. Thank you for posting.
ever run the distributor rev limiter?
_________________
regards
Uli
----------------------------------------
'53 3-Fold Oval, L35 Metallic Blue, looking for a narrow hatch panel |
|
| Back to top |
|
|
glideking
Samba Member
Joined: February 02, 2013
Posts: 990
Location: California
|
| Posted: Sun Sep 21, 2014 10:48 am Post subject: |
|
|
My shop became covered with VW parts trying to figure out how it all went back together. There is that bay middle and rear seat that I wish I did not throw away.
I felt so good about the prep and body work I felt the bottom needed my attention too. The bus was so light being stripped down like this it was easy to just push it sideways. The sand on the floor made it easy to slide. I figured the jackpoints would hold it up on it's side if I put a block of wood under them. I used straps through the skylight windows to the rafters of the garage and tipped it over. The garage was too small so I slid the bus sideways on the sandy floor multiple times until it was all the way over. I did not block the top. I just left it hanging from the straps hovering over the floor.
After the bus was over I removed the front and rear suspensions. As you can see this bus started in very good condition.
The only rust I had to repair was the passenger floor. I covered holes with tape to minimize how much sand got inside.
Here you can see the blocks of wood supporting the jackpoints.
Sandblasted to bare metal.
Urethane primer, paint and clear coat.
I did not know then that the bottom should be gray. Forgive me.
More to come...
Kurt
_________________
"The more I get done the less it looks like I did anything"
1959 Single Cab Restoration"Funky Truck"
http://www.thesamba.com/vw/forum/viewtopic.php?t=5...highlight=
1965 21 Window Restoration Thread (From old photos)
http://www.thesamba.com/vw/forum/viewtopic.php?t=6...highlight=
1963 Panelvan build "Tyvanosaurus Wrecks"
http://www.thesamba.com/vw/forum/viewtopic.php?p=8351639#8351639 |
|
| Back to top |
|
|
BDSBSS23
Samba Member
Joined: January 03, 2008
Posts: 1817
Location: Colorado
|
|
| Back to top |
|
|
glideking
Samba Member
Joined: February 02, 2013
Posts: 990
Location: California
|
| Posted: Tue Sep 23, 2014 10:02 am Post subject: |
|
|
The old photos are numbered on the back so I must have cleaned up the front beam next.
Turquoise brake drums? What was I thinking?
All new brake components.
My woodworking bench. Brings back memories. I rearranged the lock wafers so one key would open everything.
I cleaned and installed a new seal for the steering box.
My daughter Kelsy as seen before on TheSamba but this time from a better scanned print. I was very happy to find this stash of old photos. I thought they were lost forever.
The bottom was done. Time to flip it back down.
Going back down. A little bit at a time, then slide it sideways and a little bit more...
More to come...
Kurt
_________________
"The more I get done the less it looks like I did anything"
1959 Single Cab Restoration"Funky Truck"
http://www.thesamba.com/vw/forum/viewtopic.php?t=5...highlight=
1965 21 Window Restoration Thread (From old photos)
http://www.thesamba.com/vw/forum/viewtopic.php?t=6...highlight=
1963 Panelvan build "Tyvanosaurus Wrecks"
http://www.thesamba.com/vw/forum/viewtopic.php?p=8351639#8351639 |
|
| Back to top |
|
|
ratherb-buggin
Samba Member

Joined: January 30, 2005
Posts: 985
Location: Shawnee, KS
|
| Posted: Tue Sep 23, 2014 10:03 am Post subject: |
|
|
| Cool photos!! |
|
| Back to top |
|
|
glideking
Samba Member
Joined: February 02, 2013
Posts: 990
Location: California
|
| Posted: Thu Sep 25, 2014 10:46 pm Post subject: More scanned photos |
|
|
Endless filling and sanding...
Getting more practice with guide coat.
I thought it was flat before the filler... more guide coat!
Every little ding and scratch...
Getting better...
Looks like I must have painted the interior first. I have no photos of that. masked off the inside to spray the outside...
Looks like I sprayed the turquoise bottom first but I have no photos of just that. Remember photos cost money back then.
I used 1/4 inch vinyl tape to do the curves then paper tape overall.
I remember this was a very exciting day! Ready for the white top.
I could eat off a floor that clean!
Not too bad for a first timer...
This one shows the Bentley manual out guiding me through the rear brake assembly.
Not the correct colors but CLEAN!
Parts...
I never did figure out what those parts were for...
My "spray booth" plastic sheet over the walls with the door wide open to the summer air at night. I strung a bunch of bare light bulbs around the walls to see the paint going on better.
Not much more to come...
Kurt
_________________
"The more I get done the less it looks like I did anything"
1959 Single Cab Restoration"Funky Truck"
http://www.thesamba.com/vw/forum/viewtopic.php?t=5...highlight=
1965 21 Window Restoration Thread (From old photos)
http://www.thesamba.com/vw/forum/viewtopic.php?t=6...highlight=
1963 Panelvan build "Tyvanosaurus Wrecks"
http://www.thesamba.com/vw/forum/viewtopic.php?p=8351639#8351639 |
|
| Back to top |
|
|
pyrOman
Fire Master

Joined: July 21, 2003
Posts: 12403
Location: Over 2002 posts deleted!
|
| Posted: Fri Sep 26, 2014 6:11 am Post subject: |
|
|
WOW! That is a tight shop!!! 
_________________
Some people are so busy being clever they don't have time enough to be wise. |
|
| Back to top |
|
|
Chad M
Samba Member
Joined: July 14, 2003
Posts: 723
Location: Alberta
|
| Posted: Fri Sep 26, 2014 6:20 am Post subject: Re: More scanned photos |
|
|
| glideking wrote: |
I never did figure out what those parts were for...
|
Pop out window frames? |
|
| Back to top |
|
|
kenshapiro2002
Samba Member

Joined: April 26, 2013
Posts: 1826
Location: Bawlmer Hon
|
| Posted: Fri Sep 26, 2014 7:21 am Post subject: |
|
|
Kurt knows what they are...I too couldn't figure out what he meant by that. 
_________________
Looking for a correct 1967 rear seat
Looking for '67 Engine / Block HO 183xxx - HO 194xxx |
|
| Back to top |
|
|
Shoyrtt
Samba Member

Joined: August 21, 2010
Posts: 1009
Location: Redlands, CA
|
| Posted: Tue Dec 02, 2014 3:36 pm Post subject: |
|
|
| Any updates Kurt? |
|
| Back to top |
|
|
BulliBill
Samba Member

Joined: July 09, 2004
Posts: 4572
Location: St Charles, MO
|
| Posted: Tue Dec 02, 2014 4:29 pm Post subject: |
|
|
Hey Kurt,
Aren't you glad you had the foresight to buy that Deluxe back then! I've never been a "Deluxe" kinda guy, but knowing what I know now, I would have bought and stored away a few way back when they were plentiful and fairly cheap, and then retired on them! I still have a set of middle and rear seats from a Deluxe stored away since the late '80's. I won't be able to retire on them, but someday they'll help pay for something I'll really need for something in my fleet...
Can't wait to see more of your Deluxe and the SC too!).
Bill Bowman
_________________
I'm looking for these license plate frames for my fleet:
Coeur D'Alene - Lake Shore Volkswagen
Mission VW - San Fernando
Thornton VW - Stockton
Thanks for any help! |
|
| Back to top |
|
|
Ran When Parked
Samba Member

Joined: September 26, 2013
Posts: 781
Location: Birmingham, AL
|
| Posted: Tue Dec 02, 2014 6:48 pm Post subject: Awesome |
|
|
I am amazed by the rafter rotisserie and the fact it was your first time. AND without the internet expert at your fingertips factor.
Thanks for sharing with us. |
|
| Back to top |
|
|
glideking
Samba Member
Joined: February 02, 2013
Posts: 990
Location: California
|
|
| Back to top |
|
|
|


