| Author |
Message |
specialev
Samba Member

Joined: March 25, 2011
Posts: 281
Location: Mukilteo WA

|
 Posted: Wed Dec 03, 2014 10:55 am Post subject: 1989 Doka Tristar Posted: Wed Dec 03, 2014 10:55 am Post subject: 1989 Doka Tristar |
 |
|
Hey,
I love reading peoples build logs so I thought I'd try and give back to this community and try to photo document my own restoration.
Last April I bought a Swedish 1989 2WD Tristar from Autostadt West. I didn't get started on it until September as the motor in my Syncro (EJ22) blew up about a week before the Doka was delivered. Having replaced my motor with an 08 Subie 2.5 ($) and installing the freshly rebuilt transmission from Matt at AA ($$$), I could get started on the Doka.
So far I've just been doing tear down and cleaning. My plan is to work the underside/engine bay first (clean, paint, seal) and get it running driving then move onto the body work.
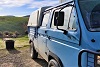
Here's how it had to sit in front of my shop for the summer while I dealt with the dead syncro.
Got it in the shop and the hard top came off and went out back.
There's not a lot of rust and it looks like the reason is based on a very thorough coating of corrosion inhibiting compound. Here's a few of the post suspension tear down pics I took, the black stuff is the CIC, probably Waxoyl or something similar (dries dark from my recollection).
I steam cleaned the underside over the weekend. I'll capture a couple pics of the underside post cleaning.
I sand blasted all the suspension parts and painted with POR15. Didn't have any of the pre-blast pics of the suspension but suffice to say the underside of the vehicle and suspension components have a lot of surface rust from the road grit blast. Chris at T3 shipped all my suspension bushes fast and I got them days after posting the order. Assembled the bushes to the front and rear control arms last night.
It's pretty nice to have a couple semi complete sub-assemblies ready to go back in. Looks like the other bushes can wait till assembly which won't happen till I refinish and seal the underside of the vehicle.
I plan to paint the engine compartment with a single stage hardened enamel in white to match the body. The remaining of the underside I was just going to paint with POR 15 and follow that with bedliner. I've sprayed a bit of the Raptor bedliner from Upol and have been happy with the results and durability, just never used it in this application. For simplicity I'm thinking about continuing that up the rocker panels and wheel arches like so many people do.
Last edited by specialev on Fri Dec 26, 2014 2:56 pm; edited 1 time in total |
|
| Back to top |
|
 |
dobryan
Samba Member

Joined: March 24, 2006
Posts: 16505
Location: Brookeville, MD
|
|
| Back to top |
|
|
tarandusVDub
Samba Member
Joined: August 27, 2010
Posts: 1649
Location: Between Here and There
|
| Posted: Wed Dec 03, 2014 11:22 am Post subject: |
|
|
Wow, jealous! Nice shop facilities too.
FWIW, a friend in town touched up a few spots with POR-15 before he put bedliner on the lower band of his syncro, and within a year the bedliner peeled off everywhere there was POR-15. Doesn't seem to be compatible.
_________________
1990 Syncro 16" DoppleKabine 2.1 DJ 112i
________________________
Sold: 1972 Bay Campmobile; 1984 Westy, base model, 2WD. |
|
| Back to top |
|
|
specialev
Samba Member
Joined: March 25, 2011
Posts: 281
Location: Mukilteo WA
|
| Posted: Thu Dec 04, 2014 7:07 am Post subject: |
|
|
| dobryan wrote: |
After you finish the underside you should consider flooding the inside surfaces of the frame members with Fluid Film or something similar.
Looks like a great start.  |
Exactly. Totally part of the plan. I know there is some surface corrosion in there that I am not going to fix but if I can eliminate part of the cause for the corrosion, exposure to moisture, I can retard the corrosion. I'm not going to do that till I finish doing the body work so I don't end up with any paint bonding surface contamination. I can just imagine having huge amounts of trouble with fish eyes and paint adhesion with CIC before I try and finish it. |
|
| Back to top |
|
|
specialev
Samba Member
Joined: March 25, 2011
Posts: 281
Location: Mukilteo WA
|
| Posted: Mon Dec 08, 2014 7:52 am Post subject: |
|
|
Couple of post steam cleaning shots. I used a pressure washer hooked up to 180F water and cleaned the underside. I'll do my prep work and wash one more time with soap and water before I paint.
I got a couple more things done this weekend.
I ground out one little rusty spot in the LR wheel well and welded in a patch.
I got started zinc electroplating on some of my removed parts. I've been wanting to try this for a while now and I finally had enough stuff gathered to give it a go. I started out by bead blasting my metal, then with the metal nice and clean I plated in a 2.5 gallon bucket on my bench. I had to take a couple shots at it as when I started I was using too much current and parts weren't plating properly (although the bubbling in the bucket was vigorous). Once I had the current low the bubbling was low and parts came out nice and evenly plated with zinc. Following the zinc plating I chromate conversion coated the parts gold with material I acquired from Caswell. I need to gather some more parts to plate now. It was pretty fun and satisfying to do this.
I continued to work on some suspension subassemblies. Sway bars were fitted with the new whiteline bushings and blasted/painted endlinks. This job is a major PITA. Getting those bushings on is not easy.
Fitted the upper joints to the control arms and installed zerk fittings. I had to throw in a spacer washer under a 1/4" zerk to keep it from bottoming into the joint.
Next thing to do is paint the underside! |
|
| Back to top |
|
|
greggearhead
Samba Member

Joined: June 20, 2004
Posts: 563
Location: Colorado Springs, CO
|
|
| Back to top |
|
|
specialev
Samba Member
Joined: March 25, 2011
Posts: 281
Location: Mukilteo WA
|
| Posted: Tue Dec 09, 2014 7:04 am Post subject: |
|
|
No progress but some goods started to show up in the mail.
Got a set of GW Zero Lift Springs....compared to the old ones, front and rear, respective. I've been holding onto these old ones so I could make this comparison. Now they can go into the metal recycling.
Subarugears! Finish of these parts is incredible and my pictures suck. This is cause to be excited. Thanks, Todd. I'm thankful for your work in putting these parts on the market and for the great blackfriday sale! Imagine my surprise when I find this little suitcase on my porch. I've got a Subie LSD and Aluminum flywheel tucked away for the future swap as well.
Need to finish the swap the |
|
| Back to top |
|
|
insyncro
Banned

Joined: March 07, 2002
Posts: 15086
Location: New York
|
| Posted: Tue Dec 09, 2014 8:13 am Post subject: |
|
|
Thanks for posting the slight issues with plating.
I too am experimenting with it.
Looking forward to seeing more. |
|
| Back to top |
|
|
specialev
Samba Member
Joined: March 25, 2011
Posts: 281
Location: Mukilteo WA
|
| Posted: Tue Dec 09, 2014 8:21 am Post subject: |
|
|
| insyncro wrote: |
Thanks for posting the slight issues with plating.
I too am experimenting with it.
Looking forward to seeing more. |
I had best luck with a 5v/0.7MA power supply for a mobile phone. The other important detail to get the best looking finish was the polishing of the zinc between runs in the plating cell with a combination of steel wool and SS/Brass brushes. Next batch I do I'm going to attempt to use some metal polish as well. For reference I did a batch of washers and a fuel pump bracket with limited polishing and the conversion coating stuck to it but there was no shine in the zinc base metal. |
|
| Back to top |
|
|
flomulgator
Samba Member

Joined: March 07, 2013
Posts: 951
Location: Leavenworth, WA
|
| Posted: Tue Dec 09, 2014 10:19 am Post subject: |
|
|
Awesome start!
_________________
She's built like a steakhouse, but she handles like a bistro! |
|
| Back to top |
|
|
specialev
Samba Member
Joined: March 25, 2011
Posts: 281
Location: Mukilteo WA
|
| Posted: Thu Dec 11, 2014 7:40 am Post subject: |
|
|
Made some more progress last night.
I used to have a 20ton floor press and I sold it when I downsized before I moved a few years back. I'd been thinking about buying another floor press for my suspension reassembly and I'm glad I didn't cause I don't need one even though I think I do sometimes. I bought this set of adapters for my incredibly versatile OTC c-clamp press with the hopes that I could expand the usefulness of this tool without consuming any more floor space.
http://www.amazon.com/gp/product/B008DGNLFY/ref=oh_aui_detailpage_o00_s00?ie=UTF8&psc=1
And it turns out they worked great for pressing in the lower ball joints. I had to monkey with this for a while to figure out what worked. A couple of the adapters look like the OEM VW tool but the real trick is supporting the end and one of the cups is turned down to fit around the LBJ and the pin on the LBJ can just be inserted through the tool. It goes without saying that you should always have the boots off when you install anyway, this technique once over makes that a mandate. I'd highly recommend this cheap set of adapters if you own one of these small presses.
http://www.amazon.com/OTC-7249-U-Joint-Anchor-Serv...X41KCR57DF
Also installed zerks in the LBJs. Between drilling and tapping spent 15 or so minutes extracting chips from inside the joint. I had thrown out the clips that hold the LBJs into the vertical link so I found an external circlip that works (1 7/8") at Tacoma Screw. These did require some trimming to make fit but otherwise they were a great replacement.
I put together my rear hubs and assembled the rear control arms. More complete assemblies sitting around and waiting for me to paint the underside!
And speaking of paint. I'm a long time Wesco customer but they recently shutdown the store I usually would go to so I decided to try something new. I ordered up all the paint for the underside online from TCP Global. I picked up a gallon of Restoration Shop LE90D Pastel White for the engine compartment and underside and 2 liters of white Kustom Kolor bedliner for the wheel wells.
In the words of Hodokaguy, more to come. |
|
| Back to top |
|
|
Vanagon Nut
Samba Member

Joined: February 08, 2008
Posts: 10379
Location: Sunshine Coast B.C.
|
| Posted: Fri Dec 12, 2014 1:38 am Post subject: |
|
|
that electroplating bit is way cool. And cell phone PS? Neat. Images of worn out OEM coil height vs GW coils is very helpful. Thanks for posting those details!
Neil.
_________________
1981 Westy DIY 15º ABA
1988 West DIY 50º ABA
VE7TBN |
|
| Back to top |
|
|
alaskadan
Samba Member
Joined: January 09, 2013
Posts: 1858
Location: anchor pt. alaska
|
| Posted: Fri Dec 12, 2014 9:10 am Post subject: |
|
|
Hmm plating, yes. Very nice. Was the gold colored plating for looks or further anti corrosion
purposes? |
|
| Back to top |
|
|
specialev
Samba Member
Joined: March 25, 2011
Posts: 281
Location: Mukilteo WA
|
| Posted: Fri Dec 12, 2014 9:31 am Post subject: |
|
|
| The yellow chromate conversion coating enhances the corrosion protection of the zinc. It also looks pretty. |
|
| Back to top |
|
|
alaskadan
Samba Member
Joined: January 09, 2013
Posts: 1858
Location: anchor pt. alaska
|
| Posted: Mon Dec 15, 2014 8:31 am Post subject: |
|
|
| Very nice. Wonder how this would hold up compared to some of the under carriage paints. Not so much undercoating but chassis paint. How bout plated control arms and the like? |
|
| Back to top |
|
|
specialev
Samba Member
Joined: March 25, 2011
Posts: 281
Location: Mukilteo WA
|
| Posted: Mon Dec 15, 2014 12:50 pm Post subject: |
|
|
A couple people on this forum have gone to the extent of plating control arms and other large parts. They'd located vendors near them that could do this work reasonably at a by-the-pound rate. In the Seattle area I didn't readily find anyone offering this service (didn't look too hard...may be someone out there). Doing small parts is relatively simple, larger stuff like the control arms is out of my realm. I didn't want to plate in a trash can...although.
I do plan on doing the threads on my radius rods. I think I am going to try and build the plating cell with a piece of PVC pipe if I can't find a deep container. Just need to make a trip to the hardware store.
Last edited by specialev on Mon Dec 15, 2014 1:26 pm; edited 1 time in total |
|
| Back to top |
|
|
purplepeopleeater
Samba Member

Joined: July 23, 2005
Posts: 3117
Location: E. Washington
|
| Posted: Mon Dec 15, 2014 1:09 pm Post subject: |
|
|
| Nice thread, I've wanted to do some zinc plating myself...i've done other plating before (nickel) |
|
| Back to top |
|
|
shadetreetim
Samba Member

Joined: January 10, 2011
Posts: 1994
Location: Riverside, California
|
| Posted: Mon Dec 15, 2014 10:08 pm Post subject: |
|
|
Awesome thread. Can't wait to see what's next.
_________________
Tim Potts
Doing my best every time I drive it to dispel the myth these Vanagons have to be slow!
'89 Vanagon Bluestar/Country Homes 1.8T & .77 4th
'74 Jeep CJ5 |
|
| Back to top |
|
|
specialev
Samba Member
Joined: March 25, 2011
Posts: 281
Location: Mukilteo WA
|
| Posted: Thu Dec 18, 2014 10:53 am Post subject: |
|
|
Lots of prep work. Cleaning, priming, sanding, priming, more cleaning, and finally some paint on the underside!
I picked up a couple of liters of white tinted bedliner to shoot into the wheel wells. Need to mask a bit then I'll get in and give the area a preparatory sanding and shoot that on with a shutz gun.
I did paint the underside of the floor pan b/t the rear cross member and the front cross member with black POR15. Simultaneously with the wheel wells I'll sand+solvent wipe all that for bond prep and shoot on black bedliner with the shutz gun. Here's hoping I don't have any adhesion problems that some have reported. |
|
| Back to top |
|
|
Signalocity
Samba Member
Joined: February 13, 2012
Posts: 573
|
| Posted: Thu Dec 18, 2014 11:27 am Post subject: |
|
|
| Looking good! |
|
| Back to top |
|
|
|


