| Author |
Message |
Spike0180
Samba Member

Joined: June 06, 2015
Posts: 2269
Location: Detroit, Michigan

|
 Posted: Wed Aug 26, 2015 10:06 am Post subject: My soon to be new 1970 vw transporter (restoration) Posted: Wed Aug 26, 2015 10:06 am Post subject: My soon to be new 1970 vw transporter (restoration) |
 |
|
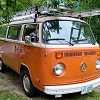
So, I recently purchased a 1970 vw Transporter. No rear seats, had recently had new carbs (with setup), and shifter work. But the guy had it primed, I knew it was bad. Didn't know it was this bad. Anyways everything10" down is being replaced. I have most the parts now and I'm workin on getting it all together.
The engine is a type 4 duel carb out of a 1973 bus, with what I think is the matching transmission. It's a 002. I'm missing a tin piece on the driver side of the engine and an engine seal but I live in Michigan so I'm thinking I'll wait on purchasing those till spring... It's like we'll below freezing here all winter and I probably won't drive it much this winter.
Anyways, here are some pictures. Let me know what you think.
|
|
| Back to top |
|
 |
Tcash
Samba Member

Joined: July 20, 2011
Posts: 12844
Location: San Jose, California, USA
|
| Posted: Wed Aug 26, 2015 10:50 am Post subject: |
|
|
Welcome to TheSamba!
|
|
| Back to top |
|
|
Tcash
Samba Member
Joined: July 20, 2011
Posts: 12844
Location: San Jose, California, USA
|
| Posted: Wed Aug 26, 2015 10:51 am Post subject: |
|
|
|
|
|
| Back to top |
|
|
jtauxe 
Samba Member

Joined: September 30, 2004
Posts: 5780
Location: Los Alamos, New Mexico
|
| Posted: Wed Aug 26, 2015 11:12 am Post subject: |
|
|
Aww, but that primer looked so nice! 
I'll be watching, as I also have a new to me bus that needs a similar amount of work:
http://vw.tauxe.net/jellybean
_________________
John
"Travelling in a fried-out Kombi, on a hippie trail, head full of zombie..." - Colin Hay and Ron Strykert
http://vw.tauxe.net
1969 Transporter, 1971 Westfalia, 1976, 1977, 1976, 1977, 1971, 1973, 1977 Westfalias,
1979 Champagne Sunroof, 1974 Westfalia Automatic, 1979 Transporter, 1972 Sportsmobile, 1973 Transporter Wild Westerner, 1974 Westfalia parts bus, 1975 Mexican single cab *FOR SALE*, 1978 Irish 4-door double cab RHD
|
|
| Back to top |
|
|
Spike0180
Samba Member
Joined: June 06, 2015
Posts: 2269
Location: Detroit, Michigan
|
| Posted: Thu Aug 27, 2015 5:45 am Post subject: |
|
|
| jtauxe wrote: |
Aww, but that primer looked so nice!
I'll be watching, as I also have a new to me bus that needs a similar amount of work:
http://vw.tauxe.net/jellybean |
Yes, very similar. I'll be watching your too. My Seats are in much better shape than yours. And I have no radio, I had one and tossed it 😣 also had a pretty good headliner that I tore out. Not overly upset about that though. It smelled pretty bad. But looks like we have the same engine though. Yours has the filter and external oil cooler from factory? |
|
| Back to top |
|
|
Spike0180
Samba Member
Joined: June 06, 2015
Posts: 2269
Location: Detroit, Michigan
|
| Posted: Fri Aug 28, 2015 10:15 am Post subject: My soon to be new 1970 vw transporter (restoration) |
|
|
Got both rockers, and outer panels on the van last night. All welded up, and I duraglassed the welds later that night to prevent rust. But, fits pretty nice. I'm really excited to finish this project! There is still so much to do.
|
|
| Back to top |
|
|
zoobum
Samba Member

Joined: June 09, 2015
Posts: 211
Location: Los Angeles
|
| Posted: Fri Aug 28, 2015 10:31 am Post subject: Welds |
|
|
| Damn dude, looking pretty good with those welds. Waiting to see more!! |
|
| Back to top |
|
|
mlesniak
Samba Member
Joined: April 08, 2015
Posts: 350
Location: Wisconsin
|
| Posted: Fri Aug 28, 2015 10:32 am Post subject: |
|
|
cool bus project! keep us posted brotha! 
_________________
Rosita the 73' Tin-top |
|
| Back to top |
|
|
jtauxe
Samba Member
Joined: September 30, 2004
Posts: 5780
Location: Los Alamos, New Mexico
|
| Posted: Fri Aug 28, 2015 10:41 am Post subject: |
|
|
| Spike0180 wrote: |
| jtauxe wrote: |
Aww, but that primer looked so nice!
I'll be watching, as I also have a new to me bus that needs a similar amount of work:
http://vw.tauxe.net/jellybean |
Yes, very similar. I'll be watching your too. My Seats are in much better shape than yours. And I have no radio, I had one and tossed it also had a pretty good headliner that I tore out. Not overly upset about that though. It smelled pretty bad. But looks like we have the same engine though. Yours has the filter and external oil cooler from factory? |
No external cooler, and the standard Type IV filter. But the engine is original to the bus, I do believe! The seats will get all new upholstery.
I am impressed with how you are getting right after all that welding. I am totally intimidated by that, having never really welded before. I've got me a little MIG welder, and have had a lesson, but I think the first thing I need to do is practice on some old junk panels that I have. Next summer, maybe?
_________________
John
"Travelling in a fried-out Kombi, on a hippie trail, head full of zombie..." - Colin Hay and Ron Strykert
http://vw.tauxe.net
1969 Transporter, 1971 Westfalia, 1976, 1977, 1976, 1977, 1971, 1973, 1977 Westfalias,
1979 Champagne Sunroof, 1974 Westfalia Automatic, 1979 Transporter, 1972 Sportsmobile, 1973 Transporter Wild Westerner, 1974 Westfalia parts bus, 1975 Mexican single cab *FOR SALE*, 1978 Irish 4-door double cab RHD
|
|
| Back to top |
|
|
Spike0180
Samba Member
Joined: June 06, 2015
Posts: 2269
Location: Detroit, Michigan
|
| Posted: Fri Aug 28, 2015 6:08 pm Post subject: |
|
|
| jtauxe wrote: |
| Spike0180 wrote: |
| jtauxe wrote: |
Aww, but that primer looked so nice!
I'll be watching, as I also have a new to me bus that needs a similar amount of work:
http://vw.tauxe.net/jellybean |
Yes, very similar. I'll be watching your too. My Seats are in much better shape than yours. And I have no radio, I had one and tossed it also had a pretty good headliner that I tore out. Not overly upset about that though. It smelled pretty bad. But looks like we have the same engine though. Yours has the filter and external oil cooler from factory? |
No external cooler, and the standard Type IV filter. But the engine is original to the bus, I do believe! The seats will get all new upholstery.
I am impressed with how you are getting right after all that welding. I am totally intimidated by that, having never really welded before. I've got me a little MIG welder, and have had a lesson, but I think the first thing I need to do is practice on some old junk panels that I have. Next summer, maybe? |
Honestly, I've been doing prep work for like two Months now. And finally got to the point where I was like I just gotta get done. So I started in the hidden places, and did lots of grinding back off my welds lol. Take your time and you'll do fine. Besides no one will see em when it's all done. |
|
| Back to top |
|
|
Wasted youth
Samba Member

Joined: July 06, 2012
Posts: 5134
Location: California's Hot and Smoggy Central Valley
|
| Posted: Fri Aug 28, 2015 11:26 pm Post subject: |
|
|
That's the first time I've seen anyone put a Type 4 into an early Baywindow.  I think the Type 4 is an improved design, but some parts are hard to find. Can we see some more engine compartment porn? I think the Type 4 is an improved design, but some parts are hard to find. Can we see some more engine compartment porn?
X2 on you good for getting after the steelwork.  I see you are using Gerson panels? They have a good reputation for fitment. Are you using a gas setup with the wire-feed, or are you going core wire? I see you are using Gerson panels? They have a good reputation for fitment. Are you using a gas setup with the wire-feed, or are you going core wire?
Take care of those hubcaps around the steel work. Around here VW re-pops are kind of hard to get with the VW logo. Most of the re-pops are without the logo. Originals in good shape usually get more than $20-30 each. |
|
| Back to top |
|
|
Spike0180
Samba Member
Joined: June 06, 2015
Posts: 2269
Location: Detroit, Michigan
|
| Posted: Sat Aug 29, 2015 8:00 am Post subject: |
|
|
| Wasted youth wrote: |
That's the first time I've seen anyone put a Type 4 into an early Baywindow. I think the Type 4 is an improved design, but some parts are hard to find. Can we see some more engine compartment porn?
X2 on you good for getting after the steelwork. I see you are using Gerson panels? They have a good reputation for fitment. Are you using a gas setup with the wire-feed, or are you going core wire?
Take care of those hubcaps around the steel work. Around here VW re-pops are kind of hard to get with the VW logo. Most of the re-pops are without the logo. Originals in good shape usually get more than $20-30 each. |
Thanks, and the bus came with that engine, professionally set up too with new carbs and heater boxes. The panels are from klassic fab. And they fit awesome! I have stuff from other places and they are Crap in comparison. And welding is gas with wire feed. I'll get engine pictures up later tonight or tomorrow. |
|
| Back to top |
|
|
cmonSTART
Samba Member
Joined: July 15, 2014
Posts: 1915
Location: NH
|
| Posted: Sat Aug 29, 2015 11:05 am Post subject: |
|
|
Nice work! Come do mine next!
_________________
'78 Bus 2.0FI
de K1IGS |
|
| Back to top |
|
|
Spike0180
Samba Member
Joined: June 06, 2015
Posts: 2269
Location: Detroit, Michigan
|
| Posted: Sat Aug 29, 2015 11:45 am Post subject: |
|
|
| Wasted youth wrote: |
That's the first time I've seen anyone put a Type 4 into an early Baywindow. I think the Type 4 is an improved design, but some parts are hard to find. Can we see some more engine compartment porn?
X2 on you good for getting after the steelwork. I see you are using Gerson panels? They have a good reputation for fitment. Are you using a gas setup with the wire-feed, or are you going core wire?
Take care of those hubcaps around the steel work. Around here VW re-pops are kind of hard to get with the VW logo. Most of the re-pops are without the logo. Originals in good shape usually get more than $20-30 each. |
A little engine porn, I'm sure I'll have some cooling things to sort out. And Ima be doing some rewiring as you can see it needs, but it purs like a kitten.
https://www.thesamba.com/vw/gallery/pix/1397127.jpg |
|
| Back to top |
|
|
Wasted youth
Samba Member
Joined: July 06, 2012
Posts: 5134
Location: California's Hot and Smoggy Central Valley
|
| Posted: Sat Aug 29, 2015 11:04 pm Post subject: |
|
|
So you do say you have some cooling tin work to attend to. I agree. It might be a challenge to get it all sealed up correctly. There are kits available to 'tin up' a Type 1 into a Type 4 compartment, but I am unaware of parts fitting a Type 4 into a Type 1 compartment. I am sure you can think of something, though.
Here is my philosophy on air path, you may disagree on the details. And... this is quoted from a reply I made on another thread, so some of this doesn't apply to you. Just the basic idea of correct cooling air flow. And  although it sounds condescending, it is NOT meant that way! although it sounds condescending, it is NOT meant that way!
| Wasted youth wrote: |
 Think of the airflow like this: from the top of the bus, where air is coolest, into the left and right scoops. At highway speeds, think of how hard your engine is working, then think about the volume and pressure of that cooler air coming into the compartment. It should go from the scoops, into the side plenums, and then down to just two places: The intake for fuel air combustion, and the cooling fan intake. It should NOT pass through little holes in your tinwork, around rotten seals, and certainly not bypass through missing tin. You should not leave your engine deck lid open while driving. And, the air flow scoops as designed do not need to be enhanced. Think of the airflow like this: from the top of the bus, where air is coolest, into the left and right scoops. At highway speeds, think of how hard your engine is working, then think about the volume and pressure of that cooler air coming into the compartment. It should go from the scoops, into the side plenums, and then down to just two places: The intake for fuel air combustion, and the cooling fan intake. It should NOT pass through little holes in your tinwork, around rotten seals, and certainly not bypass through missing tin. You should not leave your engine deck lid open while driving. And, the air flow scoops as designed do not need to be enhanced.
The pressured high volume cooling air now passes over the top portions of the piston cylinders, valve guide tubes, the oil cooler and portions of the cylinder heads in varying percentages and evenly distributed based on what VW engineers determined. This volume is also thermostatically controlled to help maintain an even curve of engine temperature. This is an engine built with a steel crankshaft and flywheel, and lightweight and dissimilar metals. The expansion and contraction rates vary widely, and thermal cracking is encouraged by rapid cooling and heating... something that should be avoided.
Once that air has done its job, it continues its downward flow, and discharges towards the pavement directly under the engine, where the swift moving bus leaves it behind in its wake.
It should NEVER be sucked back in after it has done its job; not through the deck lid because the gasket is missing, not back through anywhere. It should have a completely unimpeded path based on original planned flow. No chunks of crap and debris packed around your cylinder cooling fins because the intake screen was left off, and certainly not troubled by mouse nests or stored seed pods.
These last two reasons are just more argument for dropping an unknown engine out before you run it. I learned that first hand... you can't see what critters have packed in there if all the tin is in place. 
Now think about that same process while you are sitting in traffic on a hot summer day. Not one iota of that hot, discharged cooling air can be allowed to get sucked back into the compartment by the energy of the idling cooling fan's vacuum effect. If so, that now heated air will be drawn into both the fuel air mixture ( not so much a problem) and the cooling air path... while you are sitting in bumper to bumper traffic on a hot day (more of a problem), and begin to overheat in a cascading effect as the hot engine continues to drawn in ever hotter cooling air. |
|
|
| Back to top |
|
|
1967250s
Samba Member
Joined: May 02, 2007
Posts: 2137
|
| Posted: Sat Aug 29, 2015 11:55 pm Post subject: |
|
|
Sorta what Wasted says, be sure to seal up all the openings from below the normal sheetmetal. Imagine this, all that area from the bottom of the Bus far outstrips the area of the scoops, so any air from the bottom overwhelms the cool air and you get lots of hot air into the fan.
Very nice sheetmetal work, BTW. You sure don't screw around. What welder setup do you use? And how did you cut those nice straight lines?
_________________
'72 Elm Green Deluxe |
|
| Back to top |
|
|
Spike0180
Samba Member
Joined: June 06, 2015
Posts: 2269
Location: Detroit, Michigan
|
| Posted: Sun Aug 30, 2015 7:11 pm Post subject: My soon to be new 1970 vw transporter (restoration) |
|
|
| cmonSTART wrote: |
| Nice work! Come do mine next! |
If you're serious I can ask the shop I'm working out of if they want some extra work. My friend who is helping me is way better than I am, and excellent with detailed work like this. He is guiding me through and doing the technical stuff, I do lots of the "crap" work.
They don't do off body restorations though, just on body. |
|
| Back to top |
|
|
Spike0180
Samba Member
Joined: June 06, 2015
Posts: 2269
Location: Detroit, Michigan
|
| Posted: Mon Aug 31, 2015 7:20 am Post subject: My soon to be new 1970 vw transporter (restoration) |
|
|
| Wasted youth wrote: |
So you do say you have some cooling tin work to attend to. I agree. It might be a challenge to get it all sealed up correctly. There are kits available to 'tin up' a Type 1 into a Type 4 compartment, but I am unaware of parts fitting a Type 4 into a Type 1 compartment. I am sure you can think of something, though.
Here is my philosophy on air path, you may disagree on the details. And... this is quoted from a reply I made on another thread, so some of this doesn't apply to you. Just the basic idea of correct cooling air flow. And although it sounds condescending, it is NOT meant that way!
| Wasted youth wrote: |
Think of the airflow like this: from the top of the bus, where air is coolest, into the left and right scoops. At highway speeds, think of how hard your engine is working, then think about the volume and pressure of that cooler air coming into the compartment. It should go from the scoops, into the side plenums, and then down to just two places: The intake for fuel air combustion, and the cooling fan intake. It should NOT pass through little holes in your tinwork, around rotten seals, and certainly not bypass through missing tin. You should not leave your engine deck lid open while driving. And, the air flow scoops as designed do not need to be enhanced.
The pressured high volume cooling air now passes over the top portions of the piston cylinders, valve guide tubes, the oil cooler and portions of the cylinder heads in varying percentages and evenly distributed based on what VW engineers determined. This volume is also thermostatically controlled to help maintain an even curve of engine temperature. This is an engine built with a steel crankshaft and flywheel, and lightweight and dissimilar metals. The expansion and contraction rates vary widely, and thermal cracking is encouraged by rapid cooling and heating... something that should be avoided.
Once that air has done its job, it continues its downward flow, and discharges towards the pavement directly under the engine, where the swift moving bus leaves it behind in its wake.
It should NEVER be sucked back in after it has done its job; not through the deck lid because the gasket is missing, not back through anywhere. It should have a completely unimpeded path based on original planned flow. No chunks of crap and debris packed around your cylinder cooling fins because the intake screen was left off, and certainly not troubled by mouse nests or stored seed pods.
These last two reasons are just more argument for dropping an unknown engine out before you run it. I learned that first hand... you can't see what critters have packed in there if all the tin is in place.
Now think about that same process while you are sitting in traffic on a hot summer day. Not one iota of that hot, discharged cooling air can be allowed to get sucked back into the compartment by the energy of the idling cooling fan's vacuum effect. If so, that now heated air will be drawn into both the fuel air mixture ( not so much a problem) and the cooling air path... while you are sitting in bumper to bumper traffic on a hot day (more of a problem), and begin to overheat in a cascading effect as the hot engine continues to drawn in ever hotter cooling air. |
|
Thanks for the post! I'll probably fabricate a lot of the tin myself. And just seal it up good. I also plan on wrapping my exhaust to help keep the temp down a little. Other than that little be a trial and error kind of thing with watching my oil temp like a fiend for a while. |
|
| Back to top |
|
|
Spike0180
Samba Member
Joined: June 06, 2015
Posts: 2269
Location: Detroit, Michigan
|
| Posted: Mon Aug 31, 2015 7:26 am Post subject: My soon to be new 1970 vw transporter (restoration) |
|
|
| 1967250s wrote: |
Sorta what Wasted says, be sure to seal up all the openings from below the normal sheetmetal. Imagine this, all that area from the bottom of the Bus far outstrips the area of the scoops, so any air from the bottom overwhelms the cool air and you get lots of hot air into the fan.
Very nice sheetmetal work, BTW. You sure don't screw around. What welder setup do you use? And how did you cut those nice straight lines? |
Yep, you can see my reply above for my plan on airflow, it'll be tough. As far as welding I'm using a MIG welder. And I'm using a hand held grinder for those cuts. I do a little cleaning after the initial cut. |
|
| Back to top |
|
|
Spike0180
Samba Member
Joined: June 06, 2015
Posts: 2269
Location: Detroit, Michigan
|
| Posted: Mon Aug 31, 2015 7:32 am Post subject: My soon to be new 1970 vw transporter (restoration) |
|
|
A few pics from Saturdays work. Before we cleaned it all up. There was priming and water proofing after this point.
|
|
| Back to top |
|
|
|


