| Author |
Message |
Kylo Rich
Samba Member
Joined: November 07, 2013
Posts: 110
Location: Mesa, AZ

|
 Posted: Wed Mar 02, 2016 2:19 pm Post subject: Posted: Wed Mar 02, 2016 2:19 pm Post subject: |
 |
|
| euro911 wrote: |
Hmmm ...
All of my cars have manual steering. I have two trucks that have power steering, but they're Toyotas and never had any issues to look into.
Now, I'm a total noob when it comes to Vanagons, so don't laugh (too hard) ... do all Vanagons have power [assist] steering? |
No, sir. My 1982 Vanagon does not have power steering and instantly turns you into a Man once you have to tug on that big old bus wheel with no power steering. 
_________________
1982 Westy "Adeline" 2.3, Air-cooled, Dual Weber Carbs - Left my job of 10 years to hit the road full-time. Instagram @KyloRich |
|
| Back to top |
|
 |
SCM
Samba Member
Joined: January 26, 2011
Posts: 3119
Location: Bozeman MT
|
| Posted: Wed Mar 02, 2016 2:36 pm Post subject: Re: How does one replace a power steering rack? |
|
|
Nice thread resurrection going on here!
And, as the OP, I'm a little embarrassed to admit that I STILL haven't tackled this job. 
The PS rack leak turned out to not be as bad as I thought and I've just been living with it as I gather more and more suspension parts. I plan to do it sometime this spring.
_________________
'91 Westfalia GL Automatic (GTA "Turbo" Rebuild w/Peloquin) and 2.3L GoWesty Engine |
|
| Back to top |
|
|
SCM
Samba Member
Joined: January 26, 2011
Posts: 3119
Location: Bozeman MT
|
| Posted: Sat May 14, 2016 9:11 pm Post subject: Re: How does one replace a power steering rack? |
|
|
Well shoot, how time does fly. After four years of stumbling over a rebuilt PS rack, pump, and assorted bits, I finally decided to follow through with this job. It turned out my leak wasn't so bad so this job didn't seem so urgent. But I sure am looking forward to what will surely be a WAY better handling van.
As Bluebus pointed out, it's very important to flush the PS system. This was something that I dreaded but it turned out to be a non-issue.
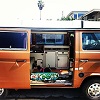
It won't impress any of you pros (especially Signalocity) but here's my work space. A bit cramped and dark but the stereo is great.
First thing I did was to clock the PS rack (thanks for the tip IdahoDoug). I thought this would be a hassle, requiring a vice, etc. Nope. Just a 8mm wrench. 1.8 turns from either lock put me at center and I marked these lines to keep everything in place.
One thing I would suggest is to somehow mark the splines themselves, not just the "clock face". It turns out that it's REALLY easy to knock the adjustment out of alignment when you're working the splines into the steering coupler. If I could have seen a mark on the splines (and not just the face shown in this picture) it would have saved some work when installing the new rack.
Then I pulled the van into the garage nice and straight and then hogtied the wheel.
The tie rods on my new rack have less threaded surface than my old ones so just measuring from the start of the thread to the tie rod ends wasn't really going to help. Given the droop of the tie rods compared to the level rack, the math was just getting to be a bitch. I don't need to go very far or fast to get to my alignment guy so I just measured the distance between the tie rod ends on the van, added a half inch to account for the droop of the tie rods, divided by two, then measured that far from the center of my new PS rack to install the new ends on the new rack. It'll probably be toed in a bit but again, it's only 3 miles to the shop.
Update: In hindsight, I should have added an 1 to 2 inches to account for tie rod droop. After remounting everything I'm obviously toed-in. I think the main thing is to "center" the new rack. Then the alignment shop can deal with the rest.
When it came time to flush the system (A MUST DO), I reread this thread http://www.thesamba.com/vw/forum/viewtopic.php?t=216729&highlight=atf+++fluid
With all due respect to 10c (I wish he'd come back. Any new Vanagon owner would be smart to print out anything he ever posted here), I went with RicoS' method and took some relaxing time to build my flushing reservoir.
Then I removed the PS fluid reservoir and disassembled. It was tough to get the black lid off and the red one started cracking a bit. I might try to find another but don't anticipate having to open it up very often once this job is done.
It was plenty dirty and had what looked like fine metal shavings in it.
Now it's all clean and equipped with a new filter and o-ring.
I also followed Bluebus' advice about linking the PS fluid lines together (of the many different hoses I had laying around, fuel hose was the ONLY one that worked for this as the two lines are different sizes and you need a fairly soft, flexible hose).
In order to document the pump replacement (for warranty purposes) here's the old one.
And the new.
This here was a milestone. The hardest part was separating the rack from the U-joint coupler. A pickle fork worked but it was nerve wracking and I'm not looking forward to getting it back together tomorrow.
After flushing a gallon of ATF through the system. Looks clean to me. The suspended jug / linked PS line technique worked like a charm.
I like to work slow. I was visited by a few friends, had an extra trip to the FLAPS, and took a beer break. Tomorrow I plan to hook up the PS rack, fill and bleed the system, and take an exploratory stab at replacing the radius rod bushings. I'll follow up after I'm finished with that.
So far, I'm slapping myself for putting this off for so long. I didn't even curse the entire day! I do wish that I would have waited a couple weekends before doing the anti-sway bar R&R. Having that out of the way would have made this just a bit easier. I am however glad that I didn't need to jack up the van for any of this. I find working under the van to be relaxing when all 4 tires are on the ground. No so much when it's in the air.
Thanks to everyone who gave advice here. This is turning out to be a really fun way to spend a chilly spring weekend. Not nearly the hassle I was expecting it to be. I wonder how much $ I'm saving by not taking it to the shop.
_________________
'91 Westfalia GL Automatic (GTA "Turbo" Rebuild w/Peloquin) and 2.3L GoWesty Engine
Last edited by SCM on Sun May 15, 2016 5:57 pm; edited 2 times in total |
|
| Back to top |
|
|
SCM
Samba Member
Joined: January 26, 2011
Posts: 3119
Location: Bozeman MT
|
| Posted: Sun May 15, 2016 5:29 pm Post subject: Re: How does one replace a power steering rack? |
|
|
All done with this job!!
Install was pretty much the same as removal although I would also add;
- when you attach the hydraulic lines, install the rear first (22 mm, that was a new wrench for me to buy). I was trying to avoid losing a bunch of ATF and got 'em both finger tight in a hurry - knowing full well it might make things tougher for me. It wasn't worth it. Tighten that rear fitting first, then put the front (17 mm, I think) back on.
- it takes a bit of wrestling, pushing, pulling, and cursing to get the splined fitting on the PS rack back into the U-joint coupler. Enough that you can spin the the rack out of center. Plan ahead for that.
- A couple repetitions of turning on the engine for 4 seconds at a time and refilling the PS fluid reservoir was all it took to keep the fluid level in the same place. Another round of that while spinning the steering wheel lock to lock finished the job.
It was such a success that I decided to plow ahead with my replacement of the radius rod bushings.
It was going great until this.
Follow up here.
http://www.thesamba.com/vw/forum/viewtopic.php?t=501730&start=20
If you can do a fuel tank and line replacement you can do a PS rack/pump replacement - easy.
_________________
'91 Westfalia GL Automatic (GTA "Turbo" Rebuild w/Peloquin) and 2.3L GoWesty Engine
Last edited by SCM on Mon May 16, 2016 11:50 am; edited 1 time in total |
|
| Back to top |
|
|
IdahoDoug
Samba Member

Joined: June 12, 2010
Posts: 10251
Location: N. Idaho
|
| Posted: Sun May 15, 2016 9:21 pm Post subject: Re: How does one replace a power steering rack? |
|
|
SCM,
I had my own tubes made at a machine shop if you can't find those anywhere. I had to buy the correct drill bit for them to use, so I still have it. At the time (8 years ago?) those were either unavailable or crazy expensive for a simple tube. PM me and I can get the bit info or might even have one laying around for ya.
Doug
_________________
1987 2WD Wolfsburg Vanagon Weekender "Mango", two fully locked 80 Series LandCruisers. 2017 Subaru Outback boxer. 1990 Audi 90 Quattro 20V with rear locking differential, 1990 burgundy parts Vanagon. 1984 Porsche 944, 1988 Toyota Supra 5 speed targa, 2002 BMW 325iX, 1982 Toyota Sunrader |
|
| Back to top |
|
|
SCM
Samba Member
Joined: January 26, 2011
Posts: 3119
Location: Bozeman MT
|
| Posted: Sat May 21, 2016 11:09 am Post subject: Re: How does one replace a power steering rack? |
|
|
Update: Except for the front end alignment this job and the radius rod bushing replacement are finished.
I guess I didn't keep everything indexed properly when installing that rack into the steering coupler. I seem to have just shy of 1/8 of a turn extra in one direction compared to the other. Probably something only I will notice so I just won't tell anybody.
In hindsight, I don't know why I didn't just remove the old rack, line it up with the new, and then adjust the tie rod ends before installing the new rack. I think I got excited to assemble the new stuff before removing the old. I had to back out the tie rod ends another cm to get the toe close enough to eliminate some obvious tire scrubbing.
Looking forward to the alignment and the first REAL test ride. The quick spin around my neighborhood felt pretty good though.
_________________
'91 Westfalia GL Automatic (GTA "Turbo" Rebuild w/Peloquin) and 2.3L GoWesty Engine |
|
| Back to top |
|
|
bluebus86
Banned
Joined: September 02, 2010
Posts: 11075
|
| Posted: Sat May 21, 2016 1:19 pm Post subject: Re: How does one replace a power steering rack? |
|
|
the caps for the reservior are the same as that found on contemporanous VW Rabbitts, so you might find a replacement cap at a wrecker, more rabbitts than vanagons at most wreckers I have been too, might also try same era other vws such as jettas too. the rabbit tank however is different, the inlet or outlet nipples are located at bottom rather than sides as on the vanagon, but the lids are identical! also make sure you renew the reservoir filter
when refilling a reservoir, only do so via the small red cap, removing the large black cap will release the filter and could cause bits stopped by the filter to get past it, as the black lid and associated spring are what hold the filter media in place.
good luck
_________________
Help Prevent VW Engine Fires, see this link.....Engine safety wire information
Stop introducing dirt into your oil when adjusting valves ... https://www.thesamba.com/vw/forum/viewtopic.php?t=683022 |
|
| Back to top |
|
|
vanagon1991
Samba Member

Joined: August 18, 2007
Posts: 152
Location: Spring Grove, IL
|
| Posted: Thu Apr 06, 2017 6:25 am Post subject: Re: How does one replace a power steering rack? |
|
|
| SCM wrote: |
| In hindsight, I don't know why I didn't just remove the old rack, line it up with the new, and then adjust the tie rod ends before installing the new rack. |
SCM...about to tackle this job as well on a subaru 2.5 conversion. Got new (used) pump as my original was wining and rack started to leak just recently. Assume metal shavings but will see when I flush out the system.
To make sure I understand...what is the order you recommend for removing the old rack and tie rods and steering assembly, (then flushing), then installing the new?
The plan when flushing is to remove old pump and replace w new first, so new pump and fresh fluid are being used for the flush.
Can you clarify your comment above please...?
Thx
Lee
_________________
1991 Tornado Red Vanagon Carat
(2003 Subaru 2.5 conversion/Smallcar kit) |
|
| Back to top |
|
|
SCM
Samba Member
Joined: January 26, 2011
Posts: 3119
Location: Bozeman MT
|
| Posted: Thu Apr 06, 2017 8:45 am Post subject: Re: How does one replace a power steering rack? |
|
|
| vanagon1991 wrote: |
| SCM wrote: |
| In hindsight, I don't know why I didn't just remove the old rack, line it up with the new, and then adjust the tie rod ends before installing the new rack. |
Can you clarify your comment above please...?
Thx
Lee |
Yeah. In order to keep your alignment somewhat decent, you need to make sure that the tie rod ends on the new rack are positioned the same (or close) to how they were on the old rack. When I did this job, I removed the old tie rod ends from the old rack before figuring out where to position the new ends on the new rack. That was a mistake.
My comment simply means this - keep the tie rod ends installed on the new rack when you remove the rack. Then, with everything on your workbench, turn the old rack and the new rack to their center position (as if driving straight ahead). From there it should be easy to install tie rod ends onto the new rack in a position that is pretty close to correct.
There's probably many other ways to do this. The important thing is to adjust toe-in close enough that your wheels spin free for the trip to the alignment shop. They can take it from there.
_________________
'91 Westfalia GL Automatic (GTA "Turbo" Rebuild w/Peloquin) and 2.3L GoWesty Engine
Last edited by SCM on Thu Apr 06, 2017 10:05 am; edited 1 time in total |
|
| Back to top |
|
|
vanagon1991
Samba Member
Joined: August 18, 2007
Posts: 152
Location: Spring Grove, IL
|
| Posted: Thu Apr 06, 2017 10:03 am Post subject: Re: How does one replace a power steering rack? |
|
|
Got it....thx
_________________
1991 Tornado Red Vanagon Carat
(2003 Subaru 2.5 conversion/Smallcar kit) |
|
| Back to top |
|
|
erdonline
Samba Member
Joined: September 26, 2004
Posts: 943
Location: CT
|
| Posted: Thu Apr 06, 2017 4:26 pm Post subject: Re: How does one replace a power steering rack? |
|
|
Don't forget to line up the arrows on the centering indicator to make sure that the rack is centered before you put it on. This makes sure that when you do a turn-to-turn left to right on the steering wheel, you have equal turns from the center.
Ed
_________________
'85 Vanagon Westfalia
'84 Vanagon 7-passenger
'98 Mexican air-cooled Beetle |
|
| Back to top |
|
|
Skidub
Samba Member
Joined: December 29, 2014
Posts: 204
Location: PNW
|
| Posted: Thu Apr 06, 2017 8:02 pm Post subject: Re: How does one replace a power steering rack? |
|
|
I purchased a NOS ZF power steering rack part number 251 422 061 that has never been put into service. Fair price, but my intentions are to take it apart and replace all the seals and make sure that it in proper working order prior to installing.
Never done this before, but not in a hurry. Can anyone who's done this let me know how long you think it might take to take the rack apart, replace seals, make sure it's operational.
Thanks!
_________________
86 Syncro GL Tin Top
Subaru 2.5L Swap
Rblt Transaxle w/ R Locker + Decoupler |
|
| Back to top |
|
|
Chainsaw
Samba Member
Joined: August 07, 2015
Posts: 249
Location: Issaquah Washington
|
| Posted: Fri Apr 07, 2017 5:50 am Post subject: Re: How does one replace a power steering rack? |
|
|
Thanks for posting this! I plan to soon dig into my rack to either rebuild or replace it. Aleays helps to have some guidance.
_________________
89 Westy. 2wd. Manual. |
|
| Back to top |
|
|
Zeitgeist 13
Samba Member

Joined: March 05, 2009
Posts: 12115
Location: Port Manteau
|
| Posted: Fri Apr 07, 2017 10:42 am Post subject: Re: How does one replace a power steering rack? |
|
|
I was servicing an early model Vanagon on a lift for a friend the other day and while I was prying the rack away from the body I saw the sheetmetal flex significantly. I showed this to him, and after I reinstalled the rack (I replaced the boots and installed new Powerflex mounts) he went ahead and welded a steel plate in the middle of the distance between the two sheetmetal panels behind the rack. He said it really stiffened up the flex considerably. Given that so many of us have reported solid benefits from installing Powerflex mounts, I suspect that a simple welded bridge between the two sections of body behind the rack will produce similar positive results. I will be doing this on my van when I'm next up there servicing the front end.
_________________
Casey--
'89 Bluestar ALH w/12mm Waldo pump, PP764 and GT2052
'01 Weekender --> full camper
y u rune klassik? |
|
| Back to top |
|
|
Jake de Villiers
Samba Member

Joined: October 24, 2007
Posts: 5911
Location: Tsawwassen, BC
|
| Posted: Sat Apr 08, 2017 7:50 am Post subject: Re: How does one replace a power steering rack? |
|
|
| Zeitgeist 13 wrote: |
| I was servicing an early model Vanagon on a lift for a friend the other day and while I was prying the rack away from the body I saw the sheetmetal flex significantly. I showed this to him, and after I reinstalled the rack (I replaced the boots and installed new Powerflex mounts) he went ahead and welded a steel plate in the middle of the distance between the two sheetmetal panels behind the rack. He said it really stiffened up the flex considerably. Given that so many of us have reported solid benefits from installing Powerflex mounts, I suspect that a simple welded bridge between the two sections of body behind the rack will produce similar positive results. I will be doing this on my van when I'm next up there servicing the front end. |
I did a similar thing a couple of years ago and added a couple of bolt-on 1/4" x 2" aluminium plate stiffeners between the rack moubnt and the cross memebr.
Works great!
_________________
'84 Vanagon GL 1.9 WBX
'86 Westy Weekender Poptop/2.5 Subaru/5 Speed Posi/Audi Front Brakes/16 x 7 Mercedes Wheels - answers to 'Dixie'
@jakedevilliersmusic1
http://sites.google.com/site/subyjake/mydixiedarlin%27
www.crescentbeachguitar.com
www.thebassspa.com |
|
| Back to top |
|
|
vanagon1991
Samba Member
Joined: August 18, 2007
Posts: 152
Location: Spring Grove, IL
|
| Posted: Mon May 22, 2017 6:06 am Post subject: Re: How does one replace a power steering rack? |
|
|
Just finished steering rack replacement following the procedures above (on 2.5 conversion) and all went well. Note I have busdepot after market power steering lines installed.
First thing we did was disconnect the fluid lines and let drain into clean container for a few minutes, then let this container sit undisturbed while we continued to work.
We then started to remove old rack next since we were already under there working.
With steering centered and tied in place, we were going to remove the rack from the u-joint coupling, but it was stuck there pretty good...so decided to remove the rack with the coupling on it, and so remove the u-joint coupling from the short steering shaft instead. Far easier as you can swing a hammer with a large screwdriver and knock it off.
Yes, we made our scratch mark in the shaft for reference but before removing I was also able to get head up high enough in the spare tire area looking straight back at rack to eye the rotational positioning of the coupling on the rack side. The rack side of the coupling on the rack was sitting nearly perfectly horizontal w a slight counter clockwise tilt (1 degree).
After removal of the rack, we removed u-joint coupling from the old rack once rack was on bench and used torch to heat it up a bit and came right off. Caution on too much heat as the these couplings may have rubber seals in them. Not sure about these.
Once the new rack was confirmed centered on the bench, I remounted u-joint coupler onto the new rack at same "tilt position" as on the old rack when it was still in position under the van. This way I could confirm remounting position using scratch mark on the steering rod when installing new rack with coupling already on it. Went on in perfect position like a glove.
Next I connected the two fluid lines with hose preparing for the flush.
We did a full gallon flush, mostly at idle, but did give it a rev or two to pick up the flow and hopefully more debris if any in the lines (two man job in my case).
When flush was done, reconnected all, w new filter too, and did manual (engine not running) left/right turns until almost no air was coming up in reservoir.
When job was done, touched my finger at the bottom of the container of the initially drained fluid from the front lines and tapped it on this black test sheet and shined LED light on it...and just as I suspected.
Note that I had a lot of wining coming from the pump on this conversion for some time (for a number of reasons), and suspected this when my rack started leaking, so as a precaution, I also replaced the pump before starting this flush, so fresh fluid was going into a new pump, bypassing new rack, and out into gallon jug.... insuring there was no cross contamination.
Total time was 5 hours at a comfortable pace. Actually a pretty straight forward job. Thanks for everybody's help.
_________________
1991 Tornado Red Vanagon Carat
(2003 Subaru 2.5 conversion/Smallcar kit) |
|
| Back to top |
|
|
bself
Samba Member

Joined: October 18, 2004
Posts: 101
Location: Portland, Oregon
|
| Posted: Thu Nov 09, 2017 4:18 pm Post subject: Re: How does one replace a power steering rack? |
|
|
Have to say this thread was a super helpful so thank you to everyone who contributed. I just wrapped up swapping out my original worn out PS rack for a GW rebuilt that's been sitting in my basement for a year, waiting for the courage to tackle this project. Cheers!
_________________
 1987 VW Vanagon Westfalia SBX EJ25 1987 VW Vanagon Westfalia SBX EJ25 |
|
| Back to top |
|
|
banksdaname
Samba Member
Joined: March 29, 2018
Posts: 19
Location: Houston
|
| Posted: Sun Dec 13, 2020 8:44 am Post subject: Re: How does one replace a power steering rack? |
|
|
I know this is a really old thread but it's the closest I've found to what I am doing.
The U-joint coupler is causing me fits and I cant get the pinion shaft to go back in. I knew when I removed the old one that this would give me problems. I've tried tying it down, greasing it, prying it open, hammering it when I get it closely aligned but it just moves in ever direction. Any techniques to get it back in? |
|
| Back to top |
|
|
doodledee
Samba Member
Joined: December 12, 2018
Posts: 14
Location: Minneapolis
|
| Posted: Tue Mar 02, 2021 8:44 pm Post subject: Re: How does one replace a power steering rack? |
|
|
| banksdaname wrote: |
I know this is a really old thread but it's the closest I've found to what I am doing.
The U-joint coupler is causing me fits and I cant get the pinion shaft to go back in. I knew when I removed the old one that this would give me problems. I've tried tying it down, greasing it, prying it open, hammering it when I get it closely aligned but it just moves in ever direction. Any techniques to get it back in? |
I have my rack off now and am planning the new install over next few days. It was a huge pain getting the u-joint off and likewise am worried about how difficult the fitment will be w/ new rack. Any tips from your learnings??
Thanks!! |
|
| Back to top |
|
|
banksdaname
Samba Member
Joined: March 29, 2018
Posts: 19
Location: Houston
|
| Posted: Wed Mar 03, 2021 8:32 am Post subject: Re: How does one replace a power steering rack? |
|
|
| doodledee wrote: |
| banksdaname wrote: |
I know this is a really old thread but it's the closest I've found to what I am doing.
The U-joint coupler is causing me fits and I cant get the pinion shaft to go back in. I knew when I removed the old one that this would give me problems. I've tried tying it down, greasing it, prying it open, hammering it when I get it closely aligned but it just moves in ever direction. Any techniques to get it back in? |
I have my rack off now and am planning the new install over next few days. It was a huge pain getting the u-joint off and likewise am worried about how difficult the fitment will be w/ new rack. Any tips from your learnings??
Thanks!! |
Tip: take off the connecting shaft thats connected to the universal joint. I tried it without and its basically impossible to get it to stay straight and rigid and press it onto the rack. Theres probably some special VW tool to do it but After fumbling with it for like 2 days, I took off that connecting shaft, I put the rack on the ground with the universal joint/shaft in hand and used a rubber hammer and a little lube to get it on. Be sure to take pics of the alignment beforehand so when you hammer it on its int he same orientation as the original. Also, secure the steering wheel like mentioned in the instructions above.
Hope thats clear. |
|
| Back to top |
|
|
|


