| Author |
Message |
Schwing
Samba Member

Joined: May 10, 2009
Posts: 2506
Location: Centreville, MD

|
 Posted: Tue Oct 11, 2016 8:15 am Post subject: Re: 72 Westy - first bus Posted: Tue Oct 11, 2016 8:15 am Post subject: Re: 72 Westy - first bus |
 |
|
Thanks fellas! Sloride your bus is definitely my twin aside from that killer subi swap, nice work!
Paint prep has begun, hoping to get some yellow down in the next week while it's still warm. |
|
| Back to top |
|
 |
Spike0180
Samba Member

Joined: June 06, 2015
Posts: 2269
Location: Detroit, Michigan
|
| Posted: Tue Oct 11, 2016 11:02 am Post subject: Re: 72 Westy - first bus |
|
|
Looking very good. Well done.
_________________
Brutis Patches Izabich: 1970 VW Transporter - 1776cc DP
Current State: Projects never truly end...
Location: Grosse Pointe, Michigan
Other cars: 2003 F150, 2003 Jetta GLI vr6-6sp
Sambastic: adj; the quality of being nit picky, elitist, expecting everyone to do things the way they believe is best with no regard to situation, "sambastic" |
|
| Back to top |
|
|
sestino
Samba Member
Joined: July 03, 2007
Posts: 70
Location: University Park, Maryland
|
| Posted: Wed Oct 12, 2016 1:07 pm Post subject: Re: 72 Westy - first bus |
|
|
I just read this thread from the beginning.
Great work, particularly the welding.
You are prolific.
_________________
1977 Fuel-Injected Sage Green Westy |
|
| Back to top |
|
|
wcfvw69 
Samba Purist

Joined: June 10, 2004
Posts: 13389
Location: Arizona
|
| Posted: Wed Oct 12, 2016 2:05 pm Post subject: Re: 72 Westy - first bus |
|
|
It's nice to see someone powering through all the challenges that your bus is providing. So many folks burn out on their projects and never finish what they started. You only have to look at all the unfinished projects for sale for evidence.
_________________
Contact me at [email protected]
Follow me on instagram @sparxwerksllc
Decades of VW and VW parts restoration experience.
The Samba member since 2004.
**Now rebuilding throttle bodies for VW's and Porsche's**
**Restored German Bosch distributors for sale or I can restore yours**
**Restored German Pierburg fuel pumps for sale or I can restore yours**
**Restored Porsche fuel pumps or I can restore yours**
**Restored Porsche distributors or I can restore yours** |
|
| Back to top |
|
|
Pinetops
Samba Member

Joined: March 24, 2007
Posts: 2987
|
|
| Back to top |
|
|
Schwing
Samba Member
Joined: May 10, 2009
Posts: 2506
Location: Centreville, MD
|
| Posted: Wed Oct 26, 2016 5:58 am Post subject: Re: 72 Westy - first bus |
|
|
Wow guys thanks! I won't lie there are a lot of nights I don't want to work on it due to general malaise after tucking in kids and working a full day but I find once I just get out there and start working things start to happen.
Plus I promised my family and myself we'd go camping!
Weather cooperated for my outdoor painting. Its not perfect but perfect for camping.
My buddy has a wicked cool stud welder. Yes no shortage of filler, gotta do what you gotta do.
Classic project scope creep. Realized there was rust on the roof that needed love before I reinstalled my fiberglass top with new canvas.
This last shows how all of this work has been outside since my garage is full of Westy Miscellania (new word) 
Tons of blocking. I could have blocked even more but overall I am happy with it.
Dupont Nason Single Stage. This is very forgiving paint.
Inside. I didn't use any filler in this opening since its such high traffic, so imperfections and all here it is:
Painted lower nose too
|
|
| Back to top |
|
|
wcfvw69
Samba Purist
Joined: June 10, 2004
Posts: 13389
Location: Arizona
|
| Posted: Wed Oct 26, 2016 7:31 am Post subject: Re: 72 Westy - first bus |
|
|
Wow! You need to pat yourself on the back my friend. What a transformation. You have a REALLY nice looking bus that anyone would be proud to drive to the next camp site!
Great job.
_________________
Contact me at [email protected]
Follow me on instagram @sparxwerksllc
Decades of VW and VW parts restoration experience.
The Samba member since 2004.
**Now rebuilding throttle bodies for VW's and Porsche's**
**Restored German Bosch distributors for sale or I can restore yours**
**Restored German Pierburg fuel pumps for sale or I can restore yours**
**Restored Porsche fuel pumps or I can restore yours**
**Restored Porsche distributors or I can restore yours** |
|
| Back to top |
|
|
sallittjob
Samba Member

Joined: September 16, 2010
Posts: 340
Location: North NJ
|
| Posted: Wed Oct 26, 2016 7:51 am Post subject: Re: 72 Westy - first bus |
|
|
Schwing, you're a wizard with a welder my friend. Can't wait to see the bus at next years AACG!
_________________
57' Beetle Deluxe
1192cc SP
71' Super Beetle
1968cc DP
73' 412 Sedan
1679cc FI
75' Westy
1800cc FI |
|
| Back to top |
|
|
danfromsyr
Samba Member

Joined: March 01, 2004
Posts: 15144
Location: Syracuse, NY
|
| Posted: Wed Oct 26, 2016 7:59 am Post subject: Re: 72 Westy - first bus |
|
|
Looks great and awesome documentation to show others just what and how much work it takes.. many nights and weekends..
make sure you treat and seal the underside/backside of your welds (where you can) so that the rust bubbles don't come back in ~3yrs..
_________________
| Abscate wrote: |
| These are the reasons we have words like wanker |
|
|
| Back to top |
|
|
Schwing
Samba Member
Joined: May 10, 2009
Posts: 2506
Location: Centreville, MD
|
| Posted: Wed Oct 26, 2016 3:46 pm Post subject: Re: 72 Westy - first bus |
|
|
Thanks danfromsyr, Sallittjob and wcfvw69, you guys are way too kind.
Wcfvw69 it all comes down to whether or not I build this type 4 right. To be honest I'm a bit intimidated. I have all the parts, they are just waiting for me.
Danfromsyr I ended up going through 2 tubes of Dynatron auto seam sealer on the underside and backsides of my welds. Hoping it helps!
Sallittjob make sure you have a few Spaten at the club before checking it out too closely haha it will look much better. See you at AACG for sure. |
|
| Back to top |
|
|
wcfvw69
Samba Purist
Joined: June 10, 2004
Posts: 13389
Location: Arizona
|
| Posted: Wed Oct 26, 2016 4:21 pm Post subject: Re: 72 Westy - first bus |
|
|
Schwing-
I think the other poster was suggesting spraying inside those panels with a rust preventer like this.
https://jet.com/product/detail/470a2aaba12f4ed7aa3...;gclsrc=ds
I use this product inside of rockers and other areas that are bare metal after welding the panel shut. Some use Waxol type of products. The spray covers the bare metal from the welds on the inside of the repair section and prevent the panel from rusting inside out. As the other poster mentioned, it doesn't take long for it to do so if the metal is left bare. I've drilled holes to get my spray nozzle inside those cavities and then resealed them with rubber plugs if it was open to the elements.
As far as the engine rebuild, there are lots of videos out there to help you navigate reassembling that Type 4. Youtube and bugme videos has one as well. The Tom Wilson book is a great resource too.
_________________
Contact me at [email protected]
Follow me on instagram @sparxwerksllc
Decades of VW and VW parts restoration experience.
The Samba member since 2004.
**Now rebuilding throttle bodies for VW's and Porsche's**
**Restored German Bosch distributors for sale or I can restore yours**
**Restored German Pierburg fuel pumps for sale or I can restore yours**
**Restored Porsche fuel pumps or I can restore yours**
**Restored Porsche distributors or I can restore yours** |
|
| Back to top |
|
|
Schwing
Samba Member
Joined: May 10, 2009
Posts: 2506
Location: Centreville, MD
|
| Posted: Wed Oct 26, 2016 7:25 pm Post subject: Re: 72 Westy - first bus |
|
|
| Ahh yes I see what you mean. In addition to seam sealer I also use Eastwood chassis black. In some cases I sprayed rustoleum just trying to use up colors I knew I would never use again. This camper will see abuse but never like it did in its first 45 years 😀 |
|
| Back to top |
|
|
Schwing
Samba Member
Joined: May 10, 2009
Posts: 2506
Location: Centreville, MD
|
| Posted: Tue Nov 01, 2016 4:37 am Post subject: Re: 72 Westy - first bus |
|
|
Next on the list was to prep the inner roof for paint (area above the driver/passenger seat). Lots of rust thanks to the mice. So bad that the poptop brackets self destructed, and yet the gutter was still in good shape.
Since I knew I could have extra paint mixed, I prepped the backside of the engine lid since it was kinda crunchy. I can appreciate a patina bus but not sure thats my thing so shiny it is! haha
Random shot of the bus in the garage for the 2nd time since I owned it. It may need a buff, I haven't decided yet.
Ok so now that the paint was dry I had some friends help get the roof up there.
Repainted all of my brackets, and I am using all new stainless hardware.
Oh also I installed the exterior power outlet that I restored.
The next day I kicked things off right with a fancy lunch, King Crab Legs, which my kids ended up eating way faster than me, so lets just say my kids ate King Crab Legs. But hey I didn't care I had a good view of the bus starting to take shape.
Now comes the tedious job....attaching the canvas to the metal roof by way of all the original screws.
First I had to clean the aluminum strips, and a brillow pad and a hose did an amazing job. Nice and bright.
I started with the front and back middle strips to hold it in place, paying attention to wrinkles. Next up was to install the corners. I used a very sharp dental like poker to push holes through the vinyl welt. I had a few of these so I would line up 3 holes at a time and install the screw in the middle, this made it much easier.
I'm not done, I ran out of time after doing this for about 2 hours. I would say to anyone doing this job do not set a deadline and you will do a great job.
My helper
Gettin there, ran out of time.
I'm going away for a couple of days but hopefully this weekend I can finish this up. I plan on buying a brand new screwdriver to get the corners tighter since I was worried about stripped screws. |
|
| Back to top |
|
|
Schwing
Samba Member
Joined: May 10, 2009
Posts: 2506
Location: Centreville, MD
|
| Posted: Wed Nov 09, 2016 6:12 pm Post subject: Re: 72 Westy - first bus |
|
|
So I managed to finish up the canvas install. I have to say, the most tedious job is getting all those screws back into place and aligning the vinyl welt. I think it took me about 4-5 hours.
But it looks great! If I must say so myself.  Toit like a tiger! Toit like a tiger!
Next I started to install my new seat pedestal matts from Wolfsburgwest. Pretty straightforward install.
Installed the engine lid using all new stainless screws, the correct hinge rubbers, and got rid of the overspray on the handle from the previous owner. Also painted my license plate frame.
Built a new subfloor using 1/2" birch. Probably overkill to use birch looking back at it, but I figure thats probably what they used at the Westfalia factory.
Next was the fun part, laying down the vinyl floor. I decided to go with Stainmaster "Handscraped Retreat", who knows how the hell they come up with these names, but its a pretty good match to the westfalia laminate on the cabinets, etc.
Last pic shows my repaired stool. I keep forgetting to go to Walgreens and buy rubber feet. I heard the rubber replacements for canes are the same size as a westy stool??
My buddy bought me this plate from Australia, sorta sums things up nicely
|
|
| Back to top |
|
|
notchboy
Samba Member

Joined: April 27, 2002
Posts: 22453
Location: Escondido CA

|
|
| Back to top |
|
|
mark d
Samba Member

Joined: February 06, 2013
Posts: 219
Location: Costa Rica
|
| Posted: Thu Nov 10, 2016 6:05 pm Post subject: Re: 72 Westy - first bus |
|
|
beautiful, good on ya
_________________
1972ish westfalia
"what good are tractors without violins ?" jose figueres |
|
| Back to top |
|
|
Sloride
Samba Member

Joined: February 09, 2002
Posts: 926
|
|
| Back to top |
|
|
Schwing
Samba Member
Joined: May 10, 2009
Posts: 2506
Location: Centreville, MD
|
| Posted: Wed Dec 14, 2016 10:55 am Post subject: Re: 72 Westy - first bus |
|
|
Thanks for looking guys!
So I have been a busy bee, just not posting here a whole lot.
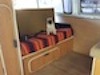
Now that the floor was done, it was time to install the rest of the furniture - jump seat, z-bed, and closet. But before I could install the closet, I needed to install the fixed curtain, and then I thought...hey I should just replace the window seal too.
Note, this pic is before I wet sanded and buffed to blend paint.
Next up was wood headliner: (had to seal the backside of my front section with a super thick marine grade poly, due to the mice and their odor). I wasn't able to find a replacement that was both correct, and matched so I worked with what I had.
Some interior shots. Oh I buffed the outside too and mounted all exterior lights.
Installed Front seats
Installing mount point for table leg. I used a square to be sure the leg was in the right position.
Yup it holds a beer, looks like a table to me.
Last but definitely not least! The engine build has begun. My son took most of these pics. The crankshaft is assembled and dropped into the case along with my Fat Performance Cam and new Cam gear, and of course new bearings. I used K2 Kuryl to seal the case halves, that's the green stuff.
_________________
Shadetree Westy
http://www.thesamba.com/vw/forum/viewtopic.php?t=657279&highlight=
Single Cab - BBXXVII Long Distance Winner
https://www.thesamba.com/vw/forum/viewtopic.php?t=...mp;start=0 |
|
| Back to top |
|
|
Schwing
Samba Member
Joined: May 10, 2009
Posts: 2506
Location: Centreville, MD
|
|
| Back to top |
|
|
khalimadeath
Samba Member
Joined: June 24, 2014
Posts: 768
Location: Reno, NV
|
| Posted: Wed Dec 14, 2016 8:55 pm Post subject: Re: 72 Westy - first bus |
|
|
Dang, nice work. Makes mine look like a hack job.
_________________
The United States Constitution
(c) 1787. All Rights Reserved
1970 Bus Westfalia
1964 Kombi |
|
| Back to top |
|
|
|


