| Author |
Message |
WHYYYTRYYY
Samba Member

Joined: June 30, 2016
Posts: 50
Location: Jackson, NJ

|
 Posted: Thu Dec 01, 2016 8:03 pm Post subject: Re: Sebring #249 official build thread Posted: Thu Dec 01, 2016 8:03 pm Post subject: Re: Sebring #249 official build thread |
 |
|
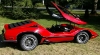
So my Sebring is sitting on its scavenged beetle chassis. No time for pictures tonight, just scouring for some information. I am trying to get the interior sealed up so I can start adding a few items...like seats. With no side windows in it currently, weather protection eludes me.
So, I found a few items that I hope will work for my Sebring. Hopefully someone more experienced with these cars can say for sure.
Latches and quick release hinges...will these work on a Sebring?
http://www.shop.sterlingsportscars.com/Side-window...IT-420.htm
Weatherstripping...is it worth it to get this kit, or is cheaper just to piece it together? I need it all anyway.
http://www.shop.sterlingsportscars.com/Special-3-in-1-rubber-kit-for-Sterling-KT-111.htm
Trying to start buying some parts tonight. Thanks for any help! |
|
| Back to top |
|
 |
Letterman7
Samba Member
Joined: March 14, 2004
Posts: 3198
Location: Downingtown, PA
|
| Posted: Fri Dec 02, 2016 12:10 pm Post subject: Re: Sebring #249 official build thread |
|
|
Window hinges.. yes, those will work. So will salvaged hinges from full size vans and mini vans (rear/side swing windows) for less than half the price. Check eBay for those. I like Dave at SSC, but sometimes his prices are a little wacked. The one advantage his hinges have is the quick release pull.. but if your hinge itself doesn't come apart to remove the window, it's not a necessary thing. Believe me, you don't want those windows flapping in the breeze.
Same deal for the weatherstrip. I think the Sebring takes a longer length around the canopy than the Sterling due to the different shape - measure that first. I've always bought my weatherstrip from, of all places, JC Whitney. They have decent prices and a fair selection. Choose the epdm rubber profiles rather than the solid profiles if you have large gaps to close. |
|
| Back to top |
|
|
jspbtown
Samba Member
Joined: January 27, 2004
Posts: 5155
|
| Posted: Fri Dec 02, 2016 12:38 pm Post subject: Re: Sebring #249 official build thread |
|
|
I agree with Letterman.....go for a stroll in a recycling yard or two.
Those handles are not Sebring/Sterling specific. They were made for a production car. Most likely a van. Maybe someone with a Sterling could see if theirs have any markings that could focus your search.
For weather stripping I have also used soffseal. They have LOTS of universal extrusions sold by the foot. |
|
| Back to top |
|
|
Letterman7
Samba Member
Joined: March 14, 2004
Posts: 3198
Location: Downingtown, PA
|
| Posted: Fri Dec 02, 2016 9:11 pm Post subject: Re: Sebring #249 official build thread |
|
|
| None of my hinges/latches had any kinds of marks. The best set I found, used on my first car, were from the old CR Laurence "His and Hers" sunroof sets. I had found a sunroof and hardware on eBay and stole the hardware for the car. The latch opened more than the OE set, and the hinges were able to be popped off the mount, making the glass easily removable. They have long been out of production though... but still occasionally find their way to market. Somewhere in my garage I have a set of Chevy Lumina van rear window hinges and latches... |
|
| Back to top |
|
|
WHYYYTRYYY
Samba Member
Joined: June 30, 2016
Posts: 50
Location: Jackson, NJ
|
| Posted: Tue Dec 20, 2016 12:14 pm Post subject: Re: Sebring #249 official build thread |
|
|
So, some work done: rebuilt the Bocar pict34 carb, since I had a rebuild kit from the beetle I bought. Tried running it but it stalls quickly at idle, same as before. Gonna check timing next and see if I can get this thing running right.
Mounted the windows. I just took a shot and bought 6 latches for a F150 side vent window. After mocking everything up, I hated it. They're way too big for this car. So I stole the window buttons from them and just bolted the windows in for now with some small brackets.
Bought some cheap ($59) 225lb linear actuators, and actually got the top to open and close. the problem is I had to make some new brackets and the lift and right sides have to be different to line up properly. I can't get each actuator to stay perfectly even with each other. I think I'm going to invest in heavy duty actuators with end point adjustment, hall effect switches, and a controller. $1100 for everything, so I gotta hold off on that for now.
Bought some cheap hood pins, ripped out all the lights, and started ordering replacements.
Decided to give buffing and waxing a shot to see what happens. This is after one mild buffing and cleaning. Much improved, and I'll get better results each time I give it a go.
|
|
| Back to top |
|
|
Letterman7
Samba Member
Joined: March 14, 2004
Posts: 3198
Location: Downingtown, PA
|
| Posted: Wed Dec 21, 2016 6:27 am Post subject: Re: Sebring #249 official build thread |
|
|
| I'll have to dig through my pile 'o parts. I might have two sets of the Sterling "Z" spring hinges for the windows. They should work (essentially, a piece of spring steel shaped like a Z). As for the cut and buff.. you can use something a little more aggressive. Try wet sanding with 3K grit paper, then compound and buff. You might be surprised. |
|
| Back to top |
|
|
woodoctr
Samba Member

Joined: June 01, 2013
Posts: 254
Location: Ohio
|
| Posted: Wed Dec 21, 2016 7:30 am Post subject: Re: Sebring #249 official build thread |
|
|
| Yep, I'd agree with Letterman7 there on getting more aggressive on that gel coat. For compound I'd go to something like 3M heavy duty compound on a twisted wool pad. That gel coat is between 12 to 20 mils thick according to the old Bremen literature so you won't easily burn through. The downside to all that work though.... if its' anything like my other Sebrings it quickly "chalks" back.... and I'm talking just a few days. On one of my cars I did a cut/buff on a Friday for a show and it was already hazing by Sunday morning on that sunny weekend. The upside is that existing gel coat makes a great surface for a new paint system. |
|
| Back to top |
|
|
Letterman7
Samba Member
Joined: March 14, 2004
Posts: 3198
Location: Downingtown, PA
|
| Posted: Wed Dec 21, 2016 8:01 pm Post subject: Re: Sebring #249 official build thread |
|
|
 Cut and buff and get the gelcoat back to snuff... then clearcoat the entire thing. You won't even need to buff it if you sand it down with 3K grit first, just clear right over the gel. The sanding will provide enough tooth for the clear to grip. Cut and buff and get the gelcoat back to snuff... then clearcoat the entire thing. You won't even need to buff it if you sand it down with 3K grit first, just clear right over the gel. The sanding will provide enough tooth for the clear to grip. |
|
| Back to top |
|
|
WHYYYTRYYY
Samba Member
Joined: June 30, 2016
Posts: 50
Location: Jackson, NJ
|
| Posted: Fri Dec 30, 2016 8:58 pm Post subject: Re: Sebring #249 official build thread |
|
|
So the chalkiness is inevitable I see, even with regular waxing. It's a shame, as it looked really good when it was freshly done. I'm leaning in the direction of Plasti Dip now. Already did a test and decided to PD the front bumper. Matte black with the glossifier on top. No pictures yet, but when I get everything back together tomorrow I'll post an update.
I also fabbed up some LED running lights for the front with 3D printed frames I made, since I couldn't find any alternatives to the 1981 Triumph TR7 orange Lucas units that the bumper seems specifically designed for. |
|
| Back to top |
|
|
woodoctr
Samba Member
Joined: June 01, 2013
Posts: 254
Location: Ohio
|
| Posted: Sat Dec 31, 2016 7:14 am Post subject: Re: Sebring #249 official build thread |
|
|
| Plasti Dip doesn't hold up for long on that "needle nose," just ask me how I know.... I have had more luck doing a faux carbon fiber wrap up there divided into sections. It looks good and I just replace it every 2 to 3 years. Takes me about 45 minutes to wrap it now. Much easier to keep clean, too. Bugs don't embed themselves in it..... |
|
| Back to top |
|
|
WHYYYTRYYY
Samba Member
Joined: June 30, 2016
Posts: 50
Location: Jackson, NJ
|
| Posted: Sun Dec 24, 2017 4:01 pm Post subject: Re: Sebring #249 official build thread |
|
|
So it's been a ridiculously long time since I updated this. Much has happened...so I'm torn between posting current pics now and ruining the story line, or continuing the 'build process' thread. I have hundreds of pictures of this build, but I'll post a slightly condensed version I suppose. Keep in mind it's been a year since my last update, and as always life gets in the way, so it's still not done. Hopefully driveable by the end of January! Anyway, picking up (roughly) from where I left off in 2016...
Couldn't find interesting running lights that matched the cutouts in the bumper, so I doubled up on white LED thin lights, built brackets to mount them, and 3D printed custom frames I designed to fit the opening. Also plastidipped the front bumper. **SPOILER** Plastidip sucks! Started peeling off within a month. Car barely moved between parking spots in that time. (woodoctr called it!)
|
|
| Back to top |
|
|
WHYYYTRYYY
Samba Member
Joined: June 30, 2016
Posts: 50
Location: Jackson, NJ
|
| Posted: Sun Dec 24, 2017 4:18 pm Post subject: Re: Sebring #249 official build thread |
|
|
Pulled headlight buckets to give them a sprucing up...
Also found some seats that fit nicely. Test fitting while paint is drying...
Some clean up, painting, and a nice LED upgrade, and headlights are looking decent.
Cleared all the crap out of the front compartment. Time to rebuild. Started by using a linear actuator to raise the headlights.
Hooked it up to a remote system I had for the actuator to test, video on my facebook
https://www.facebook.com/charles.accisano/videos/1367455349965953/
Also found some tail lights I like. These are smoked LED replacements for a Mercedes G wagon. Test fitting...
|
|
| Back to top |
|
|
woodoctr
Samba Member
Joined: June 01, 2013
Posts: 254
Location: Ohio
|
| Posted: Sun Dec 24, 2017 9:17 pm Post subject: Re: Sebring #249 official build thread |
|
|
| Just glad to see you are moving forward on it....lots of stuff interrupts kit car builds/restorations. Nice bright rear lights there....trust me with the small profile the back of these cars present you can't be too bright on the road..... |
|
| Back to top |
|
|
BIGMIKEY
Samba Member

Joined: September 24, 2007
Posts: 1104
Location: North East Pennsylvania
|
| Posted: Mon Dec 25, 2017 11:05 am Post subject: Re: Sebring #249 official build thread |
|
|
WT;
Great that you are back at this project. Love the Sterling/Sebring style bodies.
Did your donor bug body go to a good home?
Mike T
_________________
BIGMIKEY
Deserter Series 1 project.
https://www.thesamba.com/vw/forum/viewtopic.php?t=787047&highlight=
1973 Beetle Driver, Marina Blue. |
|
| Back to top |
|
|
Wetstuff
Samba Member
Joined: September 23, 2010
Posts: 700
Location: Maryland
|
| Posted: Thu Dec 28, 2017 10:36 am Post subject: Re: Sebring #249 official build thread |
|
|
WY, Not my beverage of choice, but I impressed with what you are doing with it. You are lucky to have good skills. Those headlamps look predatory. Press on.
Jim
_________________
Manx #2614 |
|
| Back to top |
|
|
WHYYYTRYYY
Samba Member
Joined: June 30, 2016
Posts: 50
Location: Jackson, NJ
|
| Posted: Wed Jan 03, 2018 7:35 pm Post subject: Re: Sebring #249 official build thread |
|
|
Thanks guys. Again, car is much further along now, I'm just going to continue posting the build process when I have time til I catch up to it's current status.
And yes, word got around to a very nice guy that ended up buying the beetle body and getting it back on the road with a chassis he was working on.
Anyway, on we go...
Added some light strips up front. White comes on with running lights, amber with turn signals. The white looks great, however amber is kind of dim. I ended up adding additional signals up front, which you will see later in the build. Testing operation...
At this point in time I had decided to go with a simple climate control system...basically meaning none. All I wanted was a blower to get some air flowing in from outside the cabin to help keep the windshield clear. A/C may be coming down the road, but I learned when you are building a kit car at your job on a time limit that concessions will be made in the name of expediency. So I got the welder out and made something happen.
Drilled some hole in the body...
Tubes to go from cabin to front compartment...
Making some air ducts...
Made some interior air vents for the top of my dash on the 3D printer. You spin the black ring and the red wings open up to let air flow. I was also going to make small risers that these will sit on, however I kinda slacked on that and haven't accomplished it this time. Eventually...
|
|
| Back to top |
|
|
WHYYYTRYYY
Samba Member
Joined: June 30, 2016
Posts: 50
Location: Jackson, NJ
|
| Posted: Wed Jan 03, 2018 7:57 pm Post subject: Re: Sebring #249 official build thread |
|
|
Did a little weatherstripping to help keep some water out. For the big canopy seal I ordered the fattest D style 3M VHB weatherstripping that Trim-Lok had. Unfortunately, it was damn expensive because the minimum order was 100 feet. It's been on for months though, and no leaks. Ha! Ya right. There's still plenty of places to leak, but not one drop around the actual canopy itself. So this stuff is awesome. Couldn't figure out a good way to seal the front compartment, so I tried out a J-style drip rail from Trim-Lok and tried to corral the water to a front drip hole. It kind of works. Still needs a little tweaking.
You'll also see the blower motor mounted right under the headlight bar. I was actually very impressed with how this came out. It looks like a factory component tucked in spot made specifically for it. At work we had some extra heavy duty bus blower motor assemblies floating around. I took one, cut off the second fan assembly and shaft off the motor, and it worked out nicely.
I decided to go with a dual battery setup, mainly for the reason that I can and I will. The beauty of building your own fantasy car Made a bracket to mount and slightly elevate the battery trays, and mounted the battery selector switch.
|
|
| Back to top |
|
|
WHYYYTRYYY
Samba Member
Joined: June 30, 2016
Posts: 50
Location: Jackson, NJ
|
| Posted: Wed Jan 03, 2018 8:39 pm Post subject: Re: Sebring #249 official build thread |
|
|
Started gathering electrical components and assembling harnesses. As I usually do, I'm overdoing it on everything. All the wiring used on the car is pure copper 12 AWG, with 16 AWG being used for signal wires. Every single terminal is crimped and soldered and heatshrinked. All wires are bundled and loomed and all the connectors are weatherpacks.
Since I really wanted to BUILD this car, I tend to get kits instead of assembled items when possible. So I purchased three relay boxes and wired em up accordingly. Found a nice program to make my own wiring diagrams as well.
Here's what $500 in switches and custom actuators looks like
|
|
| Back to top |
|
|
WHYYYTRYYY
Samba Member
Joined: June 30, 2016
Posts: 50
Location: Jackson, NJ
|
| Posted: Wed Jan 03, 2018 9:03 pm Post subject: Re: Sebring #249 official build thread |
|
|
Couldn't work with that swiss cheese of a dash, so I cut it out. Making a new aluminum plate to mount in that spot, and the whole dash will be covered.
Ordered some sweet new pedals. Pegasus Racing sent me the wrong ones initially (not their fault, packaged wrong), but immediately had the correct ones sent from England. Great company to deal with. The pics show both sets of pedals. The ones I wanted are the sweet billet aluminum set on the left. MASSIVE upgrade from the stock nonsense. In a few days I'm post all the chassis mods and upgrades that have been done. Here's just one of three carts that were full of $1000's worth of cool new stuff!
|
|
| Back to top |
|
|
TSFR
Samba Member

Joined: May 14, 2013
Posts: 365
Location: Columbia, SC
|
| Posted: Thu Jan 04, 2018 7:16 am Post subject: Re: Sebring #249 official build thread |
|
|
There's not much better in the world than when people do over the top builds. Thanks for sharing!
_________________
Thanks,
Jeff
Manxter 2+2 #160 |
|
| Back to top |
|
|
|


