| Author |
Message |
BL3Manx
Samba Member
Joined: August 29, 2006
Posts: 6767
Location: Northern California

|
 Posted: Sat Apr 30, 2016 3:06 pm Post subject: Re: Fresh from Storage Posted: Sat Apr 30, 2016 3:06 pm Post subject: Re: Fresh from Storage |
 |
|
| Great upgrades! |
|
| Back to top |
|
 |
stevemariott
Samba Member

Joined: November 09, 2003
Posts: 1052
Location: Portland, OR
|
| Posted: Sat May 14, 2016 10:09 pm Post subject: Re: Fresh from Storage |
|
|
Thanks for the kind words, guys! I appreciate it.
Progress is slow, but steady. Sometime late last year, I picked up a pair of 14 x 7 (thought they were 6.5) steel wheels. I've always wanted a set of stock widened 14s for the front, but anytime I came across a pair they were too much $$ or too far away. These were reasonably priced, but rusty and crusty as all get-out.
I could have had them sandblasted, but that's far too easy. Instead, I simply spent a ridiculous amount of time with my 1/2" drill, a wire cup brush, and a bunch of sandpaper. Upon closer inspection, I could make out the word, "ELECTROFUSE" on the inside of each rim. Some quick research tells me the rims likely began life on a GM or Chrysler product way back when, before being paired with VW centers at some point decades ago. Pretty neat!
As far as color goes, stock painted rims in a creamy white really fit the early Manx vibe I was going for, so I picked up the appropriate color on the way home from work one day, along with white primer. Several days of painting, drying, sanding, and repainting later, and we're looking pretty good:
I left the hubcap clips on, although I won't be running hubcaps.
I wrestled with tire choices for a long time, but I really just wanted a simple blackwall tire with fairly basic tread that wasn't too wide. I would love some Coker bias-ply repops, but they don't fit within my meager budget. 205/70/14s fit the bill nicely, mounted and balanced at the local tire shop:
Initial fitting, a couple of days ago:
This morning I wrestled with the Avis adjusters on my adjustable front beam and raised the nose up about an inch and a half.
I'm pretty stoked! Its beginning to look like I had always imagined it. Up next: new gas tank, and updated rear tires / wheels.
_________________
1963 Manx copy
1968 Bus |
|
| Back to top |
|
|
stevemariott
Samba Member
Joined: November 09, 2003
Posts: 1052
Location: Portland, OR
|
| Posted: Tue Aug 23, 2016 11:31 pm Post subject: Re: Fresh from Storage |
|
|
Recently my wife unearthed a couple of photos that I hadn't seen for a long time.
This photo is circa 2000, when I had just put it together after paint, but hadn't gotten covers for the seats or built the rear tray (to cover the battery and spare tire well).
A couple of months later, I brought the car to the Rose City Bug In. I had pulled an all-nighter prepping the car to show, doing all sorts of detail work and polishing everything (including the Kadron carburetors  ). It wasn't a show car by any means, but I had done a pretty nice job with it cosmetically and I was proud of how it had turned out. I was outdone that day by a non-running, flamed, full-custom Manx that was brought in on a trailer and pushed / parked right next to mine (and was later featured in Hot VWs). Needless to say, I didn't win ). It wasn't a show car by any means, but I had done a pretty nice job with it cosmetically and I was proud of how it had turned out. I was outdone that day by a non-running, flamed, full-custom Manx that was brought in on a trailer and pushed / parked right next to mine (and was later featured in Hot VWs). Needless to say, I didn't win  Frustrated, I drove home and immediately began taking the Kadron 1600 out so I could install the 78.4 x 90.5 Weber motor I had nearly finished at that point. Frustrated, I drove home and immediately began taking the Kadron 1600 out so I could install the 78.4 x 90.5 Weber motor I had nearly finished at that point.
Anyway, back to the present . . .
A couple of months ago, I drove 75 miles to buy a parts stash from Craigslist that included a glasspack header and a ton of miscellaneous VW parts. I had really wanted a sidewinder setup from Meyers Manx, but I couldn't justify the price (and I wanted it white, or black - not ceramic coated silver). This used piece had the upswept pipes that go above the valve covers that I wanted, and the glasspack and flared chrome tailpipe looked period-correct.
Once I got home, I immediately mocked it up to see how it would fit on the stock 1600 I had stashed in my folk's garage since 2000.
With the shorty Kadron manifolds, it all fit! BARELY.
The manifolds need a slight amount of clearancing to be safe, but it all works. The best part is that the short manifolds allow me to use full-size Kadron filters - in 2000, with standard aluminum manifolds, I had to run "pod" filters to fit the Kads under the body. They worked okay, but weren't ideal.
Moving on, I disassembled, lubed, and reassembled the front suspension. Years ago, I had removed the stock front beam and installed a new aftermarket beam with Avis adjusters to bring the front end down. Something I failed to notice at the time was that the bushings that surround the torsion arms (needle bearings on a stock beam) were very tight, and barely allowed the torsion arms to rotate at all  Many hours of finagling later, and I had a front suspension that actually moved up and down. Many hours of finagling later, and I had a front suspension that actually moved up and down.
Upon reinstalling it, I also added caster shims:
Moving on to the brakes - nearly a year ago I purchased a new Varga dual-circuit master cylinder to replace the single-circuit setup I had installed in probably 1999. A seller on the samba was advertising Volvo 240 master cylinder reservoirs that snap right into the beetle dual-circuit master cylinders, so I ordered one from him.
It's actually a really nice piece, and fit right on.
To plumb the dual-circuit master cylinder, I was able to tweak the passenger side hard line to fit, and found a suitable line for the driver's side setup from my new parts stash. While I had it all apart, I replaced the main line that goes from the front to the rear because . . . well, better now than later.
_________________
1963 Manx copy
1968 Bus
Last edited by stevemariott on Fri Sep 02, 2016 4:13 pm; edited 1 time in total |
|
| Back to top |
|
|
stevemariott
Samba Member
Joined: November 09, 2003
Posts: 1052
Location: Portland, OR
|
| Posted: Wed Aug 24, 2016 9:26 pm Post subject: Re: Fresh from Storage |
|
|
Moving on to the clutch - I thought I had a decent early 200mm pressure plate somewhere in my parts stash, but the only ones I had were junk. No clutch discs either. I did find a nice late pressure plate, but it wouldn't work with the heavy duty cross shaft and throwout bearing setup I had installed years ago. This meant I'd be buying a new clutch kit.
After doing some research, I found that the late ('71-up) pressure plate and guide tube setup was VW's improved design, as the throwout bearing clips could come off of the earlier version in some instances - I guess if parts were worn or not aligned correctly. Thinking back, I remembered how that exact thing had happened to me at some point, and I might as well upgrade to the late style setup if possible. I looked behind the throwout bearing on my swingaxle, and there were the three studs for the guide collar that the late pressure plate uses. Whoo!
I ordered up a new clutch disc, a late throwout bearing, a throwout bearing collar, and a '71-72 heavy duty cross shaft to replace my early setup. The pressure plate I'd be using had originally come with the 1600 when I pulled it all from a squareback years ago.
Removing the old cross shaft was a little tricky, but I had it all out in reasonable time.
Installing the new setup looked to be fairly simple - I just had to find 3 nuts for the throwout bearing collar. I dug through my fairly decent stash of hardware, and could only find ONE that would work. Turns out it's an M7 x 1.0 nut - not something the local hardware store has in stock. They directed me to a very small, mom and pop type hardware store and they had them. Apparently the M7 is a pretty oddball size, at least that's what both hardware guys told me.
Once I had the correct M7 hardware, the throwout bearing collar, new cross shaft, and new throwout bearing went in easily.
_________________
1963 Manx copy
1968 Bus |
|
| Back to top |
|
|
stevemariott
Samba Member
Joined: November 09, 2003
Posts: 1052
Location: Portland, OR
|
| Posted: Sun Feb 19, 2017 11:14 pm Post subject: Re: Fresh from Storage |
|
|
Long time, no posts - mostly because Ive been collecting parts and taking care of various non-picture-worthy jobs on the car.
The stock 1600 I was planning to use had sat on a garage floor for 16 years, so I figured Id tear it down to the short block to see how it looked. Once I was at the short block, I figured Id tear it down a little further . . . why not? Pretty soon I had the case split, and I had the whole rotating assembly on the workbench. While Im glad I tore the engine down to clean up the huge amount of sludge at the bottom of the engine case, I realized that I should probably replace a few pieces while it was all apart.
Pistons and cylinders arent in amazing shape, I should probably replace the main and rod bearings while Im at it, Id love to add some sort of oil filter, and while the heads look great, I should do a valve job too . . . Well its a slippery slope - pretty soon I had put together a parts / labor list of $500+ just to refresh the engine as it was, and I realized I would be putting much more money into it than I wanted to for a stock crankshaft 1600. 
To make a long story short, a couple weeks later I drove 100 miles to relieve my 68 Bus (in storage) of the 2028cc type 1 I had built for it 11 years prior. Sorry, Bus, your old heart will be replaced with a stock 1600 soon enough.
The 2028: fully balanced 78.8 x 90.5, 12 lb. flywheel w/Kennedy Stage 1, 40x35 heads with mild ports by A.J. Simms, Engle 110 cam w/1.25 rockers, 8.4:1, Berg oil pump w/full flow, Berg 1.5 qt. deep sump, 40mm Dellorto DRLAs, 034 distributor with Pertronix Ignitor, and a Mallory Hyfire CDI. Years ago, it made my bus really fun to drive! For my Manx, Id like to bump up the cam and compression sometime down the road, but for now it should move my buggy around pretty good as-is.
Years ago, I used Type 3 manifolds and Berg linkage in my bus to make room for an Eberspacher BN4 gas heater.
Given the lack of space around the engine in my Manx due to the body, the Type 3 manifolds would work great again. A mock up:
2001, with 44IDFs and Tayco linkage. It all barely fit; the tall CB Performance manifolds meant I couldn't run filters at the time.
I held onto the 1-5/8" merged header from years ago, and tossed it on to see what it would look like. The upswept header I picked up for it some time ago won't fit with the Dells, but the #1 and #4 pipes on this setup won't let me run the thermostat . . . I didn't really care before, but I'd like to run one now. I think a Tri Mil might work best, but that's something else I'd have to buy, so we'll see . . .
I also tossed on the full-flow mount that bolts onto the #4 exhaust studs - I had thought that it might hang the whole setup too low, but I think it should work okay. The one I ran years ago mounted the filter higher, but it was a little too flimsy to use.
Problem is, the low body line in my Manx meant that the Berg carb linkage that I had run in my bus wouldnt work. After researching the possibilities, I bought a Vintage Speed / Carreraparts push-pull linkage setup.
http://carreraparts.com.tw/index.php/vw-best-linkage/best-linkage-detail
Nice quality parts. I love the look and feel of the Berg linkage, but this is a nice setup too.
With a couple minor mods, they work GREAT. Whoo hoo! Im not crazy about the downward angle of the linkage arms, but both carbs smoothly open and close as they should, so Im happy.
_________________
1963 Manx copy
1968 Bus |
|
| Back to top |
|
|
Ken
Samba Member
Joined: November 14, 2005
Posts: 129
Location: Spokane, WA.
|
| Posted: Sat Mar 11, 2017 7:39 pm Post subject: Re: Fresh from Storage |
|
|
| Nice, I especially like the garage picture..... A Buggy on one side, and a Model A on the other. A lot like my garage!! |
|
| Back to top |
|
|
stevemariott
Samba Member
Joined: November 09, 2003
Posts: 1052
Location: Portland, OR
|
| Posted: Sun Apr 30, 2017 9:42 am Post subject: Re: Fresh from Storage |
|
|
Thanks, chopper impala! My dad still has that Model A, but he's since restored it to stock.
Long time, no posting - lots of progress in the garage, but mostly lots of tedious work.
After thinking over my exhaust options, I decided to use a Tri-Mil Bobcat so I could use a thermostat and full tin. I realize that not many people run a thermostat and tin on their buggies, but I buy into the engine longevity aspect of running one, and Ive already collected all of the parts. Beyond that, I had already bent up my own version of the industrial tin to fill in the gap where heater boxes would normally go.
I purchased a used 1.5 Bobcat off of Ebay, and began to mock up parts. Uh oh.
The type 3 manifolds barely fit inside the #3 header pipe, but the DRLA accelerator pump doesnt clear it. Doh!! The #1 header pipe fits just fine.
After considering phenolic spacers, I decided to just find another set of intakes. Intakes that would be tall enough to clear the Tri-Mil I had just bought, but hopefully short enough to fit under the body. I found a used set of short manifolds (ARPM?) in the Samba classifieds and sent off more funds from my PayPal account.
Fortunately, these were tall enough so that the LH manifold would clear the #3 header pipe with minor clearancing. In addition to that, my new linkage would look more normal with these manifolds.
I mocked everything up on the long block, tossed it in the car, and it all fit -barely. Well, the RH DRLA is fairly close to the body, and will require a shorter (2-1/2) filter than what I already have (3-1/4). What a headache! More parts to buy, I guess.
With that, I pulled the engine out, threw it on the stand, and disassembled the engine down to the case to fix an oil leak.
Time-Serts are expensive, but work great.
After building a few generally leak-free engines using Permatex Aviation, I decided to use Three Bond 1211 on the case halves for this build.
After weeks of meticulously inspecting clearances and reassembling the long block, installing all of the tin, disassembling, inspecting, and reassembling the carbs, and buying a battery, I assembled a temporary engine start stand with an old transmission. For my birthday, I took the day off of work and ran wiring for the ignition and starter, and a fuel source.
After fixing some wiring errors, and hooking up fuel lines to the pump correctly (always important), the engine coughed to life for the first time in 9 years. Whoo!!! Sorry, no pics.
With that, I bolted it into the car and setup the pedal assembly. More to come.
_________________
1963 Manx copy
1968 Bus |
|
| Back to top |
|
|
wythac
Samba Member

Joined: August 02, 2004
Posts: 2791
|
| Posted: Sun Apr 30, 2017 11:43 am Post subject: Re: Fresh from Storage |
|
|
Good fun and good documentation of your (re)build. Nice work. I'm guessing that you might have the ambition of having it on the road this spring or summer?
I noticed that in your old pics you had the same oil filter block mounted on the exhaust studs on the LH rear of the motor, so you must not have had any sump draining damage experience to inspire a change of location for the oil filter. That would make me nervous coming and going from parking lots and backing up on anything but a flat surface. But if you've had good luck with that configuration, no need to fix something not broken, right?
Love the wheel/tire combo. Looks great. |
|
| Back to top |
|
|
stevemariott
Samba Member
Joined: November 09, 2003
Posts: 1052
Location: Portland, OR
|
| Posted: Sun Apr 30, 2017 1:36 pm Post subject: Re: Fresh from Storage |
|
|
| wythac wrote: |
Good fun and good documentation of your (re)build. Nice work. I'm guessing that you might have the ambition of having it on the road this spring or summer?
I noticed that in your old pics you had the same oil filter block mounted on the exhaust studs on the LH rear of the motor, so you must not have had any sump draining damage experience to inspire a change of location for the oil filter. That would make me nervous coming and going from parking lots and backing up on anything but a flat surface. But if you've had good luck with that configuration, no need to fix something not broken, right?
|
Wythac,
Thanks, I really appreciate it! The goal is to definitely have it on the road this summer. I would LOVE to make it to some of the larger events here in the NW, but we'll have to see how much I'm able to complete. I'll be happy enough if I can finally drive it around the neighborhood.
I was concerned that the filter would be too low. While it's not as high as I had previously mounted it, it sits up higher than the my oil sump, and I've never had issues bottoming that out on anything. That, and this is definitely a street buggy - I have no off-road plans for it.
| wythac wrote: |
| Love the wheel/tire combo. Looks great. |
Thanks! I guess my car is looking a lot more like yours all of time!
_________________
1963 Manx copy
1968 Bus |
|
| Back to top |
|
|
stevemariott
Samba Member
Joined: November 09, 2003
Posts: 1052
Location: Portland, OR
|
| Posted: Tue Jul 18, 2017 10:59 pm Post subject: Re: Fresh from Storage |
|
|
Lots of slow, but continuous progress since my last post.
Years ago when I originally put the car together, I built it without a dash frame because . . . it never had one - I dont even think I had seen a picture of a dash frame at the time. I had made up a column drop out of sheet steel, had it welded onto my late beetle column, and bolted the whole thing onto the fiberglass dash. The windshield frame bolted onto the hood alone. It worked, but was obviously not the most robust setup.
This time around, I wanted to run an early column, and use a dash frame to tie the whole windshield, hood, and dash assembly together. After looking at pics of various dash frames, and mocking everything up piece by piece, I made my own frame out of steel stock with my buzzbox flux core welder. It's definitely not the most amazing piece of engineering, but it works just as I planned, and even uses the stock early beetle column mount to hold the column to it.
Early pic:
With the dash off, I filled in the area around the column and the huge holes in the dash where I had previously run a 914 tach and speedo. I forgot how . . . fun . . . it was to work with fiberglass. After multiple applications of fiberglass and Bondo, I cut a hole for a stock VW speedo. I also 'glassed in the mounting bolts on the backside so that they wouldn't be seen on the dash face.
Mockup:
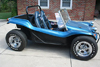
Finally getting around to the rear tires, I replaced the 255/60/15s with 235/70/15s. Taller and narrower, theyre a better fit for the look Im shooting for.
255/60 vs. 235/70:
On an 8" rim:
Side view:
On a recent road trip to Boise, I had planned to drop by the local shops to look for various odds and ends. Unfortunately, Bow Wow VW had just closed down after 46(?) years of business  Allans Automotive did service work, but didnt really have any parts for sale. They did, however, direct me to the Bug Ranch in nearby Mountain Home, that supposedly had a chrome Manx front bumper I was looking for. I paid a little more than I would have liked, and I cant say for certain that its the genuine item, but it makes for a fun parts-hunting memory and still looks enough the part. Allans Automotive did service work, but didnt really have any parts for sale. They did, however, direct me to the Bug Ranch in nearby Mountain Home, that supposedly had a chrome Manx front bumper I was looking for. I paid a little more than I would have liked, and I cant say for certain that its the genuine item, but it makes for a fun parts-hunting memory and still looks enough the part.
More to come.
_________________
1963 Manx copy
1968 Bus |
|
| Back to top |
|
|
stevemariott
Samba Member
Joined: November 09, 2003
Posts: 1052
Location: Portland, OR
|
| Posted: Wed Aug 30, 2017 9:34 pm Post subject: Re: Fresh from Storage |
|
|
More steady progress since my last post. My schedule this summer allowed me a few solid weeks of wrenching for several hours at a time, so I was able to get a lot of work done.
I made up my own bumper mounts out of steel stock, then mocked up my new old bumper to see where it would look best. Once I had it "right" I tacked it in place, then disassembled the whole thing to weld the mounts securely.
I also picked up a few parts at the Woodburn VW swap meet. I wanted to use 60s Ghia turn signals up front, and picked up a pair for a pretty reasonable price. Along with some other random pieces that followed me home.
Altogether, with new lenses, were looking pretty good:
Next up was the fuel tank. About a year ago I picked up a new late model tank from a guy on Craigslist that accidentally ordered two:
After some careful mocking up, I had a friend (with considerably better welding skills than me) relocate the filler, fill in the old inlet, and relocate the outlet on the bottom some months back.
I was finally ready to use it, so I coated inside with POR-15 and repainted the outside (sorry, no pic).
In the meantime, the car was ready for wiring. I mounted the fuse block on a piece of sheet aluminum high up on the firewall, along with ground bars front and rear. To keep it simple, I used a Signal Stat 900 universal turn signal switch. I wouldve liked to use an early OE switch, but the Signal Stat was really straightforward to wire up, and doesn't look entirely out of place, so I cant complain much.
'68 speedo, dash in primer, and spaghetti-mess wiring in progress:
Some time later, after nearly two years of chasing parts, researching, mocking up pieces, and wrenching, I was able to drive the car for the first time since 2001.
So amazing to have it move under its own power! My wife was impressed as well:
I still have to mount the windshield, roll bar, headlights, wipers, and take care of some other small projects, but the big parts are done.
Up next: chopping a couple inches from the windshield and polishing the frame.
_________________
1963 Manx copy
1968 Bus |
|
| Back to top |
|
|
joey1320
Samba Member
Joined: September 12, 2006
Posts: 2325
Location: Cleveland, OH
|
|
| Back to top |
|
|
Wetstuff
Samba Member
Joined: September 23, 2010
Posts: 700
Location: Maryland
|
| Posted: Fri Sep 01, 2017 9:21 am Post subject: Re: Fresh from Storage |
|
|
Love the way you sniff around for good parts, Steve. Press on.
Jim
_________________
Manx #2614 |
|
| Back to top |
|
|
stevemariott
Samba Member
Joined: November 09, 2003
Posts: 1052
Location: Portland, OR
|
| Posted: Fri Sep 01, 2017 11:04 pm Post subject: Re: Fresh from Storage |
|
|
Thanks joey1320 and Jim!
_________________
1963 Manx copy
1968 Bus |
|
| Back to top |
|
|
oprn
Samba Member

Joined: November 13, 2016
Posts: 12743
Location: Western Canada
|
| Posted: Sat Sep 02, 2017 4:24 am Post subject: Re: Fresh from Storage |
|
|
Keep up the good work. I like the vintage look of your wheels.
Yellow rules!
|
|
| Back to top |
|
|
stevemariott
Samba Member
Joined: November 09, 2003
Posts: 1052
Location: Portland, OR
|
| Posted: Sat Sep 02, 2017 11:26 pm Post subject: Re: Fresh from Storage |
|
|
Thanks, oprn!
_________________
1963 Manx copy
1968 Bus |
|
| Back to top |
|
|
stevemariott
Samba Member
Joined: November 09, 2003
Posts: 1052
Location: Portland, OR
|
| Posted: Sun Jan 21, 2018 10:27 pm Post subject: Re: Fresh from Storage |
|
|
Long time, no posts. Been busy though.
A few weeks back I stopped by the main city library. I wanted to dig through some old phonebooks to see if I could find any info or advertisements from my buggy body's manufacturer, Action Products - Portland, OR (not Action Fiberglass of California).
Nothing was listed for 1969, but 1970 though '73 listed this:
This location still exists, but an insurance agent is located there now. Funny, I live within a few miles of this location.
I don't believe anything was listed for '74, but '75 or '76 showed a different address and this advertisement:
Not exactly what I was hoping for, but still really eat to see. This location still exists as a U-Pull-It wrecking yard.
Other neat ads:
I actually visited this shop in Vancouver maybe 3 or 4 years ago when it was still open, but I don't believe it is there anymore.
Anyway, back to the car.
I was unsatisfied with the dash frame I had made, so I built a new one that was considerably better engineered than the first.
I also had to fill some spots on the sides of the dashboard where it meets the body, so I ended up refinishing the whole dash. I am tired of working with fiberglass.
I decided I wanted to chop my windshield, but I only a subtle amount. After doing some research and playing around with different heights, I decided on a 1-3/4 chop. The same glass shop that cut my windshield nearly 20 years ago cut my windshield down for $30, not too bad.
In the process of chopping the frame, I made a mistake or two, and ended up replacing it altogether with a frame I had picked up as part of a parts stash a year or so ago. Thank goodness I had it around to use.
Today I bolted on the Talbot mirror and pulled it out of the garage. More to come (roll bar, tach, engine stuff), but its finally back in one piece again.
Compare it to the pic of the car in 2000 with the stock-height windshield (18 years ago!):
_________________
1963 Manx copy
1968 Bus
Last edited by stevemariott on Sun Jan 21, 2018 11:04 pm; edited 1 time in total |
|
| Back to top |
|
|
andygere
Samba Member

Joined: January 31, 2014
Posts: 600
Location: Central Coast, CA
|
| Posted: Sun Jan 21, 2018 11:00 pm Post subject: Re: Fresh from Storage |
|
|
| Looks great, I've been enjoying following this build. It should be pretty quick too! |
|
| Back to top |
|
|
herbsflat4
Samba Member
Joined: February 20, 2012
Posts: 159
Location: Greenville, SC
|
| Posted: Mon Jan 22, 2018 10:37 am Post subject: Re: Fresh from Storage |
|
|
You have a great looking buggy! Congrats on all the progress.
Do you know the offset for the front and back wheels? They look great. Also, did you narrow the front beam any?
Thanks! |
|
| Back to top |
|
|
aluk
Samba Member
Joined: October 29, 2016
Posts: 67
Location: Las Vegas NV
|
| Posted: Mon Jan 22, 2018 3:18 pm Post subject: Re: Fresh from Storage |
|
|
| herbsflat4 wrote: |
You have a great looking buggy! Congrats on all the progress.
Do you know the offset for the front and back wheels? They look great. Also, did you narrow the front beam any?
Thanks! |
I am curious about the wheels too. How deep are the back ones? 8 or 10 in.?
(Edit) oops, sorry. I read it, 8 in.
_________________
"It's all a matter of what you like. That's the great thing about buggies and kit cars. I'm going for a pseudo/updated/old school/semi-clean look".
Last edited by aluk on Mon Jan 22, 2018 10:47 pm; edited 1 time in total |
|
| Back to top |
|
|
|


