| Author |
Message |
3foldfolly
Samba Member
Joined: March 08, 2009
Posts: 894
Location: Edwardsville, Il

|
|
| Back to top |
|
 |
Chrisisw
Samba Member

Joined: May 30, 2004
Posts: 148
Location: Amsterdam, Holland, Europe
|
 Posted: Sun Nov 05, 2017 6:32 am Post subject: Re: January 1954 oval engine resurrection Posted: Sun Nov 05, 2017 6:32 am Post subject: Re: January 1954 oval engine resurrection |
 |
|
Thank you for your reply. I have used this thread as a guiding reference for the collection of parts as you can read in my initial post.
However, I could not find the answers to my questions there. So if anyone can help with the answers that would be great:
* The tar board insulation in the engine compartment is pretty dirty. As this is the original insulation from 1954 I do not want to ruin it. What is the best way to clean this insulation as there seems to be years and years off mud and crud on it?
* Should the lower pulley nut in the picture above be metal colored or painted black?
* Finally, in the engine compartment there is an electrical connector. Is this connector correct or is this an addition to the car from the past?
Well continue the build on tuesday. |
|
| Back to top |
|
|
Rome
Samba Member
Joined: June 02, 2004
Posts: 9651
Location: Pearl River, NY
|
| Posted: Sun Nov 05, 2017 2:00 pm Post subject: Re: January 1954 oval engine resurrection |
|
|
| Quote: |
| * The tar board insulation in the engine compartment is pretty dirty. As this is the original insulation from 1954 I do not want to ruin it. What is the best way to clean this insulation as there seems to be years and years off mud and crud on it? |
Push the rear of the car outside your garage so that the engine compartment overhangs the driveway, then:
1. Cover your transmission bellhousing with a garbage bag so it does not get wet or dirty
2. Use a compressed air nozzle held about 2 feet away, always pointed downwards, to blow off dirt. Don't get closer than 2 feet in case the air blast digs into the insulation
3. Using either a garden hose with a spray nozzle or a spray bottle, spray the surface with water, starting at the top. Very low pressure from the hose, "fan"-shaped pattern; passing the nozzle side to side as if you were painting the car. Don't saturate the surface, just get it wet so that the water drips down and carries the surface dirt off by itself.
4. Use a multi-purpose household cleaner (in the USA, example is SimpleGreen) diluted 50% in the spray bottle. Spray a mist across the damp surface. Wait 1/2 minute for the cleaner to work in. You'll see the drips coming down being dirty from carrying off the surface dirt.
5. Use a sponge to wipe the insulation off, working the sponge in one direction only such as straight down from the top. I would hesitate using a soft brush in case the bristles would loosen the insulation material that is wet.
6. Give the insulation a final clean-down misting with water. When the washed-off water is clear and no longer dirty, you've been effective.
7. Let the insulation dry overnight. If it is cold outside, like below 5C, push the car back into the garage if it is heated.
Wipe off each of your engine compartment wires with a rag or paper towel sprayed with a mild lubricant such as WD-40, Caramba, etc.
This technique has worked well for me on my '64 Ghia which had its original formed insulation on the firewall and the wheelwells; also on a '56 Beetle about 30 years ago.
You have a beautiful Beetle! |
|
| Back to top |
|
|
Chrisisw
Samba Member
Joined: May 30, 2004
Posts: 148
Location: Amsterdam, Holland, Europe
|
| Posted: Mon Nov 06, 2017 12:29 pm Post subject: Re: January 1954 oval engine resurrection |
|
|
| Thank you Rome for you compliment and extensive description. It is much appreciated and we will definitely give it a try. |
|
| Back to top |
|
|
Chrisisw
Samba Member
Joined: May 30, 2004
Posts: 148
Location: Amsterdam, Holland, Europe
|
| Posted: Thu Nov 09, 2017 10:15 am Post subject: Re: January 1954 oval engine resurrection |
|
|
As mentioned previously, here is a picture of the repaired exhaust muffler and the butchered heater box.
Currently its feeling a bit like Christmas as almost every day parcels with parts arrive at my home. One of the parcels contained a new single tip exhaust, which is patiently awaiting to be fitted.
As the oval is now inside a workplace on a ramp without an engine, we have decided not to clean the 'tar board' firewall insulation material gunge.
Unfortunately, the manifold was still blocked, or at least, blowing in air would not go through. So I took out my drill again and anfter 10 more minutes of drilling, lumps of gunk came out and the manifold was clear. Success!! So just to be sure I topped it off again with sewage cleaner and let it sit through the night. The next day I let the cleaner out, and the color had just slightly changed to a little darker, so it seems as if all the sooth has been removed.
Ed has blasted the manifold and I have bought heat resistant paint so I can paint it so it will look like new again.
Last Tuesday Pascal made a move on the wiring in the back of the car. He has renewed all the wires to factory specifications making sure that all the connectors were cleaned, soldered and topped of with a little dash of clear sealer. It really looks great!! There are also red 6V LED lights in the pipeline that will be fitted next week.
BEFORE:
AFTER:
We have not made much progress on the engine itself. The valves have been adjusted, the lower pulley and nut are painted and the fuel pump is fitted.
Next week we will rebuild the engine, as the manifold will then be ready.
P.S. The distributor is the old one that will be removed and replaced with the correct one. |
|
| Back to top |
|
|
Rome
Samba Member
Joined: June 02, 2004
Posts: 9651
Location: Pearl River, NY
|
| Posted: Thu Nov 09, 2017 4:58 pm Post subject: Re: January 1954 oval engine resurrection |
|
|
Tedious work, clearing out the intake manifold preheat pipe.
| Quote: |
| As the oval is now inside a workplace on a ramp without an engine, we have decided not to clean the 'tar board' firewall insulation material gunge. |
You could take a bucket of medium-hot water into the garage, dip a sponge into it and squeeze out the excess water, then dab the sponge firmly straight onto the tar board. After every 2 or 3 dabs, squeeze the sponge out to clean it off, and repeat. That way you'll have nearly no drips onto the floor, and still get a good start on the cleaning which is so easy with the engine out. For greasy spots, spray on a light mist of cleaner spray only onto the spots, but don't let it drip down onto the floor. Dab off the cleaner with your damp sponge. |
|
| Back to top |
|
|
Chrisisw
Samba Member
Joined: May 30, 2004
Posts: 148
Location: Amsterdam, Holland, Europe
|
| Posted: Wed Nov 22, 2017 3:58 am Post subject: Re: January 1954 oval engine resurrection |
|
|
Its been two weeks since the last update, but we have not been sitting still.
In the meantime the manifold is now painted.
Here is my homemade spray booth with an old spare manifold acting as a counterweight.
It worked perfect and after laying on some layers of VHT heat resistant primer I sprayed on some layers of VHT heat resistant paint.
Yesterday we continued on working on the car.
| Rome wrote: |
| You could take a bucket of medium-hot water into the garage, dip a sponge into it and squeeze out the excess water, then dab the sponge firmly straight onto the tar board. After every 2 or 3 dabs, squeeze the sponge out to clean it off, and repeat. That way you'll have nearly no drips onto the floor, and still get a good start on the cleaning which is so easy with the engine out. For greasy spots, spray on a light mist of cleaner spray only onto the spots, but don't let it drip down onto the floor. Dab off the cleaner with your damp sponge. |
Thanks to Rome and his good tips we started by cleaning out the engine bay tar board insulation. We placed a washing machine drip tray beneath the engine bay. We sprayed the tar board with Dasty heavy duty degreaser and let it soak for a couple of minutes. Then we took a soft brush and an old tooth brush and gently cleaned the board. Finally, we took a sponge, soaked it with water and then pressed the sponge against the top of the tar board, letting the water run down. You could literally see all the dirt stream down into the drip tray.
The tarboard cleaned up nicely and now really looks good. Even a lot better than the pictures show.
We also started on assembling the engine.
| joe h. wrote: |
|
Two incorrect things I see are the cylinder tin is for a 25hp
|
As Joe h. already noticed the cilinder tin is incorrect. Unfortunately it is not for a 25hp engine. The tin itself is about two centimeters wider than the correct tin, so it will not fit. Ed has a 1600 engine for his 65 of which the tin looks identical to mine, so I believe it to be for a 1300 or bigger and at least a later engine.
As the cylinder tin does not fit we could not progress as we would have liked to. We attached the NOS heater boxes to the shoe boxes and attached those to the engine. Even though I bought those heater boxes to attach to the engine it feels weird that as soon as I start this engine, this sticker will no longer exist and an NOS part will no longer be NOS.
We used an old piece of late oval cilinder tin to test fit all the other tinware and to see id there would be any more surprises. Fortunately, it all fitted perfectly and really looks nice.
The crank pulley is being treated by Ed so is currently not yet fitted, but before we can continue I will first need to find that needle in the hay stack: that elusive 1954/55 - only cylinder tin. If anyone has a lead on a set that would be highly appreciated.
To be continued
(hopefully sooner rather than later)
|
|
| Back to top |
|
|
EverettB 
Administrator

Joined: April 11, 2000
Posts: 69820
Location: Phoenix Metro
|
|
| Back to top |
|
|
Chrisisw
Samba Member
Joined: May 30, 2004
Posts: 148
Location: Amsterdam, Holland, Europe
|
| Posted: Wed Nov 22, 2017 9:09 am Post subject: Re: January 1954 oval engine resurrection |
|
|
Thank you for searching Everett! I did the same search earlier today. I already contacted Brendel20 about his tin and the other tin seems not to be a complete correct set. So I am still on the look out.
Also, as the tin will be powder coated to match the other engine tin I have, It does not have to be in the best of shape to begin with, as long as it's straight. |
|
| Back to top |
|
|
Chrisisw
Samba Member
Joined: May 30, 2004
Posts: 148
Location: Amsterdam, Holland, Europe
|
| Posted: Thu Nov 30, 2017 1:43 pm Post subject: Re: January 1954 oval engine resurrection |
|
|
Tuesday, we spent some more time on the oval. We replaced the engine compartment rubber, which we expected to be a bit of a nightmare, but they slipped in pretty easy.
Next on the list were the rear lights. I ordered some LED rear lights which we fitted and looked really bright. Even with the car not started the lights looked even brighter than before. As soon as the engine is in, we can check the brightness with a running engine.
Once the lights were fitted, we removed the existing tank. As the oval is an early 1954, the late hump style is not original.
However, when we removed the tank we noted what seemed to be factory markings on the tank. Is this a factory fitted fuel tank (to another, later style oval, maybe) in the original paint?
I also removed the radio power unit, as tthe radio only has MW and LW, and over here these radio channels are no longer used.
As the brake cylinder rubber had dried out we decided not to fit the tank but order a replacement rubber.
Also, the freshly painted fuel tank is really delicate and seems to scratch real easy. Im currently contemplating to having it powder coated before it goes in.
I thought I knew my car but while we were busy, I noticed that the car also has some factory pressed numbers in the metal. I can recall reading about these numbers in the past, but I cant find it anymore. Anyone know what they mean?
Finally, I took a few additional items to the powder coater which will be finished end of the week.
The correct cylinder tin should also be in the mail on its way to me. As soon as it arrives Ill clean it and get it powder coated so we can complete the engine as soon as possible. |
|
| Back to top |
|
|
Second Air Force
Samba Member

Joined: April 10, 2017
Posts: 268
Location: Midwest
|
|
| Back to top |
|
|
Chrisisw
Samba Member
Joined: May 30, 2004
Posts: 148
Location: Amsterdam, Holland, Europe
|
| Posted: Wed Dec 06, 2017 2:21 am Post subject: Re: January 1954 oval engine resurrection |
|
|
Last week the correct cilinder tin and fuel pump drip tray arrived thanks to my friend Rene van Brunschot.
It is currently being powder coated.
Also, I received the previously sent out items back from the powder coater looking all clean and fresh. The cilinder tin is from a late oval so it won't be used.
Once the last engine tin items come back from the powder coater, we can finally start rebuilding the engine. Hopefully that will be next Tuesday  |
|
| Back to top |
|
|
Chrisisw
Samba Member
Joined: May 30, 2004
Posts: 148
Location: Amsterdam, Holland, Europe
|
| Posted: Wed Dec 13, 2017 4:46 am Post subject: Re: January 1954 oval engine resurrection |
|
|
Yesterday we continued the work on the oval. Unfortunately, not all engine tin has returned yet from the powder coater, so we were not able to work on the engine as much as we would have liked to. However, the fuel tank did come back. I took it to numerous powder coaters, but as its a fuel tank, no-one was willing to take on the job. Finally, I took it to a car painter who painted it in gloss black. It really looks the part, but I will need to be careful not to scratch it. So I will no longer be carrying stuff in the trunk.
But before we placed the tank into the car, we first replaced the brake cylinder rubber, as it looked really cracked and tired
So out with the old:
And in with the new:
In order to place the fuel line to the fuel tap we constructed a little contraption
Which turned out not to work at all. So we fitted the tank and connected the fuel line from beneath the tank. Job done!
I had a really rough looking fuel cap on the tank when it was delivered to the painter. That cap now too has a nice new glossy black coat. Even though I like the look of the cap, I will be changing the cap.
We also replaced the fuel line at the back of the car. Just to be sure.
Next we tried to fit the freshly powder coated thin lip crank case pulley to the car. However, we ran into some issues with it, which I also raised in the 1954 & 1955 engines whats not correct! topic.
The engine turns fine and easy by hand. However with the thin lip pulley fitted, it turns really hard by hand. We noticed the raised centre part of the hin lip pulley seems to be higher than the raised centre part of the normal pulley. Anyone know if this is the case and if this could cause the engine to turn hard by hand?
With this, we ended work for the night and will continue once the remaining engine tin comes back. |
|
| Back to top |
|
|
joey1320
Samba Member
Joined: September 12, 2006
Posts: 2325
Location: Cleveland, OH
|
| Posted: Wed Dec 13, 2017 4:58 am Post subject: Re: January 1954 oval engine resurrection |
|
|
| Chrisisw wrote: |
Next we tried to fit the freshly powder coated thin lip crank case pulley to the car.
The engine turns fine and easy by hand. However with the thin lip pulley fitted, it turns really hard by hand. We noticed the raised centre part of the hin lip pulley seems to be higher than the raised centre part of the normal pulley. Anyone know if this is the case and if this could cause the engine to turn hard by hand?
With this, we ended work for the night and will continue once the remaining engine tin comes back. |
The powder coating, if applied thick, will cause fitment issues with parts that have tight tolerances. You'll need to shave off the powder coating to bring it back within spec.
_________________
**1971 Super Project
https://www.thesamba.com/vw/forum/viewtopic.php?t=...mp;start=0 |
|
| Back to top |
|
|
Chrisisw
Samba Member
Joined: May 30, 2004
Posts: 148
Location: Amsterdam, Holland, Europe
|
| Posted: Wed Dec 13, 2017 5:29 am Post subject: Re: January 1954 oval engine resurrection |
|
|
| joey1320 wrote: |
The powder coating, if applied thick, will cause fitment issues with parts that have tight tolerances. You'll need to shave off the powder coating to bring it back within spec. |
Good point! We have also removed the powder coating from the raised centre part as we epected this to cause issues yesterday, but still ran into the issues. It is back to bare metal. |
|
| Back to top |
|
|
boxkiteflyer
Samba Member
Joined: May 22, 2008
Posts: 261
Location: Taylorsville, KY
|
| Posted: Wed Dec 13, 2017 4:47 pm Post subject: Re: January 1954 oval engine resurrection |
|
|
| I don't have much to add except what a beautiful car and nice work being done to it! Yes, the tank looks to be an oval version. It should bring good money as it looks to be in good condition. |
|
| Back to top |
|
|
fl59bug
Samba Member
Joined: November 23, 2005
Posts: 1976
Location: North Carolina
|
| Posted: Thu Dec 14, 2017 10:57 am Post subject: Re: January 1954 oval engine resurrection |
|
|
The sheet metal behind the master cylinder reservoir appear to be from a '59 or '60 bug. Maybe someone spliced that in at some point and used the hump tank from the donor vehicle?
Looks like they might have used a later front clip and just reused the original vin plate for your car.
Beautiful car by the way 
Ted |
|
| Back to top |
|
|
joey1320
Samba Member
Joined: September 12, 2006
Posts: 2325
Location: Cleveland, OH
|
|
| Back to top |
|
|
Chrisisw
Samba Member
Joined: May 30, 2004
Posts: 148
Location: Amsterdam, Holland, Europe
|
| Posted: Mon Dec 18, 2017 3:10 am Post subject: Re: January 1954 oval engine resurrection |
|
|
| Chrisisw wrote: |
...Next we tried to fit the freshly powder coated thin lip crank case pulley to the car. However, we ran into some issues with it, which I also raised in the 1954 & 1955 engines whats not correct! topic.
The engine turns fine and easy by hand. However with the thin lip pulley fitted, it turns really hard by hand. We noticed the raised centre part of the hin lip pulley seems to be higher than the raised centre part of the normal pulley. Anyone know if this is the case and if this could cause the engine to turn hard by hand?... |
We compared both pulleys and the sizes were almost identical. However, after Ed machined the thin lip pulley one more time and removed some burrs from it, the pulley now fits like a glove.
The final bits of tinware have also returned home, so the next step will be to rebuild the engine.
|
|
| Back to top |
|
|
Chrisisw
Samba Member
Joined: May 30, 2004
Posts: 148
Location: Amsterdam, Holland, Europe
|
| Posted: Wed Dec 20, 2017 3:09 am Post subject: Re: January 1954 oval engine resurrection |
|
|
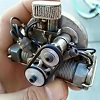
Yesterday we continued to work on the engine. As the parts collection is now complete and back from the powder coater we started with reassembling the engine. We made quite some progress.
However, the engine will not be built up completely outside of the car. We will attach the engine back to the car and then continue with the rebuild. That will probably be done next time. For now, just some pictures of the progress.
We tried to fit the generator pully, but the snout was too big, not enabling us to connect the pulley tight with the nut.
At home I found an old generator with what I believe to be the correct snout that will enable us to fit the thin lip generator pulley.
We'll continue the engine rebuild next time. |
|
| Back to top |
|
|
|


