| Author |
Message |
Abouna
Samba Member
Joined: May 24, 2015
Posts: 133
Location: Iowa

|
 Posted: Sat Sep 12, 2015 2:30 pm Post subject: How I mounted my fog lights Posted: Sat Sep 12, 2015 2:30 pm Post subject: How I mounted my fog lights |
 |
|
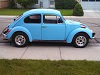
So we picked up a pair of fog lights from Ebay and got them mounted up this week. They aren't anything special, probably from the 70's or 80's, made in Japan. But they were the size we wanted, had good chrome, and the nice yellow color we wanted. Here's how we did it.
First, after asking about wiring these through the rear defrost switch, we opted to bypass the relay under the back seat and pick up a new relay. Didn't make much sense to send a bunch of wires back there anyway, since there was only one lighter gauge wire from the defrost switch to the relay.
We found a relay that had nearly the same specs as the Bosch relay mentioned in this thread: http://www.thesamba.com/vw/forum/viewtopic.php?p=7692568
It's a Novita relay RL44 we bought from Autozone: http://www.autozone.com/electrical-and-lighting/re...03873_0_0/
We used this socket to simplify the wiring, also from Autozone: http://www.autozone.com/1/products/48143-performance-wiring-harness-novita-rs40.html
To figure out the wiring, we followed the diagram and picture from the aforementioned post (above)
We did use the defrost switch under the dash, keeping the existing wire connected to the speedometer, so when the fogs are on, the indicator light for the rear defrost lights up.
We did use the old fuse housing from the rear defrost, since it was in fine shape.
But before we wired them up we built some brackets to hold the lights exactly light we wanted them.
These are 1/8" hot rolled steel brackets 1-1/4" wide. We fabricated them ourselves and gave them a couple coats of gloss black. We drilled the bumper brackets and attached them with 1/4" button head cap screws, lock washers and nuts, which we painted with black rustoleum after installation.
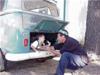
To route the single wire (the lights are grounded through the brackets) we ran it through the bracket seal and into the wheel well.
We then fed it through the headlight's rubber boot. Yeah, it was cracked, so we just fished it through the crack. We were able to do this on both sides.
We then zip tied the wire to the boot to keep things tidy. You can also see our emergency trunk release cable just above the bumper bracket (got the idea from this thread http://www.thesamba.com/vw/forum/viewtopic.php?t=635223&highlight=)
Needless to say, we we're pretty thrilled when we flipped the switch and the lights glowed.
|
|
| Back to top |
|
 |
ps2375
Samba Member
Joined: April 24, 2014
Posts: 2471
Location: Meridian,ID
|
| Posted: Sat Sep 12, 2015 3:27 pm Post subject: |
|
|
Looks nice. Can you post a pic of the defroster sw, my 69 has a rear window and wiring to it for the defrost, but I have no clue where the switch would be or what the switch looks like. Way back in the 80's or so, my father mounted PIAA fogs essentially like you did(still have them), but he put the switch for them in the ash tray, along with the switch for driving lights (they each have their own relays (don't have them). And the fogs are wired to go off with high beams and can only be turned on when running lights are on. And I just run the wire to them out under the trunk lid at bottom right behind them. I took them off when dealing with the rusty hood.
BTW, you have a very nice looking car. I'm hoping to get mine to that level someday, I've only just gotten it back on the road this year, after it having sat for 20yrs down in AZ.
Fog isn't really an issue where I live in Idaho, so I only mounted them to get them out of the box they were sitting in.  |
|
| Back to top |
|
|
Rome
Samba Member
Joined: June 02, 2004
Posts: 9653
Location: Pearl River, NY
|
| Posted: Sat Sep 12, 2015 5:01 pm Post subject: |
|
|
Very clean work on the bracket! Simple and easy to install to the bumper brackets.
This is an excellent shot! You took a few moments to make sure you were exactly centered in front of the car, and a mild zoom. "Hover Bug" look with the tires not visible.
|
|
| Back to top |
|
|
iadubber
Samba Member
Joined: May 14, 2010
Posts: 177
Location: Farley, IA
|
| Posted: Sat Sep 12, 2015 6:10 pm Post subject: |
|
|
| I like those fogs! They really fit the VW look |
|
| Back to top |
|
|
Abouna
Samba Member
Joined: May 24, 2015
Posts: 133
Location: Iowa
|
| Posted: Sun Sep 13, 2015 6:31 am Post subject: |
|
|
| ps2375 wrote: |
| Looks nice. Can you post a pic of the defroster sw, my 69 has a rear window and wiring to it for the defrost, but I have no clue where the switch would be or what the switch looks like. |
see
http://www.thesamba.com/vw/forum/viewtopic.php?t=348944[/url] |
|
| Back to top |
|
|
Abouna
Samba Member
Joined: May 24, 2015
Posts: 133
Location: Iowa
|
| Posted: Sun Sep 13, 2015 6:32 am Post subject: |
|
|
| Rome wrote: |
Very clean work on the bracket! Simple and easy to install to the bumper brackets.
This is an excellent shot! You took a few moments to make sure you were exactly centered in front of the car, and a mild zoom. "Hover Bug" look with the tires not visible.
|
Thanks Rome. They were a lot of fun to install. |
|
| Back to top |
|
|
gt1953
Samba Member
Joined: May 08, 2002
Posts: 13848
Location: White Mountains Arizona
|
| Posted: Sun Sep 13, 2015 6:46 am Post subject: |
|
|
When I installed mine I ran the wire into the head light bucket in the drain of it. Then ran it in the rubber wiring tube to the trunk.
Your look nice as well. I found a set of old school fog lights and like em.
_________________
Volkswagen: We tune what we drive.
Numbers Matching VW's are getting harder to find. Source out the most Stock vehicle and keep that way. You will be glad you did.
72 type 1
72 Squareback
({59 Euro bug, 62, 63, 67, 68, 69, 73 type ones 68 & 69 type two, 68 Ghia all sold}) |
|
| Back to top |
|
|
ps2375
Samba Member
Joined: April 24, 2014
Posts: 2471
Location: Meridian,ID
|
| Posted: Sun Sep 13, 2015 6:52 am Post subject: |
|
|
Ahh, looks like mine was re-purposed as a fuel pump cut-off. As when that was done, the car lived in Tucson area and had no need for a defroster, now I won't be driving it in the winter here. Now I have a relay on it for power to ign and fuel pump.
Looking at my brackets, they are out of aluminum and are place as you did yours. |
|
| Back to top |
|
|
jfly
Samba Member

Joined: August 27, 2013
Posts: 213
Location: CALDWELL IDAHO
|
| Posted: Tue Apr 25, 2017 5:23 pm Post subject: Re: How I mounted my fog lights |
|
|
Clean install! Better than drilling a hole in the bumper...Like I was going to do...
_________________
1973 Super Beetle, aka BUGLY, Daily Driver
SOLD:
1968 VW Beetle, Daily Driver, #68flybug
Photos: http://www.thesamba.com/vw/forum/album_search.php?search_author=jfly |
|
| Back to top |
|
|
Littleeagle28
Samba Member
Joined: April 13, 2017
Posts: 171
Location: U.K. lincs
|
| Posted: Thu May 24, 2018 11:01 am Post subject: Re: How I mounted my fog lights |
|
|
Any suggestions on wire routing for a rear fog light?
Ta
_________________
1974 1303 |
|
| Back to top |
|
|
|


