| Author |
Message |
rward011
Samba Member
Joined: May 27, 2015
Posts: 54
Location: Denver

|
 Posted: Tue Nov 28, 2017 10:50 am Post subject: Re: Ryan's 1970 Ghia Coupe Restomod Posted: Tue Nov 28, 2017 10:50 am Post subject: Re: Ryan's 1970 Ghia Coupe Restomod |
 |
|
So, for the first time in many years, the car was back on its chassis with NO RUST!
Let's just say I had to straighten my hat when we decided to see exactly what she would look like back on the ground.
Mmmmm....camber 
Up until this point, we were at around 150 hours with just 2 guys, some air tools, and a good amount of beer.
We probably spent at least 10 hours a day in my garage for two straight weeks.....and every hour was worth it
To give you a good idea, this is most of the metal that was cut and and replaced....its practically a new car!
....And here is how she sat after most of our metal work was done 
Here is a bonus video of installing the rear air ride brackets:
Link
|
|
| Back to top |
|
 |
c21darrel
Samba Member
Joined: January 22, 2009
Posts: 8211
Location: San Dimas
|
|
| Back to top |
|
|
bhartwell59
Samba Member

Joined: December 28, 2014
Posts: 792
Location: dallas, tx
|
| Posted: Tue Nov 28, 2017 11:49 am Post subject: Re: Ryan's 1970 Ghia Coupe Restomod |
|
|
good idea reversing the front bonnet. you're right, does look like it should've been done that way at the factory.
_________________
'74 Zambezi green Ghia vert, autostick, 101k
'87 Jeep Wrangler, 4.2, 330k |
|
| Back to top |
|
|
Yankees
Samba Member
Joined: November 06, 2017
Posts: 40
|
| Posted: Tue Nov 28, 2017 12:26 pm Post subject: Re: Ryan's 1970 Ghia Coupe Restomod |
|
|
| Great work, you are a master. I'm going to Pomona this weekend to see what's out there. I did a job similar like yours on a 53' Food F100. |
|
| Back to top |
|
|
xzener
Samba Member
Joined: June 03, 2006
Posts: 1777
|
| Posted: Wed Nov 29, 2017 7:33 pm Post subject: Re: Ryan's 1970 Ghia Coupe Restomod |
|
|
Looking great. Love the hood hinge modification. Our KG's look very similar ATM. I'm still working on the front suspension and finishing up block sanding prior to paint. I have chosen to drop my air ride and go back to (almost) stock. Have an adjustable beam, and will be reindexing the rear.
Before narrowed/adjustable beam/
After, with air ride...
Good luck with the rest of your build. Will be watching it closely. I see your missing a headlight bucket... I had a hard time finding one myself. Good luck with that, last I looked, they were out of stock EVERYWHERE. Keep up the great work.
_________________
My 70 beetle was totaled Now to build the Ghia I always wanted. Rest in peace Ruby, I will miss you. Hello <insert Ghia name here>! |
|
| Back to top |
|
|
kiwighia68
Samba Member

Joined: October 20, 2013
Posts: 2876
Location: Auckland, New Zealand
|
| Posted: Wed Nov 29, 2017 8:46 pm Post subject: Re: Ryan's 1970 Ghia Coupe Restomod |
|
|
| xzener wrote: |
| ... I see your missing a headlight bucket... I had a hard time finding one myself. Good luck with that, last I looked, they were out of stock EVERYWHERE... |
I think Mr Huber may have a reproduction headlight bucket.
https://www.vintagecarparts.de/artikel.php?set_sho...0HD809145R
The parts I've bought from him were top quality.
_________________
Festina lente - hasten slowly
1968 Ghia named Emiko
Resto completed Dec 2015 |
|
| Back to top |
|
|
Onceler
Samba Member
Joined: May 28, 2010
Posts: 1647
Location: Indiana
|
| Posted: Wed Nov 29, 2017 9:20 pm Post subject: Re: Ryan's 1970 Ghia Coupe Restomod |
|
|
Looking good! Keep it up, I'm in the middle of pretty much the same rust issues, so good to see how ur tackling these issues
_________________
1972 Karmann Ghia |
|
| Back to top |
|
|
rward011
Samba Member
Joined: May 27, 2015
Posts: 54
Location: Denver
|
| Posted: Thu May 24, 2018 7:44 am Post subject: Re: Ryan's 1970 Ghia Coupe Restomod |
|
|
It's been too long since I've updated this thread, so here it goes!
After a couple of moves, she was in a place where we could finally tackle the rest of the body work.
Once we were satisfied with the fabrication of the brackets and cleaning up the rest of the welds, it was time to finally put some paint on the chassis.
It's definatly the small victories that helped us going....and this might have been the turning point of actually starting to assemble the car...not take stuff off.
Almost everything was either replaced or restored.
The major differences will be the 4 wheel disc brakes, new inner and outer wheel bearings, air ride plumbing, and new front beam.
Looks like the leafbug approves!
Here are a couple shots of the finished chassis waiting to be rejoined with its other half.
|
|
| Back to top |
|
|
xzener
Samba Member
Joined: June 03, 2006
Posts: 1777
|
| Posted: Thu May 24, 2018 6:28 pm Post subject: Re: Ryan's 1970 Ghia Coupe Restomod |
|
|
Looking great. Have you decided on a paint color?
_________________
My 70 beetle was totaled Now to build the Ghia I always wanted. Rest in peace Ruby, I will miss you. Hello <insert Ghia name here>! |
|
| Back to top |
|
|
rward011
Samba Member
Joined: May 27, 2015
Posts: 54
Location: Denver
|
| Posted: Fri May 25, 2018 8:21 am Post subject: Re: Ryan's 1970 Ghia Coupe Restomod |
|
|
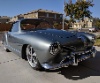
Sure did!....and that honestly might be one of the hardest decisions about this whole restoration.
Like most of us, I was flip flopping on certain color schemes. I tend to keep it simple with my cars (either Black, Silver, White), but this isn't just any car; it's my Ghia.
At first, I was dead set on a champagne silver, but after a couple of weeks driving around dealerships to see colors in person, I started to expand the search.
Happy to say I kept it in the family and chose Porsche Macadamia Brown Pearl
I will say that the picture really doesn't do the car justice, but it fit the timeless look of the Ghia when it is done!
|
|
| Back to top |
|
|
dawerks
Samba Member

Joined: September 15, 2010
Posts: 2349
|
| Posted: Fri May 25, 2018 9:07 am Post subject: Re: Ryan's 1970 Ghia Coupe Restomod |
|
|
Insane amount of work and nice colour!
_________________
"There is only one sin; disconnection from self." |
|
| Back to top |
|
|
xzener
Samba Member
Joined: June 03, 2006
Posts: 1777
|
| Posted: Fri May 25, 2018 12:39 pm Post subject: Re: Ryan's 1970 Ghia Coupe Restomod |
|
|
Excellent color choice. Puts my POs ugly metallic gold to shame. That color will make the Ghia's curves POP! Same reason I chose a metallic. 
_________________
My 70 beetle was totaled Now to build the Ghia I always wanted. Rest in peace Ruby, I will miss you. Hello <insert Ghia name here>! |
|
| Back to top |
|
|
rward011
Samba Member
Joined: May 27, 2015
Posts: 54
Location: Denver
|
| Posted: Tue May 29, 2018 2:08 pm Post subject: Re: Ryan's 1970 Ghia Coupe Restomod |
|
|
Well, with the pan out of the way....there was nothing left to procrastinate on except the body and sanding, and sanding, and more sanding.
We shaved everything we could in the rear engine department to make it look clean as possible which included deleting the fresh air filter stand, battery tray, charcoal canister, voltage regulator mount, and various tabs on the firewall.
I know in the near future that I will probably go with the gas struts in the rear and remove the springs to make room for dual carbs.
Thanks to the boys over at NuVintage in Denver, I was able to source another deck lid as mine was rusted out and warped.
Here is a picture of the same deck lid after lots of aircraft stripper and a wire wheel.
We wanted to have seamless panels between the body and the deck lid, hence the mud to create the perfect lines you see here.
Under Construction
|
|
| Back to top |
|
|
rward011
Samba Member
Joined: May 27, 2015
Posts: 54
Location: Denver
|
| Posted: Tue May 29, 2018 2:30 pm Post subject: Re: Ryan's 1970 Ghia Coupe Restomod |
|
|
The sanding continued, and with the rear of the car almost ready for paint we continued forward on the car.
Did I mention I like to be difficult/ stubborn?
I've always liked the way a '67 dash looked with the ignition in the dash instead of the steering column.
We've gone this far, so hell, why not? Let's shave the dash too!
Instead of trying to source and entire '67 dash, I decided to just fabricate an ignition cylinder close to what a '67 would look like. (I'm pretty sure the hole that used to be there was a dealer installed cigarette lighter that won't be missed)
|
|
| Back to top |
|
|
rward011
Samba Member
Joined: May 27, 2015
Posts: 54
Location: Denver
|
| Posted: Wed May 30, 2018 10:26 am Post subject: Re: Ryan's 1970 Ghia Coupe Restomod |
|
|
Now, that the dash was shaved it was time to complete the sanding that was needed in the interior and front of the car.
Even though most of these areas will never see the light of day, it was important to us to make it clean as possible.
The front trunk would need a some cleaning up, since we shaved the fuel door and other various tabs that wont be used.
Since I'm going with an airride setup, it was important that I have access to the rear bags, so we created access panels. (the parts cut out will go back, as they are part of the rear seat)
|
|
| Back to top |
|
|
rward011
Samba Member
Joined: May 27, 2015
Posts: 54
Location: Denver
|
| Posted: Wed May 30, 2018 10:41 am Post subject: Re: Ryan's 1970 Ghia Coupe Restomod |
|
|
Once we were finally satisfied with sanding everything, it was time to prime the car and final preparation ready for paint!
|
|
| Back to top |
|
|
rward011
Samba Member
Joined: May 27, 2015
Posts: 54
Location: Denver
|
| Posted: Wed May 30, 2018 10:59 am Post subject: Re: Ryan's 1970 Ghia Coupe Restomod |
|
|
By this time, I'm sure we were a nervous wreck.
After hundreds of hours of body and metal work, it was time for ole girl to finally get the paint job she deserved.
We were fortunate enough to find a paint booth for rent in Loveland about an hour away from where I live in Denver.
The night before, we were planning everything from the drive, to how we would unload the car, to how we will take the pan off of the car and get the car into the paint booth.
It was almost surreal to think that this could be the last time that we would have to take the body off the chassis, and believe me we had that down to a science!
As most of you know, once the car is ready for paint, it might as well be an original Picasso painting....after all it will be priceless!
The next two days would be long and grueling, but it would be worth it in the end.
|
|
| Back to top |
|
|
rward011
Samba Member
Joined: May 27, 2015
Posts: 54
Location: Denver
|
| Posted: Wed May 30, 2018 11:17 am Post subject: Re: Ryan's 1970 Ghia Coupe Restomod |
|
|
The drive home was probably the most stressful 60 miles of my life, but she made it back home!
The journey is far from over, but for once in this build I feel like like finally over the hump and a downhill battle from here on out.
|
|
| Back to top |
|
|
kiwighia68
Samba Member
Joined: October 20, 2013
Posts: 2876
Location: Auckland, New Zealand
|
| Posted: Wed May 30, 2018 12:46 pm Post subject: Re: Ryan's 1970 Ghia Coupe Restomod |
|
|
Beautiful colour combination you have chosen. I once saw a Porsche 997 Turbo cabriolet in those colours. A thing of beauty.
On your paint job, did you do seam sealing where the panels meet o the underside of the body? (Or have I missed it?) My painter guy made me do it -it took several days of working under the car, lying on my back.
_________________
Festina lente - hasten slowly
1968 Ghia named Emiko
Resto completed Dec 2015 |
|
| Back to top |
|
|
rward011
Samba Member
Joined: May 27, 2015
Posts: 54
Location: Denver
|
| Posted: Wed May 30, 2018 2:43 pm Post subject: Re: Ryan's 1970 Ghia Coupe Restomod |
|
|
Really appreciate it Kiwi! I have followed your build for some time and bookmarked certain pages from your post for inspiration.
The car did get seam sealer underneath the pan and along the inside of the panels, but I must have been in the moment and forgot to take pictures of the process. 
The only pictures I could find of seam sealer being applied are on the pan and the inside of the nose.
Using the painter's tape helped keep my OCD in check.
|
|
| Back to top |
|
|
|


