| Author |
Message |
Clay.0
Samba Member
Joined: August 28, 2016
Posts: 3
Location: Houston

|
 Posted: Sun Sep 04, 2016 9:13 am Post subject: DIY: Early Bug Bi-Xenon HID Projector Headlight Retrofit Posted: Sun Sep 04, 2016 9:13 am Post subject: DIY: Early Bug Bi-Xenon HID Projector Headlight Retrofit |
 |
|
Hey guys. Ive been messing with some Bi-Xenon HID projector headlights for my car and installed a set on a friends early bug. Thought I would share the project with the community.
Parts:
(2) VW Beetle RPM Headlight Assembly - 111 941 037 C OR headlight bucket of your choice
(2) Headlight Bucket To Fender Seal, 1946-66 VW Beetle -111 941 191
(2) Mini H1 projectors
(1) Morimoto or Kensun HID kit with 4300k bulbs
(2) CCM projector back-plates with hardware for mounting projectors
(2) CCM reflector shroud with city lights
The assembly includes the headlight housing with adjustment hardware, clear lens, and chrome adjustment ring.
Step 1: Disassemble the headlight assembly.
The chrome trim ring and inner bulb ring are held together with spring clips.
Remove the spring clips around the chrome trim ring and adjustment screws to disassemble the lens.
Remove the screw that holds the Beetle turn signal terminal in place. Remove terminal assembly.
With the turn signal terminal removed, a hole is left in the housing.
Step 2: Disassemble the inner bulb holder assembly.
The inner assembly ring is held together with spring clips similar to those for the outer assembly. The clips are different, keep these separated from the outer clips.
Remove these clips and pull out the inner ring.
Step 3: Assembly of the Mini H1 projector bracket.
The Closed Course Motorsport projector back plate. This part mounts inside the headlight housing and holds the Mini H1 projector and allows minimal vertical and horizontal beam adjustment with the adjustment screws.
The Beetle bulb holder ring is re-used to install the CCM projector back plate. The
notches in the back plate line up with the bulb ring to assure proper alignment.
The back plate is installed in the headlight housing with the top notch at 12 oclock.
The ring is installed on top of the back plate and spring clips re-installed.
Back plate installed the in head light housing.
Step 4: Installation of the Mini H1 projectors.
The Mini H1 projector.
Due to clearance issues inside Porsche 911 fender headlight buckets, the projector needs to be shortened in the threaded area.
Early VW bugs may or may not need this modification, but more clearance is always better
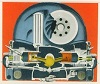
Remove all the screws holding the bulb holder and projector lens to the projector reflector
With the bulb holder removed, spin the aluminum nut down tight to the bulb reflector. This will be used as a spacer.
Drill pilot holes through the bulb holder screw holes
After the pilot holes are drilled, cut off the excess threaded part with a cut off wheel. Use the aluminum nut as a guide.
After the end is cut off, re-thread the holes with a m3x.5mm tap
Reassemble the projector assembly
The projector mounts to the back plate with 6-32 machine screws and nuts. They are spaced off the back with a nylon spacer. This is to recess the projector in the headlight housing and allow for heat dissipation.
Step 5: Installation of the Closed Course Motorsport reflector.
The CCM reflector is manufactured by Closed Course Motorsport and is unique to this headlight assembly. The one piece construction of this reflector features a wedge bulb city light and projector shroud.
The CCM reflector has an extrusion on the bottom that snaps in place to the headlight housing via the Beetle turn signal hole.
With the reflector installed, the rest of the assembly and projector is hidden.
Step 6 Lens selection:
The clear lens that comes with the Beetle headlight assembly is an excellent choice for a clean and simple installation. However, if the clear look is not your preference, a symmetrical fluted lens will also work.
Left to right: Clear lens, H4 asymmetrical fluted lens, symmetrical fluted lens.
The clear lens is an affordable option as it comes with the Beetle headlight assembly.
This lens with the projector produces a clean beam cutoff.
A Porsche Bosch H4 lens is an attractive option; however the beam cutoff is sacrificed due to the asymmetrical fluting.
A symmetrical fluted lens is a happy medium. The symmetrical fluting only mildly distorts the beam and cutoff.
Step 7: Reassembly of the headlight assembly
Reinstall the lens of choice and adjustment ring with the spring clips.
Spring installation:
The springs that hold the headlight trim ring and glass to the housing can be very tricky, but by following these steps it can be done very simply and easily.
Prior to installing the springs, install the CCM reflector and set the glass against the assembly.
Install the trim ring by first loosely threading the screw and spring into the adjustment tab. Once both screws are loosely installed, tighten both so the ring holds the glass onto the assembly, but not too tightly that the glass cannot be rotated with your palm. When both screws are firmly secured, check the glass to ensure the arrow mark is at 12 oclock.
When the trim ring is installed with the glass in the correct position, the springs are ready to be installed.
The spring clip has a long leg and short leg. Always keep the long leg on the right, no matter the location of the headlight. With the long leg on the right, both legs of the spring tilt outward, away from the assembly and into a groove in the trim ring.
The use of a small forked tool, like a flat screw driver with a groove, makes compression and seating of the short leg easy. Doing this without a tool and only using your fingers is very difficult and can become frustrating very quickly.
The spring clips are installed with the long leg first, then compressing the spring and seating the short leg, moving around the light in a counter-clockwise fashion. There are 6 spring clips, 3 on each side. Install the first spring at the longer adjustment screw location (7 oclock position) with the long leg of the spring wrapping around the adjustment screw.
The second spring to be installed is on the opposite side at the 2 oclock position, again wrapping around the adjustment screw.
The third and fourth springs are installed in the middle of each side. One side at a time. Spring five and six and then installed at the end of each side.
No springs are installed at the top or bottom.
Headlight reassembled
Step 8: Wiring
Wiring harness to adapt H4 plug to HID ballast, high beam actuator and city light
Step 9: Installation
Installed on early bug
Feel free to shoot me a PM or ask any questions below. |
|
| Back to top |
|
 |
arizonabuckeye
Samba Member
Joined: November 10, 2013
Posts: 544
Location: SLC
|
| Posted: Tue Sep 06, 2016 11:17 am Post subject: Re: DIY: Early Bug Bi-Xenon HID Projector Headlight Retrofit |
|
|
| Links to purchase parts you used? |
|
| Back to top |
|
|
Cali_Army_Guy
Samba Member
Joined: March 19, 2015
Posts: 2094
Location: Stockton, CA
|
|
| Back to top |
|
|
Erik G
Samba Member

Joined: October 16, 2002
Posts: 13281
Location: Tejas!
|
| Posted: Tue Sep 06, 2016 12:42 pm Post subject: Re: DIY: Early Bug Bi-Xenon HID Projector Headlight Retrofit |
|
|
not my style but very cool retrofit. I have D2S V3's with OSRAM components retrofit into my daily driver Yukon here in Houston. Literally night and day difference
_________________
Stop dead photo links! Post your photos to The Samba Gallery! |
|
| Back to top |
|
|
Clay.0
Samba Member
Joined: August 28, 2016
Posts: 3
Location: Houston
|
| Posted: Wed Sep 07, 2016 6:42 pm Post subject: Re: DIY: Early Bug Bi-Xenon HID Projector Headlight Retrofit |
|
|
The links posted above are correct for the parts, but the link for the complete setup is for a Porsche setup with different trim rings, that are not required with bugs.
| Erik G wrote: |
| not my style but very cool retrofit. I have D2S V3's with OSRAM components retrofit into my daily driver Yukon here in Houston. Literally night and day difference |
Thanks for the compliment and I know the look is not for everyone. Fluted lenses go a long way to look more stock, while getting the night and day difference in light out put over stock as you mentioned. |
|
| Back to top |
|
|
EVfun
Samba Member

Joined: April 01, 2012
Posts: 5481
Location: Seattle
|
| Posted: Wed Sep 07, 2016 7:50 pm Post subject: Re: DIY: Early Bug Bi-Xenon HID Projector Headlight Retrofit |
|
|
I would be interested in a bi-level projector fixture that replaces the stock bulb and could accept a halogen H1 bulb. Those bulbs are available in 6 volt and a small 6 volt to 12 volt DC to DC converter (about 2 by 2 by 1 inch, 2 or 3 amp) could power the shutter for high beams. 6 volt projector beams in my stock '57 would be interesting.
_________________
| Wildthings wrote: |
| As a general rule, cheap parts are the most expensive parts you can buy. |
|
|
| Back to top |
|
|
Clay.0
Samba Member
Joined: August 28, 2016
Posts: 3
Location: Houston
|
| Posted: Sat Oct 29, 2016 6:23 pm Post subject: Re: DIY: Early Bug Bi-Xenon HID Projector Headlight Retrofit |
|
|
I've had some issues with heat and the reflectors blistering, so we swapped out the bulbs for LED instead of the HID. Just as bright, but much less heat!
The bulbs used are from http://www.protuninglab.com/ledheadlights.html
|
|
| Back to top |
|
|
2true
Samba Member

Joined: December 13, 2004
Posts: 1218
|
| Posted: Thu Nov 17, 2016 12:04 pm Post subject: Re: DIY: Early Bug Bi-Xenon HID Projector Headlight Retrofit |
|
|
Looks Awesome!
_________________
AKA Destroyer of the Rants...... |
|
| Back to top |
|
|
socal1904
Samba Member
Joined: August 26, 2015
Posts: 99
|
| Posted: Thu Nov 17, 2016 12:15 pm Post subject: Re: DIY: Early Bug Bi-Xenon HID Projector Headlight Retrofit |
|
|
Sorry to be off topic, but what is the color on the bug?
Lights do look good though!! |
|
| Back to top |
|
|
theastronaut
Samba Member

Joined: November 19, 2007
Posts: 1631
Location: Anderson, SC
|
| Posted: Thu Nov 17, 2016 2:19 pm Post subject: Re: DIY: Early Bug Bi-Xenon HID Projector Headlight Retrofit |
|
|
I had Dapper Lighting's V2 7" HID projectors in my Miata, which use those same mini H1 projectors. They were a serious downgrade from my Cibie halogen H4's. The low beam width was pathetic and the quality of parts they use is pretty bad too. I ended up having to send them back due to the shutter malfunctioning. Also, the quality control is so bad on the projectors that you have to manually bend the bulb mounting plate to focus the headlights, which is ridiculous. They state this in the instructions, so it must be a common problem. Another problem is that the Mini H1 projectos are designed to be used with a halogen H1 bulb. Sticking a HID bulb in them messes up the optics of the reflector bowl so they don't perform as good as a projector that is desinged to use a HID bulb. Yes, they'll have a sharp cut-off still, but the rest of the beam pattern isn't as great as it should be. Stick with OEM projector retrofits or quality H4's like Cibie or Hella for a true lighting upgrade. Just because a light is brighter doesn't mean it performs as well.
Dapper's V2's with Mini H1 projectors.
Cibie H4's with standard wattage bulbs and a relay harness.
_________________
Strive for perfection in everything. Take the best that exist and make it better. If it doesn't exist, create it. Accept nothing nearly right or good enough."
-Sir Henry Royce, co-founder of Rolls-Royce
'64 Beetle Sunroof OG Bahama Blue
'63 Beetle Vert
'66 Beetle
'88 Festiva L
'89 Festiva L
'64 Chevy C10
'66 Chevy C10 |
|
| Back to top |
|
|
wolirhenes1
Samba Member
Joined: July 21, 2018
Posts: 2
Location: turkey
|
| Posted: Sat Jul 21, 2018 6:47 pm Post subject: Re: DIY: Early Bug Bi-Xenon HID Projector Headlight Retrofit |
|
|
| what is the color code of this car ?? |
|
| Back to top |
|
|
67 Sunroof
Samba Member

Joined: February 22, 2014
Posts: 1836
Location: Salisbury, MD
|
| Posted: Sat Jul 21, 2018 11:41 pm Post subject: Re: DIY: Early Bug Bi-Xenon HID Projector Headlight Retrofit |
|
|
Fantastic write-up but I should mention a few things:
Those spring clips....omg. (Use safety glasses) I had a few get away from me tonight. All I heard was ting and had to go searching for them. Haha!
The screwdriver with the notch is an amazing idea!!!!
The rubber gaskets that go around the glass lenses...omg. PITA to keep on while you are centering the glass and installing the headlight ring onto the housing😡
I just finished my led install with hella clear lenses or I would seriously consider these. Still unsure of how I will like them because my wiring isnt done yet.
Thanks for the great tutorial and great pictures too! |
|
| Back to top |
|
|
Bryan67
Samba Member
Joined: January 01, 2003
Posts: 2942
Location: Fresno, Ca.
|
| Posted: Sun Jul 22, 2018 6:45 am Post subject: Re: DIY: Early Bug Bi-Xenon HID Projector Headlight Retrofit |
|
|
Have you had a car coming at you with super bright headlights on? It`s not good.
_________________
If you`re going to do something, do it right. |
|
| Back to top |
|
|
splitjunkie
Samba Member
Joined: April 04, 2006
Posts: 4095
|
| Posted: Sun Jul 22, 2018 8:33 am Post subject: Re: DIY: Early Bug Bi-Xenon HID Projector Headlight Retrofit |
|
|
Shortening the back of the reflector where the bulb mounts alters the relationship of the light source to the lens which can affect the light pattern.
_________________
Chris
You know, a lot of these scratches will buff right out... Jerry Seinfeld |
|
| Back to top |
|
|
Ajmarqueling
Samba Member
Joined: December 19, 2018
Posts: 16
Location: IN
|
| Posted: Fri Dec 21, 2018 6:57 am Post subject: Re: DIY: Early Bug Bi-Xenon HID Projector Headlight Retrofit |
|
|
| Great and detailed write-up I'm just going to ask the same question several others have asked and what is the paint color code of this car? Also any information on the Wheel and Tire setup? |
|
| Back to top |
|
|
dapperlighting
Samba Member
Joined: May 31, 2016
Posts: 11
Location: Novato, CA
|
| Posted: Tue Dec 25, 2018 12:40 pm Post subject: Re: DIY: Early Bug Bi-Xenon HID Projector Headlight Retrofit |
|
|
Deleted
Last edited by dapperlighting on Tue Jan 15, 2019 1:22 am; edited 1 time in total |
|
| Back to top |
|
|
theastronaut
Samba Member
Joined: November 19, 2007
Posts: 1631
Location: Anderson, SC
|
| Posted: Fri Dec 28, 2018 5:20 pm Post subject: Re: DIY: Early Bug Bi-Xenon HID Projector Headlight Retrofit |
|
|
Also deleted.
_________________
Strive for perfection in everything. Take the best that exist and make it better. If it doesn't exist, create it. Accept nothing nearly right or good enough."
-Sir Henry Royce, co-founder of Rolls-Royce
'64 Beetle Sunroof OG Bahama Blue
'63 Beetle Vert
'66 Beetle
'88 Festiva L
'89 Festiva L
'64 Chevy C10
'66 Chevy C10
Last edited by theastronaut on Tue Jan 15, 2019 8:38 am; edited 1 time in total |
|
| Back to top |
|
|
dapperlighting
Samba Member
Joined: May 31, 2016
Posts: 11
Location: Novato, CA
|
| Posted: Tue Jan 15, 2019 1:24 am Post subject: Re: DIY: Early Bug Bi-Xenon HID Projector Headlight Retrofit |
|
|
| You are correct! A customer had sent that over and I didnt see the date. Ive deleted the comment. Thanks for your help. |
|
| Back to top |
|
|
|


