| Author |
Message |
ToolBox
Samba Member

Joined: January 27, 2004
Posts: 3439
Location: Detroit, where they don't jack parts off my ride in the parking lot of the 7-11

|
 Posted: Mon Aug 20, 2018 9:39 am Post subject: Re: New to the Club - '64 Split Window Camper Posted: Mon Aug 20, 2018 9:39 am Post subject: Re: New to the Club - '64 Split Window Camper |
 |
|
| Waterborn wrote: |
| Just spoke to the mechanic that sold me the bus and he is going to fix the transaxle leak. This makes me feel much better and gives me a little more time for learning the ropes. |
While the trans is out for the repair have him replace the shift rod bushings and boots. If he tells you he is not pulling the trans he is not doing the repair correctly. |
|
| Back to top |
|
 |
Waterborn
Samba Member

Joined: July 18, 2018
Posts: 179
Location: Ft Lauderdale, FL - USA
|
| Posted: Mon Aug 20, 2018 11:04 am Post subject: Re: New to the Club - '64 Split Window Camper |
|
|
| EverettB wrote: |
Gas gauge
The gas gauge you have is not a Bus gas gauge but maybe it works anyway?
If should read zero when the key is off.
If it always reads the same with the key on, the sender might be bad or it might have a bad ground.
Did you remove the clamp that clamps it to the dashboard?
Normally the mounting bracket grounds the gauge but I see that is a later gauge with a ground connection.
I see a yellow wire on there that looks like an added ground wire.
This is not a standard wire in the 1964 wiring harness - someone added it.
Does it go to ground? It should.
Reference:
Wiring diagrams on the site:
https://www.thesamba.com/vw/archives/info/wiringt2.php
For 1964 I looked at the 1963 diagram
The 3 top connections on the gauge will be power, the bulb for nighttime viewing, and a wire that goes back to the sender.
The top center is a bulb holder so that is the light for the gauge.
The power is normally marked with a + - this should be the black wire.
The brown should be the wire that travels back to the sender |
How do you know this is not a bus gas gauge, what should it look like? Manual pic are pretty basic but it looks similar to those there. Gauge zeros out when key is off. There was no bracket to hold this piece in. It was secured with some type of rubber O-ring, which disintegrated when the gauge was pulled from the dash. Will look into your other questions. Thanks for the help! |
|
| Back to top |
|
|
Z
Samba Member
Joined: June 15, 2003
Posts: 2517
Location: galveston, tx
|
| Posted: Mon Aug 20, 2018 11:29 am Post subject: Re: New to the Club - '64 Split Window Camper |
|
|
| ToolBox wrote: |
| Waterborn wrote: |
| Just spoke to the mechanic that sold me the bus and he is going to fix the transaxle leak. This makes me feel much better and gives me a little more time for learning the ropes. |
While the trans is out for the repair have him replace the shift rod bushings and boots. If he tells you he is not pulling the trans he is not doing the repair correctly. |
X2. Make sure his fix isnt a gob of silicone all over the leaky spot. Im sceptical that he is gonna pull the trans for you. |
|
| Back to top |
|
|
Eric&Barb
Samba Member

Joined: September 19, 2004
Posts: 24764
Location: Olympia Wash Rinse & Repeat
|
| Posted: Mon Aug 20, 2018 11:31 am Post subject: Re: New to the Club - '64 Split Window Camper |
|
|
| Waterborn wrote: |
How do you know this is not a bus gas gauge, what should it look like? Manual pic are pretty basic but it looks similar to those there. Gauge zeros out when key is off. There was no bracket to hold this piece in. It was secured with some type of rubber O-ring, which disintegrated when the gauge was pulled from the dash. Will look into your other questions. Thanks for the help! |
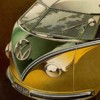
Color of gauge back ground does not match speedo.
Color and shape of the numbers on the face do not match speedo.
Bezel of gauge does not curve to fit the bus curved dash.
The just below from the OM, does not look like what you have.
Here is your speedo do they look like a matching set?
From the gallery a compilation of bus only gauge images over the years:
_________________
In Stereo, Where Available! |
|
| Back to top |
|
|
easy e
Samba Member

Joined: May 28, 2008
Posts: 3931
Location: 1 hr north of Santa Barbara
|
| Posted: Mon Aug 20, 2018 11:42 am Post subject: Re: New to the Club - '64 Split Window Camper |
|
|
| Waterborn wrote: |
| How do you know this is not a bus gas gauge, what should it look like? |
1) The backside of the bus gauge's bezel (chrome part that touches the paint) is curved, like the dashboard. Other gauges are flat backed bezel.
2) Bus gauge has the faint lines that swipe across the gauge.
_________________
aka: Evan
Spreadsheet for Bus RPM, based on gearing & tire size (Excel format)
Searchable, click-navigable 1958 Bus Parts List |
|
| Back to top |
|
|
62DoKaGuy
Samba Member

Joined: May 22, 2011
Posts: 1276
Location: Surprise, AZ
|
| Posted: Mon Aug 20, 2018 12:40 pm Post subject: Re: New to the Club - '64 Split Window Camper |
|
|
| easy e wrote: |
| Waterborn wrote: |
| How do you know this is not a bus gas gauge, what should it look like? |
1) The backside of the bus gauge's bezel (chrome part that touches the paint) is curved, like the dashboard. Other gauges are flat backed bezel.
2) Bus gauge has the faint lines that swipe across the gauge. |
Unless I missed where someone else answered, but I'm pretty sure that's a Ghia gas gauge...my '62 DC had in it in the 90's when I got it...it fits but the bezel contour does not match a bus dash...
_________________
,,Wenige Menschen denken, und doch wollen alle entscheiden.'' -der Alte Fritz
| EverettB wrote: |
| ...I went at it from both ends but going from the rear didn't seem to do anything, although I did spray some rust breaker in there... |
4/62 Double Cab
5/61 Panel (sold)
4/59 Single Cab (sold) |
|
| Back to top |
|
|
Waterborn
Samba Member
Joined: July 18, 2018
Posts: 179
Location: Ft Lauderdale, FL - USA
|
| Posted: Mon Aug 20, 2018 1:31 pm Post subject: Re: New to the Club - '64 Split Window Camper |
|
|
| Mechanic confirmed he will pull the trans and replace the shift rod bushings and the boots. So far seems like a stand up guy. Will report back when he finishes the work. In the meantime Ive got a ton of reading to do. |
|
| Back to top |
|
|
EverettB 
Administrator

Joined: April 11, 2000
Posts: 69827
Location: Phoenix Metro
|
| Posted: Mon Aug 20, 2018 5:55 pm Post subject: Re: New to the Club - '64 Split Window Camper |
|
|
| 62DoKaGuy wrote: |
| easy e wrote: |
| Waterborn wrote: |
| How do you know this is not a bus gas gauge, what should it look like? |
1) The backside of the bus gauge's bezel (chrome part that touches the paint) is curved, like the dashboard. Other gauges are flat backed bezel.
2) Bus gauge has the faint lines that swipe across the gauge. |
Unless I missed where someone else answered, but I'm pretty sure that's a Ghia gas gauge...my '62 DC had in it in the 90's when I got it...it fits but the bezel contour does not match a bus dash... |
Yes, I think it's Ghia, I see a bunch just like it in the Ghia Parts section of the classifieds
_________________
How to Post Photos
Everett Barnes - [email protected] | My wanted ads
"Water is the only drink for a wise man" | "Communication prevents complaints"
Stop dead photo links! Post your photos to The Samba Gallery! |
|
| Back to top |
|
|
Waterborn
Samba Member
Joined: July 18, 2018
Posts: 179
Location: Ft Lauderdale, FL - USA
|
| Posted: Tue Aug 21, 2018 5:23 am Post subject: Re: New to the Club - '64 Split Window Camper |
|
|
So then this would be the correct gauge?
https://www.thesamba.com/vw/classifieds/detail.php?id=2064135
My bus was upgraded to a 12v electrical system. Is it still possible to use a 6v gauge under these circumstances. If so, what modifications would be necessary to the wiring? It seems that some of the later "authentic" gauges were 12V. Is this in fact the case or am I destined for a repro?
Thanks as always for all the help. Still plugging through the Idiot's Guide each night  |
|
| Back to top |
|
|
easy e
Samba Member
Joined: May 28, 2008
Posts: 3931
Location: 1 hr north of Santa Barbara
|
| Posted: Tue Aug 21, 2018 6:05 am Post subject: Re: New to the Club - '64 Split Window Camper |
|
|
That gauge is a bus gauge... correct for a bus (vs. Beetle/Ghia/etc.)
Not month/year correct or voltage correct... but, it's $25 shipped (good price).
People have used 6v gauge in 12v vehicles.
The gauge "pegs" faster. Some have said broken needles... some have said works fine for eons.
Fuel senders are the same... gauge is a little different internally.
Here's a method to modify... if you can't handle your needle moving fast when you start the bus up:
| dstefun wrote: |
I know a lot of the guys use their 6V gas gauges on 12V without a problem - but I found this info about early Volvo VDO gas gauges, which are very similar to VW. Looks like the Volvo 12V gauge just has an 82 ohm resistor internal to the gauge, which would be easy to install externally, might make the gauge read a little more accurately, and maybe keep it from burning out.  It just goes in series with the power lead to the gauge. It just goes in series with the power lead to the gauge.
Radio Shack has a 100 ohm 1 watt resistor # 271-152 which should be close enough. The worst it could do would be to read a little low. Be sure to insulate those bare wires! http://www.radioshack.com/product.asp?catalog%5Fname=CTLG&product%5Fid=271-152
A good way to mount it would be on a barrier type terminal strip. http://www.radioshack.com/product.asp?catalog%5Fname=CTLG&product%5Fid=274-656
| Quote: |
Physical comparison, passive checks and power up performance tests confirm, that the VDO magnetic indicator movement used in the 6V and 12V instruments are the same, with the only difference being the addition of the 82 Ohm resistor in series with the power input lead in the 12V version. This is great news because it means that when you upgrade your originally 6V 444/544 vehicle, you can effectively and simply add this resistance externally to the instrument panel and be done!... removal and modification of the fragile fuel gauge is not even required! |
|
_________________
aka: Evan
Spreadsheet for Bus RPM, based on gearing & tire size (Excel format)
Searchable, click-navigable 1958 Bus Parts List |
|
| Back to top |
|
|
ToolBox
Samba Member
Joined: January 27, 2004
Posts: 3439
Location: Detroit, where they don't jack parts off my ride in the parking lot of the 7-11
|
| Posted: Tue Aug 21, 2018 8:51 am Post subject: Re: New to the Club - '64 Split Window Camper |
|
|
| Waterborn wrote: |
| Mechanic confirmed he will pull the trans and replace the shift rod bushings and the boots. So far seems like a stand up guy. Will report back when he finishes the work. In the meantime Ive got a ton of reading to do. |
Just so you know, the repair to the side cover leak means the reduction box needs to come apart to pull the axle tube off. Then the side cover can be removed and the gasket and possibly the o-ring can be replaced depending on the parts used. |
|
| Back to top |
|
|
Eric&Barb
Samba Member
Joined: September 19, 2004
Posts: 24764
Location: Olympia Wash Rinse & Repeat
|
| Posted: Tue Aug 21, 2018 9:09 am Post subject: Re: New to the Club - '64 Split Window Camper |
|
|
You can also pick up from Ebay a 12 volt to 6 volt converter for the gauge and another for the 6 volt wiper. That way you do not have the 6 volt gauge snap off the needle or burn up a perfectly good wiper motor. Would need a 10 Amp continual converter at least for the wiper motor.
_________________
In Stereo, Where Available! |
|
| Back to top |
|
|
Waterborn
Samba Member
Joined: July 18, 2018
Posts: 179
Location: Ft Lauderdale, FL - USA
|
| Posted: Sun Aug 26, 2018 3:53 pm Post subject: Re: New to the Club - '64 Split Window Camper |
|
|
Well got the vehicle back on Friday with mixed results. Mechanic did install new bushings and boots, but I am not 100% convinced that he pulled the trans apart. Still a bit of oil around the seams/gaskets though not seeing any dripping so far.
Also, he supposedly replaced the bulbs for the blinker lights on the speedo and the one for the high beam. The blue high beam indicator works now, but neither blinker on the dash illuminates and there is now ZERO voltage to the gas gauge. I followed the black power wire on the gas gauge and it is coupled to a connection on the speedo. Can't really see much back there and need to figure out how to pull the speedo. I don't think the factory mount is in place.
On a brighter note, I found a magnetic key holder under the dash and low and behold, it had a key in it that fits AND WORKS on ALL the door and hatch locks. Can't for the life of me figure out why the seller did not tell me about this key unless he simply was not aware of it. At least now I don't have to have all the locks re-keyed.
Also got the seat belt properly installed using mounts that I ordered from Wolfsburg. One of the mounts did not want to thread in properly, but after cleaning up the mounting hole and lubricating it a bit with some grease, I was able to get it to thread properly.
I also finally got around to pulling out the poles for the canopy that were in the side closet. Amazingly it seems like all the poles were still there. Pretty sure that the "canopy" is just something a previous owner threw together as it has gromets on one side and buttons on the other, but no place to secure the latter and no way to tie down the former. I temporarily used zip ties just to hold the thing in place for some pics. I cannot find any info on the manufacturer of the poles. Does anyone have any idea where these may have come from?
|
|
| Back to top |
|
|
Waterborn
Samba Member
Joined: July 18, 2018
Posts: 179
Location: Ft Lauderdale, FL - USA
|
| Posted: Sun Aug 26, 2018 4:14 pm Post subject: Re: New to the Club - '64 Split Window Camper |
|
|
| Eric&Barb wrote: |
Nice project!
Get a stock air cleaner and reduce the fuel line length to stock from pump to carb. |
Working on the air cleaner. Have a friend who is a mechanic (not the one that I bought the vehicle from) and he is up to help me put in some work. |
|
| Back to top |
|
|
Eric&Barb
Samba Member
Joined: September 19, 2004
Posts: 24764
Location: Olympia Wash Rinse & Repeat
|
| Posted: Sun Aug 26, 2018 5:07 pm Post subject: Re: New to the Club - '64 Split Window Camper |
|
|
Tent frame is same as we found for our 1960 walk thru panel camper conversion. The roof had the correct tent mounts at one time for the tent frame. Welded shut the screw holes for the mounts.
Get a couple of spare keys made to CYA. Rear hatch latch lock is most likely to be still correct to the bus. Use the key code off that to get a real locksmith to make them.
You can drop the dash package tray to get a bit more access to the dash wiring. Flashlight and hand mirror will be needed. Removing the speedo will cause you just more grief.
_________________
In Stereo, Where Available! |
|
| Back to top |
|
|
Waterborn
Samba Member
Joined: July 18, 2018
Posts: 179
Location: Ft Lauderdale, FL - USA
|
| Posted: Tue Aug 28, 2018 5:01 am Post subject: Re: New to the Club - '64 Split Window Camper |
|
|
| Eric&Barb wrote: |
You can drop the dash package tray to get a bit more access to the dash wiring. Flashlight and hand mirror will be needed. Removing the speedo will cause you just more grief. |
Tried to mess with this a bit last night. Disconnected all the bolts holding up the dash package and for the life of me could not get the tray away from the steering wheel enough to drop it out of the way. Ran out of time and light, but need to track down a video to see what I might have missed.
After fiddling around with the wires a bit using the flashlight/mirror combo, I was able to get all lights working. Odd thing is that the flasher indicators work if the key in the ignition is in the OFF position (both for blinkers and hazards) but will not light up when the key is in the first position or when the car is running. External signals all work.
Also, still no power to the gas gauge when the key is turned. Couldn't quite figure out how that wire is currently connected to everything else. Its messed up in the middle of a rat's nest of wires behind the speedo. Hopefully I can get a better look once I figure out how to drop that dash all the way out.
With all that said, LOVE driving this bus, even when the Miami traffic gets bogged down. |
|
| Back to top |
|
|
EverettB
Administrator
Joined: April 11, 2000
Posts: 69827
Location: Phoenix Metro
|
| Posted: Tue Aug 28, 2018 8:55 am Post subject: Re: New to the Club - '64 Split Window Camper |
|
|
I don't know if you did this so:
You have to unbolt the steering column bracket from underneath and pivot it out of the way too.
These bolts
The power to the gas gauge runs off the power wire that powers the speedo lights. It usually attaches to the top of the speedometer, where the turn signal light is.
_________________
How to Post Photos
Everett Barnes - [email protected] | My wanted ads
"Water is the only drink for a wise man" | "Communication prevents complaints"
Stop dead photo links! Post your photos to The Samba Gallery! |
|
| Back to top |
|
|
Z
Samba Member
Joined: June 15, 2003
Posts: 2517
Location: galveston, tx
|
| Posted: Tue Aug 28, 2018 9:32 am Post subject: Re: New to the Club - '64 Split Window Camper |
|
|
Electrical issues are my least favorite, but my starting point is always 'is everything connected as original?'
Find the one of these that's correct for your bus, print it and laminate it. It may be the MOST used tool I have for my bus.
https://www.thesamba.com/vw/archives/info/wiringt2.php |
|
| Back to top |
|
|
Waterborn
Samba Member
Joined: July 18, 2018
Posts: 179
Location: Ft Lauderdale, FL - USA
|
| Posted: Thu Aug 30, 2018 9:09 am Post subject: Re: New to the Club - '64 Split Window Camper |
|
|
Well this am I took my first drive through a torrential downpour and learned quickly what NOT to do when breaking in a '64 VW Bus
I also learned where all the leaks are. Most of the water that made its way into the vehicle came from the air duct that allows outside air to come into the cab or toward the cargo area. At lunch today I took the panel off of this area and found quite a bit of water and old, dried out seals. The large black seals are rock hard and were actually preventing the flap that closes off the air flow to shut all the way.
You can see where some of the old seal has adhered to the top of the duct.
And the bottom
What is the best way to fix these seals? Is there someplace to locate repro ones or should I just go to the hardware store and pick up regular weather strip type material?
Also, If I undo these screws, will I be able to pull the flap out for cleaning and re-affixing new seals? I noticed that there is a washer and pin on the passenger exterior of the duct. I presume if I loosen the screws pictured and remove that washer/pin, the I can pull the rod out toward the driver's side and remove the flap. Does this sound correct?
Every day I learn just a little more about this vehicle. It's like a form of treasure hunt, uncovering new ticks, oddities and things in need of repair. |
|
| Back to top |
|
|
easy e
Samba Member
Joined: May 28, 2008
Posts: 3931
Location: 1 hr north of Santa Barbara
|
|
| Back to top |
|
|
|


