| Author |
Message |
baxsie
Samba Member
Joined: August 09, 2005
Posts: 606
Location: Eastern Washington State

|
 Posted: Thu Jan 05, 2017 1:36 pm Post subject: Re: Electric Windshield Washer Pump, reusing old tank Posted: Thu Jan 05, 2017 1:36 pm Post subject: Re: Electric Windshield Washer Pump, reusing old tank |
 |
|
| baxsie wrote: |
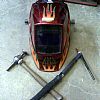
There is no way we are going to mess with that sad "flat spare" windshield washer spray setup. We grabbed a generic pump from NAPA, and found a likely place to mount it:
Used some of that formable clay epoxy stuff to make a mounting ramp:
Modified the lid to have a vent:
Here is the overall setup. Not so bad, I think:
|
_________________
1975 LaGrande Super Beetle Build Log / Farm boy hinge pin puller / Farm Boy Chassis Rotisserie
"I'm not getting older, I'm getting bitter." |
|
| Back to top |
|
 |
joey1320
Samba Member
Joined: September 12, 2006
Posts: 2325
Location: Cleveland, OH
|
|
| Back to top |
|
|
Tim Donahoe
Samba Member

Joined: December 08, 2012
Posts: 11740
Location: Redding, CA
|
| Posted: Thu Jan 05, 2017 4:47 pm Post subject: Re: Kick Azz 1975 LaGrande Super Rebuild |
|
|
Baxie, that's pretty much how I did my electric washer system, but I just drilled a little vent hole in the stock bottle cap. No sponge. I also drilled two holes to mount the Trico pump. It squirts like a one-year-old baby while attempting to change its diaper.
Tim
_________________
Let's do the Time Warp again!
Richard O'Brien |
|
| Back to top |
|
|
vamram 
Samba Member

Joined: March 08, 2012
Posts: 7304
Location: NOVA
|
| Posted: Thu Jan 05, 2017 5:23 pm Post subject: Re: Kick Azz 1975 LaGrande Super Rebuild |
|
|
Baxie, can you post a close up of how you engineered the hoses from the washer tank to the NAPA pump? I have a similar pump and would like to do the same thing w/my original tank.
Thanks!
Victor
_________________
Eventually, "we are what we pretend to be.
Give peace a chance - Stop Russian-Soviet Aggression!!
'74 Super 9/16 - present, in refurb process.
'73 Super - 6/18 - Present - Daily Driver!
'75 Super Le Grande...waiting it's turn in line behind '74.
Click to view image
Save the Supers!! |
|
| Back to top |
|
|
Tim Donahoe
Samba Member
Joined: December 08, 2012
Posts: 11740
Location: Redding, CA
|
| Posted: Thu Jan 05, 2017 5:58 pm Post subject: Re: Kick Azz 1975 LaGrande Super Rebuild |
|
|
Victor, one hose goes from the bottom of the tank to the pump, another hose goes from the "out" fitting on the pump to the spray nozzle. This pump to nozzle hose goes through the right side of the air box. You have to drill a hole for this. Make the hole's diameter the size of a rubber grommet that has an inside diameter, the same size as your hose.
I used WW hose, as well as their chrome
nozzle.http://www.thesamba.com/vw/forum/album_page.php?pic_id=1193126
Click this to see where I drilled the hole in the air box. Just route that hose from the pump to the nozzle.
You also need to hook up wires to the pump. Pretty easy.
Tim
_________________
Let's do the Time Warp again!
Richard O'Brien |
|
| Back to top |
|
|
Tim Donahoe
Samba Member
Joined: December 08, 2012
Posts: 11740
Location: Redding, CA
|
| Posted: Thu Jan 05, 2017 6:00 pm Post subject: Re: Kick Azz 1975 LaGrande Super Rebuild |
|
|
Never mind about the stupid link. I'll have to transfer over to my computer to show it to you.
Tim
_________________
Let's do the Time Warp again!
Richard O'Brien |
|
| Back to top |
|
|
Tim Donahoe
Samba Member
Joined: December 08, 2012
Posts: 11740
Location: Redding, CA
|
| Posted: Thu Jan 05, 2017 6:12 pm Post subject: Re: Kick Azz 1975 LaGrande Super Rebuild |
|
|
The last photo shows where I put my switch on the dash panel.
The first shows where I made the hole for the hose through the air box.
The second shows where I mounted my pump--as far below the level of the washer fluid as I could manage.
Tim
_________________
Let's do the Time Warp again!
Richard O'Brien |
|
| Back to top |
|
|
vamram
Samba Member
Joined: March 08, 2012
Posts: 7304
Location: NOVA
|
| Posted: Thu Jan 05, 2017 7:14 pm Post subject: Re: Kick Azz 1975 LaGrande Super Rebuild |
|
|
Cool Tim. To you and the OP - how about a shot of how u modified the bottle and connected the water hose to it.
_________________
Eventually, "we are what we pretend to be.
Give peace a chance - Stop Russian-Soviet Aggression!!
'74 Super 9/16 - present, in refurb process.
'73 Super - 6/18 - Present - Daily Driver!
'75 Super Le Grande...waiting it's turn in line behind '74.
Click to view image
Save the Supers!! |
|
| Back to top |
|
|
Tim Donahoe
Samba Member
Joined: December 08, 2012
Posts: 11740
Location: Redding, CA
|
| Posted: Thu Jan 05, 2017 8:13 pm Post subject: Re: Kick Azz 1975 LaGrande Super Rebuild |
|
|
Victor, all I did was drill a vent hole in the top of the bottle cap valve. You need a vent because it works on gravity feed, as opposed to air pressure from the tire. Then I reused the original braided hose that connects to the bottom of the bottle. You can see it attached to the inlet on the pump. I cut the hose long, as it went to the stock washer stalk, and measured and cut it a little more. Then I attached it to the new pump. Very easy.
The wiring took more time, since I used a switch at the dash plate; but it was still pretty easy. Although, if I had it to do over, I'd have used a momentary switch (but I kind of like the look of the red on/off switch that I installed). But pressing the switch, down, then up is no biggie.
Tim
_________________
Let's do the Time Warp again!
Richard O'Brien |
|
| Back to top |
|
|
fabricator john
Samba Member
Joined: October 09, 2009
Posts: 510
Location: manassas va. now Venice Fl.
|
| Posted: Sun Jan 08, 2017 6:46 pm Post subject: Re: Kick Azz 1975 LaGrande Super Rebuild |
|
|
| just a interjection, i have a mixed year 63, so i made my harness, i put the dimmer on the floor ,and used the dimmer on the signal switch for my washer pump, hid and stealthy .... fabricator john |
|
| Back to top |
|
|
chicagovw
Samba Member
Joined: January 06, 2007
Posts: 1422
Location: Chicago IL/CHandler AZ
|
| Posted: Wed Feb 20, 2019 8:09 am Post subject: Re: Kick Azz 1975 LaGrande Super Rebuild |
|
|
| Whatever happened to this build? Any interior shots of the ICE A/C system in place? |
|
| Back to top |
|
|
STEAK_BUG72
Samba Member

Joined: June 24, 2016
Posts: 106
Location: BARRIE, ONT
|
| Posted: Sat Feb 23, 2019 1:55 pm Post subject: Re: Kick Azz 1975 LaGrande Super Rebuild |
|
|
I did an external pump also. The inlet of the pump is flooded so it always works. Used a momentary toggle switch under the dash. Working great.
_________________
OFY!!! |
|
| Back to top |
|
|
STEAK_BUG72
Samba Member
Joined: June 24, 2016
Posts: 106
Location: BARRIE, ONT
|
| Posted: Sat Feb 23, 2019 2:03 pm Post subject: Re: Kick Azz 1975 LaGrande Super Rebuild |
|
|
Toggle switch
_________________
OFY!!! |
|
| Back to top |
|
|
baxsie
Samba Member
Joined: August 09, 2005
Posts: 606
Location: Eastern Washington State
|
| Posted: Sun Feb 24, 2019 4:46 pm Post subject: Parallel-flow / Micro-Channel condenser for ICE AC |
|
|
Parallel-flow / Micro-Channel condenser for ICE AC
(Disclaimer: This work was done in summer of 2017 . . . and I am only writing it up now in 2019, so there may be some errors in my recall.)
Originally, we never had the AC working. At one point we had the tube & fin "extra condenser" that ICE supplied (which they recommended putting in front of the main engine cooling air intake) installed under the back seat, above the transmission on the left, but it really did not fit correctly and had a pretty bad interference with the heater hoses that required removing one of its two fans.
After some communications with a nice Chinese acquaintance I made by way of Alibaba, a beautiful, custom micro-channel, parallel flow heat exchange showed up:
The main thing that I wanted was to have the new condenser fit with the same Derale fan that I used on the other side for the oil cooler:
Here is how the new AC condenser fits in the engine bay. The existing oil cooler is on the right.
I had to re-route the oil cooler lines with a sharp 90-degree elbow coming out of the oil thermostat:
The lines clear the transmission . . . at least by a little bit. We did not have interference issues with the oil cooler, so it is probably OK:
Here is a pic of the condenser mounted with the (rebuilt) transmission in place:
For reference here is the oil cooler:
Since the AC system was uncharged for something like a year, I decided to get a new dryer/filter:
After tightening some fittings that had never been more than hand tight, the system pulled vacuum OK. However, as soon as we introduced the freon, the custom 3-d printed fitting we made for connection to the AC compressor leaked. After trying to find some kind of sealant that was rated for freon, I ended up trying JB-Weld. Yes, epoxy is apparently resistant to freon. The o-ring is still in there, under all that epoxy. It also looks like I used JB-Weld to seal the little blow-off safety valve:
With that leak fixed, it would maintain a hard vacuum pretty much indefinitely. If I recall correctly, I left the vacuum pump on overnight to be sure all traces of moisture in the system would be boiled out, then checked the gauge after another couple of days. The leak down was imperceptible:
We had never charged an AC system before -- how hard could it be -- we ended up putting in the number of ounces that ICE AC recommended. Here is what the gauges read after charging (non-operating):
When the compressor is going, here is the gauge readings
Here is the temp our at the dash vent on a nice hot summer day:
_________________
1975 LaGrande Super Beetle Build Log / Farm boy hinge pin puller / Farm Boy Chassis Rotisserie
"I'm not getting older, I'm getting bitter." |
|
| Back to top |
|
|
baxsie
Samba Member
Joined: August 09, 2005
Posts: 606
Location: Eastern Washington State
|
| Posted: Sun Feb 24, 2019 5:01 pm Post subject: Wrapping the Stainless Sidewinder Exhaust |
|
|
Wrapping the Stainless Sidewinder Exhaust
(Disclaimer: This work was done in summer of 2017 . . . and I am only writing it up now in 2019, so there may be some errors in my recall.)
Since we had the engine out:
Based on the heat of things when operating, I decided to wrap the ever-loving snot out of the custom stainless sidewinder exhaust from (from Genuine A1):
_________________
1975 LaGrande Super Beetle Build Log / Farm boy hinge pin puller / Farm Boy Chassis Rotisserie
"I'm not getting older, I'm getting bitter." |
|
| Back to top |
|
|
baxsie
Samba Member
Joined: August 09, 2005
Posts: 606
Location: Eastern Washington State
|
| Posted: Sun Feb 24, 2019 5:33 pm Post subject: Cruise Control Sensor Magnets Mounting Ring |
|
|
Cruise Control Sensor Magnets Mounting Ring
(Disclaimer: This work was done in summer of 2017 . . . and I am only writing it up now in 2019, so there may be some errors in my recall.)
I was not very happy with the original cruise control magnet/sensor setup. It just seemed that it was very likely to fail or be damaged over time.
To make the magnets smooth, we 3D printed a ring and placed the magnets into it. The "real" magnets are inside the ring, there is an extra set of magnets outside, just to hold the real magnets in place:
We used JB-Weld to glue the magnets into the ring. JB weld has steel particles in it, so it bunches up around the magnets  : :
The ring has grooves in it to make space for the JB-Weld. We slobbered those with JB-Weld:
We then cleaned and slobbered the outside of the CV joint with JB-weld:
After pressing the magnet ring on, letting it cure and cleaning it up it looks great:
Here is a shot of the sensor and the new magnet ring mounted:
_________________
1975 LaGrande Super Beetle Build Log / Farm boy hinge pin puller / Farm Boy Chassis Rotisserie
"I'm not getting older, I'm getting bitter." |
|
| Back to top |
|
|
baxsie
Samba Member
Joined: August 09, 2005
Posts: 606
Location: Eastern Washington State
|
| Posted: Sun Feb 24, 2019 6:04 pm Post subject: Cruise Control Clutch Interlock |
|
|
Cruise Control Clutch Interlock
(Disclaimer: This work was done in summer of 2017 . . . and I am only writing it up now in 2019, so there may be some errors in my recall.)
The cruise control clutch interlock really never worked well. There was no way to adjust it, and any time the clutch freeplay needed adjustment, the switch would need adjustment also.
What we really needed to sense was that the clutch pedal was not depressed--so we decided to measure the position of the clutch cable. The best choice seemed to be a motorcycle brake switch:
We modified the clutch Bowden tube bracket to hold the switch:
Here is a closer pic of it mounted:
We then fashioned a simple clamp around the clutch cable. In this pic the clutch is depressed, the ball chain is loose, the switch is closed and the cruise is disabled:
When the clutch is released the ball chain goes tight, the switch is activated and the cruise is enabled:
_________________
1975 LaGrande Super Beetle Build Log / Farm boy hinge pin puller / Farm Boy Chassis Rotisserie
"I'm not getting older, I'm getting bitter." |
|
| Back to top |
|
|
baxsie
Samba Member
Joined: August 09, 2005
Posts: 606
Location: Eastern Washington State
|
| Posted: Sun Feb 24, 2019 6:46 pm Post subject: Repairing Broken Defrost Trace |
|
|
Repairing Broken Defrost Trace
(Disclaimer: This work was done in summer of 2017 . . . and I am only writing it up now in 2019, so there may be some errors in my recall.)
While we had the bug in the shop, we wanted to fix the defrost. We knew from the FLIR images that the window was originally good. so the trace must have been broken when we installed:
Originally we tried to bridge the small crack with solder. I used too much heat for too long and the hot solder basically dissolved whatever metal (silver?) was on the glass. We then tried again with a strip of copper and much less heat. Ugly as can be, but it does work:
_________________
1975 LaGrande Super Beetle Build Log / Farm boy hinge pin puller / Farm Boy Chassis Rotisserie
"I'm not getting older, I'm getting bitter." |
|
| Back to top |
|
|
baxsie
Samba Member
Joined: August 09, 2005
Posts: 606
Location: Eastern Washington State
|
| Posted: Sun Feb 24, 2019 7:10 pm Post subject: Road Trip and Random Pics |
|
|
Road Trip and Random Pics
By random chance parked next to a newish VW, nearly the same color:
Local car show, mainly Detriot muscle, but there was an import category, and he won an award:
Here is a shot of the dash with the Android tablet showing the Megasquirt real-time data:
The work in the above 2017 posts had a goal: To go to the Vintage Meet in Seattle and the VW Nationals in Seattle. This is ~5 hour trip of ~300 miles over the cascade range through Snoqualmie pass.
In the driveway, loaded with gas, tools, and parts:
2017 Vintage Meet in Seattle:
He picked up another award at the 2017 VW Nationals:
On the way back, we hit a couple of local landmarks. First was the cafe from Twin Peaks. We had a piece of pie, of course.
Then we dropped by the diner from Northern Exposure:
That was a great trip.
There are two fiddly bits we are working on.
1) The gas tank sender still has a leak, even after several attempts to seal it.
2) If it is really hot, and you turn off the engine, it will vapor lock. We need to add a way to manually run the fuel pump continuously to get the lines cooled down. We found this out on a hot as hades stretch of freeway near George, WA. An accident a few miles ahead brought us from freeway speed to stopped quickly. We turned off the engine and we were not able to restart it. Of course, traffic started flowing so we had to push it off into the center median. Eventually, it cooled enough to restart. Later we learned that cycling the key on and off multiple times would help. The MegaSquirt primes the fuel pump ~3 seconds each cycle, and eventually it could punch enough cool fuel through to start.
_________________
1975 LaGrande Super Beetle Build Log / Farm boy hinge pin puller / Farm Boy Chassis Rotisserie
"I'm not getting older, I'm getting bitter." |
|
| Back to top |
|
|
|


