| Author |
Message |
Daddy o's 67
Samba Member
Joined: November 25, 2008
Posts: 118
Location: Lancaster, SC

|
 Posted: Tue Sep 29, 2020 8:56 pm Post subject: Re: 70 Baja Build Thread The Long Road to La Paz Posted: Tue Sep 29, 2020 8:56 pm Post subject: Re: 70 Baja Build Thread The Long Road to La Paz |
 |
|
I bought that turn signal/head light switch set up. Had to shim the backside just like you so it would say mounted on my dash panel. one thing I found out when wiring it up was that turn signal and hi-low head light colors were backwards from the chart. Double check the leads from the switch before wiring it up to save yourself some grief.
Other than, that I like that it is a multifunction switch that doesn't take up much space. |
|
| Back to top |
|
 |
Scott SD
Samba Member
Joined: June 22, 2010
Posts: 153
Location: San Diego, CA
|
| Posted: Tue Sep 29, 2020 10:41 pm Post subject: Re: 70 Baja Build Thread The Long Road to La Paz |
|
|
| Daddy o's 67 wrote: |
I bought that turn signal/head light switch set up. Had to shim the backside just like you so it would say mounted on my dash panel. one thing I found out when wiring it up was that turn signal and hi-low head light colors were backwards from the chart. Double check the leads from the switch before wiring it up to save yourself some grief.
Other than, that I like that it is a multifunction switch that doesn't take up much space. |
Thanks for the feedback. I am going to start some wiring and will have to test it before I pin the connector. I would have been a little irritated trying to solve that. |
|
| Back to top |
|
|
Scott SD
Samba Member
Joined: June 22, 2010
Posts: 153
Location: San Diego, CA
|
| Posted: Sun Oct 04, 2020 9:13 pm Post subject: Re: 70 Baja Build Thread The Long Road to La Paz |
|
|
One project Ive wanted to tackle for awhile is the wiper motor assembly. I removed the assembly from the parts car (one of the reasons I bought the parts car) and put 12 volts to it
..no movement. I disassembled everything and every piece that was supposed to move freely was seized. I was hoping for a quick test, paint, and install. Once again, not going to happen. So goes the same process of blasting, painting, and reassembling with liberal amounts of grease. With some new hardware from Wolfsberg West, the mechanism moves nicely. For the motor I thought about rebuilding it, but decided to just buy a new unit. One great thing about being so close to Mexico is that it is possible to source OEM parts. I found a a new Bosch wiper motor for $50 on the Mexican eBay type of site. If you are reading this and are thinking about asking me to find a part, please dont. The whole process was a PITA. The wiper motor assembly is complete for now. I just need to mount it in the car and then figure out some day how to wire it.
|
|
| Back to top |
|
|
Scott SD
Samba Member
Joined: June 22, 2010
Posts: 153
Location: San Diego, CA
|
| Posted: Sun Oct 18, 2020 10:38 pm Post subject: Re: 70 Baja Build Thread The Long Road to La Paz |
|
|
Back to the steering. I finally made it to the welder and had the column and 1 shaft welded. To get everything to fit how I expect, this will probably take 3 trips to the welder. I wanted the column in the stock position, so I measured the stock column mounting plate to the centerline of the shaft. I then cut off the stock 73 mounting plate and made it fit the Blitzkrieg 2 column. At some point in the future this will be tied into the cage when I get a knee bar welded in. It will work for now.
For the rack, I saw a failure on my friends 5/16 car where a tie rod boss weld failed. Saco only welds them on 1 side of the boss. I decided to have the welder TIG the backside. It would always be in the back of my mind, so I prefer to mitigate the risk.
When setting up the steering shaft position I went straight from the rack through the firewall because at some point in the future I plan to install a power steering pump. I mocked it up a friends spare pump to make sure it will fit. After getting the bulkhead support in place I welded a u-joint at the end of a splined shaft and set-up the intermediate shaft length.
Next is to determine the correct steering wheel position. The Blitzkrieg steering shaft has a long taper on the steering wheel end and does not allow the quick release adapter to go on far enough. I cut down the adapter 1, but I am still a few inches from where it needs to be. The taper on the steering shaft needs to be turned down. I am looking for some time on a lathe, but havent got any leads. If anyone in the San Diego area has access to a lathe, I would be grateful.
|
|
| Back to top |
|
|
mkparker
Samba Member
Joined: October 12, 2004
Posts: 332
Location: Sherman, Tx
|
| Posted: Mon Oct 19, 2020 5:43 am Post subject: Re: 70 Baja Build Thread The Long Road to La Paz |
|
|
More excellent work!
_________________
Michael
Pit Boy 6163 Spec Trophy Truck |
|
| Back to top |
|
|
Scott SD
Samba Member
Joined: June 22, 2010
Posts: 153
Location: San Diego, CA
|
| Posted: Tue Oct 20, 2020 1:39 pm Post subject: Re: 70 Baja Build Thread The Long Road to La Paz |
|
|
| mkparker wrote: |
| More excellent work! |
Thank you sir! I have definitely learned a lot. |
|
| Back to top |
|
|
baja5
Samba Member
Joined: February 28, 2004
Posts: 4326
Location: Ramona,Ca.
|
| Posted: Tue Oct 20, 2020 4:03 pm Post subject: Re: 70 Baja Build Thread The Long Road to La Paz |
|
|
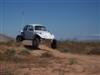
I had a buddy install his steering column like that, his was pretty stiff due to U joint angles. Hopefully yours is smooth. Hard to tell from the pic but the angles look pretty extreme. Nice looking car though. Like to see it in person.
_________________
http://www.wix.com/baja5s/nightrun |
|
| Back to top |
|
|
Scott SD
Samba Member
Joined: June 22, 2010
Posts: 153
Location: San Diego, CA
|
| Posted: Sat Oct 31, 2020 8:32 am Post subject: Re: 70 Baja Build Thread The Long Road to La Paz |
|
|
Back to the pedal assembly. Last update was on Page 2 when I disassembled, blasted, and made a gusset for the clutch pedal. This part of the project went from a simple rebuild to ridiculous really quickly.
Modifications:
TIG welded gusset on the clutch pedal
Additional TIG welds on the brake pedal
New WW bronze bushings
Drilled and tapped the housing for a grease fitting
Installed a heavy duty Classic Bug Parts clutch arm
Installed a heavy duty Classic Bug Parts accelerator pedal and arm
Added spacers to the clutch and brake pedals to reduce end play
I had some issues with the alignment on the clutch pedal and Ron from Classic Bug Parts was really responsive. For some reason the clutch pedal was tweaked and not lining up with the shaft. The pedal arm and accelerator kits from Ron are well engineered and fit perfectly, the way aftermarket parts should be. A pleasant surprise to not have to make any adjustments.
After I get the pedal assembly installed I can then start to bleed the brakes.
|
|
| Back to top |
|
|
Q-Dog
Samba Member

Joined: April 05, 2010
Posts: 8699
Location: Sunset, Louisiana
|
| Posted: Sat Oct 31, 2020 12:47 pm Post subject: Re: 70 Baja Build Thread The Long Road to La Paz |
|
|
I have seen a few broken clutch pedals and every one was broken in the space between the end of your gusset and the retaining pin. Like this one.
_________________
Brian
'69 Dune Buggy
'69 Beetle Convertible
'70 Beetle |
|
| Back to top |
|
|
Scott SD
Samba Member
Joined: June 22, 2010
Posts: 153
Location: San Diego, CA
|
| Posted: Sat Oct 31, 2020 1:50 pm Post subject: Re: 70 Baja Build Thread The Long Road to La Paz |
|
|
| Q-Dog wrote: |
I have seen a few broken clutch pedals and every one was broken in the space between the end of your gusset and the retaining pin. Like this one.
|
Thank you for the feedback! I will need to start looking for another pedal assembly to better modify the clutch pedal. |
|
| Back to top |
|
|
dustymojave
Samba Member

Joined: January 07, 2007
Posts: 5802
Location: Lake LA, Mojave Desert, SoCal
|
| Posted: Sat Oct 31, 2020 10:02 pm Post subject: Re: 70 Baja Build Thread The Long Road to La Paz |
|
|
My 1967 Street Bug suffered the same break in the clutch pedal arm as shown in Q-Dog's post. I made the repair gusset so it wrapped from under the pivot all the way up the arm to the pedal. No further trouble after that.
But I've NEVER seen a forged pedal arm (1958 - 1965) bend or break. That's what I have in my Hi Jumper.
_________________
Richard
Offroading VW based cars since 1965
Tech Inspection 1963 - 2012 SCCA/SCORE/HDRA/MORE/MDR +
Retired from building Bajas, Fiberglass Buggies and Rails in the Mojave Desert. Also Sprints & Midgets, Dry Lakes, Road Race cars. All types New and Vintage
SoCalBajas Member
Kicked Cancer's A$$...1st and 2nd round...Fight ain't over yet. |
|
| Back to top |
|
|
Q-Dog
Samba Member
Joined: April 05, 2010
Posts: 8699
Location: Sunset, Louisiana
|
|
| Back to top |
|
|
Daddy o's 67
Samba Member
Joined: November 25, 2008
Posts: 118
Location: Lancaster, SC
|
| Posted: Mon Nov 02, 2020 12:21 pm Post subject: Re: 70 Baja Build Thread The Long Road to La Paz |
|
|
| I former street car of mine split at the pin holding the clutch arm in place. Some sort of gusset is needed in this area. Like Dusty said, wrap the area with addition material to support the load. I'd go to a longer pin too. |
|
| Back to top |
|
|
Scott SD
Samba Member
Joined: June 22, 2010
Posts: 153
Location: San Diego, CA
|
| Posted: Mon Nov 02, 2020 7:16 pm Post subject: Re: 70 Baja Build Thread The Long Road to La Paz |
|
|
Thanks guys. I already started installing the pedal assembly in the car. The clutch pedal looks tweaked to one side. I took it out of my parts car and didn't even look to see if it was straight. I'm a little disappointed, but I will use it for now and start looking for a few more pedal assemblies.
I have seen people use a bolt in the clutch arm instead of the pin, but unless it is a perfect interference fit, it would just oval the hole on the clutch arm. The pin that Ron provides with the Classic Bug Parts shaft has a crush feature and works great. For the next pedal I am going to ask him to modify the design to make it longer with a head on one end. |
|
| Back to top |
|
|
Scott SD
Samba Member
Joined: June 22, 2010
Posts: 153
Location: San Diego, CA
|
| Posted: Tue Nov 17, 2020 1:18 pm Post subject: Re: 70 Baja Build Thread The Long Road to La Paz |
|
|
Update on the brakes. Got the pedal cluster in and adjusted. I don't like the clutch pedal alignment. I think it is tweaked, but I'll fix it when I weld up another arm.
The issue I have is that when I filled the reservoir with brake fluid, the master and (3) of the wheel cylinders were leaking. The master was a quick fix, but the wheel cylinders are leaking from the threads on the bleeder. (2) wheel cylinders are Varga and (2) are TRW. I swapped bleeder screws and it is the same. I read on another thread that this is a common problem and the fix is to use teflon tape on the threads, which seems strange. Any thoughts? |
|
| Back to top |
|
|
joemama
Samba Member
Joined: February 09, 2006
Posts: 1636
Location: La Crescenta, California
|
| Posted: Tue Nov 17, 2020 3:20 pm Post subject: Re: 70 Baja Build Thread The Long Road to La Paz |
|
|
| The tip of the bleed screws is tapered, and its fit into the opposite taper in the cylinder is how it seals. I dont see how adding teflon tape would work or be desirable. I use a box wrench on the screws when I bleed the brakes, and usually it just takes a tad past snug to close them. |
|
| Back to top |
|
|
Scott SD
Samba Member
Joined: June 22, 2010
Posts: 153
Location: San Diego, CA
|
| Posted: Tue Nov 17, 2020 4:47 pm Post subject: Re: 70 Baja Build Thread The Long Road to La Paz |
|
|
| joemama wrote: |
| The tip of the bleed screws is tapered, and its fit into the opposite taper in the cylinder is how it seals. I dont see how adding teflon tape would work or be desirable. I use a box wrench on the screws when I bleed the brakes, and usually it just takes a tad past snug to close them. |
Exactly what I did to bleed the brakes. I snugged them a little tighter than normal just to be sure. The wheel cylinders were bought probably 10 years apart, so I swapped bleed screws to check if they were mixed and had a slightly different taper, but they both leak. I might find a stock bleed screw and check for any differences. I thought this would be an easy job. |
|
| Back to top |
|
|
dustymojave
Samba Member
Joined: January 07, 2007
Posts: 5802
Location: Lake LA, Mojave Desert, SoCal
|
| Posted: Fri Nov 20, 2020 12:10 pm Post subject: Re: 70 Baja Build Thread The Long Road to La Paz |
|
|
You MAY have over-torqued the bleed screws now when you bled them or in the past 10 years. That damages the tip. Bleed screws should NEVER get teflon tape of other thread dope.
It's possible you may need to replace the wheel cylinders now to fix it.
_________________
Richard
Offroading VW based cars since 1965
Tech Inspection 1963 - 2012 SCCA/SCORE/HDRA/MORE/MDR +
Retired from building Bajas, Fiberglass Buggies and Rails in the Mojave Desert. Also Sprints & Midgets, Dry Lakes, Road Race cars. All types New and Vintage
SoCalBajas Member
Kicked Cancer's A$$...1st and 2nd round...Fight ain't over yet. |
|
| Back to top |
|
|
Scott SD
Samba Member
Joined: June 22, 2010
Posts: 153
Location: San Diego, CA
|
| Posted: Thu Dec 10, 2020 11:10 pm Post subject: Re: 70 Baja Build Thread The Long Road to La Paz |
|
|
Finally, the wheel cylinder leaks are fixed after a month of multiple changes. I am still not clear on the root cause. The wheel cylinders were new, ATEs in the front, TRW/Vargas in the back. I tried new bleed screws, but still leaked. I found some VW and old Vargas in my parts stash. I honed and assembled the old housings with the new parts. After bleeding I still had a leak. Removed all of the bleeders, added teflon tape, and tightened the bleeders a little more than before. Finally no leaks. My wife helped to bleed the brakes with her hand because the car has no seat or steering wheel.
The brakes are good enough for now. The pedal is firm. Next I will move back to the steering column. I am still looking for a lathe to finish up a few parts. No luck yet, so I might have to buy one. |
|
| Back to top |
|
|
Scott SD
Samba Member
Joined: June 22, 2010
Posts: 153
Location: San Diego, CA
|
| Posted: Sun Jul 18, 2021 12:35 pm Post subject: Re: 70 Baja Build Thread The Long Road to La Paz |
|
|
It has been awhile since I updated my build post. Progress is slow, as always.
Some highlights:
I couldnt find a lathe to finish up the steering column parts, so I bought one. Ive always wanted a lathe anyway. It is an older 12 Taiwan machine, with some upgrades it will be a great lathe.
Welded the steering shafts together. Nice to finally have a steering wheel in the car.
When I went to the welder, I also brought another clutch and brake pedal to gusset. That will go in the car some day.
Since my objective is to get the car legal, I wanted to make it drivable. I needed a temp solution for a gas tank and found a Honda 1 g tank on ebay. Weled it in, mounted a pump & regulator, and wired everything into the switch. Now the car can start with the key. I threw in a stock seat and decided to take it for a test spin around my neighborhood. This is the first time the car has been driven in at least 20 years. It was an awesome sense of satisfaction.
Next was to get it licensed. I need to get the VIN inspected by the DMV because the title was from the 70s or 80s. To get it to the DMV was another challenge. I designed my trailer to take my 67 to the track and the baja does not fit. I found some stock wheels on Offerup and finally got it on the trailer (looks stupid with the small wheels). The DMV lady that was inspecting was skeptical, but I talked her into signing it off. I now have a title and current license plates.
In the middle of everything else, I chased for my friend at the Baja 250 and 500 races. We won the 250 and finished after the clock in the 500. I also found another 5 rib for a decent price. I have a weakness for VW transmissions. I should really get some help.
Next is to collect all of the parts in order to drop it off at the fab guy in Ensenada. I hate paying someone else, but I want this car to be done someday. All of the expensive items are on the list (shocks, seats, and gas tank). Next time I can take a day off I will go up to PRP to look at seat options with my son.
|
|
| Back to top |
|
|
|


