| Author |
Message |
will t
Samba Member
Joined: February 23, 2009
Posts: 179

|
 Posted: Tue Jan 26, 2021 8:43 am Post subject: 67 Restoration - not my first VW but it is my first Ghia Posted: Tue Jan 26, 2021 8:43 am Post subject: 67 Restoration - not my first VW but it is my first Ghia |
 |
|
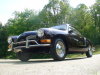
I am a hobbyist, not a professional, and therefore have way more questions than answers. I bought this 67 Ghia coupe from a friend who didn't know too much about it other than it has been sitting for quite a few years but was a daily driver in the not too distant past. Based on what I have seen so far it looks like it was professionally repainted at some point (changed from green to red) but the interior appears to be original. There is no engine with the car but the transaxle is in it. I wish I had taken more "before" pictures but I am anxious to get it to the body shop so I have been busy stripping the interior and the glass. The pan areas under the driver and passenger seats are rusted and will need to be replaced. The following pictures I took along the way and as of now the seats, carpet, under-carpet sound board, door cards, and all four operable window are out, along with all the hardware and locks. My goal is to get the body off the pan and send it to a media blaster and then to a body shop. I have never done this before and I'm not sure what the process is with the pan, but I'm hoping to learn along the way. I do not know how to weld, unfortunately. Next I intend to get the rest of the glass out and then the gauges. Any and all comments welcome. Thanks!
|
|
| Back to top |
|
 |
c21darrel
Samba Member
Joined: January 22, 2009
Posts: 8211
Location: San Dimas
|
|
| Back to top |
|
|
jeffrey8164 
Samba Member
Joined: January 06, 2018
Posts: 3815
Location: Georgia
|
| Posted: Tue Jan 26, 2021 12:39 pm Post subject: Re: 67 Restoration - not my first VW but it is my first Ghia |
|
|
I did the exact same thing 27 years ago. You will find once you start pulling it apart there will be more areas that need attention. In my case I pulled the body off the pan, and had both the body and the pan media blasted. In my case I just needed to replace sections instead of the whole floor pan halves as the car was fairly solid. Although I have no direct experience, I hear the Dansk floor pans are thicker. I didnt have to replace my heater channels or rocker panels, so I have no experience in that arena either.
I actually fixed my pan first and then send it to the media blaster. I took all the pieces and parts at once and then re-coated everything on my own afterward. The people that media blasted it actually cleaned it and primed it when they were done to protect it from rust and that primer to this day has not let loose I really dont know what they used but it was cut with Naptha and Toluene.
At one point I thought I should have the body dipped rather than media blasted but I did not feel comfortable having all the interior channels of the metal striped clean.
I dont know if Ive actually answered your question or if Im just rambling.
_________________
Volkswagen!
Turning owners into mechanics since 1938.
Let he that is without oil throw the first rod
(Compression 8.7:1) |
|
| Back to top |
|
|
will t
Samba Member
Joined: February 23, 2009
Posts: 179
|
| Posted: Tue Jan 26, 2021 2:44 pm Post subject: Re: 67 Restoration - not my first VW but it is my first Ghia |
|
|
| c21darrel wrote: |
Nice buy, congrats. Looks like it was a Roulette Green car.
https://www.thesamba.com/vw/forum/album_page.php?pic_id=1754330
Looks like you have a good start, they come apart one bolt at a time. 
Take your time and bag and tag everything. Most of the original parts, once restored are better than repops. Dont throw anything away. |
Thank you, I have not thrown anything away and would like to re-use whatever I can. I'm even thinking of taking the leatherette off the door cards, cleaning it, and putting it on new door cards that I make. Also would like to use the original soundboard under the carpet, and the carpet itself for that matter. I guess I'll just have to see what the carpet looks like after its been cleaned. The front passenger soundboard delaminated but I think I could get it pretty well back together with some liquid-ish roofing tar and hope I don't add any foreign smell. The rear ones aren't great either but I might try to use them doing the same type of repair but I am completely open to suggestions on all this.
The front seats have to be recovered but the "emergency" seat parts look like they might work once cleaned.
Oh and thanks for the picture of the green car. Beautiful! Maybe we will stick with it!
Chrome, rubber, and aluminum parts
Keeping everything bagged including all fasteners
Rear cards
Soundboards
Window glass
Carpet
Last edited by will t on Tue Jan 26, 2021 4:23 pm; edited 2 times in total |
|
| Back to top |
|
|
will t
Samba Member
Joined: February 23, 2009
Posts: 179
|
| Posted: Tue Jan 26, 2021 2:49 pm Post subject: Re: 67 Restoration - not my first VW but it is my first Ghia |
|
|
| jeffrey8164 wrote: |
I did the exact same thing 27 years ago. You will find once you start pulling it apart there will be more areas that need attention. In my case I pulled the body off the pan, and had both the body and the pan media blasted. In my case I just needed to replace sections instead of the whole floor pan halves as the car was fairly solid. Although I have no direct experience, I hear the Dansk floor pans are thicker. I didnt have to replace my heater channels or rocker panels, so I have no experience in that arena either.
I actually fixed my pan first and then send it to the media blaster. I took all the pieces and parts at once and then re-coated everything on my own afterward. The people that media blasted it actually cleaned it and primed it when they were done to protect it from rust and that primer to this day has not let loose I really dont know what they used but it was cut with Naptha and Toluene.
At one point I thought I should have the body dipped rather than media blasted but I did not feel comfortable having all the interior channels of the metal striped clean.
I dont know if Ive actually answered your question or if Im just rambling. |
I plan to get all the fasteners out that hold the body to the pan, but leave four for transportation to the blaster, and then have both blasted if they can do it. I've never done this before so we shall see. I think that it is good idea to weld the new pans in after blasting. I was hoping to keep the insulation on the transmission tunnel but that may not happen. Thanks for the help! |
|
| Back to top |
|
|
kingkarmann
Samba Member

Joined: November 05, 2003
Posts: 4111
|
| Posted: Tue Jan 26, 2021 2:53 pm Post subject: Re: 67 Restoration - not my first VW but it is my first Ghia |
|
|
Congrats!
Another 67 owner here.
The journey you plan to take is nearly my story
I am a novice but love to learn and tinker. It took me nine years to restore mine doing all I could myself. The only things I had professionals tackle was body work, re-plating and rebuilding and recovering the seats.
That means I refurbished the pan. I had to replace a rear quarter piece on the drivers side floor. That was my first attempt at welding. It was a miserable, ugly experience. I had no real guidance but I did it! It's not perfect but once I epoxy painted it it turned out pretty nice IMO.
I redid all the suspension and brakes & lines & rebuilt the engine. The transmission was in decent shape. Anyhow, before I ramble too much feel free to look up my Samba photo gallery under kingkarmann. There are several restoration photo's. Most are on the last 3-4 pages.
Love to see your progress!
_________________
"Depression is a malfunction of the instrument we use to determine reality.
Mike Gerson
What is your "Bespoke Reality"? |
|
| Back to top |
|
|
will t
Samba Member
Joined: February 23, 2009
Posts: 179
|
| Posted: Tue Jan 26, 2021 4:20 pm Post subject: Re: 67 Restoration - not my first VW but it is my first Ghia |
|
|
| kingkarmann wrote: |
Congrats!
Another 67 owner here.
The journey you plan to take is nearly my story
I am a novice but love to learn and tinker. It took me nine years to restore mine doing all I could myself. The only things I had professionals tackle was body work, re-plating and rebuilding and recovering the seats.
That means I refurbished the pan. I had to replace a rear quarter piece on the drivers side floor. That was my first attempt at welding. It was a miserable, ugly experience. I had no real guidance but I did it! It's not perfect but once I epoxy painted it it turned out pretty nice IMO.
I redid all the suspension and brakes & lines & rebuilt the engine. The transmission was in decent shape. Anyhow, before I ramble too much feel free to look up my Samba photo gallery under kingkarmann. There are several restoration photo's. Most are on the last 3-4 pages.
Love to see your progress!
|
Thank you! I will look at your threads. I was thinking of doing the pan myself but like you I have never welded. But maybe! I look at things like that like if I do it myself I'll save the cost of the welder, and then I'll have it for good. I have a lot of tools because of that philosophy.
What are you referring to when you say re-plating?
I'm considering doing the seats but only because I know if I get in trouble Sew-Fine is here in Denver.
That's impressive doing all the brakes and suspension. I might try that myself. I've replaced plenty of disc pads in my time but I've never gone through an entire system. It would be very educational and a lot of fun I think. |
|
| Back to top |
|
|
Rome
Samba Member
Joined: June 02, 2004
Posts: 9637
Location: Pearl River, NY
|
| Posted: Wed Jan 27, 2021 6:07 am Post subject: Re: 67 Restoration - not my first VW but it is my first Ghia |
|
|
Welcome to the Ghia world, will t! I hope you see the project through to completion, or at least to a driveable condition.
Your carpets appear to be originals, with the grey/black vinyl edge binding. I recommend that you try to save the individual pieces. Shake them out, bang them face-out against a wall to get loose dirt out, then put them into the washing machine with regular clothes detergent. Warm water, regular cycle. Hang each piece up to dry on a clothes line, letting it hang down instead of draping a larger piece over the line. You may be pleasantly surprised at the result, even if some small areas are worn.
When you are ready to take the shell to the body shop, make certain that you advise them to:
1. Leave the 2 small holes in the rear apron open instead of filling them in. They are M6 thread nuts to hold the diagonal metal support bars for your rear bumper overriders.
2. Don't fill in the vertical seams on the new rocker outer panels that are below the doors. Both the front and rear seams are supposed to be there.
3. Don't fill in the round piece that's just ahead of the rear fenderwell opening. That piece is a removeable cover (1 small nut on inside of fenderwell) to allow the rear axle torsion bar to be pulled out in case of servicing.
4. Carefully position the replacement headlamp buckets so that there is a small ledge going all around the bucket. This is for holding the factory headlamp trim ring rubber gasket. The bucket needs to protrude approx. 3/8" from the fender to give enough surface area for the gasket to sit. The gasket fits between the trim ring and the fender. You can see it here on this '61 (kingkarmann gallery). |
|
| Back to top |
|
|
kingkarmann
Samba Member
Joined: November 05, 2003
Posts: 4111
|
| Posted: Wed Jan 27, 2021 7:58 am Post subject: Re: 67 Restoration - not my first VW but it is my first Ghia |
|
|
| will t wrote: |
What are you referring to when you say re-plating?
I'm considering doing the seats but only because I know if I get in trouble Sew-Fine is here in Denver.
|
Rome made some excellent points!
Re-plating is just another term for re-chroming. I had all the chrome redone. Some go as far as re-plating fastener hardware in cadmium.
1967 Karmann Ghia seats have a one year only unique shape. I'm not sure if anyone sells that pattern. I ended up having mine re-built and recovered to the original contours.
The seat bottom is more concave. I'm not sure a kit will conform.
The upholsterer was able to rebuild and bolster the old padding and "encapsulate" it to restore the shape. I would be careful not to throw anything away. Even the worst looking materials can be saved or at the very least used as a pattern.
I hand stripped a lot of the paint myself. But now that I think about it I was almost 25 years younger 
Oh well, perhaps it will inspire 
_________________
"Depression is a malfunction of the instrument we use to determine reality.
Mike Gerson
What is your "Bespoke Reality"? |
|
| Back to top |
|
|
Braukuche
Samba Member
Joined: September 03, 2004
Posts: 10997
|
| Posted: Wed Jan 27, 2021 9:06 am Post subject: Re: 67 Restoration - not my first VW but it is my first Ghia |
|
|
Hands stripping is the best way. Media blasting in the wrong hands can result in damage to the panels plus media getting into every crevice imaginable and coming out later.
Paint strippers work pretty well. I used Citrastrip recently on a 58 panel bus. The trick is to let the chemical sit for at least 30 minutes, scrape, then spray a mist of water on it to reactivate it and scrape again.
Its messy but the best way to do it.
_________________
Go Reds! Smash state!
Retirement is here!
1956 Ghia
1959 SO-23 Westfalia
1960 double cab
1960 Baja Bug
1963 stretched double cab
1962 Golde sunroof Ghia
1963 356 B coupe
1963 Notchback
1967 21 window less rusty now |
|
| Back to top |
|
|
will t
Samba Member
Joined: February 23, 2009
Posts: 179
|
| Posted: Wed Jan 27, 2021 10:16 am Post subject: Re: 67 Restoration - not my first VW but it is my first Ghia |
|
|
| Rome wrote: |
Welcome to the Ghia world, will t! I hope you see the project through to completion, or at least to a driveable condition.
Your carpets appear to be originals, with the grey/black vinyl edge binding. I recommend that you try to save the individual pieces. Shake them out, bang them face-out against a wall to get loose dirt out, then put them into the washing machine with regular clothes detergent. Warm water, regular cycle. Hang each piece up to dry on a clothes line, letting it hang down instead of draping a larger piece over the line. You may be pleasantly surprised at the result, even if some small areas are worn.
When you are ready to take the shell to the body shop, make certain that you advise them to:
1. Leave the 2 small holes in the rear apron open instead of filling them in. They are M6 thread nuts to hold the diagonal metal support bars for your rear bumper overriders.
2. Don't fill in the vertical seams on the new rocker outer panels that are below the doors. Both the front and rear seams are supposed to be there.
3. Don't fill in the round piece that's just ahead of the rear fenderwell opening. That piece is a removeable cover (1 small nut on inside of fenderwell) to allow the rear axle torsion bar to be pulled out in case of servicing.
4. Carefully position the replacement headlamp buckets so that there is a small ledge going all around the bucket. This is for holding the factory headlamp trim ring rubber gasket. The bucket needs to protrude approx. 3/8" from the fender to give enough surface area for the gasket to sit. The gasket fits between the trim ring and the fender. You can see it here on this '61 (kingkarmann gallery). |
Duly noted, thank you! I will pass this along to the body shop when it comes time. And I will do my best to re-use the original carpets. They came out nicely with not too much of a fight so I expect them to clean up pretty well. Great picture by the way.
Thank again! |
|
| Back to top |
|
|
will t
Samba Member
Joined: February 23, 2009
Posts: 179
|
| Posted: Wed Jan 27, 2021 10:18 am Post subject: Re: 67 Restoration - not my first VW but it is my first Ghia |
|
|
| Braukuche wrote: |
Hands stripping is the best way. Media blasting in the wrong hands can result in damage to the panels plus media getting into every crevice imaginable and coming out later.
Paint strippers work pretty well. I used Citrastrip recently on a 58 panel bus. The trick is to let the chemical sit for at least 30 minutes, scrape, then spray a mist of water on it to reactivate it and scrape again.
Its messy but the best way to do it. |
I have hand stripped quite a few things in the past so your suggestion to do the Ghia is well taken. Do you think I should still take the pan to be blasted or do the same dangers exist with that?
Thanks! |
|
| Back to top |
|
|
Marcdeb
Samba Member

Joined: May 22, 2019
Posts: 3031
Location: Vermont
|
| Posted: Wed Jan 27, 2021 10:38 am Post subject: Re: 67 Restoration - not my first VW but it is my first Ghia |
|
|
If you want to strip the paint yourself, it will save you a ton of money. An easy and safe way to strip is with these Polycarbide Abrasive wheels and an angle grinder. The wheels cost about $6 each at Harbor Freight. Or packs of 10 on Amazon for $45. I had 4 coats of paint in places and One wheel striped a complete door and half the deck lid. Each took a little over an hour. These wheels do not do any damage to the metal.
_________________
Marc
68 Karmann Ghia Cabrio Autostick
71 Karmann Ghia Cabrio
Previously Owned:
2011 VW EOS Hard Top Conv
2008 Saab 9-3 2.0T Conv
2003 Saab 9-3 SE Conv
2001 Saab 9-3 Conv
1998 BMW 3 Series Conv
1997 Saab 900 Conv
1997 Mazda Miata
68 Ghia Vert Survivor with 22,350 miles: https://www.thesamba.com/vw/forum/viewtopic.php?t=768107&highlight=
71 Ghia Vert Restoration: https://www.thesamba.com/vw/forum/viewtopic.php?t=726710&postorder=asc |
|
| Back to top |
|
|
will t
Samba Member
Joined: February 23, 2009
Posts: 179
|
| Posted: Wed Jan 27, 2021 4:48 pm Post subject: Re: 67 Restoration - not my first VW but it is my first Ghia |
|
|
Interesting, thank you Marc. All ideas welcome!
Will |
|
| Back to top |
|
|
Rome
Samba Member
Joined: June 02, 2004
Posts: 9637
Location: Pearl River, NY
|
| Posted: Wed Jan 27, 2021 6:56 pm Post subject: Re: 67 Restoration - not my first VW but it is my first Ghia |
|
|
| Quote: |
| Great picture by the way. |
I just realized I goofed up. Photo was in 61karmann's gallery, not kingkarmann's.
Here's another reference shot of headlamp rings and the rubber gasket, barely visible but definitely there. This is from 67 Florida Deluxe's gallery of his fine, all original '66 Cabrio.
Not easy to see due to the light paint color and strong sunlight, but important details:
1. The nose ridge that runs from the hood openjing and down the center, has a definite profile whereby the "slopes" of the ridge are "steep". Many repairs reshape the ridge with filler so that they are shallower, especially when the ridge has been damaged from impact and the shop/restorer does not have a reference to an undamaged ridge.
2. The other spot which is often not correctly done is the front edge of the fender above the headlamp ring. There is a slight peak to the fender contour that peters out just before the ring. Many times that peak is incorrectly continued right to the edge. It may look right to the shop, and to most non-Ghia observers. Repair pieces for the headlamp surround section are usually correctly shaped at the top, but the repairer carries the fender peak too far forward with filler. |
|
| Back to top |
|
|
will t
Samba Member
Joined: February 23, 2009
Posts: 179
|
| Posted: Tue Feb 02, 2021 10:06 am Post subject: Re: 67 Restoration - not my first VW but it is my first Ghia |
|
|
Rome thank you for the advice about the fenders and headlights. I'll pass that along to the sheet-metal guy although he may be familiar with it because he does a lot of classic vw's and porsches)
I'm now in the process of separating the body from the pan. It is evident that due to rust I must replace both sides of the pan - full length replacements. Can anyone recommend where I would source these pan halves? I see quite a few of them offered here and there but thought if there is a range of quality I would like to be able to get the right ones. Any suggestions welcome. Thanks!
Last edited by will t on Thu Feb 04, 2021 8:10 pm; edited 1 time in total |
|
| Back to top |
|
|
rbsurfguy
Samba Member

Joined: August 10, 2008
Posts: 1757
Location: Fairfax, Northern Virginia Formerly Huntington Beach, SoCal
|
| Posted: Wed Feb 03, 2021 10:14 am Post subject: Re: 67 Restoration - not my first VW but it is my first Ghia |
|
|
Check here for body metal https://www.wagner-blechteile.de/produkte.html
I didn't see pan halves but they do sell a lot of other metal parts you may need, and I hear they sell some of the best products.
There is a thread or two with conversations about pans, I'm pretty sure you can find some vendors there where people have found the best made.
Have fun
Jeff
_________________
1971 Ghia convertible (Body off rebuild)
2019 VW Atlas 4Motion
2012 Passat-Sold
See my build on The Samba at:
Jeff's 71 Vert Restoration/Reassembly http://www.thesamba.com/vw/forum/viewtopic.php?t=6...highlight= |
|
| Back to top |
|
|
simon varley
Samba Member
Joined: March 12, 2020
Posts: 175
Location: Geelong Australia
|
| Posted: Thu Feb 04, 2021 12:17 am Post subject: Re: 67 Restoration - not my first VW but it is my first Ghia |
|
|
| Quote: |
| Thank you! I will look at your threads. I was thinking of doing the pan myself but like you I have never welded. But maybe! I look at things like that like if I do it myself I'll save the cost of the welder, and then I'll have it for good. I have a lot of tools because of that philosophy |
I'm self taught and did the floor pans on my 63. It's really not too hard, and frankly even if you stuff it up, its embarassing more than anything. |
|
| Back to top |
|
|
flobar00
Samba Member

Joined: January 20, 2021
Posts: 24
|
| Posted: Thu Feb 04, 2021 7:47 am Post subject: Re: 67 Restoration - not my first VW but it is my first Ghia |
|
|
| I recently purchased a pair of full length pans from California Imports. They are the Dansk version and come with slits that must be welded up, but it really helps with the fit. Overall, the fitting is amazingly close and I only had to do minor trimming for the fit. I was able to salvage the seat tracks from old, but I had to source new jack points from SoCal Imports. |
|
| Back to top |
|
|
will t
Samba Member
Joined: February 23, 2009
Posts: 179
|
| Posted: Thu Feb 04, 2021 8:09 pm Post subject: Re: 67 Restoration - not my first VW but it is my first Ghia |
|
|
| This is all very helpful. Thank you |
|
| Back to top |
|
|
|


