| Author |
Message |
Culito
11010101

Joined: December 07, 2006
Posts: 5865
Location: Columbia Missourah

|
 Posted: Mon Jun 07, 2021 4:34 pm Post subject: Re: Rusty 65 SC restoration Posted: Mon Jun 07, 2021 4:34 pm Post subject: Re: Rusty 65 SC restoration |
 |
|
Very nice!!
_________________
Copyright CJ Industries, Inc.
'64 standard w/2.0L type 4
'62 bug
| johnnypan wrote: |
| ...dont pay no attention to Culito,he's a cornhole.. |
|
|
| Back to top |
|
 |
Kb65single
Samba Member
Joined: July 24, 2019
Posts: 269
Location: Obxnc
|
| Posted: Tue Jun 08, 2021 5:06 am Post subject: Re: Rusty 65 SC restoration |
|
|
Removing the load bed made getting to the rust so much easier. Crawling in to the treasure chest area isn't easy and I have 2 doors to get in to it. I couldn't imagine restoring a SC with only one door , I'd have to cut a hole in the other side.
Had to cut the load bed where it meets the bulkhead because the bulkhead goes on top of the load bed. Load bed gets installed first then the bulkhead.
I used a spot weld remover/grinder from Eastwood that I have had for a long time. It is very important to drill a pilot hole in the center of the spot weld with a 5/64 or 3/32 drill bit. You have to start slowly at first then pick up speed when the circle is halfway through the metal. I think there were 230-250 spot welds to free up. Also important to see the spot weld, I use a fiber wheel/disk to clean the paint off so I can see the outer circle of the "spot".
Damage /rust that I will address soon
|
|
| Back to top |
|
|
Kb65single
Samba Member
Joined: July 24, 2019
Posts: 269
Location: Obxnc
|
| Posted: Tue Jun 08, 2021 7:50 am Post subject: Re: Rusty 65 SC restoration |
|
|
Removal of the rear section of the load bed ,more spot welds to deal with joy
Grinding the edge off , it was to hard to bend it back . Almost got it off in one piece.
Load bed was well used
Start my Gerson list
Load bed off on to the bulkhead.
|
|
| Back to top |
|
|
Captain Pike
Samba Member

Joined: December 30, 2003
Posts: 3341
Location: Talos IV, Piedmont Arizona
|
| Posted: Tue Jun 08, 2021 6:36 pm Post subject: Re: Rusty 65 SC restoration |
|
|
Are you going to reuse the truck bed? If not some of the popular vendors do NOT use etching primer. Beware.
_________________
LEARN TO SELF RESCUE
59 Panel bus, 1966 Single cab. 73' 181. 73 Westy. 91' H6 Vanagon 3.3L.
.....................All Current....................... |
|
| Back to top |
|
|
Burlyhammer
Samba Member

Joined: March 07, 2002
Posts: 1693
Location: Great north woods Maine
|
| Posted: Wed Jun 09, 2021 2:32 am Post subject: Re: Rusty 65 SC restoration |
|
|
| Nice work on the front frame. Your welds look great too! Theres a lot of rust there, but it looks like you are on the right track. Have fun! (Insert popcorn emoji) |
|
| Back to top |
|
|
Kb65single
Samba Member
Joined: July 24, 2019
Posts: 269
Location: Obxnc
|
| Posted: Wed Jun 09, 2021 3:49 am Post subject: Re: Rusty 65 SC restoration |
|
|
| Captain Pike wrote: |
| Are you going to reuse the truck bed? If not some of the popular vendors do NOT use etching primer. Beware. |
I will not be re using the bed, thanks for the warning |
|
| Back to top |
|
|
Kb65single
Samba Member
Joined: July 24, 2019
Posts: 269
Location: Obxnc
|
| Posted: Wed Jun 09, 2021 4:14 am Post subject: Re: Rusty 65 SC restoration |
|
|
| Burlyhammer wrote: |
| Nice work on the front frame. Your welds look great too! Theres a lot of rust there, but it looks like you are on the right track. Have fun! (Insert popcorn emoji) |
Thanks for the comments. They say money can't buy happiness but it can buy you a real nice welder, and seeing good welds always puts a smile on my face. |
|
| Back to top |
|
|
Kb65single
Samba Member
Joined: July 24, 2019
Posts: 269
Location: Obxnc
|
| Posted: Thu Jun 10, 2021 9:50 am Post subject: Re: Rusty 65 SC restoration |
|
|
Bulkhead removal
Peeling off the edge by grinding. Takes some time but it seems like the only way because of the window panel an inch away.
Finding all the spot welds is a challenge. Sneaking a putty knife in between the panels being welded together helps locate the next "spot". The top section had a high row and a low row with no repeatable pattern, makes you earn your money.
The hammer is for the putty knife.
Mission accomplished
Last edited by Kb65single on Sat Jul 10, 2021 2:56 pm; edited 1 time in total |
|
| Back to top |
|
|
Captain Pike
Samba Member
Joined: December 30, 2003
Posts: 3341
Location: Talos IV, Piedmont Arizona
|
| Posted: Thu Jun 10, 2021 9:54 am Post subject: Re: Rusty 65 SC restoration |
|
|
For those spot welds I use an extremely sharp hatchet and hammer to work down the line. Light hits until you get one then drill out.
_________________
LEARN TO SELF RESCUE
59 Panel bus, 1966 Single cab. 73' 181. 73 Westy. 91' H6 Vanagon 3.3L.
.....................All Current....................... |
|
| Back to top |
|
|
Kb65single
Samba Member
Joined: July 24, 2019
Posts: 269
Location: Obxnc
|
| Posted: Thu Jun 10, 2021 11:19 am Post subject: Re: Rusty 65 SC restoration |
|
|
Emergency brake removal was a challenge. All the horror stories I've read in the samba really are true. It's such a difficult area to work in. Getting a hammer strike on the metal cylinder is just about impossible. I tried heat and soaking with everything on the planet with no success. I used my last option which was destroying the metal cylinder by cutting it in 3. The Milwaukee Sawzall proved to be an ideal tool for the task.
I found a vendor who sells replacements with grease fittings here in the Samba. After I got the handle out it was easy to get the cylinder out. I put the correct size socket underneath and used a wide punch with a hammer. |
|
| Back to top |
|
|
Kb65single
Samba Member
Joined: July 24, 2019
Posts: 269
Location: Obxnc
|
| Posted: Thu Jun 10, 2021 3:11 pm Post subject: Re: Rusty 65 SC restoration |
|
|
Pulling the transaxle off so I can start building the rotisserie. I didn't have the tool that the Bentley book showed so I made one.
Used a threaded rod that was welded to a bracket that was bolted through the shock mount. Then tapped a hole in a square piece of steel that then bolted through the torsion arm. Slid that over the threaded rod and had a bolt and washer to start raising the arm. Worked like magic.
Ground the galvanization off, I read that it wasn't to healthy to breath the welding vapor.
Final product, probably need it for reassembly. Need to put it some where I can find it in a couple years.
|
|
| Back to top |
|
|
BarryL 
Samba Member

Joined: November 01, 2004
Posts: 14259
Location: Casa de Oro, California
|
| Posted: Thu Jun 10, 2021 6:23 pm Post subject: Re: Rusty 65 SC restoration |
|
|
| Is that tool so you can remove the spring plate? |
|
| Back to top |
|
|
Kb65single
Samba Member
Joined: July 24, 2019
Posts: 269
Location: Obxnc
|
| Posted: Fri Jun 11, 2021 4:43 am Post subject: Re: Rusty 65 SC restoration |
|
|
| BarryL wrote: |
| Is that tool so you can remove the spring plate? |
Yes it is. The 63-67 Bentley manual Section H-10 page 2 has a picture. Luckily VW drilled a 4th hole in the spring plate for securing the front of the reduction box to the spring plate. That helped hold the tool in one position. The Bentley tool looked like it might have the ability to slide so I included the bolt through the spring plate. The shock mount bolt goes through the tool at an angle so pay attention to that if anyone is considering making one. |
|
| Back to top |
|
|
Kb65single
Samba Member
Joined: July 24, 2019
Posts: 269
Location: Obxnc
|
| Posted: Sun Jun 13, 2021 4:22 pm Post subject: Re: Rusty 65 SC restoration |
|
|
Trying to figure out what type of rotisserie to build is a challenge. I searched through the internet and the samba. The size of work area automatically eliminated a Glideking type of rotisserie because my garage door opening is 82 1/2 " tall. I had to be able to move it in and out of the garage to sandblast and get out of paint and welding fumes and enjoy the good weather every so often. My opening was 117" wide so that was good. I've never restored a bus before which made choosing difficult. Being 64 years old poses all sorts of challenges that the younger crowd doesn't think twice about. Just common sense told me that turning the bus on its side would make it easier to work on. I finally narrowed my choice to the Jimb0w design. No height problems and tipping it from one side to the other requires minimal effort. Here's the link for the design and measurements Thanks Jimb0w.
https://drive.google.com/drive/folders/1U2rrXX19iUVmOLirkAxg0nYiwSPcdXSS
I started on the arms that the rotisserie tips on. The bed of the SC turned out to be a handy surface to work on.
Screwed strips of plywood to create a repeatable pattern since two arms are required
Clamping before welding
Welding the joints
Cutting the reinforcement metal with a sabre saw
Welding those in place
Now I can move on to the sections that attach to the bus. |
|
| Back to top |
|
|
Kb65single
Samba Member
Joined: July 24, 2019
Posts: 269
Location: Obxnc
|
| Posted: Sun Jun 20, 2021 2:25 pm Post subject: Re: Rusty 65 SC restoration |
|
|
I started on the rear section of rotisserie first. It's best to look at the drawing of Jimb0w's design while reading this, it's hard to explain without having the dimensions in front of you. I leveled the bus from front to back and side to side first. ( My garage door opening was 82 1/2" so I set the bus height at 79"). Then cut out and drilled holes in the rear plates that attach to the bus. I used Sgellis's rear plate design they were excellent thanks. Sgellis,s rear plate moves the cart more toward the center of the wheel well which gives you more room to work in the front of the wheel well. I bolted the plates to the bus parallel to each other. Parallel is important because getting the cart on and off is impossible if you don't ( I found out the hard way). I attached my wheels to a 2x4 ( with a 1/2 inch strip of plywood screwed to it, steel is 2x2 boxed 1/8 inch thick) so I could determine where they needed to be welded to the 421mm piece. I did not change any of the lengths of boxed steel in the drawings. I did need to slide the 1150mm piece down because Jimb0w's wheels were much larger than mine.
Plate bolted to the bus
Mocking up to verify where to weld wheel height
laying things out
welded all together
painted black
finger got in the way of the sabre saw ,that hurt
installed rear section of Jimb0w rotisserie. On to the front
|
|
| Back to top |
|
|
BarryL
Samba Member
Joined: November 01, 2004
Posts: 14259
Location: Casa de Oro, California
|
| Posted: Sun Jun 20, 2021 6:28 pm Post subject: Re: Rusty 65 SC restoration |
|
|
| Lots of gain for lots of pain? Are those stitches in your finger tip? |
|
| Back to top |
|
|
Kb65single
Samba Member
Joined: July 24, 2019
Posts: 269
Location: Obxnc
|
| Posted: Mon Jun 21, 2021 5:31 am Post subject: Re: Rusty 65 SC restoration |
|
|
| BarryL wrote: |
| Lots of gain for lots of pain? Are those stitches in your finger tip? |
No I did not get stitches . The sabre saw blade jumped on top of my finger tip splitting the nail and laying the skin back. The thought of them tearing the rest of the nail off and stitching it didn't appeal to me. Cleaned it up the best I could (with the help of my wife shacking her head back and forth) and taped it up. The tip of the nail finally fell off about 2 weeks later. I did not include a picture of the blood puddle on the garage floor. |
|
| Back to top |
|
|
Kb65single
Samba Member
Joined: July 24, 2019
Posts: 269
Location: Obxnc
|
| Posted: Mon Jun 21, 2021 11:28 am Post subject: Re: Rusty 65 SC restoration |
|
|
Just a note this will be easier to follow with Jimb0w's drawings. I included the link in a previous post.
Things I would do different on the rear section would be making the horizontal pieces that stick out of the wheel well removable. This would eliminate thigh and leg cuts and bruises while passing by. Would also make the 4x4 plates that bolt the arms to the cart larger. 4x6 would be better, that would give you more room for placing the bolt holes. My weld width got in the way of putting a socket or wrench on the bolts. I had to grind off some of the weld to tighten the bolts properly.
Now on to the front.
Jimb0w's wheels were 300mm (11 1/2") tall, mine were 7 3/4" (200mm) tall. In the rear axle section it was easy to make the change to compensate for the wheel height change. All I had to do was slide the bar that holds the wheels down approx. 3 1/2". All the dimensions of the pieces stayed the same. The front component of the tipper cart requires you to change the dimensions of some of the individual parts. The front [ 275mm (10 13/16") ] piece was made 3 1/2" taller which helped compensate for the shorter wheels. Increasing that dimension forced the 1542mm piece to become shorter. The cart has to "tip" evenly on both sections. In order to make them match I traced the rear section on a piece of 4'x8' plywood. I just used the tracing to determine the length of that piece (1542mm on the drawing).
I also decided to make one side of the frame attachment section removable. I tack welded both sides in place but it was to hard to get it on and off. Hopefully it will make it easier to not scratch the paint behind it. Making one side removable is so much easier for one person to handle. I also decided to make the horizontal arms that stick out of the wheel well removable. I knew I had to replace the doglegs and I had b-pillar and a-pillar issues. Not beating my head to a pulp made the extra work an easy decision.
Welding the fixed section , decided to add an extra 45 deg. brace
Making the removable section
Fixed side with removable horizontal arm
removable section bolted to cart and bus
Painting the finished product
Had to make a passenger and driver side removable horizontal arm so 4 pieces total.
I am now mobile and able to shake from side to side
Now I can start fixing the rest of the rust issues. I bought my metal from Metal Supermarkets they were easy to deal with but they do charge 5 dollars for a 45 degree cut on the steel square tube. Plan your cuts wisely.
|
|
| Back to top |
|
|
Kb65single
Samba Member
Joined: July 24, 2019
Posts: 269
Location: Obxnc
|
| Posted: Tue Jun 22, 2021 11:23 am Post subject: Re: Rusty 65 SC restoration |
|
|
Just a few more things on the rotisserie. The steel square tube measured 2x2x0.120". The steel square tube that slides over top of it measured 2.5x2.5x0.250" . Those tubes are machine welded down there length. In order to get them to slide inside of each other you have to grind the weld material that penetrates the inside of the 2.5x2.5x0.250 pieces. The outside of these pieces are smooth the insides are not.
Penetration weld material
Ground smooth
Now they slide inside each other with the help of the Dremel tool.
When I finally tried to tip the cart it was really difficult. What made it easy was making a bar that slid inside the arms so I could get better fulcrum. There is a round bar about a foot long inside that front arm. I welded a piece of metal to that bar so it would not rotate . I had two small pieces of 2x2 material left over that I welded with a 22.5deg. angle on each one.
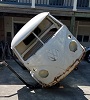
When the bus is tipped 45+ degrees you really need to brace it so it doesn't tip back on you. I am doing most of my work at 45 deg. it's easier to weld versus upside down. I have not tipped it to 90deg. because it hasn't been necessary. |
|
| Back to top |
|
|
chrisflstf
Samba Member

Joined: February 10, 2004
Posts: 3439
Location: San Diego
|
| Posted: Tue Jun 22, 2021 1:22 pm Post subject: Re: Rusty 65 SC restoration |
|
|
| Awesome work for an old guy! ( im old too) |
|
| Back to top |
|
|
|


