| Author |
Message |
rstrobel
Samba Member

Joined: April 05, 2018
Posts: 217
Location: Indianapolis, Indiana

|
 Posted: Sat Jun 19, 2021 8:37 am Post subject: Re: Romans Rust Bucket ('67 Beetle) Posted: Sat Jun 19, 2021 8:37 am Post subject: Re: Romans Rust Bucket ('67 Beetle) |
 |
|
Thanks! It may take a little longer, but it should be worth it in the end!
_________________
1967 VW Beetle
1993 VW Cabriolet
My 67 build thread: https://www.thesamba.com/vw/forum/viewtopic.php?t=716767
(__)
(O\!/O) <--- supposed to look like a beetle  |
|
| Back to top |
|
 |
rstrobel
Samba Member
Joined: April 05, 2018
Posts: 217
Location: Indianapolis, Indiana
|
| Posted: Sat Jun 19, 2021 8:48 am Post subject: Re: Romans Rust Bucket ('67 Beetle) |
|
|
In order to replace the body mount area, I first took a few reference pictures.
Then, I cut out a big chunk, so that I am able to better access and remove the rest of the metal.
There it is...the death foam!!
I began to pick the foam out with a pry bar, but I noticed that it was quite rusty up there. As such, I decided that I need to cut out a piece of metal in the inside, so that I am able to completely remove the foam and sandblast everything.
_________________
1967 VW Beetle
1993 VW Cabriolet
My 67 build thread: https://www.thesamba.com/vw/forum/viewtopic.php?t=716767
(__)
(O\!/O) <--- supposed to look like a beetle |
|
| Back to top |
|
|
Rome
Samba Member
Joined: June 02, 2004
Posts: 9638
Location: Pearl River, NY
|
| Posted: Sat Jun 19, 2021 9:02 am Post subject: Re: Romans Rust Bucket ('67 Beetle) |
|
|
Careful with the test-fitting of the rear body mount repair panel: There should be a rubber pad in between the underside of the body mount bracket and the top of the frame casting, though that won't influence the alignment of the mount panel on the rear quarter panel. The pad is there for reducing transmitting frame vibrations from road bumps to the body.
|
|
| Back to top |
|
|
rstrobel
Samba Member
Joined: April 05, 2018
Posts: 217
Location: Indianapolis, Indiana
|
| Posted: Sat Jun 19, 2021 10:35 am Post subject: Re: Romans Rust Bucket ('67 Beetle) |
|
|
| Rome wrote: |
Careful with the test-fitting of the rear body mount repair panel: There should be a rubber pad in between the underside of the body mount bracket and the top of the frame casting, though that won't influence the alignment of the mount panel on the rear quarter panel. The pad is there for reducing transmitting frame vibrations from road bumps to the body.
|
Thanks for keeping an eye out! Since I don't have the floor to body seal installed on the chassis, the car sits a little bit lower. Those are the original body mounts, and without the body seal, the body mount sits all the way on the chassis. However, when I weld in the new body mount, I'll make sure that I leave enough room for the body mount rubber.
_________________
1967 VW Beetle
1993 VW Cabriolet
My 67 build thread: https://www.thesamba.com/vw/forum/viewtopic.php?t=716767
(__)
(O\!/O) <--- supposed to look like a beetle |
|
| Back to top |
|
|
rstrobel
Samba Member
Joined: April 05, 2018
Posts: 217
Location: Indianapolis, Indiana
|
| Posted: Thu Jun 24, 2021 4:45 pm Post subject: Re: Romans Rust Bucket ('67 Beetle) |
|
|
After cutting the area out, I was able to remove most of the foam. I then sandblasted the whole area and painted it with Eastwood's "Internal Frame Coating."
Once it was painted and dry, I welded the panel back in place.
_________________
1967 VW Beetle
1993 VW Cabriolet
My 67 build thread: https://www.thesamba.com/vw/forum/viewtopic.php?t=716767
(__)
(O\!/O) <--- supposed to look like a beetle |
|
| Back to top |
|
|
Dibaltic
Samba Member
Joined: May 06, 2007
Posts: 564
Location: Chambersburg, Pennsylvania
|
| Posted: Thu Jun 24, 2021 6:19 pm Post subject: Re: Romans Rust Bucket ('67 Beetle) |
|
|
Nice work and very detail orientated !  |
|
| Back to top |
|
|
Chickensoup
Samba Member

Joined: January 06, 2018
Posts: 5368
Location: Good Hope, GA
|
| Posted: Fri Jun 25, 2021 7:07 am Post subject: Re: Romans Rust Bucket ('67 Beetle) |
|
|
| Dibaltic wrote: |
| Nice work and very detail orientated ! |
X2!
_________________
-'85 c10 5.3 LS, 222 cam, long tubes, x pipe, 3 inch spin tech's
-'05 B5.5 TDI Wagon 17in sport rims ;EGR + BSM + ASV Delete, Stage-2 Tune, straight pipe
'65 Tourist Delivery Build
'66 RIP
'69 RIP
Hosea 4:6 "My people are destroyed for lack of knowledge" |
|
| Back to top |
|
|
rstrobel
Samba Member
Joined: April 05, 2018
Posts: 217
Location: Indianapolis, Indiana
|
| Posted: Fri Jun 25, 2021 8:24 am Post subject: Re: Romans Rust Bucket ('67 Beetle) |
|
|
| Dibaltic wrote: |
| Nice work and very detail orientated ! |
| Chickensoup wrote: |
| Dibaltic wrote: |
| Nice work and very detail orientated ! |
X2! |
Thank you! I am quite glad that I removed the foam, as there was a lot of rust that was lurking in there. I didn't get a picture when I was completely done sandblasting, but I was able to remove 50% more of the black rust that is seen in the picture above. Although it may be louder when I drive it around, at least I won't have to worry about rust for a while in that area.
_________________
1967 VW Beetle
1993 VW Cabriolet
My 67 build thread: https://www.thesamba.com/vw/forum/viewtopic.php?t=716767
(__)
(O\!/O) <--- supposed to look like a beetle |
|
| Back to top |
|
|
rstrobel
Samba Member
Joined: April 05, 2018
Posts: 217
Location: Indianapolis, Indiana
|
| Posted: Wed Jul 14, 2021 10:12 am Post subject: Re: Romans Rust Bucket ('67 Beetle) |
|
|
I taped a straight piece of wood along the bottom of the door, in order to ensure that the quarter panel is in line with the door.
Then, I cut through both the original quarter panel and the aftermarket one.
Once the quarter panel was cut, I removed it and put seam sealer in all of the necessary locations. Man, that was a messy job...
_________________
1967 VW Beetle
1993 VW Cabriolet
My 67 build thread: https://www.thesamba.com/vw/forum/viewtopic.php?t=716767
(__)
(O\!/O) <--- supposed to look like a beetle |
|
| Back to top |
|
|
rstrobel
Samba Member
Joined: April 05, 2018
Posts: 217
Location: Indianapolis, Indiana
|
| Posted: Thu Jul 15, 2021 7:51 am Post subject: Re: Romans Rust Bucket ('67 Beetle) |
|
|
Due to the poor quality of the klokkerholm cross members, I had to extend part of the quarter panel so that it fits underneath the cross member (it was about 1cm too low).
After a little bit of cutting, bending, and preparation, I was able to weld the extension piece on.
Then I test fit the bottom part and welded it on.
This is the final product. Not the best, but it'll do.
_________________
1967 VW Beetle
1993 VW Cabriolet
My 67 build thread: https://www.thesamba.com/vw/forum/viewtopic.php?t=716767
(__)
(O\!/O) <--- supposed to look like a beetle |
|
| Back to top |
|
|
rstrobel
Samba Member
Joined: April 05, 2018
Posts: 217
Location: Indianapolis, Indiana
|
| Posted: Tue Jul 27, 2021 4:48 pm Post subject: Re: Romans Rust Bucket ('67 Beetle) |
|
|
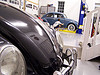
I bolted the fender onto the car, so that I was able to determine where I needed to weld the nut.
As you can see, the fender will need some work due to previous repairs that were poorly done.
Since I wanted to keep the indentations that are around the fender nuts, I cut it out of the extra piece of quarter panel and welded it into the new quarter panel.
After a little bit of grinding...
Next, it was time to fill in the hole that was there for the stud.
Now that everything was welded in place, it was time to grind it down.
I didn't really grind the back down, as no one will ever see it...and it allows for a little more strength.
I also went ahead and seam sealed the other body mount metal and quarter panel area.
Before welding the quarter panel in, I had to do a little bit of fitting.
Since the rear portion of the quarter panel was too far back, I decided to cut it right where the curved metal stopped. This allowed me to move the metal without creating too much extra work.
Then, I started to weld the quarter panel in.
I made sure to always check the angle with a straight edge. It's not perfect, but that's because the quarter panel did not have the correct curvature.
Once it was welded in, I ground it down and painted it.
Next, it was time to weld the wheel well in.
I first tacked it onto the original wheel well, and then I cut through both sheets of metal, to ensure proper fitment.
Once it was cut, it was time to slowly weld it in...always making sure that it still fit as I wanted it to.
By shining a flashlight on the backside of the weld, I found a couple of holes that I needed to weld.
Next, I moved to the driver-side quarter panel. Same process...tape jig onto door and cut through both quarter panels.
_________________
1967 VW Beetle
1993 VW Cabriolet
My 67 build thread: https://www.thesamba.com/vw/forum/viewtopic.php?t=716767
(__)
(O\!/O) <--- supposed to look like a beetle |
|
| Back to top |
|
|
viiking
Samba Member
Joined: May 10, 2013
Posts: 2667
Location: Sydney Australia
|
| Posted: Tue Jul 27, 2021 9:02 pm Post subject: Re: Romans Rust Bucket ('67 Beetle) |
|
|
Awesome work! I'm particularly impressed with the sandblasting.
Are you using a pressure pot or something else? I have seen the normal venturi gun type blaster that you just stick the suction hose into a bucket or the pressure pot type.
I only have small sections that I need to blast so don't want to clutter up the garage any more than I need to. I already have a sandblasting cabinet for detachable items.
Appreciate your advice.
_________________
1968 1500 RHD Lotus White Beetle since birth. In the hospital for major surgery
1966 Lancia Flavia Pininfarina Coupe - in the waiting room
Discharged: 1983 Vanagon, 1974 1800 Microbus,1968 Low Light,1968 Type 3 |
|
| Back to top |
|
|
matthew henricks
Samba Member

Joined: January 02, 2002
Posts: 1219
Location: So. Cal
|
|
| Back to top |
|
|
rstrobel
Samba Member
Joined: April 05, 2018
Posts: 217
Location: Indianapolis, Indiana
|
| Posted: Wed Jul 28, 2021 9:50 am Post subject: Re: Romans Rust Bucket ('67 Beetle) |
|
|
| viiking wrote: |
Awesome work! I'm particularly impressed with the sandblasting.
Are you using a pressure pot or something else? I have seen the normal venturi gun type blaster that you just stick the suction hose into a bucket or the pressure pot type.
I only have small sections that I need to blast so don't want to clutter up the garage any more than I need to. I already have a sandblasting cabinet for detachable items.
Appreciate your advice. |
Thank you!
I'm using a 110lb pressurized abrasive blaster from Harbor Freight, since I have quite a bit to sandblast. However, there is also a 20lb version available that is significantly smaller. The sandblasters work okay, they're not perfect, but they do get the job done for a reasonable price. I prefer sandblasting, as it is the proper way to remove rust.
This is the one that I use:
https://www.harborfreight.com/air-tools-compressor...69724.html
_________________
1967 VW Beetle
1993 VW Cabriolet
My 67 build thread: https://www.thesamba.com/vw/forum/viewtopic.php?t=716767
(__)
(O\!/O) <--- supposed to look like a beetle |
|
| Back to top |
|
|
rstrobel
Samba Member
Joined: April 05, 2018
Posts: 217
Location: Indianapolis, Indiana
|
| Posted: Wed Jul 28, 2021 9:59 am Post subject: Re: Romans Rust Bucket ('67 Beetle) |
|
|
| matthew henricks wrote: |
| Nice work. Love reading the metal replacement process. Every car is different and every builder does it different. I learn sooo much that way. Good work. |
Very true! Some methods work for some cars and don't for others. This is my first time doing all of this metal work, so I am just doing it based off of what I think is the better way of doing it. However, I do realize, after the fact, that some of my methods aren't the best way of doing it. For example, I did not know that there is so much tension in the inner part of the quarter panel/wheel well. Not knowing this, I removed the spot welds on the inside, along the wheel well, and all of a sudden the metal shifted significantly. It shouldn't be noticeable once I am done with it; however, now I know that it is better to completely weld the quarter panel in before removing those spot welds...which is what I am doing on the driver's side. You live and you learn
_________________
1967 VW Beetle
1993 VW Cabriolet
My 67 build thread: https://www.thesamba.com/vw/forum/viewtopic.php?t=716767
(__)
(O\!/O) <--- supposed to look like a beetle |
|
| Back to top |
|
|
rstrobel
Samba Member
Joined: April 05, 2018
Posts: 217
Location: Indianapolis, Indiana
|
| Posted: Sat Aug 14, 2021 9:12 am Post subject: Re: Romans Rust Bucket ('67 Beetle) |
|
|
I took a small break from the driver side and continued on passenger side. I had to make a custom piece for the lower corner of the wheel well. The first time that I tried to make the piece, I simply used a vise and bent it in the correct locations. However, that proved to be rather difficult, as the vise would crease the corners too much. As a result, I used some scrap tubing to get the correct shape...and instead of using one piece, I made it out of two.
I was able to use a part of the donor bug to ensure that the angles are correct.
Before sandblasting:
After sandblasting:
The first bend...
The second bend...
The finished product...
Once that was done, it was time to repeat the whole process on the other side.
First, I cut out a majority of the wheel well. I kept the spot welds on the lower part of the wheel well, so that the panel does not shift like last time.
Then, I cut out the inner part, so that I could remove the foam.
Once the foam was removed, I sandblasted the entire area and used internal frame coating to paint it. Then, it was time to weld the panel back in, grind the welds down, and paint it inside and out.
Since I accidentally cut the driver side quarter panel too low, I had to purchase a new one.
I also tested out the Rust Oleum Aircraft stripper...it's okay. It was able to remove the single stage with one coat.
However, it was not able to remove the primer with a second coat (after removing the bubbled single stage coat.
After cutting the quarter panel in the correct location, I was able to weld it in...always making sure that it is straight with a straight edge.
I then cut part of the inner door jamb out, as it was very thin.
Next, I tackled the lower wheel well area.
_________________
1967 VW Beetle
1993 VW Cabriolet
My 67 build thread: https://www.thesamba.com/vw/forum/viewtopic.php?t=716767
(__)
(O\!/O) <--- supposed to look like a beetle |
|
| Back to top |
|
|
rstrobel
Samba Member
Joined: April 05, 2018
Posts: 217
Location: Indianapolis, Indiana
|
| Posted: Sat Oct 02, 2021 4:53 pm Post subject: Re: Romans Rust Bucket ('67 Beetle) |
|
|
Time to update this thread...
I made sure that all of the curves lined up and that the curvature was correct.
Once the rear corner was welded in and ground down, I cut out a square, so that I could weld the nut in. The reason why I wanted to use the KlassicFab nut is because I wanted to to keep the factory indentation.
Once the nut fit, I painted the the metal behind it.
Time to weld it in...
The fender still fit as expected
Here it is fully welded in.
I am glad that I removed this metal piece and sandblasted behind it...there was a lot of rust lurking behind it.
Then, I trimmed the wheel well area and welded it in.
For some reason the corner didn't fit, so we had to use the Oxyacetylene torch to bend it into place.
Here it is fully welded in.
While the torch is out, I decided to remove the rear clip by melting the brazing.
_________________
1967 VW Beetle
1993 VW Cabriolet
My 67 build thread: https://www.thesamba.com/vw/forum/viewtopic.php?t=716767
(__)
(O\!/O) <--- supposed to look like a beetle |
|
| Back to top |
|
|
scrivyscriv
Samba Electrician

Joined: October 04, 2011
Posts: 2922
Location: Memphis
|
|
| Back to top |
|
|
rstrobel
Samba Member
Joined: April 05, 2018
Posts: 217
Location: Indianapolis, Indiana
|
| Posted: Fri Oct 29, 2021 5:13 pm Post subject: Re: Romans Rust Bucket ('67 Beetle) |
|
|
| scrivyscriv wrote: |
Your welds look pretty good.  |
Thank you! I am pretty much just doing a bunch of tack welds, to prevent the panel from warping.
_________________
1967 VW Beetle
1993 VW Cabriolet
My 67 build thread: https://www.thesamba.com/vw/forum/viewtopic.php?t=716767
(__)
(O\!/O) <--- supposed to look like a beetle |
|
| Back to top |
|
|
Chickensoup
Samba Member
Joined: January 06, 2018
Posts: 5368
Location: Good Hope, GA
|
| Posted: Fri Oct 29, 2021 5:28 pm Post subject: Re: Romans Rust Bucket ('67 Beetle) |
|
|
 very nice work! very nice work!
_________________
-'85 c10 5.3 LS, 222 cam, long tubes, x pipe, 3 inch spin tech's
-'05 B5.5 TDI Wagon 17in sport rims ;EGR + BSM + ASV Delete, Stage-2 Tune, straight pipe
'65 Tourist Delivery Build
'66 RIP
'69 RIP
Hosea 4:6 "My people are destroyed for lack of knowledge" |
|
| Back to top |
|
|
|


