| Author |
Message |
Kb65single
Samba Member
Joined: July 24, 2019
Posts: 270
Location: Obxnc

|
 Posted: Tue Aug 31, 2021 7:36 am Post subject: Re: Rusty 65 SC restoration Posted: Tue Aug 31, 2021 7:36 am Post subject: Re: Rusty 65 SC restoration |
 |
|
The last two pieces have to be made at the same time because each panel determines the size and shape of each other. Started with filling in the hole in the outer skin.
Started out with a 90deg. bend to make the flange that will weld to the vent/louvre side flange.
That flange is curved at the tip and needs to be shaped inward. This picture is when the flange is straight.
I used my shrinker/stretcher to make the bend but you can make pie cuts like I did on the passenger side to accomplish the same thing. Next picture shows the correct shape.
Saved the tip of the wheel well section and grafted that on to the new piece.
Ready to weld in but before that the wheel well section needs to be made. Not welding that section in makes it a lot easier to test fit and make the bends to shape the wheel well section.
Made the inner flange first with the shrinker, that allowed me to fit the side that gets butt welded to the rest of the wheel well (screws give me repeatable reference points)
When those 2 sides are fit, the 3rd side follows the profile of the outer skin.
Used pie cuts and bent the flange in small sections
Traced a line on the flange so the outer skin could fit.
All fit now ready to weld
While the wheel well section was screwed to the bus I welded the pie cuts shut. Grinding and smoothing is a lot easier on the bench
Almost there  |
|
| Back to top |
|
 |
andybla
Samba Member
Joined: March 03, 2014
Posts: 630
Location: BE
|
| Posted: Tue Aug 31, 2021 7:56 am Post subject: Re: Rusty 65 SC restoration |
|
|
you're doing great, keep it up!  |
|
| Back to top |
|
|
Kb65single
Samba Member
Joined: July 24, 2019
Posts: 270
Location: Obxnc
|
| Posted: Tue Aug 31, 2021 2:05 pm Post subject: Re: Rusty 65 SC restoration |
|
|
| andybla wrote: |
| you're doing great, keep it up! |
thanks for the encouragement , it keeps me moving forward  |
|
| Back to top |
|
|
chrisflstf
Samba Member

Joined: February 10, 2004
Posts: 3442
Location: San Diego
|
| Posted: Tue Aug 31, 2021 3:24 pm Post subject: Re: Rusty 65 SC restoration |
|
|
I think you are the Plug Weld master  |
|
| Back to top |
|
|
Kb65single
Samba Member
Joined: July 24, 2019
Posts: 270
Location: Obxnc
|
| Posted: Wed Sep 01, 2021 6:09 am Post subject: Re: Rusty 65 SC restoration |
|
|
Welded in the outer skin first. A little rustproofing in between panels.
Full weld on the outside
Plug welds on the inside
Left the last part of the outer skin flange unbent which allows the wheel well panel to slide in
Tacked the butt weld
These clamps are great for butt welds but I find the metal that slides in between the metal to thick. I thinned that metal down by at least half maybe a little more. A copper plate helps if the gap is to wide.
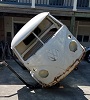
Full weld. Having the bus on the tipper cart helps with welding and grinding. Building the cart was worth the time and effort.
After the wheel well panel was welded 360 the flange on the outer skin was trimmed and fit to the contours of the wheel well arch. That side was a little more involved than the passenger side and now the rear of the bus is rust free.
Will be moving forward now to address more rust issues. |
|
| Back to top |
|
|
Two Glove Boxes
Samba Member

Joined: March 03, 2005
Posts: 838
Location: Texas
|
|
| Back to top |
|
|
BIG_TEXAS_PETE
Samba Member
Joined: August 11, 2006
Posts: 167
Location: England
|
|
| Back to top |
|
|
FeveredMind
Samba Member

Joined: December 28, 2016
Posts: 147
Location: Riverside, CA
|
| Posted: Thu Sep 02, 2021 10:01 am Post subject: Re: Rusty 65 SC restoration |
|
|
I just read through the entire thread and, my goodness, that is some fine work you are doing.
 |
|
| Back to top |
|
|
Kb65single
Samba Member
Joined: July 24, 2019
Posts: 270
Location: Obxnc
|
| Posted: Mon Sep 06, 2021 3:10 pm Post subject: Re: Rusty 65 SC restoration |
|
|
German Krew
thanks again
BIG TEXAS PETE
thanks
Imadesignerd
You probably need some dry eye drops after going through all those pictures
Thanks y'all for your posts and kind encouragement/comments.
Since the ass end of the bus has improved the rest of the SC needs major improvement to match. I knew that the frame still had weak areas that needed attention and the b-pillar, c-pillar and floor supports were a major liability. This area was overwhelming for a first timer like me. I didn't want to cut to much away and lose reference points but at some point some the rusty and poorly repaired areas offered no help. The middle of the treasure chest floor was in really good shape and I made a commitment to try to save that. Watching the glidekings restoration really made me shy away from trying to deal with the rear of the treasure chest floor near the heater tubes. My heater tubes were in good shape and the floor was too. I decided to replace the top hats, I-beams and try to save the middle of the treasure chest floor . First part was donating to the Gerson panel improvement research fund.
The b-pillar top hat was rusted through on both the passenger and driver side inside the frame rails. Outside the frame rails they were in even poorer shape.
View from cab side of passenger b-pillar top hat. Emergency brake cable tube is plugged with a phillips head screw through a rubber hose.
Next is middle cab side b-pillar with shifter tube plugged with a rubber cork from ace hardware.
last is drivers side view
Drivers side b-pillar outside the frame . Cut away the outrigger and jack point.
View of the jack point from the treasure chest floor side. An f-in mess.
This is how an I-beam reacts to salt on the northeast coast.
The hole that was in the frame a few pictures ago grew in size after a short explore. Wanted to keep the inside of the frame plate while I fixed the outside. 14 gauge metal on the outside of the frame. The future inside plate will be without the swiss cheese look. The front chassis cross brace was repaired in the past(KF 504) and will be replaced.
Bent a 90 deg. piece on the vice with a hammer. 14 gauge is hard to bend. Used the shrinker/stretcher to bend that . But you can pie cut and weld to get the same effect.
cut a flat plate to weld to it.
welding from the inside
Tacked in place
Almost good as new
|
|
| Back to top |
|
|
Kb65single
Samba Member
Joined: July 24, 2019
Posts: 270
Location: Obxnc
|
| Posted: Sat Sep 11, 2021 7:40 am Post subject: Re: Rusty 65 SC restoration |
|
|
Moved back to the to the rear jack point and outrigger . Nothing worth saving when I was removing them. The rear outrigger had been replaced before and when I was cutting it off I was dealing with two thicknesses of metal in various places and it was frustrating the crap out of me. Finally figured out that the last restorer of this bus just welded over the top of the first one.
Peeling off a few layers of stuff to get a better look.
That's what was left.
Cleaning up the outrigger at the frame.
Rust through
More nuts from the mice.
Hole got bigger in the search for full thickness metal. Found a hole on the other side of the frame that will need to be fixed later. Vacuumed and scraped the inside of the frame from the ass end of the bus to the hole. Sprayed some rust fixer inside.
Repaired
After repairing the outside of the drivers side frame I really didn't know if I could take out the frame supports on the inside without some sort of bracing. I decided to go to the passenger side frame and do the same dissection and repairs to the outside of the frame. But since I had the bus tipped to work on the driver side I wanted to find out if I could get the shift tube and emergency brake cable tubes out without destroying them. Once again I thought that I could replace the top hats and I-beams and keep the middle of the treasure chest floor. The emergency brake tubes have just one weld, on one side, on each of the 3 I-beams and the same on the top hats. The I-beams were a little more difficult just because of the thickness of the metal and the top hats were wasted because of rust. I started to drill small holes a good distance away from the tube weld.
Increased the size of the drill bits.
Didn't take that long, just keeping the first small drill hole away from the tube is key. Use a sharp punch to mark the holes.
Measured how much the emer. brake cable tube sticks out of the b-pillar top hat/bulkhead underneath the bus.
Always good to not rely on memory when you don't know how long it will take to complete a task. |
|
| Back to top |
|
|
Culito
11010101

Joined: December 07, 2006
Posts: 5866
Location: Columbia Missourah
|
| Posted: Sat Sep 11, 2021 10:43 am Post subject: Re: Rusty 65 SC restoration |
|
|
I've been waiting for an upadate!
_________________
Copyright CJ Industries, Inc.
'64 standard w/2.0L type 4
'62 bug
| johnnypan wrote: |
| ...dont pay no attention to Culito,he's a cornhole.. |
|
|
| Back to top |
|
|
Kb65single
Samba Member
Joined: July 24, 2019
Posts: 270
Location: Obxnc
|
| Posted: Thu Sep 16, 2021 7:41 am Post subject: Re: Rusty 65 SC restoration |
|
|
Tipped the SC to the other side and got the other emergency cable tube out. The shifter linkage tube was a little more difficult just because the access to the welds that held the tube in were hidden especially when it went through the top hats. Where the tube went through the I-beams was the easy part, the weld was easy to see and grinding it off was easy to get to.
Pictures show the welds ground off on the bottom of the reinforcement plate that the tube slides into the I-beam.
Found one of the welds inside the b-pillar top hat. I guess the long heater tube was installed after the weld was done.
Had to persuade the tube out of its rusty chamber. Fortunately I cut an old bicycle apart for some round steel and the metal tube that the holds the seat just slid inside the shift tube and I was able to pound the tube out without destroying or damaging the ends.
After I had the tube out I did find one weld on the rear most top hat that I just couldn't see or get to. After pounding it from front to back the steel of the top hat finally fatigued and broke free. Used a lot of WD-40 during the process. Cleaned the tube up and figured I could use it as an alignment tool for when I install the new top hats and I-beams.
Found another weld inside the top hat of the rear frame cross support. Was able to get to that by cutting some of the cross support away. The cross support was wasted and needed to be replaced.
The tubes that were the most difficult to get out of the way were now out of the way. The rest of the spaghetti of tubes were welded in plain site and easy to free up. So now I could pursue the frame repairs on the passenger side. Cut away the jack point and outrigger at the passenger side b-pillar.
I was happy to see that I didn't have any holes in the outside of the frame.
Cleaned the outrigger still no holes in the frame.
A wonderful site . Saves a lot of work.
After viewing a bunch of restoration threads I didn't see anybody reinforce the frame before cutting the front cross frame support away so I started to cut it away. The driver side inside frame needed rust repair and the bus was tipped in the right direction.
Marked the area that needed repair
Had to save the bracket that holds the clutch cable
rustproof as much as I could
16 gauge metal on the inside on frame
new piece ready
Welded in. Time to clean the work space.
|
|
| Back to top |
|
|
Walk Thru KO
Samba Member

Joined: August 14, 2003
Posts: 156
Location: North Carolina
|
| Posted: Thu Sep 16, 2021 8:49 am Post subject: Re: Rusty 65 SC restoration |
|
|
An Expert at work, I love your skills and methods of attack!!
Would you mind sharing about how many man-hours you'd estimate you have into this SC up to this point?
Keep up the great work!! |
|
| Back to top |
|
|
Kb65single
Samba Member
Joined: July 24, 2019
Posts: 270
Location: Obxnc
|
| Posted: Thu Sep 16, 2021 1:47 pm Post subject: Re: Rusty 65 SC restoration |
|
|
| Culito wrote: |
I've been waiting for an upadate!
|
thanks again for the happiness and joy. |
|
| Back to top |
|
|
Kb65single
Samba Member
Joined: July 24, 2019
Posts: 270
Location: Obxnc
|
| Posted: Thu Sep 16, 2021 2:27 pm Post subject: Re: Rusty 65 SC restoration |
|
|
| Walk Thru KO wrote: |
An Expert at work, I love your skills and methods of attack!!
Would you mind sharing about how many man-hours you'd estimate you have into this SC up to this point?
Keep up the great work!! |
Not an expert I have never restored a bus before. If I was one I probably would have never bought this thing. But I do love a challenge. Restored 3 beetles but never a bus. As far as hours go probably more than I want to know. I bought this bus with the expectation of substituting " SOME" of my time with what I spent working full time and running my business. My wife probably wishes I would have not retired because the house would be much quieter and wouldn't stop her to help me put band-aids on all the cuts I get working on this thing. I easily put 30 hrs. a week on this thing when I get in the mood. Can't do it all the time have to many pots on the kettle. |
|
| Back to top |
|
|
chrisflstf
Samba Member
Joined: February 10, 2004
Posts: 3442
Location: San Diego
|
| Posted: Thu Sep 16, 2021 2:56 pm Post subject: Re: Rusty 65 SC restoration |
|
|
| Just an FYI, but I would be spraying Phosphoric acid ( Ospho) on all the rust you cant get to like seams and flanges. It will kill it. Keep it going, looking great! |
|
| Back to top |
|
|
Mr Margaret Scratcher
Samba Member
Joined: February 10, 2013
Posts: 246
Location: Cambridge UK
|
| Posted: Fri Sep 17, 2021 4:21 am Post subject: Re: Rusty 65 SC restoration |
|
|
Great work!
Quick question - how do you maintain the seam here in between the rear corner and the wheelarch/side panel where you had to weld the repair section in?
Careful use of a cutting disc afterwards?
|
|
| Back to top |
|
|
Kb65single
Samba Member
Joined: July 24, 2019
Posts: 270
Location: Obxnc
|
| Posted: Fri Sep 17, 2021 4:43 am Post subject: Re: Rusty 65 SC restoration |
|
|
| chrisflstf wrote: |
| Just an FYI, but I would be spraying Phosphoric acid ( Ospho) on all the rust you cant get to like seams and flanges. It will kill it. Keep it going, looking great! |
Yes I love Ospho for minor rust in between panels, its water like , and soaks in well. Needs to be top coated though. |
|
| Back to top |
|
|
Kb65single
Samba Member
Joined: July 24, 2019
Posts: 270
Location: Obxnc
|
| Posted: Fri Sep 17, 2021 5:01 am Post subject: Re: Rusty 65 SC restoration |
|
|
| Mr Margaret Scratcher wrote: |
Great work!
Quick question - how do you maintain the seam here in between the rear corner and the wheelarch/side panel where you had to weld the repair section in?
Careful use of a cutting disc afterwards?
|
Right at the butt weld in the 90deg bend I weld from the back side. You should get penetration to the outside but it won't be as much as if you started the bead across the seam from the outside. I also have a small Triangular file that I finish that area with. Stay away from the 90deg bend on the outside a couple of mm. |
|
| Back to top |
|
|
andybla
Samba Member
Joined: March 03, 2014
Posts: 630
Location: BE
|
| Posted: Sat Sep 18, 2021 1:17 pm Post subject: Re: Rusty 65 SC restoration |
|
|
| another nice update |
|
| Back to top |
|
|
|


