| Author |
Message |
vwwestyman
Samba Member

Joined: April 24, 2004
Posts: 5688
Location: Manhattan, Kansas, USA

|
 Posted: Tue Oct 26, 2021 7:46 pm Post subject: 2003 Eurovan Heater Core Replacement How-To Posted: Tue Oct 26, 2021 7:46 pm Post subject: 2003 Eurovan Heater Core Replacement How-To |
 |
|
After looking all over for a good how-to on getting to the heater core for this Van and coming up short (I did find a bit of info on earlier Vans, but there are a few differences) I decided to document my process. Due to life, I'm sure I'll be pausing and updating as I work on it over the next few days (or maybe longer...?) And, bonus, it'll probably help me remember how to put this mess all back together because I'm only going to have an hour or two every once in a while to work on this.
Anyway-
* Clean out the stuff your wife left in the van, so you have more room to work. If there are candy bars in there leftover from, say, a recent camping trip-leave them. You might want snacks! Take the rest of the stuff inside for her to put away.
* Disconnect the battery. Don't want to let the smoke out of anything.
* Remove the front seats. Mostly because it is super easy and you'll have tons of room to work.
Just look at all this space!
* Make sure you have a beer appropriate to the time of year you're working, to help you get through the nonsense of this big ole job. In my case, it is an Oktoberfest because it is currently late October and I am somewhat fretting about getting this done before real cold weather arrives!
* Remove the console/cupholder. One screw on each side, then you have to kind of squeeze the back of it by the shifter. Perhaps if your interior is still especially nice, you might want to move/loosen the shifter housing because it is a squeeze and will rub on the shifter housing a bit. But it's doable.
*Remove the rest of the lower trim/panels:
Driver side panel above the feet: Well, there is one screw into the center console. Besides that, mine is kind of broken so you'll just need to look for other screws.
Passenger side panel above the feet: There is a large plastic slotted screw by your right foot. Then two clips that pull out of the "knee bar" trim, and it fit into a slot at the front.
Center console trim: There is a screw on the right side into the "knee bar" and four screws holding the small panel on. Remove all those and pop it out. If applicable, disconnect the sensor that is clipped in to the lower air duct. I suspect it is for the Climatronic system.
* Optional, if applicable: Take a break at this point to go in and sing a song to your baby as he goes to bed.
*Gently pry out the vents. I used a flat screwdriver on either side of the vent to gently pry one side out a little bit then the other. Then I was able to pull the vents. Left the very center one in place.
* Remove the knee bars. They are each held in by two bolts near the doors, behind trim and one nut (passenger side) or bolt (driver side near the center console area. To remove the trim, look very closely for two plastic push-pins and push them in, then pry the trim pieces off.
Driver side bolts
middle driver side center bolt
Passenger side trim with buttons pushed in
*I chose to lower the steering column rather than remove the wheel, etc. I guess time will tell if this was a good choice.
To do so, I removed the "clamshell" trim just in front of the steering wheel. 3 screws then gently pry the halves apart. There is a bolt that goes through the support. It is a 13 mm head, and once you loosen it you have to get it at just the right angle to pull out; the metal arms that support the fuse panel are a bit in the way. I also had to loosen but didn't remove the bolt at the very front of the support. That allowed it to begin to pivot lower.
I also lowered the fuse panel and removed the ground tree to give the column a little more room to lower for now.
_________________
Dave Cook
President, Wild Westerner Club
1978 Champagne Edition Westy, repowered to '97 Jetta TDI
1973 Wild Westerner
My Thing
Last edited by vwwestyman on Sun Oct 31, 2021 1:03 pm; edited 3 times in total |
|
| Back to top |
|
 |
vwwestyman
Samba Member
Joined: April 24, 2004
Posts: 5688
Location: Manhattan, Kansas, USA
|
| Posted: Tue Oct 26, 2021 8:21 pm Post subject: Re: 2003 Eurovan Heater Core |
|
|
* Begin to remove trim around the controls/dash. Once I had my radio out, I was able to easily pop out the trim piece around the ashtray and buttons. The trim around the HVAC controls and that little cubby required a little more pulling but popped out pretty easily.
* Climatronic was held in by 4 screws and easy to unplug; if you've got the three dials, you may need to fish it out and down from the back to get out of the way.
* To remove the rest of the center vents, there are two screws below the vents you previously removed, and two clips to press up on with a screwdriver to release it.
* Once that's out, you can remove the two screws holding the cluster trim and pop it out. Watch out, there is a strip of foam along the bottom, and that foam is likely degraded and sticky and yucky.
* Be grossed out because you've now discovered a number of the previous owner's fingernails that have gotten in below the cluster trim, and also some made their way onto the top of the steering column support. 
* Remove the left and right vents (similar as middle ones, a screw and two tabs to pry, though these are a bit more of a pain).
* Remove the headlight switch. To do so, you'll insert a stiff feeler gauge in the gap at the top of the switch, about in the middle. Slide it to the right to push a tab that will release the lock.
Close up of tab you push to the right
* Take a break for the evening and vow to resume later.
_________________
Dave Cook
President, Wild Westerner Club
1978 Champagne Edition Westy, repowered to '97 Jetta TDI
1973 Wild Westerner
My Thing
Last edited by vwwestyman on Wed Oct 27, 2021 10:09 am; edited 1 time in total |
|
| Back to top |
|
|
Wasted youth
Samba Member

Joined: July 06, 2012
Posts: 5134
Location: California's Hot and Smoggy Central Valley
|
| Posted: Tue Oct 26, 2021 9:08 pm Post subject: Re: 2003 Eurovan Heater Core |
|
|
I thought your comment about 'not letting the smoke out of anything' was hilarious. I've never heard that one. 
But I'm lost. Are you installing a Eurovan heater core in a Baywindow? Or is this posted in the wrong forum? |
|
| Back to top |
|
|
vwwestyman
Samba Member
Joined: April 24, 2004
Posts: 5688
Location: Manhattan, Kansas, USA
|
|
| Back to top |
|
|
consvws
Samba Member

Joined: April 07, 2009
Posts: 950
Location: Roseburg, OR
|
| Posted: Wed Oct 27, 2021 7:19 am Post subject: Re: 2003 Eurovan Heater Core |
|
|
| Stick a Subaru in it, oh wait wrong forum |
|
| Back to top |
|
|
danfromsyr
Samba Member

Joined: March 01, 2004
Posts: 15143
Location: Syracuse, NY
|
| Posted: Wed Oct 27, 2021 9:44 am Post subject: Re: 2003 Eurovan Heater Core |
|
|
put a CDH in the EV and enjoy it on and off the road.. 
most cars the 1st part the factory puts on the chassis is the heater core. then the car is built around it.. you know. because they last forever right.
best luck..
_________________
| Abscate wrote: |
| These are the reasons we have words like wanker |
|
|
| Back to top |
|
|
vwwestyman
Samba Member
Joined: April 24, 2004
Posts: 5688
Location: Manhattan, Kansas, USA
|
| Posted: Wed Oct 27, 2021 10:49 am Post subject: Re: 2003 Eurovan Heater Core |
|
|
| danfromsyr wrote: |
put a CDH in the EV and enjoy it on and off the road..
most cars the 1st part the factory puts on the chassis is the heater core. then the car is built around it.. you know. because they last forever right.
best luck.. |
I've got aux heaters in all three of my old VWs and really like the pre-heat option and have noodled on the idea of a CDH or similar in the Eurovan. But I still figure it would be good to have this thing's proper heater going.
You are right, though. I'm confident that they sent the heater core down the line, and then built the entire car around it. Did one on a MKIV Golf last fall. Previously did one on a Corrado I had. All require a LOT of disassembly.
_________________
Dave Cook
President, Wild Westerner Club
1978 Champagne Edition Westy, repowered to '97 Jetta TDI
1973 Wild Westerner
My Thing |
|
| Back to top |
|
|
Endopotential
Samba Member

Joined: February 13, 2012
Posts: 186
Location: Pacifica, California
|
| Posted: Wed Oct 27, 2021 1:25 pm Post subject: Re: 2003 Eurovan Heater Core |
|
|
| Super great writeup and pictures. Thanks for putting this together. Hope to never have to do this, but this will be a great resource for all of us. |
|
| Back to top |
|
|
vwwestyman
Samba Member
Joined: April 24, 2004
Posts: 5688
Location: Manhattan, Kansas, USA
|
|
| Back to top |
|
|
Zeitgeist 13
Samba Member

Joined: March 05, 2009
Posts: 12115
Location: Port Manteau
|
| Posted: Wed Oct 27, 2021 9:49 pm Post subject: Re: 2003 Eurovan Heater Core |
|
|
Thanks for taking the time to document this rite of passage. I've done it, and the worst part is figuring out how to get the plastic center of the dash reinstalled without busting it up or screaming profanities loudly to Valhalla.
_________________
Casey--
'89 Bluestar ALH w/12mm Waldo pump, PP764 and GT2052
'01 Weekender --> full camper
y u rune klassik? |
|
| Back to top |
|
|
Abscate
Samba Member
Joined: October 05, 2014
Posts: 22639
Location: NYC/Upstate/ROW
|
| Posted: Wed Oct 27, 2021 11:43 pm Post subject: Re: 2003 Eurovan Heater Core |
|
|
Dave. If you can get to the AC evaporator easily while the dash is off one of my projects is to measure its size so I can spec a variant from another model, since T4 evaps are NLA
_________________
.ssS! |
|
| Back to top |
|
|
Stripped66
Samba Member
Joined: May 31, 2005
Posts: 3470
Location: Charleston, SC
|
| Posted: Thu Oct 28, 2021 5:14 am Post subject: Re: 2003 Eurovan Heater Core |
|
|
| Abscate wrote: |
| Dave. If you can get to the AC evaporator easily while the dash is off one of my projects is to measure its size so I can spec a variant from another model, since T4 evaps are NLA |
What was the problem with the measurements I posted for you? The conversion from standard to metric?
_________________
| 66brm wrote: |
| Bodacious wrote: |
| Why not just make a custom set of wires with a Y splice in them. Then you could just run one distributor. |
I don't think electrickery works that way |
|
|
| Back to top |
|
|
vwwestyman
Samba Member
Joined: April 24, 2004
Posts: 5688
Location: Manhattan, Kansas, USA
|
| Posted: Thu Oct 28, 2021 5:35 pm Post subject: Re: 2003 Eurovan Heater Core |
|
|
Soon as Baby heads to bed here pretty quick, I'm planning to head out to the Van and try to get a little further in this mess.
It occurred to me-if any of you have requests for more details pics of anything, let me know and I'll do my best. I can't promise that my ADHD won't keep me from forgetting, but I'll try. The ADHD also probably explains why the order of how I remove some of the stuff could seem a bit haphazard at times...
_________________
Dave Cook
President, Wild Westerner Club
1978 Champagne Edition Westy, repowered to '97 Jetta TDI
1973 Wild Westerner
My Thing |
|
| Back to top |
|
|
danfromsyr
Samba Member
Joined: March 01, 2004
Posts: 15143
Location: Syracuse, NY
|
| Posted: Thu Oct 28, 2021 5:46 pm Post subject: Re: 2003 Eurovan Heater Core |
|
|
and yet the vanagon guys are afraid of their heater/dash...
which can be serviced in 1 day with a dinner break.
_________________
| Abscate wrote: |
| These are the reasons we have words like wanker |
|
|
| Back to top |
|
|
vwwestyman
Samba Member
Joined: April 24, 2004
Posts: 5688
Location: Manhattan, Kansas, USA
|
| Posted: Thu Oct 28, 2021 7:42 pm Post subject: Re: 2003 Eurovan Heater Core |
|
|
* Get a beer for the evening. In this case, I still have some Oktoberfest beers.
Right now, I'm just trying to look at things that will likely need to come off/out to get the dash out. To that point:
* Remove the inner part of the outer vents-the part that connects to the hose. You'll just pry the a big tab on the top and bottom and wiggle them out. For the center vent, I couldn't get it to disconnect from the plenum, but I did separate the equivalent tabs from the dash so it will stay behind when I pull the dash.
* Unplug the dash switches-seat heaters, ESP button, rear defrost, and hazard switch.
* Remove instrument cluster. Two screws and then you'll have to unplug two plugs. Mine have wire locks on them, presumably from the factory to prevent tampering.
I just thought the VW logo stamped into the "locks" was kind of neat.
* Remove the passenger side airbag. When the center part of the dash is disassembled, you can see two 10mm bolt heads on the left side, and through the passenger side vent you can see the other two 10mm bolts. With those four bolts out, you can lift the airbag out, but be prepared to support it as you unplug it.
Took this pic after removing one of the bolts, and loosening the other.
You can see the bolt holes here.
* Underneath you may see a weird set of wires plugged into something, but there doesn't seem to be anything on the other side. Anyway, that little clip will need to pop off the dash. And under the right air vent are a couple relays. The holder is held in by two screws, you'll want to remove that so it can hang when you pull the dash.
You can see one of the screws in the holder in this pic.
* Disconnect the speaker wires while you're there, and don't forget the driver side. Pics mostly for my reference on what color goes to what plug.
* There is a bracket that holds a couple controller boxes of some sort that is attached to the right side support of the instrument cluster. I believe unscrewing this bracket from the support will allow it all to stay in the car when the dash is removed. (Edit: I was correct.)
* I decided to remove the rest of the passenger side inner knee bar bracket for a little more working room. Probably not necessary, but made it easier to remove a connector that holds all the wires along the dash.
* Unclip these four relays from the bracket, and snip the zip ties securing the wires. It'll take some gentle wiggling to get the relay sockets to unclip.
* Look for and remove the grounds along the metal bar. So far I've found one under the passenger side airbag, one nut behind the heating controls with two ground wires, and one more to the right of the steering column.
* Get another beer.
* Get this last wire tie and zip tie to further loosen the wire connectors. I also unplugged the cigarette lighter at this point, as earlier it didn't want to pop out of the dash and I didn't want to force it and break something.
For reference, the round bar in this pic is the dash support bar just to the right of the driver's leg. I'm laying down and looking at it from under the dash, sort of facing where the steering wheel would be.
These wire holders don't need to be cut or broken, it is pretty easy to push the clip together to release the tie.
Hitting post so I don't lose this work...
_________________
Dave Cook
President, Wild Westerner Club
1978 Champagne Edition Westy, repowered to '97 Jetta TDI
1973 Wild Westerner
My Thing
Last edited by vwwestyman on Fri Oct 29, 2021 8:35 am; edited 1 time in total |
|
| Back to top |
|
|
vwwestyman
Samba Member
Joined: April 24, 2004
Posts: 5688
Location: Manhattan, Kansas, USA
|
| Posted: Thu Oct 28, 2021 7:44 pm Post subject: Re: 2003 Eurovan Heater Core |
|
|
| danfromsyr wrote: |
and yet the vanagon guys are afraid of their heater/dash...
which can be serviced in 1 day with a dinner break. |
I think if I had a nice Saturday with no one disturbing me, I could likely get this thing out.
I often say that the only way I could afford to own the many VWs is that I do my own work. Also this way, I'm almost certainly more careful than most mechanics working on not their own car (whose squeaks they don't have to hear afterward) and also aware of anything I might break along the way vs. guessing what someone else broke!
_________________
Dave Cook
President, Wild Westerner Club
1978 Champagne Edition Westy, repowered to '97 Jetta TDI
1973 Wild Westerner
My Thing |
|
| Back to top |
|
|
vwwestyman
Samba Member
Joined: April 24, 2004
Posts: 5688
Location: Manhattan, Kansas, USA
|
| Posted: Thu Oct 28, 2021 8:51 pm Post subject: Re: 2003 Eurovan Heater Core |
|
|
I think I am pretty close to being able to unbolt this dang dash from the car and lift it out. I'm nervous of it being loose and finding out there are some wires or something hanging up someplace, but I've checked it more than once and I'm pretty sure I've found them all.
* There is one bolt under the hood that needs to be undone. I suppose VW just put it there to mess with everybody. There was a similar bolt in the '00 Golf I worked on last year. It's toward the top of this pic. I chose to picture it from a bit of a ways away to give more context to it's location. The other pic I saw online was very close in, so it was hard to decide which one was the trick bolt. It is the one near where the wiper arm attaches.
* There are two small bolts holding the dash on on either side, seen under round trim pieces when the doors are open.
* And then two larger bolts hold the metal support piece on either side. This pic is the passenger side; driver side is very similar.
* And loosen and remove the support rod. I wrapped a piece of tape just under the clamp in order to get the height correct later.
* I thought at this point I could remove the dash along with the metal support bar that runs along the underside of it. But my beautiful assistant and I could not get all that lifted over the steering column, primarily because the arms that hold the fuse panel were interfering. So I separated the two-this was easier than I thought. Two screws (there is a third hole, I may have removed that screw loosening something else earlier, or your Van may have a third screw) that are just under the airbag, two screws just under where the instrument cluster was, and two more on the underside of the dash. At that point, especially because we'd already removed it halfway, it was pretty easy to lift the whole plastic portion of the dash out.
It may have been possible to lift the dash and metal bar out as a unit if I'd have removed the steering wheel and switches, but I wasn't having luck releasing the airbag clips.
* And because I'd already undone the bolts as I attempted to lift the whole thing out, the metal portion came out easily. Mind the wires around the fuse box, one little wire got caught, but I think I found it before any damage was done.
* Watch the trim where the rubber overlaps the dash. The bottom part of the the A-pillar trim hangs over the corner of the edge of the dash. You can carefully pry it up and over the corner of the dash/pry the corner of the dash down a little and under the trim, but if it gets caught it'll likely break the trim. When we were trying to get the whole dash out, it actually slipped back under the plastic trim on the driver side and did snap about an inch off. Ugh. Perhaps a little clearance-ing would be helpful, trimming the corner of the dash. It would be hidden by the door rubber. If I review this and remind myself, I probably will go ahead and snip the corner of the dash off. This pic was after I folded the door rubber under the dash, but before I wiggled/pried the dash out from under the plastic A-pillar trim.
Almost there! (?)
And here is the top of the culprit that started this whole mess. I may be able to sneak it up and out if I loosened up the HVAC box, but I do want to improve my taping of the air flap holes from last year, so the heater side of the box will have to come out.
Maybe next time I will take my Dremel tool and cut a hole in the firewall. Then it'll be like older cars where it is super-easy to access from the engine compartment!
It looks like this will be like my old Corrado, where I can split the heating and cooling halves of the system and remove the heater side without having to open the AC. In that car, you just had to acknowledge that the inner-most clip won't be reattached. It almost seems like it could be in this thing.
Looks like there is a bolt or something at the bottom of the heater portion of the box that I'll have to access from below/the engine compartment. Ugh.
But it's 10:50 and I still haven't taken my Benadryl and melatonin to get ready for bed (damn ADHD). Time to head in. As before, I'll add pics later.
_________________
Dave Cook
President, Wild Westerner Club
1978 Champagne Edition Westy, repowered to '97 Jetta TDI
1973 Wild Westerner
My Thing
Last edited by vwwestyman on Fri Oct 29, 2021 8:50 am; edited 1 time in total |
|
| Back to top |
|
|
Abscate
Samba Member
Joined: October 05, 2014
Posts: 22639
Location: NYC/Upstate/ROW
|
| Posted: Fri Oct 29, 2021 2:05 am Post subject: Re: 2003 Eurovan Heater Core |
|
|
| Stripped66 wrote: |
| Abscate wrote: |
| Dave. If you can get to the AC evaporator easily while the dash is off one of my projects is to measure its size so I can spec a variant from another model, since T4 evaps are NLA |
What was the problem with the measurements I posted for you? The conversion from standard to metric? |
When I wrote them down from my computer screen I accidentally used it as bathroom tissue in an emergency
Bumped your thread and thanked you again, shinola, that was only Feb 21
_________________
.ssS! |
|
| Back to top |
|
|
Stripped66
Samba Member
Joined: May 31, 2005
Posts: 3470
Location: Charleston, SC
|
| Posted: Fri Oct 29, 2021 5:03 am Post subject: Re: 2003 Eurovan Heater Core |
|
|
| Abscate wrote: |
When I wrote them down from my computer screen I accidentally used it as bathroom tissue in an emergency
|
First-world problems.
The pics are also in my gallery should that thread become difficult to find.
_________________
| 66brm wrote: |
| Bodacious wrote: |
| Why not just make a custom set of wires with a Y splice in them. Then you could just run one distributor. |
I don't think electrickery works that way |
|
|
| Back to top |
|
|
vwwestyman
Samba Member
Joined: April 24, 2004
Posts: 5688
Location: Manhattan, Kansas, USA
|
| Posted: Sun Oct 31, 2021 1:22 pm Post subject: Re: 2003 Eurovan Heater Core Replacement How-To |
|
|
I got the core removed and replaced yesterday. I'm sorry I didn't do as well with writing things step-by-step. I do have some pics I'll add soon.
But to get it the rest of the way out from where I left off last time, you'll need to:
* Remove the heat distribution duct that is closest to you (it feeds the center and side vents. Two plastic 10mm nuts.
* Remove the duct to the defrost-three screws. Two on the side towards the driver side, one is revealed when you removed the previous duct.
* Unscrew the three motors from underneath if you have Climatronic. If you don't... Then I'm not sure what is down there! Anyway, I chose to do this because I couldn't easily unplug the harnesses to them from the other end; the bracket for the ESP computer is riveted to the AC side of the box, and is in the way of unplugging the cables. One has a small control cable you'll have to remove.
For the first you get to (it is furthest away from the firewall) it would be worthwhile to note the position of the flap you see with the duct removed. That is because the first little motor controls that flap with a gear and you'll want it to be in the same position when you put everything back together. I didn't do this, but got lucky by having taken a pic before removing it.
Here's one of the little motors.
* There are two allen-head bolts in the engine compartment that hold the heater section of the box to the car. One is just under the heater hose hookups, and the other is about a foot lower. I had to cut a flap in the insulation to access it, but thankfully was able to do that and remove the bolt from above easily.
You can see where I cut the insulation/heat shield piece. There is a bump in the heat shield so you'll know where it is. It was easy enough to fold back in place later.
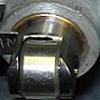
* There are I believe 7 clips that hold the heater portion to the AC portion. Two you see from the back, two up by the firewall, two on the top, and one (I believe it is only one) on the bottom. All but the ones by the firewall are pretty straightforward to access. The firewall two may be more difficult, in fact I ended up breaking the tabs they clip to. (No matter; once I got everything together, with the other 5 clips and bolting the heat box in place, this doesn't appear to be an issue at all.)
Here's one of the clips. Gold thing in the middle.
* Don't forget the vacuum line from the engine compartment-one end connects to a nipple on the engine side, and another connects to a nipple on the inside.
* Once that is all undone, you should be able to get the heater portion of the box out. I guess if you had not bypassed the heater core a few months ago, and haven't done it yet, disconnect the water hoses.
* Heater core is easily removed by removing two screws and pulling it up and out.
*Repair your heater flaps. The foam is probably deteriorated and not mixing hot/cold properly and all that. A year ago, I temporarily "fixed" them by reaching up in through the flap that sends air to your feet with my hand and squares of tape. I was kind of stuck with placing them wherever they first stuck, hence the many overlaps and such nonsense. I just kept doing it until I was pretty sure it was covered. Here you can see my work o fart.
* To properly repair the flaps, you'll need to split the box in half. You've got to pry it apart with the zillion clips. I just started splitting it from one end and slowly worked my way around, separating a clop and splitting it a little then moving to the next. A couple of them broke, but there are a bunch so I don't think this will cause any real issues.
I pushed the wedge with one screwdriver and pried a little with the other.
* I used pipe insulation foam I found at Menards. It says it is rated for contact with pipes at 180 degrees. I decided that is likely plenty; that the actual air temperature contacting the flaps is very likely never getting that hot (though it might be close) and that since it had some fabric reinforcement it would likely help. There may be other materials, but that is what I had available and I believe it will be ok. None of the old deteriorated foam seemed like anything special, so this may actually be an improvement.
Packages of the insulation I used:
Completed flaps. I took care to not have many seams of the foam in places it would rub as the doors moved.
I did also use this insulation on the sides of the core to block air from going around it. In that case, I did decide that even if the temperature was slightly above rated temp, usually things are good for a bit more than rated and it should never get much higher and also it is held in place by compression between the core and sides of the box.
I slit the Air Conditioner foam seal and wrapped that around the top surface where the duct meets the defrost duct that is a part of the dash. I used a little super glue to hold it in place.
And all this is better that the tape that was in there from when I just snuck my hand in there last year and felt around with pieces of tape until I thought I had most of the holes covered.
When you go to mate the heater portion of the box back up, there is a little plastic flange that must go inside the AC portion. It took me a couple minutes to see what the hang up was. Took this pic with my finger in there so you could see the contrast of this flange.
_________________
Dave Cook
President, Wild Westerner Club
1978 Champagne Edition Westy, repowered to '97 Jetta TDI
1973 Wild Westerner
My Thing
Last edited by vwwestyman on Mon Nov 01, 2021 4:50 pm; edited 3 times in total |
|
| Back to top |
|
|
|


