| Author |
Message |
DerrickfromNC1
Samba Member
Joined: October 24, 2008
Posts: 1302
Location: North Carolina

|
 Posted: Tue Nov 09, 2021 8:15 am Post subject: 3 stage buffing compounds Posted: Tue Nov 09, 2021 8:15 am Post subject: 3 stage buffing compounds |
 |
|
What are your go to 3 stage buffing compounds for new paint? I plan to begin color sanding(1000-2500g) in a couple of weeks & then machine buff in 3 stages. Starting with a compound designed to remove 2500g sanding, then to a compound to remove the swirl marks produced from that process. Finally finishing with a micro polish before a quality wax. I think most professionals favor the 3M products but I interested in hearing if anyone has received equivalent or better results from other products. Also feel free to chime in on the sanding/buffing process as I have described above!
Thanks |
|
| Back to top |
|
 |
evanfrucht
Samba Member

Joined: July 24, 2016
Posts: 2180
Location: Laurel Canyon, CA
|
| Posted: Wed Nov 10, 2021 10:54 am Post subject: Re: 3 stage buffing compounds |
|
|
Everyone has their own preference. 3M is good
I use the yellow and black bottle of 3M often, I forget what they are called.
Tape the corners and edges when you wet sand so you don't burn thru in those areas
You have the right idea.
_________________
1967 Bug ( the daily rod )
1964 Fury Wagon ( the pavement shredder ) |
|
| Back to top |
|
|
74 Thing
Samba Member
Joined: September 02, 2004
Posts: 7394
|
| Posted: Wed Nov 10, 2021 11:28 am Post subject: Re: 3 stage buffing compounds |
|
|
Go to autogeek.net
There are a lot to choose from. Sometimes u need to find the right one that works for your paint. All paints are different. |
|
| Back to top |
|
|
adventurebob
Samba Member
Joined: August 06, 2020
Posts: 107
Location: Colorado
|
| Posted: Wed Nov 10, 2021 12:47 pm Post subject: Re: 3 stage buffing compounds |
|
|
Cant go wrong with 3M, that's why shops use it and probably they are the widest used compounds in the automotive paint industry.
I have some Chemical Guys and some Ammo stuff. I've tried tons of them along the way but tend to fall back to 3M especially for the removal of sanding marks. |
|
| Back to top |
|
|
DerrickfromNC1
Samba Member
Joined: October 24, 2008
Posts: 1302
Location: North Carolina
|
| Posted: Sun Nov 14, 2021 8:26 am Post subject: Re: 3 stage buffing compounds |
|
|
| adventurebob wrote: |
Cant go wrong with 3M, that's why shops use it and probably they are the widest used compounds in the automotive paint industry.
I have some Chemical Guys and some Ammo stuff. I've tried tons of them along the way but tend to fall back to 3M especially for the removal of sanding marks. |
I going to go with Sonax product line.
https://www.amazon.com/dp/B07L6NFVST#customerReviews
It rated very high on the Autogeeks site and you can get it in 8.5oz bottles. Check out the YouTube heads up matches with other leading compounds and polishes including 3M
.its consistently rated number 1. Also the 3M come in quart size which is good for professionals but not so for the hobbyist. |
|
| Back to top |
|
|
adventurebob
Samba Member
Joined: August 06, 2020
Posts: 107
Location: Colorado
|
| Posted: Sun Nov 14, 2021 1:11 pm Post subject: Re: 3 stage buffing compounds |
|
|
| No doubt it performs well, but if you do a lot the 3M is cheaper per ounce. I go through a bunch so, 3M. One of the things I always find interesting is that if you do enough digging youll find that 3M is actually the manufacturer of most of the brands that dont have production facilities. It takes. Good amount of investment dollars to start a chemical company that can produce at volume that makes money. |
|
| Back to top |
|
|
kman
Samba Member

Joined: November 04, 2005
Posts: 739
Location: Michigan
|
|
| Back to top |
|
|
DerrickfromNC1
Samba Member
Joined: October 24, 2008
Posts: 1302
Location: North Carolina
|
| Posted: Wed Dec 01, 2021 5:47 pm Post subject: Re: 3 stage buffing compounds |
|
|
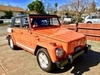
Started the process of color sanding and buffing the fenders and learned some lessons
Before:
After:
Tools:
I used a Harbor Freight(hf) $30 electric variable speed da sander to level the paint(orange peal, texture, trash). Initially I used 1500g(wet) sand paper but switched to 600g because it seemed like the 1500 was having little affect in leveling the paint. Big mistake which I will reveal later.
I followed the 600 with 1000, 1500, 2000, 3000. Next I purchased a hf random orbital polisher and a variable speed 7 polisher/sander. After using both I tossed the orbital polisher in favor of the 7 polisher.
I followed the advice of adventurebob and went with the 3M 1st step compound and their foam pad. I also used the 3M finishing pad with Sonax Perfect Finish. Rather than 3 stages I was able to get quality results with 2 stages.
During my first attempt to buff the fenders, I noticed that under the right light I could still see(just barely) the da orbital sanding marks. This was also taking away from the overall gloss. What I believe was happening was that even though I was coming behind the 600, with 1000,1500,2000, and 3000 I never actually cleaned up the deep cuts created by the 600. I ended up resanding by hand with 1500,2000, then 3000. Thank God this euro high solids clear(Tamco) is thick enough that I didnt cut through to the base.
When I begin leveling the other fenders and body I will start with the 1500 wet in the orbital da regardless how long it takes followed be hand sanding with 2000, & 3000. Out of curiosity I tried a 3M Trizact 5000 sanding disc($12/ea) after I hand sanded with the 3000g. This left a nice sheen that reduced buffing efforts but at that price it had better last thru at least half the car. |
|
| Back to top |
|
|
c21darrel
Samba Member
Joined: January 22, 2009
Posts: 8211
Location: San Dimas
|
|
| Back to top |
|
|
DerrickfromNC1
Samba Member
Joined: October 24, 2008
Posts: 1302
Location: North Carolina
|
| Posted: Thu Dec 02, 2021 1:24 pm Post subject: Re: 3 stage buffing compounds |
|
|
| I didnt burn thru but when I made my 1st attempt to buff and polish the original da 600grit color sanding marks where still there(barely) despite following this grit with finer grits. I had to re sand by hand with 1500-2000-3000 b4 I was able to successfully buff & polish. Im glad to say it worked w/o going thru to basecoat. As I continue on to the remainder of the car I will not use 600. |
|
| Back to top |
|
|
Braukuche
Samba Member
Joined: September 03, 2004
Posts: 11005
|
| Posted: Sat Dec 04, 2021 4:39 pm Post subject: Re: 3 stage buffing compounds |
|
|
| DerrickfromNC1 wrote: |
| I didnt burn thru but when I made my 1st attempt to buff and polish the original da 600grit color sanding marks where still there(barely) despite following this grit with finer grits. I had to re sand by hand with 1500-2000-3000 b4 I was able to successfully buff & polish. Im glad to say it worked w/o going thru to basecoat. As I continue on to the remainder of the car I will not use 600. |
I hate cutting and buffing.
I use a small orbital designed for color sanding and start with wet 1000 then 1500 then 3k. When I do it all with machine I get those annoying pig tails, which I believe is fragments of paint or trash that the DA etches into the paint. It doesnt matter how much water I use I cant prevent hem and like you I found the only solution after DAing with 1000 is hand sanding with 1500 and 3k.
If someone knows a better way let me know.
_________________
Go Reds! Smash state!
Retirement is here!
1956 Ghia
1959 SO-23 Westfalia
1960 double cab
1960 Baja Bug
1963 stretched double cab
1962 Golde sunroof Ghia
1963 356 B coupe
1963 Notchback
1967 21 window less rusty now |
|
| Back to top |
|
|
evanfrucht
Samba Member
Joined: July 24, 2016
Posts: 2180
Location: Laurel Canyon, CA
|
| Posted: Sat Dec 04, 2021 6:12 pm Post subject: Re: 3 stage buffing compounds |
|
|
| Braukuche wrote: |
| DerrickfromNC1 wrote: |
| I didnt burn thru but when I made my 1st attempt to buff and polish the original da 600grit color sanding marks where still there(barely) despite following this grit with finer grits. I had to re sand by hand with 1500-2000-3000 b4 I was able to successfully buff & polish. Im glad to say it worked w/o going thru to basecoat. As I continue on to the remainder of the car I will not use 600. |
I hate cutting and buffing.
I use a small orbital designed for color sanding and start with wet 1000 then 1500 then 3k. When I do it all with machine I get those annoying pig tails, which I believe is fragments of paint or trash that the DA etches into the paint. It doesnt matter how much water I use I cant prevent hem and like you I found the only solution after DAing with 1000 is hand sanding with 1500 and 3k.
If someone knows a better way let me know. |
Orbital sander won't work. You need the kind that goes back and forth in one direction with the semi soft foam backing on it. Even then you may need to touch up by hand. With power sanders you really need more water, like a constant flow from a hose or something, and don't forget some dish soap, helps prevent the paper from gumming up and making marks. The type/brand of paper you use can make a difference as well, some work better.
The reason you get those pigtails is because of heat/friction and/or the paint hasn't cured fully for at least a few weeks. The longer the paint has cured the less that will tend to occur.
_________________
1967 Bug ( the daily rod )
1964 Fury Wagon ( the pavement shredder ) |
|
| Back to top |
|
|
Braukuche
Samba Member
Joined: September 03, 2004
Posts: 11005
|
| Posted: Sat Dec 04, 2021 7:13 pm Post subject: Re: 3 stage buffing compounds |
|
|
| evanfrucht wrote: |
| Braukuche wrote: |
| DerrickfromNC1 wrote: |
| I didnt burn thru but when I made my 1st attempt to buff and polish the original da 600grit color sanding marks where still there(barely) despite following this grit with finer grits. I had to re sand by hand with 1500-2000-3000 b4 I was able to successfully buff & polish. Im glad to say it worked w/o going thru to basecoat. As I continue on to the remainder of the car I will not use 600. |
I hate cutting and buffing.
I use a small orbital designed for color sanding and start with wet 1000 then 1500 then 3k. When I do it all with machine I get those annoying pig tails, which I believe is fragments of paint or trash that the DA etches into the paint. It doesnt matter how much water I use I cant prevent hem and like you I found the only solution after DAing with 1000 is hand sanding with 1500 and 3k.
If someone knows a better way let me know. |
Orbital sander won't work. You need the kind that goes back and forth in one direction with the semi soft foam backing on it. Even then you may need to touch up by hand. With power sanders you really need more water, like a constant flow from a hose or something, and don't forget some dish soap, helps prevent the paper from gumming up and making marks. The type/brand of paper you use can make a difference as well, some work better.
The reason you get those pigtails is because of heat/friction and/or the paint hasn't cured fully for at least a few weeks. The longer the paint has cured the less that will tend to occur. |
I misspoke, its a small DA.
I usually wait at least a month before if cut and buff, I probably am not using enough water and I never tried soap, all things to try next time. Thanks for the tips.
_________________
Go Reds! Smash state!
Retirement is here!
1956 Ghia
1959 SO-23 Westfalia
1960 double cab
1960 Baja Bug
1963 stretched double cab
1962 Golde sunroof Ghia
1963 356 B coupe
1963 Notchback
1967 21 window less rusty now |
|
| Back to top |
|
|
74 Thing
Samba Member
Joined: September 02, 2004
Posts: 7394
|
|
| Back to top |
|
|
DerrickfromNC1
Samba Member
Joined: October 24, 2008
Posts: 1302
Location: North Carolina
|
| Posted: Sun Dec 05, 2021 2:57 pm Post subject: Re: 3 stage buffing compounds |
|
|
Im finishing with a rotary and a 3M waffle style finishing pad using Sonax Perfect Finish.
Leaves a crystal clear finish as far as I can tell under led lighting. Might have to purchase that neat little device! |
|
| Back to top |
|
|
74 Thing
Samba Member
Joined: September 02, 2004
Posts: 7394
|
| Posted: Sun Dec 05, 2021 6:57 pm Post subject: Re: 3 stage buffing compounds |
|
|
Yes, try different lighting sources for sure. If you can get a high k value LED bulb and some of the dual xenon lights work well for detailing.
The one I referenced from HF is a china made copy of the sun light used for paint and detailing.
The best is pull it into the sun or when you get it running and go to a gas station at light you will see all the swirls etc..
Sometimes you can finish with a good finish pad and final polish pad on a rotary but still have to check for holograms from the rotary.
Are you going to ceramic coat it when you are done and after the paint cures? Autogeek.net has sales all December on various coatings-check it out.
The car is looking good! |
|
| Back to top |
|
|
evanfrucht
Samba Member
Joined: July 24, 2016
Posts: 2180
Location: Laurel Canyon, CA
|
| Posted: Sun Dec 05, 2021 10:30 pm Post subject: Re: 3 stage buffing compounds |
|
|
Dual action is part orbital. It'll work.
Soap will help for sure. Put a drop or two per cup if water. It keeps the slurry in suspension and prevents it from clumping up on the paper.
_________________
1967 Bug ( the daily rod )
1964 Fury Wagon ( the pavement shredder ) |
|
| Back to top |
|
|
DerrickfromNC1
Samba Member
Joined: October 24, 2008
Posts: 1302
Location: North Carolina
|
| Posted: Tue Dec 07, 2021 10:44 am Post subject: Re: 3 stage buffing compounds |
|
|
| evanfrucht wrote: |
| Braukuche wrote: |
| DerrickfromNC1 wrote: |
| I didnt burn thru but when I made my 1st attempt to buff and polish the original da 600grit color sanding marks where still there(barely) despite following this grit with finer grits. I had to re sand by hand with 1500-2000-3000 b4 I was able to successfully buff & polish. Im glad to say it worked w/o going thru to basecoat. As I continue on to the remainder of the car I will not use 600. |
I hate cutting and buffing.
I use a small orbital designed for color sanding and start with wet 1000 then 1500 then 3k. When I do it all with machine I get those annoying pig tails, which I believe is fragments of paint or trash that the DA etches into the paint. It doesnt matter how much water I use I cant prevent hem and like you I found the only solution after DAing with 1000 is hand sanding with 1500 and 3k.
If someone knows a better way let me know. |
Orbital sander won't work. You need the kind that goes back and forth in one direction with the semi soft foam backing on it. Even then you may need to touch up by hand. With power sanders you really need more water, like a constant flow from a hose or something, and don't forget some dish soap, helps prevent the paper from gumming up and making marks. The type/brand of paper you use can make a difference as well, some work better.
The reason you get those pigtails is because of heat/friction and/or the paint hasn't cured fully for at least a few weeks. The longer the paint has cured the less that will tend to occur. |
Can you give me an example of a orbital sander designed for color sanding
..the kind that goes back and forth in one direction with the semi soft foam backing you mentioned? I still have a lot of car to do. Heres what I have:
|
|
| Back to top |
|
|
DerrickfromNC1
Samba Member
Joined: October 24, 2008
Posts: 1302
Location: North Carolina
|
| Posted: Fri Dec 10, 2021 2:37 pm Post subject: Re: 3 stage buffing compounds |
|
|
I think I found the process, materials, & equipment that works best for me.
*tape off all edges, corners, etc that could be more apt to burn thru.
*focus on small sections at a time
*da sand with 1000g & plenty of water(with a little soap) to level clearcoat.
*wipe dry & look for any remaining texture on clearcoat
*repeat above focusing only on remaining texture
*da sand with 1500g & plenty of water to cleanup the 1000g
*wet sand by hand with 2000g in one direction
*wet sand by hand with 2500g in one direction
*buff with 3M #1 rubbing compound & 3M #1 foam waffle pad using rotary
polisher between 1500-2000rpm until compound starts to dry & dust up
*repeat the above step
*wipe clean with a micro cloth and inspect
.if ok proceed to next step
*buff with Sonax perfect finish and 3M finishing waffle pad with the rotary
at a slightly slower speed but stop b4 the Sonax drys.
*wipe clean with fresh micro cloth & inspect, if touch up is required complete
b4 moving on to the next section or panel.
Some things to note:
An example of sectioning off was I taped off the door into 4 sections. When I started buffing I was careful to reposition the tape so as not to miss an area. Im not sure how many sections I will need to create when I get to the roof.
As I color sanded I discovered very very small paint sags that werent visibly obvious during 1st inspection out my dyi paintbooth.
My rotary sander is a cheap HF(Warrior) model & I believe the variable speed adjuster is not accurate to the actual speed the polisher is running so I had to play it by feel. My polisher uses 7-9 pads, so for small areas I will purchase a headlight polishing kit($25) from OReillys & use the small 3 pads that are included with my hand drill.
The true test will be when I push it out the garage into the sunlight! |
|
| Back to top |
|
|
74 Thing
Samba Member
Joined: September 02, 2004
Posts: 7394
|
| Posted: Fri Dec 10, 2021 4:53 pm Post subject: Re: 3 stage buffing compounds |
|
|
It is looking good but you need to really put a light on it.
The best way to do it is to do a small area and work through you whole process from beginning to end then look at the results in the light or sunlight and look at the reflection of the light coming back and if you are good with those results then use your process throughout.
The last thing you want to do is go through an entire car and then have to go over it again since the process left swirls, scratches or holograms.
Can you post a photo with the light source on the door. Even a dual xenon freestanding workshop light would work. |
|
| Back to top |
|
|
|


