| Author |
Message |
Kb65single
Samba Member
Joined: July 24, 2019
Posts: 268
Location: Obxnc

|
 Posted: Thu Jun 09, 2022 2:17 pm Post subject: Re: Rusty 65 SC restoration Posted: Thu Jun 09, 2022 2:17 pm Post subject: Re: Rusty 65 SC restoration |
 |
|
| ryans65 wrote: |
| that's a staggering amount of metal work, way to go!! |
When I was thinking about buying a SC, I thought I really want a project that needed a lot of metal work because I enjoy it. Boy did I get what I asked for! If you are ever in the neighborhood get in contact and stop by would like to see your SC. |
|
| Back to top |
|
 |
Kb65single
Samba Member
Joined: July 24, 2019
Posts: 268
Location: Obxnc
|
| Posted: Thu Jun 09, 2022 5:19 pm Post subject: Re: Rusty 65 SC restoration |
|
|
| Walk Thru KO wrote: |
Good to see you back with updates Ken.
You do metal repair and refurbishing the way it should be done, great work!!
One question - what is your honest opinion on the fitment and accuracy of Gerson's metal stampings now that you've had the pleasure of hands on with some of his product? |
Well that's a question that requires some thought. 
That is something I have been asking myself every time I order more parts. Could they be better most definitely yes. I have restored 3 beetles and know the difference between shitty aftermarket parts and the opposite spectrum ( NOS parts ) or custom fabrication. I will tell you that in every stage of this restoration every Gerson panel that I touch needs some modification. That isn't a bad or good thing it just is or is just necessary. Gerson simply cannot satisfy every panel fitment on every bus, it's just impossible. His parts are good, the metal thickness is worlds different than shitty aftermarket but all require "adjustments". They could be crisper in there bends but they usually get bent close to where they need to be bent. Their response to issues with defects is good you just need to supply pictures. If you expect every Gerson replacement part to fit without adjustments you will be disappointed. |
|
| Back to top |
|
|
Kb65single
Samba Member
Joined: July 24, 2019
Posts: 268
Location: Obxnc
|
| Posted: Sun Jun 12, 2022 3:26 am Post subject: Re: Rusty 65 SC restoration |
|
|
The front jack point was fit but not welded in. Decided to weld the holes shut that were created when sliding the jack point past the top hats and outriggers.
Welded shut
Welding the little round holes shut that are present in the top hats seemed like a good idea. Letting water in on the top of the top hat didn't makes sense. The holes in the bottom of the outriggers to let any water out did. Tacked a larger piece of metal to a metal rod made the job easier. Shape it to fill the hole, weld it, cut the rod off and smooth.
Welding the jack points on created pockets of green metal that I didn't have access to after the jack point is in place. Got those areas covered on the bus and the jack points.
Had to cut off a "wing" on the back jack point to get it to sit straight and be flush with the height of the top hats.
Welded in place. The last large piece to fit and weld in will be the treasure chest floor.
|
|
| Back to top |
|
|
Kb65single
Samba Member
Joined: July 24, 2019
Posts: 268
Location: Obxnc
|
| Posted: Fri Jun 17, 2022 4:30 am Post subject: Re: Rusty 65 SC restoration |
|
|
Fitting the treasure chest floor repair panel. Getting the panel to fit in a relaxed way was necessary because of the long butt weld that connected the original middle section and the Gerson repair piece. A lot of holes to drill.
The front outside (B-pillar) corner needed an adjustment on the flange that gets welded to the pillar.
The area around the c-pillar also needed adjustment.
The flange that would be welded to the inside of the short rocker wouldn't allow the panel to sit on top of the top hats directly underneath. Had to cut that flange off, trim the floor section, then reattach.
The front inside corner of the repair panel didn't match the contour of the original, small change there.
Checked the location of the hole for the treasure chest lock and the clearance for the plate that the lock fits over and into. Hole needed to be shifted to one side and the plate needed to be lowered.
Harvested the "plate" from the original section.
Finally ready to weld in. Had to get the areas covered that I wouldn't be able to get to, after welding. Sanded the repair panel with 150 grit. Some of these pictures show the long rocker not welded in but I fit both pieces at the same time and welded the long rocker before the floor section.
Did all the plug welds first all 150+ of them. Then the long butt weld. Getting the butt weld started required using a jack on the concrete floor to push the areas up that needed it and wedging it down using the load bed top hats. It took a while to get that weld done. The holes along the outside of the floor section get welded to the long rocker. The next row inside of those (in the valley with the screws) get welded to the inner rocker.
Then the grinding started. Left a lot of the weld on the bottom (underneath) for strength. Not quite 100% done with the metal work on this side but I'm on the downside of the hill.
|
|
| Back to top |
|
|
69aircooled
Samba Member

Joined: August 04, 2004
Posts: 241
Location: North Carolina
|
| Posted: Fri Jun 17, 2022 5:00 pm Post subject: Re: Rusty 65 SC restoration |
|
|
This is going to be such a nice truck. Thanks for all the documentation. I look forward to beginning on my own 62. Until then an 84 Westy project will have to do 
Keep showing us your skill!
Chan |
|
| Back to top |
|
|
Kb65single
Samba Member
Joined: July 24, 2019
Posts: 268
Location: Obxnc
|
| Posted: Sat Jun 18, 2022 3:16 am Post subject: Re: Rusty 65 SC restoration |
|
|
| 69aircooled wrote: |
This is going to be such a nice truck. Thanks for all the documentation. I look forward to beginning on my own 62. Until then an 84 Westy project will have to do
Keep showing us your skill!
Chan |
Chan thanks for the kind comments. My cloud storage reminded me that my bus ownership is now 3 years old July 17,2019. I better hurry up. Goodluck on you Westy, just keep the 62 dry until you get to it.
Ken |
|
| Back to top |
|
|
Kb65single
Samba Member
Joined: July 24, 2019
Posts: 268
Location: Obxnc
|
| Posted: Tue Jun 21, 2022 4:54 am Post subject: Re: Rusty 65 SC restoration |
|
|
While I was trying to take my time during the long butt weld there were other things to fit and fabricate. Is's hard to force yourself to take your time welding but getting things too hot to fast leads to distortion.
The original floors had this piece welded to the support of the main load bed beam and to the treasure chest floor.
The C-pillar also had the same thing only on two sides.
I repaired the bottom flange that the gas tank separation panels screw to a while ago. With the reproduction Gerson floor repair panel installed it changed the orientation of where the bumps and valleys lined up compared to the original middle section. Had to weld an extension to that piece and reshape the fingers that fit into the bumps and valleys. Checked the separation panel to see if the screw holes lined up and they did. Better to make changes before I welded it on. That piece was a Pita.
Welded in.
Had to modify the plate that the treasure chest door fit over and in to. Needed to lower its profile and change the position of the stop that the lock fits into. After all the welds were ground smooth all the metal work was finished on that side  . Now on to the other side. . Now on to the other side.
|
|
| Back to top |
|
|
chrisflstf
Samba Member

Joined: February 10, 2004
Posts: 3437
Location: San Diego
|
| Posted: Tue Jun 21, 2022 11:13 am Post subject: Re: Rusty 65 SC restoration |
|
|
| Awesome work ethic you have, taking the time to do your best. Have you picked out a color to paint it? |
|
| Back to top |
|
|
Kb65single
Samba Member
Joined: July 24, 2019
Posts: 268
Location: Obxnc
|
| Posted: Fri Jun 24, 2022 2:10 am Post subject: Re: Rusty 65 SC restoration |
|
|
| chrisflstf wrote: |
| Awesome work ethic you have, taking the time to do your best. Have you picked out a color to paint it? |
I'm not excited about the original color. Engine bay has a few pictures on page 4 . can't figure if its ivory or pale gray. I do love a dove blue SC. Can't be two colors top and bottom it just looks weird on a SC. Long way from color choice and thanks for your comments. |
|
| Back to top |
|
|
Kb65single
Samba Member
Joined: July 24, 2019
Posts: 268
Location: Obxnc
|
| Posted: Sat Jul 16, 2022 7:13 am Post subject: Re: Rusty 65 SC restoration |
|
|
Before I started in on the passenger side repairs there were a few things other that needed attention. Having the big floor section done was a relief and I needed to catch up on things that I noticed away from that area. Searching through the forums I stumbled on a post that made me check the attachment of the clutch tube and accelerator cable tube to the main rear torsion housing. Seems like the welds or the plate that secures these two tubes fail or break after constant use. Shifting difficulty and clutch adjustment are symptoms of this problem. Some people have secured these tubes with large hose clamps. Since my motor and trans are not in I decided to try to reinforce that area while I had the room and access.
The plate that secured these two tubes was cracked and separated in one spot. The two tubes would not move but reinforcing that area seemed like the thing to do. Access to that area is really difficult.
Circled area shows a break in the plate.
Made a template for a plate. Getting the location of the two holes was by trial and error. The plate would rotate as you got closer to the main tube.
In metal. Used 14-gauge steel.
Making sure the Bowden tube fit.
Bending the plate to match the main tube. Had a scrap of 3 1/2" pipe to bend it over.
Smoothed off the weld on the main tube and welded it in place.
Weld the clutch and accelerator tubes to the plate. Hopefully that will prevent that original area from complete failure.
Another area that was on the "list of things to do" involved the rear apron. While fixing the rear corners I knew that the Gerson repair panel on the driver side of the engine compartment came up short for the screw to attach to the rear apron. The hole on the apron was located just on the edge of the repair panel. That panel needed to be about 3/8" longer.
Line at hole of the Gerson panel is the edge of the apron.
Welded on an extension and added a capture nut underneath
Apron in place.
Added a capture nut for the other side.
|
|
| Back to top |
|
|
Kb65single
Samba Member
Joined: July 24, 2019
Posts: 268
Location: Obxnc
|
| Posted: Sat Jul 23, 2022 8:43 am Post subject: Re: Rusty 65 SC restoration |
|
|
So on to the passenger side. I had previously attempted to restore that side, but a Gerson panel (short rocker 14" tall) had to be reworked. Gerson did send me a proper panel after suppling an explanation of the problem and pictures. Since this side involves a treasure chest door that has 3 sides with rust issues, I needed a door to frame that opening around. I bought a Gerson treasure chest door for the driver's side (500$) but I grew less enthused the longer that I worked with it. The biggest frustration was that the door wouldn't ever hold its shape. I would constantly have to twist the door to make the edges " blend in" with the rest of the bus. Another issue was the door started to bow in at the bottom after trying to close it with the rubber seal installed. I had the original treasure chest doors and decided to restore one of them and see if there would be any difference, after all how hard could it be 
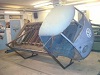
Since the door is straight from front to back but curved from top to bottom a jig to build it on was needed. The curved part was made with wood and the straight part was bed frame angle iron. Had to drill holes in the angle iron to attach wood blocks which would be screwed to the curved side rails. As with most treasure chest doors the bottom is very rusty and the top is good. My door fit that description and I did not need to replace the entire door skin just the lower 10 inches. My louvers were in great shape dent wise just surface rust. The jig had to accommodate space for the louvers so that they would remain dent free. Made sure that the angle iron was sited so that there would be a small crown in the door.
Two spot welds on both sides the middle frame support needed to be freed up; did that with a drill.
The bottom frame member was wasted but I needed to save the middle frame section that the locking mechanism bolts to. After the middle frame section is cut away the long skin support will slide from side to side and is short enough that it will expose one end. With one end exposed the whole thing slides out in one piece. Rust has its advantages and the spot welds that attached the long skin support were all broken free.
Started to strip the paint off using a sharp chisel. I wanted to keep the outer skin in place until I had the frame repaired. Keeping the curvature of the door the same would be easier if the skin stayed there but I had to get rid of the fiberglass mesh and Bondo that was used to " fix" the door. Getting all of the layers removed would make it sit better on the jig and reveal the real damage.
Got the door into a reasonable state where I could clamp it into the jig and start making the frame repairs.
Bottom corners of the frame were daunting at first but breaking it down into few pieces welded together made it come together. Cardboard patterns helped.
Cutting the door skin metal that is bent back over the frame was done with a Dremel tool with their small separating disks (Dremel reinforced #426). They really come in handy in tight spaces I buy them 10 at a time through the interweb. They wear out quickly if you lean on them so buy 20 at a time and be patient with them. The shrinker/stretcher tool helped with the curves.
One corner done. The final result made me want to continue but I am realizing that this is going to be a little more work than I thought.
|
|
| Back to top |
|
|
Kb65single
Samba Member
Joined: July 24, 2019
Posts: 268
Location: Obxnc
|
| Posted: Tue Jul 26, 2022 4:28 am Post subject: Re: Rusty 65 SC restoration |
|
|
The other side of the bottom of the treasure chest door frame needed the same type of repair.
Breaking the repair up into individual pieces kept all of the reference points intact. In this picture there is a red line along the metal of the edge of the door. That is where the Dremel tool with the thin separating disk helped peel the metal flange back and keep the door skin in place.
Moving along and finishing the repairs on that frame section. Next is the bottom frame section.
|
|
| Back to top |
|
|
Huetti_1989
Samba Member
Joined: February 13, 2011
Posts: 1132
Location: Austria
|
|
| Back to top |
|
|
Kb65single
Samba Member
Joined: July 24, 2019
Posts: 268
Location: Obxnc
|
| Posted: Tue Jul 26, 2022 2:29 pm Post subject: Re: Rusty 65 SC restoration |
|
|
| Huetti_1989 wrote: |
looks good!
- i can smell the good grinding smell while look at that pictures
-Christian |
Cristian thanks for the compliment. Your progress on the 67 is outstanding, especially the long side butt weld which I know took a major time investment. I enjoy your commitment to the hobby and always look forward to any updates.
Ken |
|
| Back to top |
|
|
Kb65single
Samba Member
Joined: July 24, 2019
Posts: 268
Location: Obxnc
|
| Posted: Fri Jul 29, 2022 6:07 am Post subject: Re: Rusty 65 SC restoration |
|
|
The bottom corners of the treasure chest door frame came out better than expected. The bottom frame piece was longer than my metal brake (36") so decided to just weld an additional 4" on to the longest piece. Made a few small prototype sections to get the correct bending sequence and correct measurements that would make that frame section as close to the original as possible.
Peeling back the rest of the flange of the outer skin. Had to make a decision about where that door skin cut line should be. Knew I would sandblast the door but didn't want any thin spots in the top part of the door that I was saving. Having the location of the butt weld of the door skin in the best spot was a concern. Really didn't know what or how I was making the middle frame section out of. Just wanted to eliminate the rust holes that were under that middle section.
Could only make two bends with the brake. 20-gauge metal over 36" didn't bend crisply so had to make a jig that the metal could be hammered over.
The jig that was used; made with bed frame metal (free).
Bent the rest using the vice to gradually match the shape of the original. Started the bends by hand, then when there was enough clearance, hammer and long wide plate steel. Finished it over the jig, just had to turn the piece over and work one side at a time.
The last 2" of the ends of this frame section changed shape. The bottom needed to change so that it would mate up with the corner sections. Picture of the original section.
Cut the ends of the new piece and roughed in the bottom measurement change but could not go any further until I had the skin metal made up and the rest of the door cleaned up. Any final welding needed to happen when all the new pieces were there.
The top frame section (hinge side) was bowed inward from years of abuse.
Cut the frame section and welded it back together while it was clamped to the jig. Straightened it out and had a slight crown which is what I wanted.
Matched the opening better with the correction.
|
|
| Back to top |
|
|
Kb65single
Samba Member
Joined: July 24, 2019
Posts: 268
Location: Obxnc
|
| Posted: Wed Aug 10, 2022 4:29 am Post subject: Re: Rusty 65 SC restoration |
|
|
After straightening the top frame, cleaning the rest of the paint off the door would speed up the sand blasting.
Spot welds had failed around the top and sides of the frame so getting those cleaned up and ready to reweld after sandblasting.
Didn't cut the bottom of the door skin off until after the blasting. Didn't know if warping the metal from blasting would be a problem and didn't want to find out. After cutting the bottom off I could blast the inside of the side frame and eventually seal the exposed metal.
Bending the outer skin metal so that it had the correct shape. Watching as many car restoration shows as I do, I knew that there is a proper machine that will roll the metal but finding one close to me was a challenge. Being that the piece was 48" wide complicated it even further. In the end I just laid the piece on the floor, elevated it on one side, and gradually used a 4" metal pipe to get the shape I was looking for.
Piece elevated on one side with one inch marks to line up the pipe and roll while standing on the pipe. Would check the piece for contour and repeat the sequence, moving the pipe further toward the elevation each time.
The bottom of the original outer skin gone and the new rolled metal. Didn't want to cut the new bottom skin until the frame was welded together. Got to the shop that has an 8' metal brake and bent a strong 90deg. on the bottom end.
Used some 20 guage metal pieces to act as spacers under the frame and welded it together.
Closed the holes created by matching the contour of the corners and grinded them smooth.
Finally, after much thinking the design of the middle frame section. 18 guage flat stock with rectangular box steel plug welded to it. Box was 1/2"x 1"x.065. That would be welded underneath the location of the butt weld on the outer skin. The original middle frame section wasn't very strong and bending it straight wouldn't be easy.
Checking the fit of the door to see if anything needed adjustment. Looks reasonable, can move forward.
|
|
| Back to top |
|
|
Major Woody
Samba Enigma

Joined: December 04, 2002
Posts: 9010
Location: Portland, OR
|
| Posted: Wed Aug 10, 2022 10:58 am Post subject: Re: Rusty 65 SC restoration |
|
|
| Incredible determination. I love watching you solve problems. |
|
| Back to top |
|
|
Kb65single
Samba Member
Joined: July 24, 2019
Posts: 268
Location: Obxnc
|
| Posted: Thu Aug 11, 2022 2:55 pm Post subject: Re: Rusty 65 SC restoration |
|
|
| Major Woody wrote: |
| Incredible determination. I love watching you solve problems. |
thanks for the comment. We all have to think outside box to solve 60 year old problems. Sometimes they work sometimes they don't. |
|
| Back to top |
|
|
karl h
Samba Member

Joined: October 10, 2005
Posts: 578
Location: austria
|
|
| Back to top |
|
|
Kb65single
Samba Member
Joined: July 24, 2019
Posts: 268
Location: Obxnc
|
| Posted: Sat Aug 13, 2022 4:18 am Post subject: Re: Rusty 65 SC restoration |
|
|
| karl h wrote: |
| just read the whole thread, unbelievable clean work |
I read about your adventure with the 61 panel about a week ago. Nice save and hopefully you will finish it in between restoring multiple beetles.
Ken |
|
| Back to top |
|
|
|


