| Author |
Message |
jbannon
Samba Member
Joined: September 19, 2020
Posts: 178

|
 Posted: Sun Sep 04, 2022 11:20 pm Post subject: Re: 1959 Beetle Restoration Project Posted: Sun Sep 04, 2022 11:20 pm Post subject: Re: 1959 Beetle Restoration Project |
 |
|
| pastellgreen wrote: |
| The neiman steering lock was added later to the car. I would also consider to restore it to stock condition with ignition cylinder in dashboard and the simple clamp that holds the column tube. That looks more clean. At all cars I once had, where the steering lock had been added later, I removed all that and turned it back to stock. Also: I recommend to put the warning light switch below the dash board, next to the column not into the face of the dash board. It is designed so beautiful, any additional non-stock switch hurts. |
Thanks for the comments. I have already purchased the Neiman lock and want to see if I can restore it. Ill see how things turn out and go from there.
As for visual simplicity you may be happy to know that I removed the passenger side dashboard grab handle during metal work and had the holes filled. I also filled the radio antenna holes and found a radio delete plate and correct chrome trim, and will run a bare bones, as-it-left-the-factory look in the car. |
|
| Back to top |
|
 |
jbannon
Samba Member
Joined: September 19, 2020
Posts: 178
|
| Posted: Wed Nov 16, 2022 11:34 am Post subject: Re: 1959 Beetle Restoration Project |
|
|
Pan Restoration and Rebuild
First some updates...
It's been a while since I posted but progress has continued in the 59 Beetle. Some quick updates before I jump into the pan:
- The seats are at the upholster and should be done before Christmas. I'll post a full update on the interior once it's done.
- I have started restoring the door panels and will provide a full update once they are finished.
- All body work is completed and the car is ready for paint. I hope to have the car painted and returned by Christmas.
Pan
As many of you know the rear torsion bars and spring plates were frozen solid and no amount of pounding or heat on my part could free them. I didn't have the correct tools or equipment to remove the bars and opted to go with Scheidl-Vetiska OG, which is a local company that provides a host of services to the car restoration community in Austria. The owner, Harald Scheidl picked the pan up from my shop and returned it fully prepped and painted minus the frozen torsion bars. When I asked him how they removed the bars he commented that it took three guys with hammers and a hell of a lot of heat to get them out!
In addition to removing the bars they cleaned and prepped the pan (inside and out), and painted it with semi-gloss epoxy plant. I opted for the epoxy versus powder coating given I can more easily touch up the epoxy if it gets scratched or damaged. It was also a service that Scheidl-Vetiska OG offered and it made sense to have them do everything so I could get the pan back to the shop and complete assembly.
Here is a picture of the pan when Harald returned it:
Since then I have been building the pan and assembled the front beam and started to work on the brake lines:
As you can see I have opted for a dual circuit master cylinder for safety reasons. The guys at Airkweld made a good video on how to prep the master cylinder so it doesn't rust once its installed (I have no affiliation to Airkweld--I found the video useful and thought I would share it.) I also installed a steering damper given my front beam is a post 59 beam and had the support bracket. These are small things but they will positively add to the driving experience.
Link
Services / Vendors:
- Scheidl-Vetiska OG
www.coldpowerclean.at |
|
| Back to top |
|
|
VW_Jimbo 
Samba Member

Joined: May 22, 2016
Posts: 9966
Location: Huntington Beach, CA
|
| Posted: Wed Nov 16, 2022 9:32 pm Post subject: Re: 1959 Beetle Restoration Project |
|
|
Very cool thread! I will be following along. I love the information you supply with those posts where a vendor was used. Great resource for those that follow in your foot steps!
And I ABSOLUTELY LOVE YOUR ATTENTION TO DETAIL! Man after my own heart!
_________________
Jimbo
There is never enough time to do it right the first time, but all the time necessary the second time!
| TDCTDI wrote: |
| Basically, a whole bunch of fuckery to achieve a look. |
| 67rustavenger wrote: |
GFY's Xevin and VW_Jimbo!  |
|
|
| Back to top |
|
|
Busstom
Samba Member

Joined: November 23, 2014
Posts: 3853
Location: San Jose, CA
|
| Posted: Wed Nov 16, 2022 11:18 pm Post subject: Re: 1959 Beetle Restoration Project |
|
|
My GOD dude, that pan looks GREAT. I'm jealous.
_________________
My name's Steve and it's pronounced "Bust 'em" (cuz people think I'm Tom) 😏 |
|
| Back to top |
|
|
scrivyscriv
Samba Electrician

Joined: October 04, 2011
Posts: 2922
Location: Memphis
|
| Posted: Thu Nov 17, 2022 4:06 am Post subject: Re: 1959 Beetle Restoration Project |
|
|
Looking great! Its all downhill from here!
_________________
Robert in Memphis
Dünkelgrügen 1967 Java Green bug thread
Engine rebuild thread
If you're ever in the Memphis area, you are welcome to stop by for advice and help. |
|
| Back to top |
|
|
jbannon
Samba Member
Joined: September 19, 2020
Posts: 178
|
| Posted: Thu Nov 17, 2022 10:27 am Post subject: Re: 1959 Beetle Restoration Project |
|
|
| VW_Jimbo wrote: |
Very cool thread! I will be following along. I love the information you supply with those posts where a vendor was used. Great resource for those that follow in your foot steps!
And I ABSOLUTELY LOVE YOUR ATTENTION TO DETAIL! Man after my own heart! |
Jimbo, many thanks for the kinds comments. I am very glad to hear that the vendor information is useful, and will definitely keep posting where I am getting my parts from. |
|
| Back to top |
|
|
jbannon
Samba Member
Joined: September 19, 2020
Posts: 178
|
| Posted: Thu Nov 17, 2022 10:28 am Post subject: Re: 1959 Beetle Restoration Project |
|
|
| Busstom wrote: |
| My GOD dude, that pan looks GREAT. I'm jealous. |
Thanks! Its taken a while but its finally all coming together. |
|
| Back to top |
|
|
jbannon
Samba Member
Joined: September 19, 2020
Posts: 178
|
| Posted: Thu Nov 17, 2022 10:29 am Post subject: Re: 1959 Beetle Restoration Project |
|
|
| scrivyscriv wrote: |
| Looking great! Its all downhill from here! |
I hope so! The plan is to have the car finished this winter. I still have a bit to do, but most of the bigger items are done. |
|
| Back to top |
|
|
Wily
Samba Member
Joined: September 11, 2022
Posts: 80
Location: Belgium
|
| Posted: Thu Nov 17, 2022 1:15 pm Post subject: Re: 1959 Beetle Restoration Project |
|
|
 |
|
| Back to top |
|
|
jbannon
Samba Member
Joined: September 19, 2020
Posts: 178
|
| Posted: Mon Dec 19, 2022 10:41 am Post subject: Re: 1959 Beetle Restoration Project |
|
|
Bodywork and Paint Progress
Received a few photos from the body/paint shop today. Body should be completed next month and assembly can begin.
A motometer 3-in-1 gauge will go into the new dash grill plate
Here is paint swatch of L243 Diamond gray. On the left is my glove box door with original paint, and on the right is the paint swatch.
Vendors/Parts:
Pasztor Classic (Hungary)
https://pasztorclassic.hu/en
Grumpy's Metal
https://grumpysmetal.com/gas-gauge-bezel-single-2-13-32th-hole-lhd.html |
|
| Back to top |
|
|
jbannon
Samba Member
Joined: September 19, 2020
Posts: 178
|
| Posted: Tue Jan 31, 2023 11:08 am Post subject: Re: 1959 Beetle Restoration Project |
|
|
Paint
It's been some time since I last posted any updates. Despite this, the restoration is making progress and I thought I would share the results.
Painting has begun! The L243 Diamond Gray paint is looking great, and I really enjoy how the color changes depending on the lighting. Paint should be completed and the car will be ready to bring home in February 2023.
And the wheels are done! Stock colors for L243 Diamond Gray were Moss Green (L244) on the outer rim, Pearl White (L87) on the inner rim, and black for the back of the rim. While it was easy to find a paint code for Pearl White, my painter could not find a paint code for Moss Green. The only references I had were pictures from The Samba, so my Moss Green may not be exact. I defaulted to going a little darker given the darker moss green contrasts better against the Diamond Gray paint. Now I just need to figure out tires.
Vendors/Parts:
Pasztor Classic (Hungary) - Body
https://pasztorclassic.hu/en
Albert Kiegler e.U. - Karosserie Fach- u. Meisterbetrieb - Wheels
https://www.kiegler.at
Last edited by jbannon on Tue Jan 31, 2023 12:05 pm; edited 1 time in total |
|
| Back to top |
|
|
jbannon
Samba Member
Joined: September 19, 2020
Posts: 178
|
| Posted: Tue Jan 31, 2023 11:46 am Post subject: Re: 1959 Beetle Restoration Project |
|
|
SWF Windshield Wiper Restoration
I did this a while back but hadn't shared the results. When I pulled the windshield wipers they were covered in an inch of grease and were very beat up. The wiper shafts themselves were seized (and needed replaced), which I assume was the reason for all the grease. Here is what I started with:
I disassembled everything, inspected and cleaned the motor, polished the motor case, and had all metal sandblasted and powder coated.
I then replaced all the seals, bushings, grommets, etc., cleaned the grounding strap, had the bolts and retaining spring zinced, and then reassembled all the parts.
Parts / Vendors:
- Sand blasting and powder coating
Sandstrahlen-Stockerau
https://www.sandstrahlen-stockerau.at/
Replacement Parts (all from Wolfsburg West)
- Wiper Shaft (Left) - 111955215B
- Wiper Shaft (Right) - 111955216B
- Wiper Shaft Grommets - 111955261A
- Wiper Link Bushing - 111955341
- Wiper Shaft Nut - 113955243A
- Wiper Assembly Grommet - 111955641
- Wiper Shaft C-Clip - 111955346A |
|
| Back to top |
|
|
jbannon
Samba Member
Joined: September 19, 2020
Posts: 178
|
| Posted: Tue Jan 31, 2023 12:44 pm Post subject: Re: 1959 Beetle Restoration Project |
|
|
Chrome
I sent my side mirrors, door handles, and hood handle to Wittka Galvanisierung GesmbH (http://www.wittka.at) to get re-chromed, and was very happy with the results. Wittka has an employee that enjoys working on classic car parts, and personally handles all the chroming to ensure everything is done correctly.
Driver Side and Passenger Side Mirrors:
The car came with a passenger side mirror that I had never seen before but thought was very cool. After searching for a while I found a driver side version to complete the pair. The "Made in Germany" must have been embossed after they chromed them at the factory, and unfortunately they got a little lost when re-chromed. Regardless, they look very good.
Before:
After
Door Handles
Before
After
Front Hood
Before
After
Other chromed parts
As for the bumpers, deck lid handle, vent windows, window division bars, chrome trim, and running board trim I decided to go with new items. I purchased stainless steel chromed bumpers from BBT, and stainless steel chrome trim and new chrome window division bars from Kaeferland. In addition, I bought NOS vent window frames, vent wing locks, and related hardware when I attended HO 2022 in Germany last summer. These items were very worn and beat up, and it was surprisingly cheap to replace them with new NOS parts. I'll provide updates once I start putting things together to show you how they turned out.
Vendors:
- Wittka Galvanisierung GesmbH (http://www.wittka.at) |
|
| Back to top |
|
|
jbannon
Samba Member
Joined: September 19, 2020
Posts: 178
|
| Posted: Sat Feb 18, 2023 2:12 am Post subject: Re: 1959 Beetle Restoration Project |
|
|
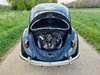
Some quick updates on painting the car. The body is nearly done and I should get the car back soon.
|
|
| Back to top |
|
|
Rome
Samba Member
Joined: June 02, 2004
Posts: 9653
Location: Pearl River, NY
|
| Posted: Sat Feb 18, 2023 6:21 am Post subject: Re: 1959 Beetle Restoration Project |
|
|
| Beautiful paintwork! Please try to post a photo of the body outdoors in mild daylight when you are transferring it back home- that color often appears very different in natural light compared to the fluorescent in the paint booth. |
|
| Back to top |
|
|
jbannon
Samba Member
Joined: September 19, 2020
Posts: 178
|
| Posted: Sat Feb 18, 2023 7:46 am Post subject: Re: 1959 Beetle Restoration Project |
|
|
| Thanks and will do! |
|
| Back to top |
|
|
markendee
Samba Member

Joined: April 30, 2009
Posts: 248
Location: Kyabram, Australia
|
| Posted: Sat Feb 18, 2023 2:59 pm Post subject: Re: 1959 Beetle Restoration Project |
|
|
Just discovered your build thread last night and have read every post.
Magnificent!
Looking forward to seeing your car finished.
Regards from Australia.
Mark.
_________________
Member # 145244 |
|
| Back to top |
|
|
Busstom
Samba Member
Joined: November 23, 2014
Posts: 3853
Location: San Jose, CA
|
| Posted: Sat Feb 18, 2023 3:45 pm Post subject: Re: 1959 Beetle Restoration Project |
|
|
Wow, loving it! That's not Diamond Grey, is it? Whatever it is, it's stunning and will suit the car very well
_________________
My name's Steve and it's pronounced "Bust 'em" (cuz people think I'm Tom) 😏 |
|
| Back to top |
|
|
jbannon
Samba Member
Joined: September 19, 2020
Posts: 178
|
| Posted: Sun Feb 19, 2023 2:21 am Post subject: Re: 1959 Beetle Restoration Project |
|
|
| Busstom wrote: |
| Wow, loving it! That's not Diamond Grey, is it? Whatever it is, it's stunning and will suit the car very well |
Thank you! The metal work, bodywork, and paint have taken a long, long time. Way more time than expected or planned for. However, the transformation is amazing. Last time I visited the painter I couldnt believe it was the same carthe metal and body work were stunning.
And yes, the color is L243 Diamond Gray, aka what I consider the chameleon color. Depending on the quality of the light, the color changessometimes dark gray, sometimes light gray, sometimes greenish gold, sometimes gold-gray. Alongside Glacier Blue, its my favorite late 50s color. Ill post pictures of the car in the sun when I bring it home from paint. |
|
| Back to top |
|
|
jbannon
Samba Member
Joined: September 19, 2020
Posts: 178
|
| Posted: Sun Feb 19, 2023 2:22 am Post subject: Re: 1959 Beetle Restoration Project |
|
|
| markendee wrote: |
Just discovered your build thread last night and have read every post.
Magnificent!
Looking forward to seeing your car finished.
Regards from Australia.
Mark. |
Thanks Mark! Really appreciate your comments. Way more to come so stay tuned! |
|
| Back to top |
|
|
|


