| Author |
Message |
dwill49965
Samba Member

Joined: August 08, 2005
Posts: 1396
Location: Dartmouth, Nova Scotia

|
 Posted: Sat Jan 06, 2007 2:48 pm Post subject: Re: Front sidemarker - turn signal modification Posted: Sat Jan 06, 2007 2:48 pm Post subject: Re: Front sidemarker - turn signal modification |
 |
|
| dwill49965 wrote: |
I'm going to do this mod to the rear sidemarker lights, too, and turn them into turn signals. It will only involve switching one wire (the ground wire from ground to the turn signal feed).
|
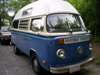
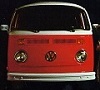
Well, I finished off this job this afternoon. It was quite easy. Just removed the brown ground wire from rear sidemarker light from the male spade grounding terminal, and spliced it (soldered it) into the right rear turn signal wire - black wire with green stripe on my '78 Westy. For the drivers side, the turn signal feed wire is black with a white stripe.
Here's a couple of short (15-20 sec) .avi movies of them in action. Sorry for the quality - its a 5 year old Canon A60 2MPixel camera, and sorry for the radio being on in the background. 
http://www3.ns.sympatico.ca/dwilliams1/front%20turn%20signal%20mod%20005.avi
http://www3.ns.sympatico.ca/dwilliams1/front%20turn%20signal%20mod%20006.avi
Bring on the flames, hatchets, and admonitions about cutting into my original wiring harness ...
_________________
Darryl
--------------
'78 Westy, Boston Bob built 2.0 L, FI, MSD 6A
| Meyer wrote: |
| Lastly, you just referred to US citizens as 'Americans'. Exactly what kind of Canadian are you? From what continent? |
|
|
| Back to top |
|
 |
Duncwarw
Samba Member

Joined: August 25, 2003
Posts: 3094
|
| Posted: Sat Jan 06, 2007 3:16 pm Post subject: |
|
|
I like it! No flame from me at least.
I'd think you're safer than the rest of us.
_________________
To find yourself, think for yourself
Socrates, 470 BC - 399 BC |
|
| Back to top |
|
|
NASkeet
Samba Member
Joined: April 29, 2006
Posts: 2958
Location: South Benfleet, Essex, UK
|
| Posted: Sun Jan 07, 2007 6:32 am Post subject: Re: Front sidemarker - turn signal modification |
|
|
| phorce1 wrote: |
Now, for those in the U.S. (I'm in Texas) please note his description mentioned BOTH "parking lights" and "side marker lights".
In Europe narrow roads and no garage is the rule rather than the exception.
When light switch is pulled out the MARKER lights light up to make you more visible while driving, just like over here
When one parks for the night you just pull two wheels up on the sidewalk and leave the rest of the car hanging out in the roadway. Special circuitry in the turn signal switch turns on JUST the PARKING lamps on the left/right side of the car when you flip the switch while the key is off. So, when one pulls up for the night one turns on the parking lamps and has a red-rear and clear-front light lit on the side of the car that is hanging out in the road.
Over here we call all lamps that light when the headlight switch is pulled out to the first stop either parking lights or marker ligts. Usually people will refer to front/rear facing lights as parking lights and anything on the side of the vehicle as a marker light. No special way to light only some of them. |
In some areas, of some countries, parking with one or more wheels on the verge or pavement (i.e. sidewalk in USA parlance), will result in your vehicle being towed away or wheel-clamped, requiring one to pay a hefty fine to retrieve the vehicle. In extreme cases, your vehicle might even be auctioned off or sent to the crusher, so be wary of what you do, when you venture abroad, because you might fall foul of draconian local laws!
Regards.
Nigel A. Skeet
Last edited by NASkeet on Mon Jan 08, 2007 6:47 am; edited 1 time in total |
|
| Back to top |
|
|
phorce1
Samba Member

Joined: July 24, 2004
Posts: 54
Location: Texas, USA
|
| Posted: Sun Jan 07, 2007 9:34 am Post subject: Re: Front sidemarker - turn signal modification |
|
|
| NASkeet wrote: |
| ... be wary of what you do, when you venture abroad, because you might fall foul of draconian local laws! |
In this regard the EU and the US are exactly alike.
_________________
TCB
Buskatiers |
|
| Back to top |
|
|
otiswesty
Samba Member

Joined: November 21, 2006
Posts: 1731
Location: Portland
|
| Posted: Wed Apr 22, 2009 10:03 am Post subject: Re: Front sidemarker - turn signal modification |
|
|
| dwill49965 wrote: |
| dwill49965 wrote: |
I'm going to do this mod to the rear sidemarker lights, too, and turn them into turn signals. It will only involve switching one wire (the ground wire from ground to the turn signal feed).
|
Well, I finished off this job this afternoon. It was quite easy. Just removed the brown ground wire from rear sidemarker light from the male spade grounding terminal, and spliced it (soldered it) into the right rear turn signal wire - black wire with green stripe on my '78 Westy. For the drivers side, the turn signal feed wire is black with a white stripe. |
Does this wiring setup allow the sidelights to work both as sidemarkers and turn signal?
I like the front reflector -> side marker conversion. Not a hack idea at all, but the hole could be made a bit cleaner. 
_________________
1978 Sage Green P22 Westfalia
1989 T3 Syncro Single cab
Just a regular guy |
|
| Back to top |
|
|
Mike Boell
Samba Member
Joined: February 21, 2009
Posts: 58
Location: oregon city
|
| Posted: Wed Apr 22, 2009 11:11 am Post subject: |
|
|
I did this to my 1975 Westfalia also, but I did it back in 1980. Glad to see you guys catching up. Ha!
That being said I do not have them set-up to flash, so now I will catch up with you and move a wire or two around. I'll do the front and the back as well.
Great idea.
Thanks
Mike |
|
| Back to top |
|
|
Air_Cooled_Nut
Samba Member

Joined: March 27, 2004
Posts: 3040
Location: Portland, Oregon
|
| Posted: Wed Apr 22, 2009 12:47 pm Post subject: Re: Front sidemarker - turn signal modification |
|
|
| otiswesty wrote: |
| Does this wiring setup allow the sidelights to work both as sidemarkers and turn signal? |
Yes.
_________________
Toby http://www.aircoolednut.com/
Did I mention that I'm an original Darksider?
'72 VW Squareback, 2007cc, GB 5-speed, rag top; '76 VW Riviera Penthouse Sundowner 2.0L; 2015 Audi S5 Cabby w/Stage II APR; '06 Ducati Sport Classic 1000; '14 Ducati Diavel Strada
The First Invasion |
|
| Back to top |
|
|
BUSBOSS
Samba Member

Joined: January 21, 2009
Posts: 2161
Location: Northern California
|
| Posted: Tue Aug 11, 2009 11:27 am Post subject: Here's my take on the yuppie hack! |
|
|
I was inspired by the original poster's idea. The exposed metal will be treated with POR15 and I'm waiting for my housings to complete the electrical work and cosmetic install.
FYI: I used a 1 1/2" bi-metal hole saw with a 1/4" pilot bit for the main bulb socket hole and a 5/16" bit for the housing mount holes.
I kept a xerox of my template in case anyone would like to use it. Just send me a PM.
Here is my work on it so far:
Thanks for the idea!
_________________
All the redemption I can offer, girl, is beneath this dirty hood
1976 Westfalia
1970 Karmann Ghia Convertible (sold - but not forgotten) |
|
| Back to top |
|
|
BUSBOSS
Samba Member
Joined: January 21, 2009
Posts: 2161
Location: Northern California
|
| Posted: Fri Aug 21, 2009 4:53 pm Post subject: |
|
|
Here are some photos of the finished project:
_________________
All the redemption I can offer, girl, is beneath this dirty hood
1976 Westfalia
1970 Karmann Ghia Convertible (sold - but not forgotten) |
|
| Back to top |
|
|
Big Bad John
Samba Member

Joined: April 24, 2005
Posts: 431
Location: Palm Coast, Florida
|
| Posted: Fri Aug 21, 2009 5:46 pm Post subject: |
|
|
I did the same thing on mine a couple of years ago, just a different location. They do look cool at night or in the evening.
[/img]
_________________
Is that your final answer? |
|
| Back to top |
|
|
soissisc
Samba Member

Joined: April 04, 2007
Posts: 636
Location: Western Pennsylvania
|
| Posted: Fri Aug 21, 2009 6:02 pm Post subject: |
|
|
Be sure to seal up the back side as well (inside the door), as water can / will get at it from there.
I do like the idea, I think it is great. Mine are round and on the rear of the dogleg.
_________________
Mark
68 Westy
92 Jetta (oh it is retired)
99 Eurovan
05 NBC
06 Audi A3
72 Westy (I am going to fix it up) |
|
| Back to top |
|
|
78Kombi
Samba Member
Joined: October 05, 2006
Posts: 1043
Location: Western Mass
|
| Posted: Fri Aug 21, 2009 8:15 pm Post subject: |
|
|
| Big Bad John wrote: |
I did the same thing on mine a couple of years ago, just a different location. They do look cool at night or in the evening.
[/img] |
I really dig that, it looks great.but im listening to Leonard Cohen so i cant really get too excited right now..hehe Joe
_________________
78 hightop 2.0 FI
| Wildthings wrote: |
no engine that I know of will run off of hype.
|
|
|
| Back to top |
|
|
Air_Cooled_Nut
Samba Member
Joined: March 27, 2004
Posts: 3040
Location: Portland, Oregon
|
| Posted: Fri Aug 21, 2009 8:51 pm Post subject: |
|
|
| soissisc wrote: |
| Be sure to seal up the back side as well (inside the door), as water can / will get at it from there... |
If mounted on the door skin then making it water-tight isn't of concern as the doors normally get water in them, thus the reason they have drains in them...just like modern cars. One does, however, want to make sure there's a vapor barrier in the door to help protect the panel. If the stock one is a gonner then a heavy-duty, thick plastic garbage bag will work. Use Gas-A-Cinch or rubber-cement to hold the vapor barrier to the door -- follow the directions for allowing the glue to cure to get best adherence.
_________________
Toby http://www.aircoolednut.com/
Did I mention that I'm an original Darksider?
'72 VW Squareback, 2007cc, GB 5-speed, rag top; '76 VW Riviera Penthouse Sundowner 2.0L; 2015 Audi S5 Cabby w/Stage II APR; '06 Ducati Sport Classic 1000; '14 Ducati Diavel Strada
The First Invasion |
|
| Back to top |
|
|
BUSBOSS
Samba Member
Joined: January 21, 2009
Posts: 2161
Location: Northern California
|
| Posted: Fri Aug 21, 2009 10:25 pm Post subject: |
|
|
I installed this inner vapor barrier of 4mil plastic with a bead of clear waterproof liquid nails.
Tip: While you're in there, you should make sure that your drain or weep holes are clear of debris (including parts of the rubber clip mounts for the panel).
I then sealed the door with soundproofing. I'll be posting about that experience soon.
_________________
All the redemption I can offer, girl, is beneath this dirty hood
1976 Westfalia
1970 Karmann Ghia Convertible (sold - but not forgotten) |
|
| Back to top |
|
|
Air_Cooled_Nut
Samba Member
Joined: March 27, 2004
Posts: 3040
Location: Portland, Oregon
|
| Posted: Sat Aug 22, 2009 9:36 am Post subject: |
|
|
If that's the same Liquid Nails I'm thinking of, that's too permanent of a solution!  You want something that WILL allow you to remove the vapor barrier when needed, thus the use of a mild-adhesion contact cement. You want something that WILL allow you to remove the vapor barrier when needed, thus the use of a mild-adhesion contact cement.
_________________
Toby http://www.aircoolednut.com/
Did I mention that I'm an original Darksider?
'72 VW Squareback, 2007cc, GB 5-speed, rag top; '76 VW Riviera Penthouse Sundowner 2.0L; 2015 Audi S5 Cabby w/Stage II APR; '06 Ducati Sport Classic 1000; '14 Ducati Diavel Strada
The First Invasion |
|
| Back to top |
|
|
BUSBOSS
Samba Member
Joined: January 21, 2009
Posts: 2161
Location: Northern California
|
| Posted: Sat Aug 22, 2009 10:14 am Post subject: |
|
|
It is in fact the permanent adhesive you are thinking of. Hopefully I won't need to remove it ever. In any event, the plastic is sized, cut and and positioned so that I can easily reach behind it if necessary.
_________________
All the redemption I can offer, girl, is beneath this dirty hood
1976 Westfalia
1970 Karmann Ghia Convertible (sold - but not forgotten) |
|
| Back to top |
|
|
BUSBOSS
Samba Member
Joined: January 21, 2009
Posts: 2161
Location: Northern California
|
| Posted: Tue Sep 20, 2011 1:26 pm Post subject: |
|
|
Here is the template for all to use:
(It's in the gallery now - Thanks Everett!  Now I don't have to keep xeroxing and mailing it out.) Now I don't have to keep xeroxing and mailing it out.)
https://www.thesamba.com/vw/gallery/pix/849402.jpg
_________________
All the redemption I can offer, girl, is beneath this dirty hood
1976 Westfalia
1970 Karmann Ghia Convertible (sold - but not forgotten) |
|
| Back to top |
|
|
thewalrus
Big Jack
Joined: March 27, 2006
Posts: 3014
Location: Belchertown, MA
|
| Posted: Tue Sep 20, 2011 3:33 pm Post subject: |
|
|
Ever since I first saw this topic I've wanted to do this conversion. I think there's a line between a "Hack" and a tasteful upgrade and I think this falls into the tasteful upgrade category. Thanks for the template BUSBOSS, that'll really make this upgrade hard to fall into the hack category now
_________________
'73 Transporter 1.7L Dual Carb
| notchboy wrote: |
| You ran over some #Vanlife'ers hopes and dreams? |
| 60vwnewengland wrote: |
| Looking forward to next weekend, weed, krunk juice, hookers, blow, hanging with bums, philly, ...the awards! |
|
|
| Back to top |
|
|
my59
Samba Member

Joined: August 13, 2003
Posts: 3793
Location: connecting the dots
|
| Posted: Tue Sep 20, 2011 5:17 pm Post subject: |
|
|
I've got all the gear for this since I saw it last year. The template is way neater than the one I made. Thanks for posting it. Now I just have to scrounge some wire from a few local parts buses so it will key into the lighting diagram wiring and I'll be off drilling holes.
_________________
my59: Well son, my grandfather died before I got to drive it, so does that answer your question?
our79: sunroof bus w/camper interior and 2.0 FI
Other:'12 Jetta, '77 Benz 300D, and a 74 MG Midget. |
|
| Back to top |
|
|
Earl 78 westy
Samba Member

Joined: October 28, 2007
Posts: 364
Location: Jersey
|
| Posted: Tue Sep 20, 2011 6:02 pm Post subject: |
|
|
im doing it. it looks great and it is safer 
c'mon guys.....you all know that our lights are dim enough....this idea will just make our buses brighter. 
_________________
Just another VW girl driving a bus....
78' Westy named Feo.
04' Jetta TDI
check out my stuff on ebay....
http://www.ebay.com/sch/simplefundesigns/m.html?_n...ksid=p3686
. |
|
| Back to top |
|
|
|


