| Author |
Message |
obnoxiousblue
Samba Member

Joined: February 21, 2007
Posts: 2940
Location: East Northport, NY

|
 Posted: Wed May 01, 2013 7:26 pm Post subject: Posted: Wed May 01, 2013 7:26 pm Post subject: |
 |
|
What is pricing on the Amescador repop vs the model from FlyAway?
I'm only partial to the Amescardor because it has the cables which draw the hatch down a bit, thus helping drainage away from the opening I presume.
Having spoke to another Westy owner about the rear hatch tent while at Volksfest last week (he had never heard of it) I happened to demonstrate where the platform gets its support from. I subsequently pulled downward on the hatch arm, and was quite suprised that it bore weight (not my while body weight, but I didn't want to pull that hard for fear of knocking myself out)
I was impressed!
_________________
Mike
1964 Beetle
2001 Eurovan Camper |
|
| Back to top |
|
 |
kevinj73us
Samba Member

Joined: September 25, 2011
Posts: 228
Location: Laurel, MD
|
|
| Back to top |
|
|
babysnakes
Samba Member
Joined: August 19, 2008
Posts: 7107
|
| Posted: Thu May 02, 2013 9:00 am Post subject: |
|
|
Eh.... It works but it looks a bit sloppy and suseptible to jostling in the wind.
DBM's looks so much better, nice and tight.
A great "homebrew" setup. Really not that difficult to make and WAY less than 1000 bones in cost. |
|
| Back to top |
|
|
kevinj73us
Samba Member
Joined: September 25, 2011
Posts: 228
Location: Laurel, MD
|
| Posted: Thu May 02, 2013 9:40 am Post subject: |
|
|
| babysnakes wrote: |
DBM's looks so much better, nice and tight.
A great "homebrew" setup. Really not that difficult to make and WAY less than 1000 bones in cost. |
You'll get no argument from me on that. DBM's is really top notch. I put that link up more to show the platform and frame than to compare the tent itself.
It would seriously help if there were a tent pattern available for folks to use to make something like DMB has.
kj
_________________
1973 Station Wagon
m-plate |
|
| Back to top |
|
|
babysnakes
Samba Member
Joined: August 19, 2008
Posts: 7107
|
| Posted: Thu May 02, 2013 12:37 pm Post subject: |
|
|
| Make your own pattern. Set up the platform and support bars then take some old bedsheets and design a template. Then off to the fabric store for some canvas. |
|
| Back to top |
|
|
grandpa pete
Samba Member

Joined: July 06, 2008
Posts: 6426
Location: St. Petersburg, FL
|
|
| Back to top |
|
|
crushie
Samba Member

Joined: September 23, 2011
Posts: 878
Location: alberta
|
| Posted: Thu May 02, 2013 5:32 pm Post subject: |
|
|
| grandpa pete wrote: |
| two rachet straps...i peice 1/2 plywood...one $49 tent....ten 3/4 inch round magnets....already did it !! |
Can we see?
_________________
1974 VW Combi 1800 Auto. Weber 32/36 |
|
| Back to top |
|
|
bugger101
Samba Member
Joined: September 04, 2010
Posts: 1559
Location: orlando
|
| Posted: Thu May 02, 2013 5:52 pm Post subject: |
|
|
| grandpa pete wrote: |
| two rachet straps...i peice 1/2 plywood...one $49 tent....ten 3/4 inch round magnets....already did it !! |
hey Pete I can't find any pictures of your tent all setup and what it looks like, I was it in person but not extended out . Got any pics.
_________________
75 west deluxe http://www.thesamba.com/vw/forum/viewtopic.php?p=5270450#5270450
2010 ford focus |
|
| Back to top |
|
|
mnskmobi
Samba Member
Joined: February 28, 2005
Posts: 536
Location: Melbourne, Australia
|
| Posted: Thu May 02, 2013 7:49 pm Post subject: |
|
|
| grandpa pete wrote: |
| two rachet straps...i peice 1/2 plywood...one $49 tent....ten 3/4 inch round magnets....already did it !! |
I had the same idea as Grandpa Pete using a free standing shower tent. Got the tent, haven't had the time to do the rest.  |
|
| Back to top |
|
|
Hoody
Samba Member
Joined: November 28, 2007
Posts: 1948
|
| Posted: Fri May 03, 2013 12:23 am Post subject: |
|
|
| DB has it nailed. |
|
| Back to top |
|
|
kevinj73us
Samba Member
Joined: September 25, 2011
Posts: 228
Location: Laurel, MD
|
|
| Back to top |
|
|
webwalker 
Samba Member

Joined: January 26, 2006
Posts: 2803
Location: Mount Laurel, NJ
|
| Posted: Sun May 05, 2013 8:29 pm Post subject: |
|
|
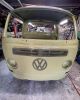
Here are pictures I found about 18 months ago while trolling. While obviously the same bus in the earlier pictures, these pictures have all of the details of the construction, which might set you back $100 if you bought the most expensive parts.
_________________
"Consistent maintenance with quality products is the cheapest warranty you'll ever need."
1977 CE1 Transporter Deluxe, Subaru EJ22, Skills Cooling, Steedle HD 091 w/ GuardT .82 4th
Click to view image |
|
| Back to top |
|
|
babysnakes
Samba Member
Joined: August 19, 2008
Posts: 7107
|
| Posted: Mon May 06, 2013 2:48 am Post subject: |
|
|
 |
|
| Back to top |
|
|
fusername
Samba Member

Joined: March 15, 2006
Posts: 2897
Location: Boston MA
|
| Posted: Mon May 06, 2013 8:52 am Post subject: |
|
|
I suspect someone lost the part that goes there. I might need to make something like this and just call it a table.
_________________
[email protected]
Need something custom bent up? shoot me an email, maybe we can make it work!
FORSALE: Thrust cut T4 and 1.9 main bearings
| obnoxiousblue wrote: |
| Maybe Ben Pon's ghost comes and vomits NOS stampings for your bus, but not mine! |
|
|
| Back to top |
|
|
The Real Amescador
Samba Member

Joined: April 28, 2013
Posts: 3
Location: NL
|
| Posted: Mon May 06, 2013 12:19 pm Post subject: |
|
|
The Regis type is nothing! It's to big to handle 
| notchboy wrote: |
| The Real Amescador wrote: |
Now for sale!
|
Where!
And will you be making the REGIS type as well? |
_________________
www.amescador.nl |
|
| Back to top |
|
|
obnoxiousblue
Samba Member
Joined: February 21, 2007
Posts: 2940
Location: East Northport, NY
|
| Posted: Mon May 06, 2013 12:54 pm Post subject: |
|
|
| fusername wrote: |
| I suspect someone lost the part that goes there. I might need to make something like this and just call it a table. |
That was a home brew... I'm sure he didn't have any other idea as to how to bind the poles from the hinge to the bed (load bearing) to the poles that go to the trunk lid (just holds the lid down)
_________________
Mike
1964 Beetle
2001 Eurovan Camper |
|
| Back to top |
|
|
grandpa pete
Samba Member
Joined: July 06, 2008
Posts: 6426
Location: St. Petersburg, FL
|
| Posted: Mon May 06, 2013 5:36 pm Post subject: |
|
|
Photoshop changed and messed me all up...hope this works
Built "drawer" unit twin bed air matress wide and side cabinets then cut, fit and stapled $49 tent to it.Bungee strap across top under gutter holds it all in place.NO fancy steel bars;Rachet straps work fine. White tape holds magnets onto sides....DBM's unit is nicer; I've seen it in person;but I'm not a retired engineer that can sew 
_________________
63 two fold rag
66 sedan delivery Type 6
http://www.thesamba.com/vw/forum/viewtopic.php?t=569619&highlight=sedan+delivery |
|
| Back to top |
|
|
Tristan79
Samba Member
Joined: June 22, 2012
Posts: 157
Location: Bend, Oregon
|
| Posted: Sun Jun 09, 2013 9:46 pm Post subject: |
|
|
| im wanting to make one of these, i think i have figured out how to connect and make everything but i dont understand how the base board connects to the bus? can someone that has one post some picture or explain this? |
|
| Back to top |
|
|
webwalker
Samba Member
Joined: January 26, 2006
Posts: 2803
Location: Mount Laurel, NJ
|
| Posted: Mon Jun 10, 2013 10:22 am Post subject: |
|
|
It depends on variant of the design, but essentially, a stop is installed inside of the bottom of the hatch, usually just behind the latch post.
The board that hangs outside of the hatch, is therefore supported at both ends: the far end by the straps which transfers the weight up to the hinges, and at the near end by resting directly on the inside of the hatch sill, and prevented from sliding by the stop connected the floor of the hatch.
I've always loved this design, as it makes it quite plausible to do all kinds of camping things with an uncut Deluxe without having to do major body butchery. And when you get home, you take the board and the poles out and take the kids to the movies or dinner or whatever.
M
_________________
"Consistent maintenance with quality products is the cheapest warranty you'll ever need."
1977 CE1 Transporter Deluxe, Subaru EJ22, Skills Cooling, Steedle HD 091 w/ GuardT .82 4th
Click to view image |
|
| Back to top |
|
|
Tristan79
Samba Member
Joined: June 22, 2012
Posts: 157
Location: Bend, Oregon
|
| Posted: Tue Jun 11, 2013 1:58 pm Post subject: |
|
|
| Quote: |
It depends on variant of the design, but essentially, a stop is installed inside of the bottom of the hatch, usually just behind the latch post.
The board that hangs outside of the hatch, is therefore supported at both ends: the far end by the straps which transfers the weight up to the hinges, and at the near end by resting directly on the inside of the hatch sill, and prevented from sliding by the stop connected the floor of the hatch.
I've always loved this design, as it makes it quite plausible to do all kinds of camping things with an uncut Deluxe without having to do major body butchery. And when you get home, you take the board and the poles out and take the kids to the movies or dinner or whatever.
M |
do you have a picture? do i need to drill? |
|
| Back to top |
|
|
|


