| Author |
Message |
82WestyMan
Samba Member
Joined: December 28, 2006
Posts: 1098
Location: Western OR

|
 Posted: Wed Jan 14, 2009 6:07 pm Post subject: Aircooler Engine Harness Rebuild Posted: Wed Jan 14, 2009 6:07 pm Post subject: Aircooler Engine Harness Rebuild |
 |
|
Last time I was in the salvage yard, I ran across a Engine Harness that looked in better shape than the one I currently am running
When checked it out, it turned out the #1 injector wasn't firing and some of the other AMP connectors had some pretty sorry connectors in them.
Since I already had a working Engine Harness, I thought I'd take a stab at rebuilding with 4 new connectors at the injectors and using the best of those to replace a couple of the ones at the Thermo Time Switch / Cold Start Valve / Aux Air Regulator.
Along the way I did put 'zip-ties' to 'clean-up' the wiring inside the cover
Once I cut away all the brittle and old cover, this is what I had to work with
As you can see, some of the AMP connectors were "less than stellar"
After some research, the best bet for true replacements looked like this option, since it came with your choice of boot type / lengths
http://store.yahoo.com/eagleday/electrical.html
This is what the replacements I ordered looked like unassembled
(I supplied the 18 gauge wire and shrink-wrap
I decided to solder all the connections
Actually assembling the connectors was pretty easy
I decided to added a little more length to each injector wire (about 1.5 in)
Cyl's 1 & 2
Cyl's 3 & 4
This is what it looked like finished, waiting on some wire loom to cover it
I did bring the coil wire thru the harness to clean up my engine compartment, used some of the better 'replaced' connectors to replace and added some length to Therm/Cold-Start/Aux-Air connecters
I still have to run thru all the connections with my multimeter but I'm hoping it will put to rest any possible problems in the harness in the future and clean up my engine compartment all in one fell swoop
I'll let you know how it works when I get the wire loom on it and installed
_________________
"The floggings will continue until morale improves"
"I never did give anybody hell. I just told the truth and they thought it was hell" - Harry S. Truman
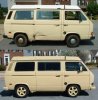
82 Westfalia - w/ a Raby 'Camper Special' engine |
|
| Back to top |
|
 |
Vanagon Nut
Samba Member

Joined: February 08, 2008
Posts: 10371
Location: Sunshine Coast B.C.
|
| Posted: Wed Jan 14, 2009 8:11 pm Post subject: |
|
|
Lookin' good.
I wish I had taken more pics of my Vanagon/Jetta harness during my conversion. I wanted to make more notes too of little details I learned about. (the hard way in some cases!   ) )
The devil is in the detail for sure. These wires: (hard to see, but 3 casings were cracked)
were twisted together (factory) and were likely shorting out. (of course they went to the CMP connector on the dizzy!) Engine heat does some crazy stuff to harnesses I'm learning.
FWIW, to prevent this (partially removed cuz i missed a ground)
if possible/safe, hook up and run the engine before looming the harness. I recall having to unwrap my work to get at that dang missed ground. Yeesh!
You will be totally happy with a nice clean engine bay and refurbed harness!
Neil.
_________________
1981 Westy DIY 15º ABA
1988 West DIY 50º ABA
VE7TBN |
|
| Back to top |
|
|
deprivation
Samba Member
Joined: September 14, 2006
Posts: 1220
Location: Austin, Texas
|
| Posted: Thu Jan 15, 2009 6:02 pm Post subject: |
|
|
Way to go! I have a used harness that I have been re-doing ever-so-slowly for about a year now. Your post gave me a little kick in the pants to get moving on that again.
_________________
1986 Westy 2WD auto a.k.a. "The Old Girl"
www.kittenfart.com |
|
| Back to top |
|
|
82WestyMan
Samba Member
Joined: December 28, 2006
Posts: 1098
Location: Western OR
|
| Posted: Thu Jan 22, 2009 2:09 pm Post subject: |
|
|
Though I'd a few final thoughts & pictures
After I got all the new connectors and all done, I did a final fit and test on the engine.
It worked great but a few of my connectors were not quite the right length
So after marking and correcting those, I wrapped the whole thing up in black wire loom
I used 1/4", 1/2" and 3/4". I started by installing the smallest size first and worked my way back up to the main bundle that used the 3/4".
I had a 5 ft piece of 3/4" and it fit perfectly from the ECM connectior to the double relay plugs
Here's what it looked like before being installed
And here's what it looks like in the engine compartment
Overall, the project wasn't that hard
My only recommendation to anyone else is to start with a fairly good used harness (I had 2) so you're not working on your 'known good' one
The only parts I really go new were the 4 injector connectors and the wire loom (if you discount some 18 gauge white wire, shrink-tubing and solder)
Sure beats laying out $350 and I got exactly what I had in mind and with the exact fit
_________________
"The floggings will continue until morale improves"
"I never did give anybody hell. I just told the truth and they thought it was hell" - Harry S. Truman
82 Westfalia - w/ a Raby 'Camper Special' engine |
|
| Back to top |
|
|
ftp2leta
Samba Member

Joined: October 11, 2004
Posts: 3271
Location: Montreal
|
| Posted: Thu Jan 22, 2009 3:41 pm Post subject: |
|
|
| 82WestyMan wrote: |
Though I'd a few final thoughts & pictures
After I got all the new connectors and all done, I did a final fit and test on the engine.
It worked great but a few of my connectors were not quite the right length
So after marking and correcting those, I wrapped the whole thing up in black wire loom
I used 1/4", 1/2" and 3/4". I started by installing the smallest size first and worked my way back up to the main bundle that used the 3/4".
I had a 5 ft piece of 3/4" and it fit perfectly from the ECM connectior to the double relay plugs
Here's what it looked like before being installed
Overall, the project wasn't that hard
My only recommendation to anyone else is to start with a fairly good used harness (I had 2) so you're not working on your 'known good' one
The only parts I really go new were the 4 injector connectors and the wire loom (if you discount some 18 gauge white wire, shrink-tubing and solder)
Sure beats laying out $350 and I got exactly what I had in mind and with the exact fit |
Beautiful job men, BEAUTIFUL!!!
Ben
_________________
Working with rust, grease, dirt and dust is a sad truth.
------------------------------------------------------
FI part for sale: http://www.benplace.com/parts_sale1.htm
My site: http://www.benplace.com/vw2.htm
Subi conversion: http://www.benplace.com/vanaru_eng.htm
Youtube http://www.youtube.com/user/ftp2leta |
|
| Back to top |
|
|
airkooledchris
Samba Member

Joined: January 25, 2005
Posts: 2710
|
| Posted: Thu Jan 22, 2009 3:50 pm Post subject: |
|
|
that is the best looking AC Vanagon motor compartment ive ever seen.
nice work, again. |
|
| Back to top |
|
|
82WestyMan
Samba Member
Joined: December 28, 2006
Posts: 1098
Location: Western OR
|
| Posted: Thu Jan 22, 2009 4:48 pm Post subject: |
|
|
thanx for the compliments
_________________
"The floggings will continue until morale improves"
"I never did give anybody hell. I just told the truth and they thought it was hell" - Harry S. Truman
82 Westfalia - w/ a Raby 'Camper Special' engine |
|
| Back to top |
|
|
tencentlife
Samba Member
Joined: May 02, 2006
Posts: 10078
Location: Abiquiu, NM, USA
|
| Posted: Thu Jan 22, 2009 7:54 pm Post subject: |
|
|
Very nice! Makes me want to get out my spare harness and do it up.
Yeah, sure, someday....
_________________
Shop for unique Vanagon accessories at the Vanistan shop:
https://intrepidoverland.com/vanistan/
Please don't PM here, I will not reply.
Experience is kryptonite to doctrine. |
|
| Back to top |
|
|
daroota
Samba Member

Joined: December 19, 2012
Posts: 266
Location: bc
|
| Posted: Tue Apr 12, 2016 11:42 am Post subject: Re: Aircooler Engine Harness Rebuild |
|
|
Thanks for this!!
I'm working on making a harness for myself. 82 Air cooled Federal.
I've found a computer pigtail off a old 84 Golf (it will have to be repinned of course)
Digikey parts list:
USD http://www.digikey.com/short/38vvz3
CAD http://www.digikey.ca/short/38vtc8
I've ordered some SXL grade wire, heat shrink wrap so far. I'm still waiting to order the rest from digikey because I'm trying to source a few more parts. Hopefully with some help, and from Digikey, I can find the rest.
German supply seems to have the connectors for the Double relay, but is there a equal from Digikey that anyone knows? (I'll need 2)
http://www.germansupply.com/home/customer/product.php?productid=17593
Looking for the boot for the AFM connector.
And looking for information for the Coldstart injector connector (I don't think it's the same as the regular injectors) and I don't have my van with me at the moment (it's getting touched up at the paint shop)
Anyone point me to the correct digikey parts?
BTW, new ECU pigtail is: http://www.digikey.ca/product-search/en?keywords=963318-2
_________________
1982 Westy-Air Cooled, Fuel Injected, 4 Speed Manual
Air Cooled Vanagon's FaceBook Group:
www.facebook.com/groups/AirCooledVanagon/ |
|
| Back to top |
|
|
gatorjos
Samba Member

Joined: April 19, 2003
Posts: 406
Location: San Francisco
|
| Posted: Tue Aug 21, 2018 5:38 pm Post subject: Re: Aircooler Engine Harness Rebuild |
|
|
| daroota wrote: |
Looking for the boot for the AFM connector.
|
This one:
http://eagleday.stores.yahoo.net/bofor7feampj.html
I'm not positive the vanagon AFM is 7 position Junior Timer connector, but here's the boot. I'm guessing the OP already found by now, but just capturing since I'm cruising various threads
_________________
1977 Westfalia Weekender Berlin "The Kitebus" aka " Colonel Mustard"
Previous romances:
1972 Ghia cabriolet (full body-off restoration -- stolen after five years of ownership)
2004 Passat 1.8T (manual)
http://21stcenturyhobo.com |
|
| Back to top |
|
|
daroota
Samba Member
Joined: December 19, 2012
Posts: 266
Location: bc
|
| Posted: Tue Aug 21, 2018 6:13 pm Post subject: Re: Aircooler Engine Harness Rebuild |
|
|
Thats where i bought my 7pin boot and plug.
_________________
1982 Westy-Air Cooled, Fuel Injected, 4 Speed Manual
Air Cooled Vanagon's FaceBook Group:
www.facebook.com/groups/AirCooledVanagon/ |
|
| Back to top |
|
|
|


