| Author |
Message |
63ziggy
Samba Member
Joined: June 19, 2005
Posts: 1100
Location: The Woodlands, Texas

|
 Posted: Sat Jun 12, 2010 6:30 pm Post subject: My 74 Thing Body Off Restoration Posted: Sat Jun 12, 2010 6:30 pm Post subject: My 74 Thing Body Off Restoration |
 |
|
1 step closer
Very productive day.
took the ride down to the local Goodyear store. I had them order in tires during the week. We ordered not knowing if they would fit. The gentleman at the shop was real cool about it. He said he would order, we could try them out and no issue if they did not work out and no charge to me.
so far worked out great.
New shoes all the way around with wheels I have been storing for over a year if not more.
alignment
state inspection
So we are pending registration and plates. I am planning on hitting the local ct house this week. We still have to work a couple bugs on engine fine tuning. running rich and can't seem to get her dialed in. may need different jets. We did cured a major oil leak at the remote filter last week and last night we cured a leak at the oil pump. Fittings had to be pulled and reinstalled. This seems to have cured them for now. Definitely happy about that. I still have a couple small leaks appears from oil drain cover plate. I snugged them a little and will watch. The engine builder said it may take a little for that to seat in.
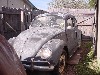
here's the tire test fit for the front end. we were not sure if the new tires/wheels would fit. will do great as long as we are not doing any serious off road pounding.
backs going on
up on the front end alignment rack
pulling back in at the home
pics back in drive
had a couple challenges. Thank goodness shop was close by home.
once they put up on alignment rack, found out rt front hub was lose. had to track down the allen tools to correct.
went through majority of inspection when they announced we needed the license plate mount and light in order to pass. back in the truck headed home to pick up the deck lid (leaving it off till dial in motor).
got back to the shop, guy was real cool. we did not have to mount the lid. just plugged in the leads for the license light, he called it good.
The topper for the day happened when we stopped at the gas station next door before heading back to home. first real exposure out away from the home. had a couple folks breaking their necks to figure out what it was.
had a great experience when a car fan who is in to older Quattros and vw's recognized our Thing. Had a great conversation.
Can't wait to get plates/registration and lst initial bugs resolved so we can begin hitting the roads and shows.
everyone talks about the experiences with their Things. we are just beginning. can't wait.
hope you enjoy the pics |
|
| Back to top |
|
 |
rsorak
Samba Member

Joined: March 07, 2005
Posts: 2005
Location: Memphis
|
| Posted: Sat Jun 12, 2010 8:52 pm Post subject: |
|
|
Are you at stock height and if so what size tires are those? Looks great! Ah I see 3 inch body lift....
_________________
Rick '71 Westfalia & '73 Thing |
|
| Back to top |
|
|
63ziggy
Samba Member
Joined: June 19, 2005
Posts: 1100
Location: The Woodlands, Texas
|
| Posted: Sat Jun 12, 2010 9:20 pm Post subject: |
|
|
has been a fun topic that I chased forever with mixed responses.
3" body lift as you spied. no suspension mods with exception of KYB gas-a-just shocks
15x6 wheels widened by Boltons in CA (original Beetle wide 5 centers in new blanks)
LT235/75R15 tires
seem to have the clearance I need. no intentions of baja jumping so should be fine on suspension travel |
|
| Back to top |
|
|
man130
Samba Member
Joined: August 25, 2008
Posts: 406
Location: long island , ny.
|
| Posted: Sat Jun 12, 2010 10:02 pm Post subject: |
|
|
| Ive been waiting for you to put some rims and tires on it .It just didnt look right without them ,but now ,God Dam that looks good .perfect in my opinion .You did a great job all the way through.Congrats |
|
| Back to top |
|
|
norcalmike
Samba Member
Joined: May 14, 2005
Posts: 4784
Location: Marina, CA
|
| Posted: Sat Jun 12, 2010 10:13 pm Post subject: |
|
|
| i really like the stock widened wheels. best look over any aftermarket wheel IMO. sweet |
|
| Back to top |
|
|
GI Joe
Samba Member
Joined: April 28, 2005
Posts: 2012
Location: Athens, TN
|
|
| Back to top |
|
|
63ziggy
Samba Member
Joined: June 19, 2005
Posts: 1100
Location: The Woodlands, Texas
|
| Posted: Mon Jan 30, 2012 12:10 pm Post subject: |
|
|
after 1.5 years, it is time for a radio system. also been tough sitting down to plan around as well as other priorities in life.
designed front kick panel boxes and got them covered in fleece. I will need to cover in resin then add additional fiberglass cloth/mat and resin to add strength. so far so good. this is first attempt. they will house new Kicker 6 3/4 coax speakers. have not addressed radio location as of yet. more to come on that topic. couple pics for enjoyment
|
|
| Back to top |
|
|
63ziggy
Samba Member
Joined: June 19, 2005
Posts: 1100
Location: The Woodlands, Texas
|
| Posted: Mon Jan 30, 2012 12:18 pm Post subject: |
|
|
quick update once I noticed date of prior last post.
been busy working little bugs out, ignoring a couple of things I need to do but are not life threatening to driving and running.
I have been busy driving around the area as well as hitting local shows when I can with my boys. Couple road trips in there last year that were a blast. Looking forward to this years shows that kick off the end of March. |
|
| Back to top |
|
|
63ziggy
Samba Member
Joined: June 19, 2005
Posts: 1100
Location: The Woodlands, Texas
|
| Posted: Sun Feb 05, 2012 8:55 pm Post subject: speaker enclosures |
|
|
some more work on speaker enclosures. got resin on fleece followed by resin and mat. initial rough sanding and centers cut out. coming along nicely.
also, got mounting holes drilled for under dash radio box. been visualizing antennae lead run along with speaker wire runs. looking to keep as clean a set up as possible.
will be a couple more weekends if not longer till Ii get enclosures fully sanded, filled, primed and most likely painted along with whole radio install. will look to work on back set up but not until I get fronts and radio working.
couple pics or so
|
|
| Back to top |
|
|
63ziggy
Samba Member
Joined: June 19, 2005
Posts: 1100
Location: The Woodlands, Texas
|
| Posted: Sun Feb 12, 2012 7:23 pm Post subject: |
|
|
latest progress on enclosures. some bondo work, primer, test fit, ran wires and under dash radio box. I still have to decide final color of boxes. not sure if going pearl white as exterior, use a gray as interior or bling with red matching cage work etc. I think the angle projection will work out well by pushing the sound up and towards driver and passenger vs straight across my knees. already thinking of rears
|
|
| Back to top |
|
|
63ziggy
Samba Member
Joined: June 19, 2005
Posts: 1100
Location: The Woodlands, Texas
|
| Posted: Sun Feb 26, 2012 1:55 pm Post subject: |
|
|
Front speakers installed, pods painted same L87 Pearl white as body. Pleased with results, sounds great for basic set up.
|
|
| Back to top |
|
|
mgirdner
Samba Member

Joined: January 21, 2003
Posts: 199
Location: Covina, CA
|
| Posted: Wed Mar 07, 2012 11:52 pm Post subject: |
|
|
| 63ziggy wrote: |
...New aftermarket taillights that delete the amber lens for a cleaner look...
New taillights
|
Hey, where did you get those tail lights? I've been looking for those amber-less ones for a while and have struck out.
Thanks in advance,
-Mark
_________________
Professor Emeritus of the Old-Skool, Ghetto-Fabricated, Nearly-Stock, Bolt-On, Bungee-Cord and Duct-Tape School of Automotive Design |
|
| Back to top |
|
|
63ziggy
Samba Member
Joined: June 19, 2005
Posts: 1100
Location: The Woodlands, Texas
|
| Posted: Thu Mar 08, 2012 5:52 pm Post subject: |
|
|
MidAmerica Motorworks.
only complaint, bulb sockets are definitely not the quality as OG. I have one of them that gives me fits. the socket is a softer plastic and had trouble with metal contacts snapping out of place. |
|
| Back to top |
|
|
Noel62
Samba Member

Joined: September 21, 2010
Posts: 18
Location: West Australia
|
| Posted: Thu Mar 08, 2012 9:21 pm Post subject: |
|
|
Re the last couple of interior photos, I am very envious of the general condition of the drivers compartment, as my complete resto is a lonnnggg way from that condition.
However, I'm fairly tall at 6ft 3", and I just cant see myself getting my foot up to the headlight dip switch near the steering column, so I will be keeping mine stock.....  |
|
| Back to top |
|
|
mgirdner
Samba Member
Joined: January 21, 2003
Posts: 199
Location: Covina, CA
|
| Posted: Thu Mar 08, 2012 9:22 pm Post subject: |
|
|
| 63ziggy wrote: |
| MidAmerica Motorworks.... |
Thanks for the tip.
I went to their website but they are apparently out of stock.
I only need the lenses so I assume they'd mate up to my existing Hella housings. But, alas, maybe I'll never find out.
In any case, thanks for the prompt response and help.
-Mark
_________________
Professor Emeritus of the Old-Skool, Ghetto-Fabricated, Nearly-Stock, Bolt-On, Bungee-Cord and Duct-Tape School of Automotive Design |
|
| Back to top |
|
|
saddlesore1
Samba Member
Joined: November 20, 2006
Posts: 548
|
| Posted: Sat Mar 10, 2012 1:23 pm Post subject: |
|
|
| I see you live in Tx. I was in Seal Beach, Cali laste weekend and I swore I saw your car. It was almost dead on. Looks great. Is that your Hi/Low button on the steering colum? How do you get your foot that high to press it? |
|
| Back to top |
|
|
63ziggy
Samba Member
Joined: June 19, 2005
Posts: 1100
Location: The Woodlands, Texas
|
| Posted: Sat Mar 10, 2012 5:22 pm Post subject: |
|
|
would love to be cruising in CA. unfortunately not me.
yep, that's my hi-low. finger operated. I did not want to run wires down to floor switch. tried to keep wiring somewhat tidy. yes different but works. |
|
| Back to top |
|
|
63ziggy
Samba Member
Joined: June 19, 2005
Posts: 1100
Location: The Woodlands, Texas
|
| Posted: Sat Mar 24, 2012 7:56 pm Post subject: |
|
|
rear speaker pods
|
|
| Back to top |
|
|
63ziggy
Samba Member
Joined: June 19, 2005
Posts: 1100
Location: The Woodlands, Texas
|
| Posted: Sun Apr 08, 2012 6:30 pm Post subject: |
|
|
rear speakers mounted
|
|
| Back to top |
|
|
GI Joe
Samba Member
Joined: April 28, 2005
Posts: 2012
Location: Athens, TN
|
|
| Back to top |
|
|
|


